Lincoln Corsair (2022 year). Manual in english — page 10
SWITCHING THE HEATED SEAT
SETTINGS ON AND OFF
1. Using the information display controls on
the steering wheel, select Settings.
2. Select Vehicle.
3. Select Remote Start.
4. Select Front Seats.
5. Select Auto or Off.
Note: If you switch the heated seat settings
on, the heated seats turn on during cold
weather.
Note: You cannot adjust the heated seat
settings when you have remotely started the
engine.
SWITCHING THE HEATED STEERING
WHEEL SETTINGS ON AND OFF
1. Using the information display controls on
the steering wheel, select Settings.
2. Select Vehicle.
3. Select Remote Start.
4. Select Front Seats & Wheel.
5. Select Auto or Off.
Note: If you switch the heated steering wheel
settings on, the heated steering wheel turns
on during cold weather.
Note: You cannot adjust the heated steering
wheel settings when you have remotely
started the engine.
SETTING THE REMOTE START
DURATION
You can set a duration for the engine to run.
Note: Wait a few seconds before remotely
starting the engine after the engine stops
running.
1. Using the information display controls on
the steering wheel, select Settings.
2. Select Vehicle.
3. Select Remote Start.
4. Select Duration.
168
Remote Start
-------------------------------------------------------------------------------------------------------------------------------------------------------------
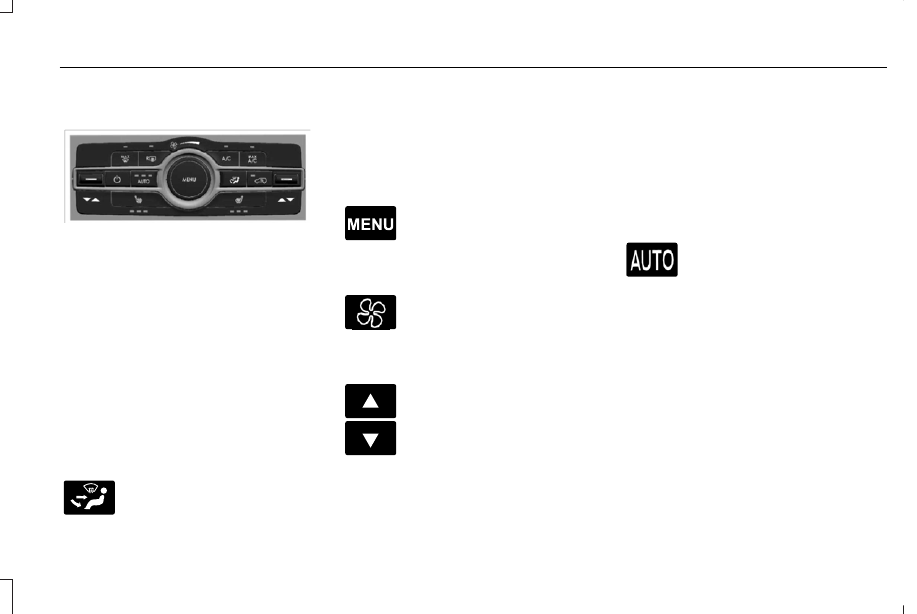
AUTOMATIC CLIMATE CONTROL
E287616
Note: Depending on your vehicle option
package, the controls may look different
from what you see here.
Note: You can switch temperature units
between Fahrenheit and Celsius.
Note: For hybrid vehicles, the air
conditioning compressor may run allowing
you to feel airflow when the climate control
is off providing cooling to the battery.
Note: You can control some of the climate
features using the touchscreen.
Accessing the Air Distribution Controls
E265283
Press and release the button to
activate the selection screen.
From the screen, you can direct air to the
windshield, instrument panel or footwell
vents on or off. You can direct air through
any combination of these vents. See Climate
(page 533).
Accessing the Climate Control Menu
E265038
Press and release the button to
access additional controls for the
front climate system.
Setting the Blower Motor Speed
Turn the control to adjust the
volume of air circulating in your
vehicle.
Setting the Temperature
E266187
E266186
Press the button on the left-hand side of the
climate control upward or downward to set
the left-hand side temperature.
Note: This control also adjusts the right-hand
side temperature when you switch off dual
zone mode.
Press the toggle button on the right-hand
side of the climate control upward or
downward to set the right-hand side
temperature.
Switching Auto Mode On and Off
Press and release the button to
switch on automatic operation.
Repeatedly press the button to
adjust auto mode.
The system adjusts the blower motor speed,
air distribution, air conditioning operation,
and outside or recirculated air to reach and
maintain the temperature you have set.
Adjust the blower motor control to turn auto
mode off.
Note: The system starts at the previous
setting when you switch on auto mode.
Note: You can also switch off dual zone
mode by pressing and holding the button for
more than two seconds.
169
Climate Control
-------------------------------------------------------------------------------------------------------------------------------------------------------------

Auto Mode Indicator Status
Description
Auto Mode Indicator Status
One indicator illuminates.
•
The blower motor speed reduces.
•
Use this setting to minimize the amount of noise from the blower motor.
•
This setting increases the time taken to cool the interior.
Two indicators illuminate.
•
The blower motor speed is moderate.
Three indicators illuminate.
•
The blower motor speed increases.
•
Use this setting to reduce the time taken to cool the interior.
•
This setting increases the amount of noise from the blower motor.
Switching the Air Conditioning On and
Off
Press and release the button.
Use air conditioning with recirculated air to
improve cooling performance and efficiency.
Note: In certain conditions, such as
maximum defrost, the air conditioning
compressor may continue to operate even
though you switch off the air conditioning.
Switching the Climate Control On and
Off
Press and release the button.
Note: Your vehicle may not have a physical
button. You can use the touchscreen to turn
the climate control on and off.
Switching Maximum Air Conditioning
On and Off
Press and release the button for
maximum cooling.
170
Climate Control
-------------------------------------------------------------------------------------------------------------------------------------------------------------

The left-hand and right-hand settings set to
LO, recirculated air flows through the
instrument panel air vents, air conditioning
turns on and the blower motor adjusts to the
highest speed.
Switching Maximum Defrost On and
Off
Press and release the button for
maximum defrosting.
The left-hand and right-hand temperatures
are set to HI, air flows through the windshield
air vents, and the blower motor adjusts to
the highest speed.
You can also use this setting to defog and
clear the windshield of a thin covering of ice.
Note: To prevent window fogging, you
cannot select recirculated air when
maximum defrost is on.
Note: The heated rear window also turns on
when you select maximum defrost.
Switching Recirculated Air On and Off
Press and release the button to
switch between outside air and
recirculated air.
The air currently in the passenger
compartment recirculates. This may reduce
the time needed to cool the interior when
used with air conditioning, and reduce
unwanted odors from entering your vehicle.
Note: Recirculated air may turn off, or
prevent you from switching on, in all air flow
modes except maximum air conditioning to
reduce the risk of fogging. Recirculation may
also turn on and off in various air distribution
control combinations to improve heating or
cooling efficiency.
HINTS ON CONTROLLING THE
INTERIOR CLIMATE
General Hints
Note: Prolonged use of recirculated air may
cause the windows to fog up.
Note: You may feel a small amount of air
from the footwell air vents regardless of the
air distribution setting.
Note: To reduce humidity build-up inside
your vehicle, do not drive with the system
switched off or with recirculated air always
switched on.
Note: Do not place objects under the front
seats as this may interfere with the airflow
to the rear seats.
Note: Remove any snow, ice or leaves from
the air intake area at the base of the
windshield.
Note: To improve the time to reach a
comfortable temperature in hot weather,
drive with the windows open until you feel
cold air through the air vents.
Automatic Climate Control
Note: Adjusting the settings when your
vehicle interior is extremely hot or cold is not
necessary. Automatic mode is best
recommended to maintain set temperature.
171
Climate Control
-------------------------------------------------------------------------------------------------------------------------------------------------------------

Note: The system adjusts to heat or cool the
interior to the temperature you select as
quickly as possible.
Note: For the system to function efficiently,
the instrument panel and side air vents
should be fully open.
Note: If you select AUTO during cold outside
temperatures, the system directs air flow to
the windshield and side window air vents. In
addition, the blower motor may run at a
slower speed until the engine warms up.
Note: If you select AUTO during hot
temperatures and the inside of the vehicle
is hot, the system uses recirculated air to
maximize interior cooling. Blower motor
speed may also reduce until the air cools.
Quickly Heating the Interior
1. Press and release AUTO.
2. Adjust the temperature function to the
setting you prefer.
Recommended Settings for Heating
1. Press and release AUTO.
2. Adjust the temperature function to the
setting you prefer. Use 72°F (22°C) as a
starting point, then adjust the setting as
necessary.
Quickly Cooling the Interior
1. Press and release MAX A/C.
Recommended Settings for Cooling
1. Press and release AUTO.
2. Adjust the temperature function to the
setting you prefer. Use 72°F (22°C) as a
starting point, then adjust the setting as
necessary.
Defogging the Side Windows in Cold
Weather
1. Press and release defrost or maximum
defrost.
2. Adjust the temperature control to the
setting you prefer. Use 72°F (22°C) as a
starting point, then adjust the setting as
necessary.
HEATED WINDSHIELD
(IF EQUIPPED)
Windshield Wiper De-Icer
E184884
When you switch the heated rear
window on, the windshield wiper
de-icer turns on.
HEATED REAR WINDOW
E184884
Press the button to clear the rear
window of thin ice and fog. The
heated rear window turns off after
a short period of time.
Note: Do not use harsh chemicals, razor
blades or other sharp objects to clean or
remove decals from the inside of the heated
rear window. The vehicle warranty may not
cover damage to the heated rear window
grid lines.
172
Climate Control
-------------------------------------------------------------------------------------------------------------------------------------------------------------
HEATED EXTERIOR MIRRORS
(IF
EQUIPPED)
When you switch the heated rear window
on, the heated exterior mirrors turn on.
Note: Do not remove ice from the mirrors
with a scraper or adjust the mirror glass
when it is frozen in place.
Note: Do not clean the mirror housing or
glass with harsh abrasives, fuel or other
petroleum-based cleaning products. The
vehicle warranty may not cover damage
caused to the mirror housing or glass.
173
Climate Control
-------------------------------------------------------------------------------------------------------------------------------------------------------------
WHAT IS THE CABIN AIR FILTER
The cabin air filter improves the quality of air
in your vehicle by trapping dust, pollen and
other particles.
LOCATING THE CABIN AIR FILTER
You can locate the cabin air filter behind the
glove box.
REPLACING THE CABIN AIR FILTER
Replace the filter at regular intervals. See
Scheduled Maintenance (page 579).
Note: Make sure you have a cabin air filter
installed at all times. This prevents foreign
objects from entering the system. Running
the system without a filter in place could
result in degradation or damage to the
system.
Note: Using an aftermarket cabin air filter
could reduce cabin air filtration and climate
control performance.
174
Interior Air Quality
-------------------------------------------------------------------------------------------------------------------------------------------------------------
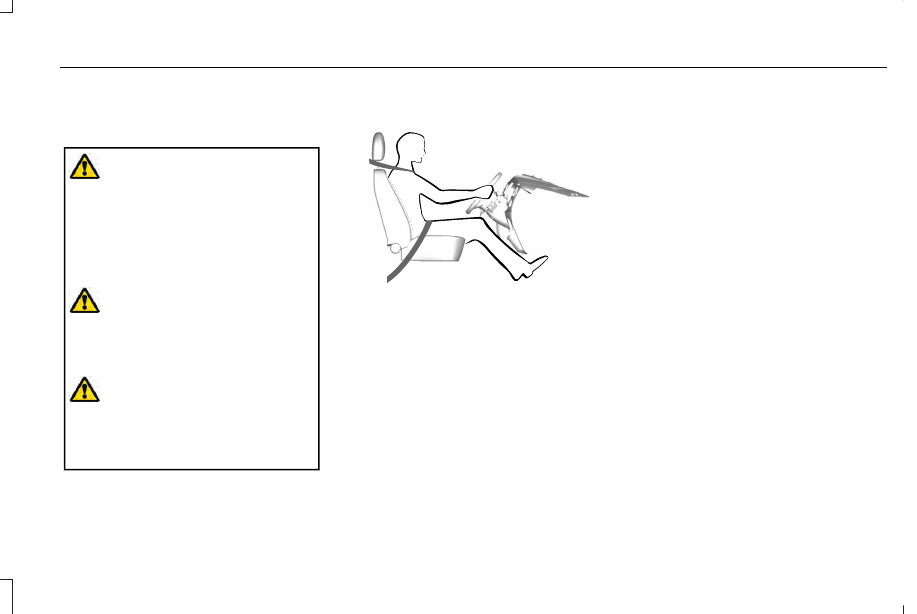
SITTING IN THE CORRECT
POSITION
WARNING: Sitting improperly, out of
position or with the seatback reclined too
far can take weight off the seat cushion
and affect the decision of the passenger
sensing system, resulting in serious injury
or death in the event of a crash. Always sit
upright against your seat back, with your
feet on the floor.
WARNING: Do not recline the seat
backrest too far as this can cause the
occupant to slide under the seatbelt,
resulting in personal injury in the event of
a crash.
WARNING: Do not place objects
higher than the top of the seat backrest.
Failure to follow this instruction could result
in personal injury or death in the event of
a sudden stop or crash.
E68595
When you use them properly, the seat, head
restraint, seatbelt and airbags will provide
optimum protection in the event of a crash.
We recommend that you follow these
guidelines:
•
Sit in an upright position with the base of
your spine as far back as possible.
•
Do not recline the seat backrest so that
your torso is more than 30 degrees from
the upright position.
•
Adjust the head restraint so that the top
of it is level with the top of your head and
as far forward as possible. Make sure that
you remain comfortable.
•
Keep sufficient distance between
yourself and the steering wheel. We
recommend a minimum of 10 in (25 cm)
between your breastbone and the airbag
cover.
•
Hold the steering wheel with your arms
slightly bent.
•
Bend your legs slightly so that you can
press the pedals fully.
•
Position the shoulder strap of the seatbelt
over the center of your shoulder and
position the lap strap tightly across your
hips.
Make sure that your driving position is
comfortable and that you can maintain full
control of your vehicle.
175
Seats
-------------------------------------------------------------------------------------------------------------------------------------------------------------
HEAD RESTRAINTS
WARNING: Fully adjust the head
restraint before you sit in or operate your
vehicle. This will help minimize the risk of
neck injury in the event of a crash. Do not
adjust the head restraint when your vehicle
is moving.
WARNING: The head restraint is a
safety device. Whenever possible it should
be installed and properly adjusted when
the seat is occupied. Failure to adjust the
head restraint properly could reduce its
effectiveness during certain impacts.
WARNING: Adjust the head restraints
for all passengers before you drive your
vehicle. This will help minimize the risk of
neck injury in the event of a crash. Do not
adjust the head restraints when your
vehicle is moving.
Note: Adjust the seat backrest to an upright
driving position before adjusting the head
restraint. Adjust the head restraint so that
the top of it is level with the top of your head
and as far forward as possible. Make sure
that you remain comfortable. If you are
extremely tall, adjust the head restraint to
its highest position.
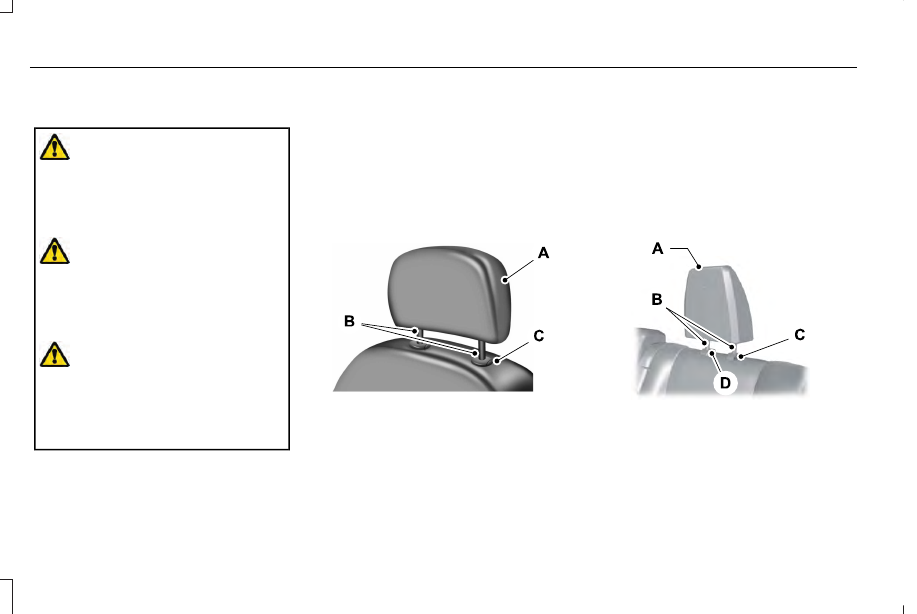
Front Seat Head Restraint
E308781
The head restraint consists of:
An energy absorbing head
restraint.
A
Two steel stems.
B
Guide sleeve adjust and unlock
button.
C
Rear Seat Outermost Head Restraint
E153105
The head restraint consists of:
An energy absorbing head
restraint.
A
Two steel stems.
B
176
Seats
-------------------------------------------------------------------------------------------------------------------------------------------------------------
Guide sleeve adjust and unlock
button.
C
Guide sleeve unlock and remove
button.
D
Rear Seat Center Head Restraint
E187325
The head restraint consists of:
An energy absorbing head
restraint.
A
Two steel stems.
B
Guide sleeve unlock and remove
button.
C
Raising the Head Restraint
Pull the head restraint up.
Lowering the Head Restraint
1. Press and hold button C.
2. Push the head restraint down.
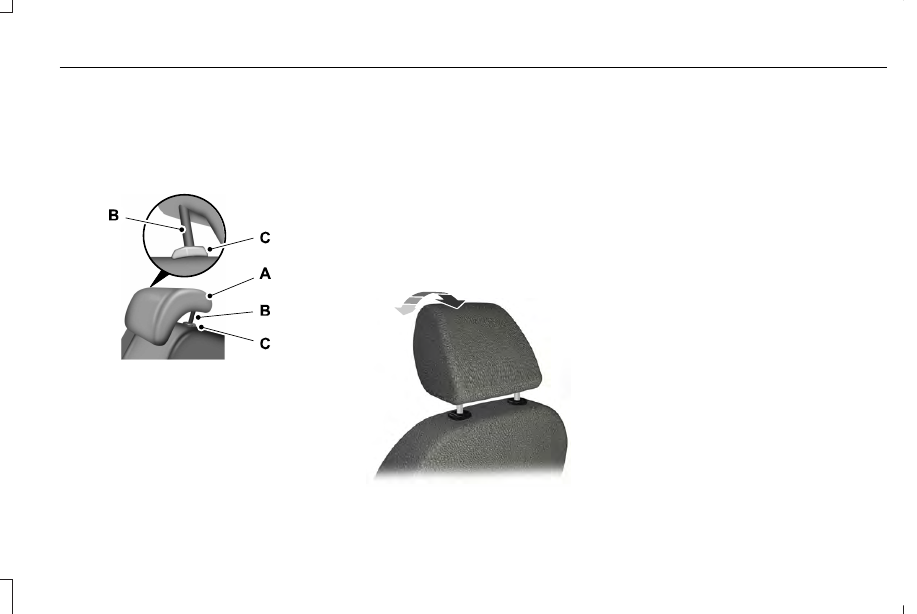
Tilting the Front Seat Head Restraint
(If
Equipped)
The front head restraint tilts for extra comfort.
E144727
To tilt the head restraint:
1. Adjust the seat backrest to an upright
driving or riding position.
2. Pivot the head restraint forward toward
your head to the preferred position.
After the head restraint reaches the
forward-most tilt position, pivot it forward
again to release it to the rearward, un-tilted
position.
Removing the Head Restraint
Removing the Front Seat Head Restraint
1. Pull the head restraint up until it reaches
its highest position.
2. Press and hold button C.
3. Pull the head restraint up.
Removing the Rear Seat Outermost Head
Restraints
1. Pull the head restraint up until it reaches
its highest position.
2. Press and hold buttons C and D.
3. Pull the head restraint up.
177
Seats
-------------------------------------------------------------------------------------------------------------------------------------------------------------

Removing the Rear Seat Center Head
Restraint
1. Pull the head restraint up until it reaches
its highest position.
2. Press and hold button C.
3. Pull the head restraint up.
Installing the Head Restraint
Align the steel stems into the guide sleeves
and push the head restraint down until it
locks.
POWER SEATS
WARNING: Do not adjust the driver
seat or seat backrest when your vehicle is
moving. This may result in sudden seat
movement, causing the loss of control of
your vehicle.
WARNING: Do not place cargo or
any objects behind the seat backrest
before returning it to the original position.
Pull on the seat backrest to make sure that
it has fully latched after returning the seat
backrest to its original position. An
unlatched seat may become dangerous if
you stop suddenly or have a crash.
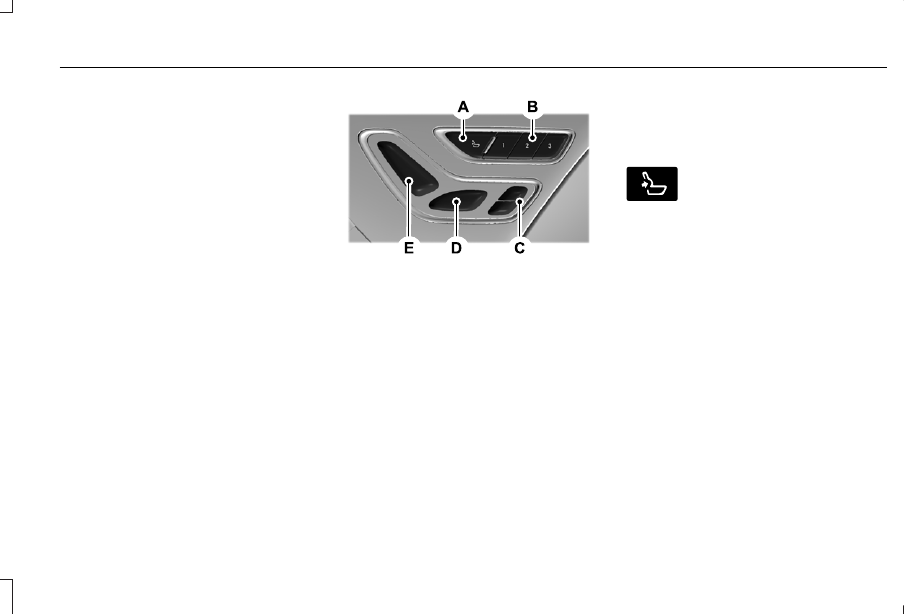
The power seat controls are on the door.
E285258
Recline.
A
Lumbar control.
B
Memory function.
C
Power seat.
D
E285278
Press this button to access the
lumbar menu on the touchscreen.
178
Seats
-------------------------------------------------------------------------------------------------------------------------------------------------------------

10-Way Seat Controls
(If Equipped)
E285488
179
Seats
-------------------------------------------------------------------------------------------------------------------------------------------------------------
8-Way Seat Controls
(If Equipped)
E354709
180
Seats
-------------------------------------------------------------------------------------------------------------------------------------------------------------
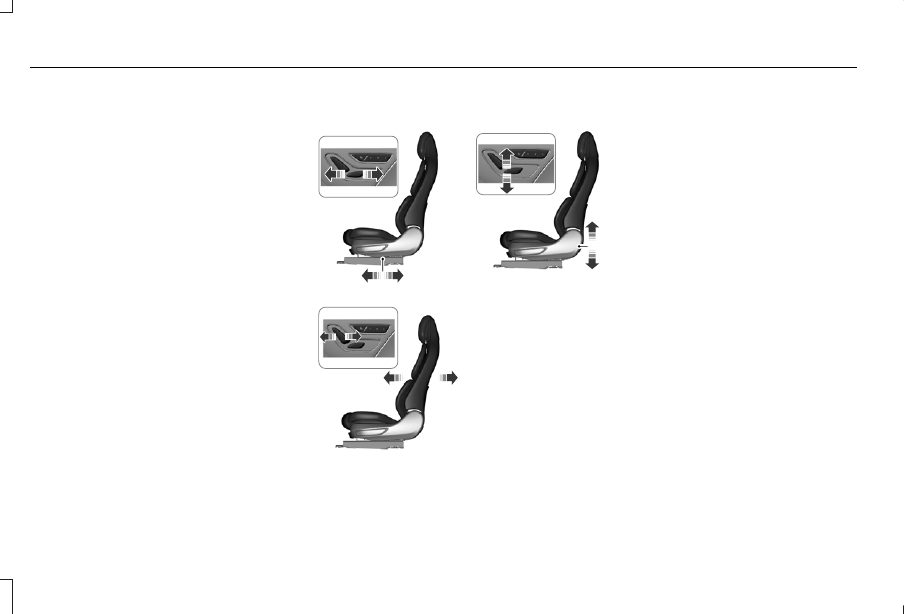
24-Way Seat Controls
(If Equipped)
The power seat controls are on the door.
E285259
A
Lumbar control or multi-contour
seat control.
A
Memory function.
B
Seat cushion adjustment.
C
Power seat.
D
Recline.
E
E285278
Press this button to access the
lumbar menu on the touchscreen.
181
Seats
-------------------------------------------------------------------------------------------------------------------------------------------------------------

E306597
182
Seats
-------------------------------------------------------------------------------------------------------------------------------------------------------------
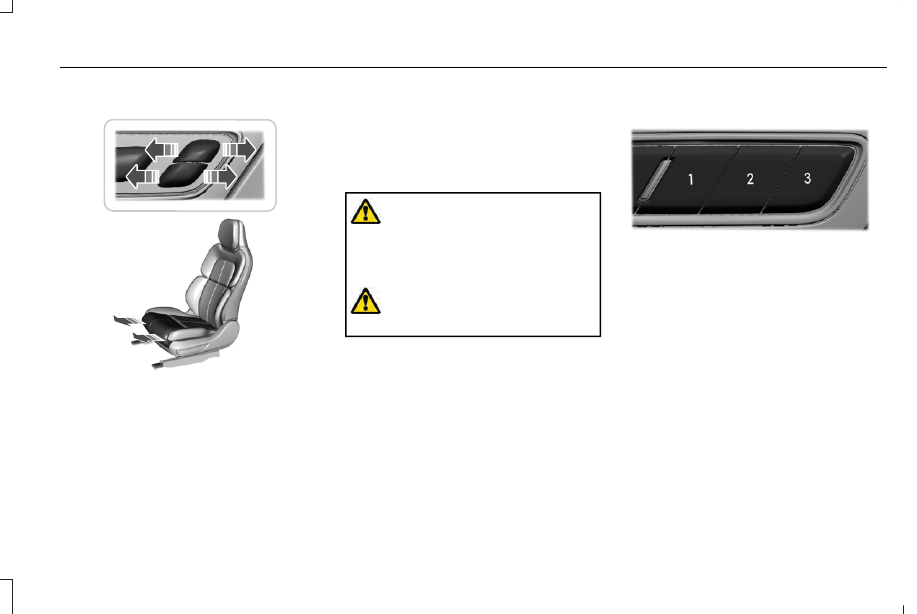
Adjusting the Length of the Seat Cushion
E285685
Adjusting the Multi-Contour Front
Seats With Active Motion
(If Equipped)
You can adjust this feature through the
touchscreen.
Note: The engine must be running or the
vehicle must be in accessory mode to
activate the seats.
Note: Allow a few seconds for any selection
to activate. The seat backrest and cushion
massage cannot function at the same time.
MEMORY FUNCTION
WARNING: Before activating the
memory seat, make sure that the area
immediately surrounding the seat is clear
of obstructions and that all occupants are
clear of moving parts.
WARNING: Do not use the memory
function when your vehicle is moving.
This feature recalls the position of the
following:
•
Driver seat.
•
Power mirrors.
•
Optional power steering column.
E283882
The memory control is on the driver door.
Saving a Preset Position
1. Switch the ignition on.
2. Adjust the memory features to your
preferred positions.
3. Press and hold the preferred reset button
until you hear a single tone.
Note: A confirmation that you saved a
memory preset appears in the information
display.
You can save up to three preset memory
positions. You can save a memory preset at
any time.
183
Seats
-------------------------------------------------------------------------------------------------------------------------------------------------------------
Нет комментариевНе стесняйтесь поделиться с нами вашим ценным мнением.
Текст