Mitsubishi Montero (1991+). Manual — part 17
Removal
1) Remove A/C compressor. Remove pressure plate shaft bolt
using socket wrench and Clutch Stopper (07112-76060). Install Clutch
Remover (07112-66040) on pressure plate. Using clutch stopper and
socket wrench, rotate clutch remover to remove pressure plate.
2) Remove shims from pressure plate. Remove snap ring from
compressor. Tap rotor off shaft with plastic hammer. Disconnect stator
wire from housing. Remove snap ring from inside stator. Remove stator.
See Fig. 12.
CAUTION: DO NOT damage pulley when tapping on rotor.
Installation
To install, reverse removal procedure. Ensure snap rings are
installed with beveled side up. tighten shaft bolt to 10 ft. lbs.
(14 N.m). Ensure clutch clearance is .014-.026" (.36-66 mm). adjust
clearance by adding or subtracting shims as necessary.
NIPPONDENSO 6 & 10-CYL SHAFT SEAL R & I
NOTE: Check compressor refrigerant oil level when replacing seals.
See COMPRESSOR OIL CHECKING article in the AIR CONDITIONING &
HEAT section.
Removal
1) Hold clutch hub stationary and remove center nut. Screw
remover into center of hub. Turn center bolt to remove pressure plate.
2) Remove shims from shaft. Remove snap ring from inside of
pulley. Tap pulley off of shaft with plastic mallet. Be careful not to
distort pulley while removing.
3) Disconnect clutch coil wires from compressor housing.
remove snap ring inside coil and lift coil off compressor. Pry dust
seal out from around compressor shaft (if equipped).
4) Place shaft key remover on shaft and turn to remove key.
Remove drain plug (if equipped). Remove service valves-to-compressor
body bolts. Remove valves. Discard "O" rings. Drain oil out of
compressor.
5) Remove 6 through bolts from front head of compressor and
discard washers. Tap head loose from compressor; be careful not to
scratch sealing surfaces. remove snap ring (if equipped) from front
housing. Press seal plate out. Remove seal from shaft. See Fig. 14.
Installation
1) Lubricate shaft seal with clean refrigerant oil and place
on compressor shaft. Lubricate seal plate and "O" ring (if equipped)
and install in front housing. Install snap ring (if equipped).
2) Place front housing on compressor body. Install through
bolts with new washers. Tighten bolts evenly and alternately to
18 ft. lbs. (24 N.m). Install shaft key using installer and plastic
mallet. Insert dust seal into front of compressor.
3) Install drain plug with new gasket. Add correct amount of
refrigerant oil to compressor. If service valves were removed, coat
new "O" rings with refrigerant oil and install service valves.
4) Place clutch coil on compressor and install snap ring.
Install shims on shaft to adjust pressure plate-to-rotor clearance to
.016-.028" (.41-.71 mm). Tighten shaft nut to 12 ft. lbs. (16 N.m).
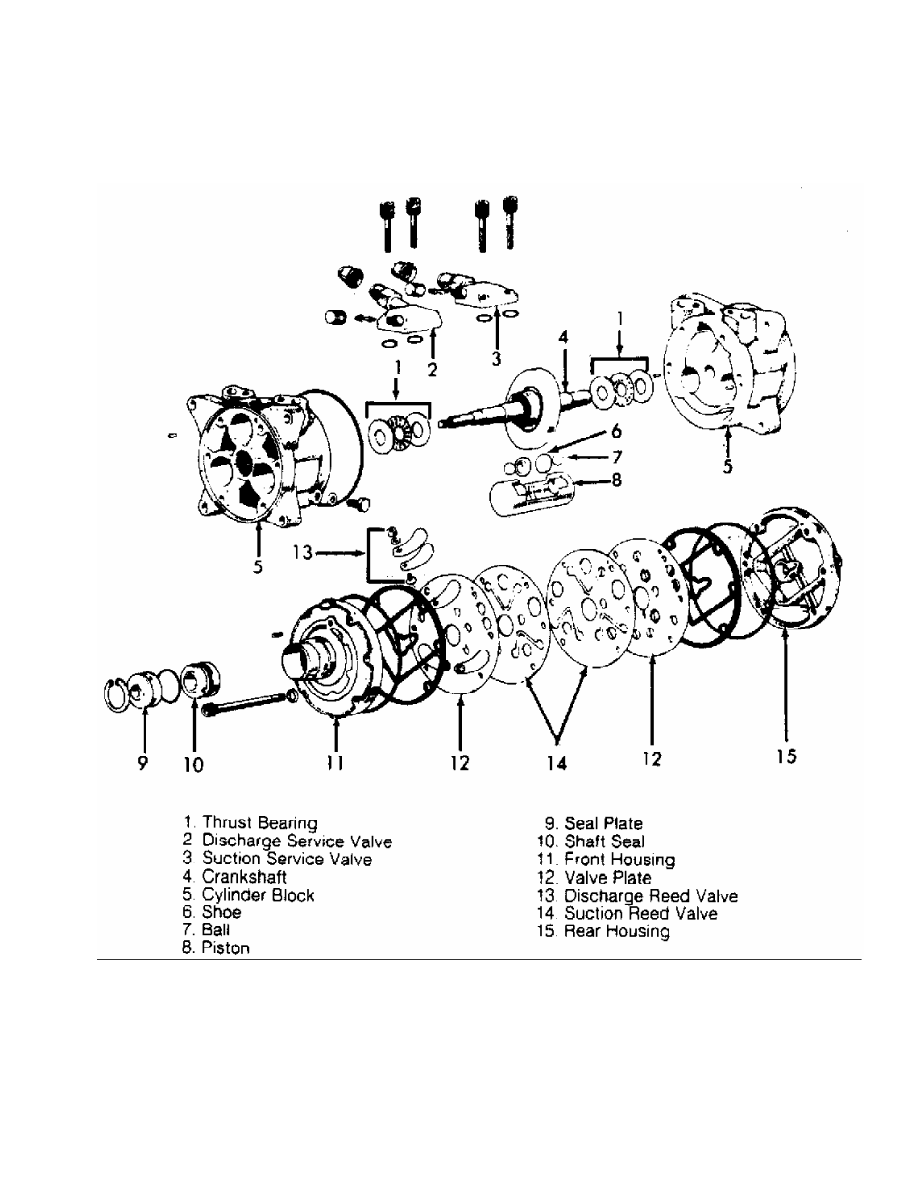
Fig. 14: Nippondenso 6-Cylinder Compressor
Courtesy of Chrysler Motors.
PANASONIC ROTARY VANE CLUTCH R & I
Removal
1) Insert two 5 mm bolts into threaded holes in armature.
Using screwdriver as a lever in between bolts, remove center bolt.
Remove armature and shims from shaft.
2) remove snap ring. Using puller, remove pulley. Disconnect
electrical leads from field coil. Remove 3 field coil mounting bolts.
Remove field coil.
Inspection
Check friction surfaces for damage from excessive heat or
grooving caused by slippage. Replace parts as necessary. Check coil
winding for shorted or open winding. Clean surfaces with solvent and
dry rag.
Installation
To install, reverse removal procedure. Tighten field coil
retaining screws to 30-56 INCH lbs. (3.4-6.4 N.m). Ensure pulley-to-
armature gap is .016-.024" (.4-.6 mm). If gap is not as specified,
adjust by adding or removing shims. Tighten center bolt to
96-108 INCH lbs. (11-13 N.m). See Fig. 15.
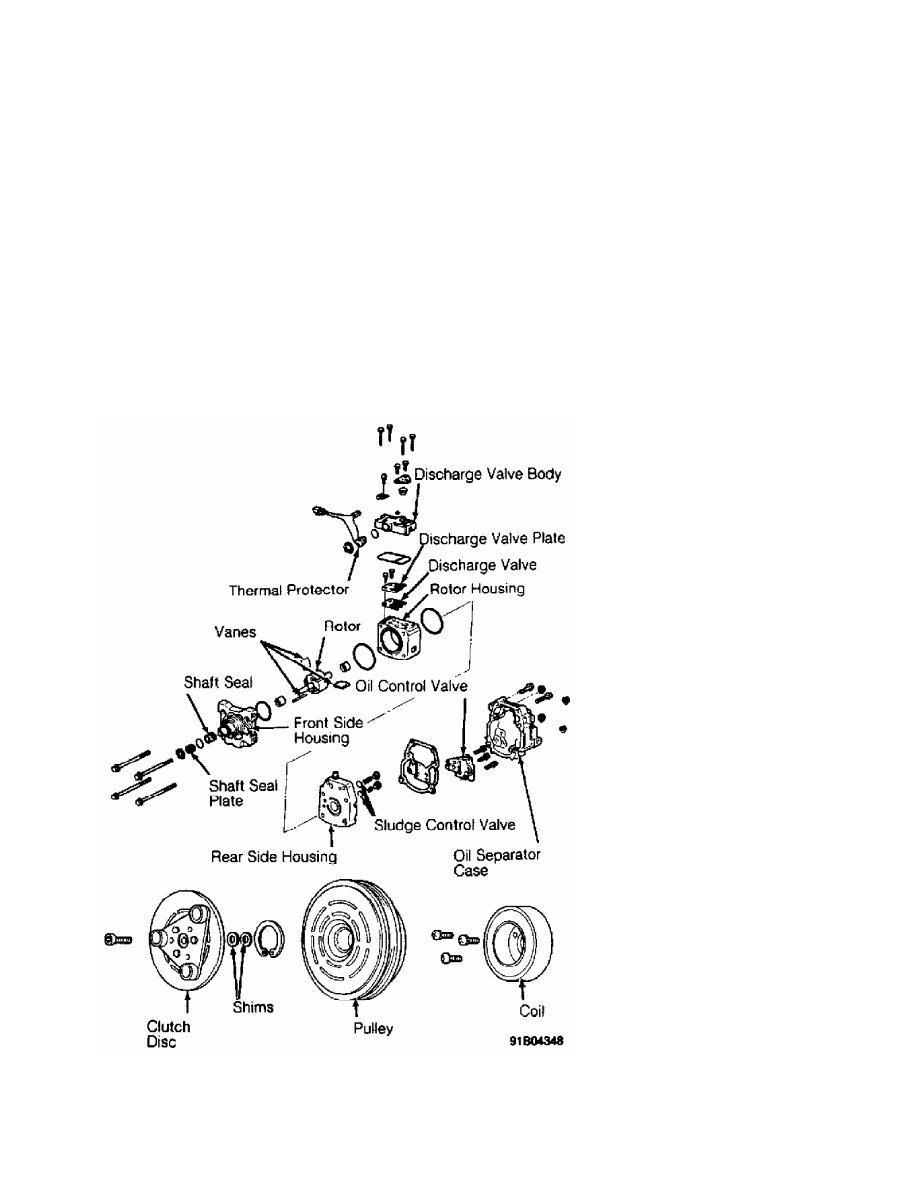
Fig. 15: Exploded View of Rotary Vane Compressor (Panasonic)
Courtesy of Chrysler Motors.
PANASONIC ROTARY VANE SHAFT SEAL R & I
Removal & Installation
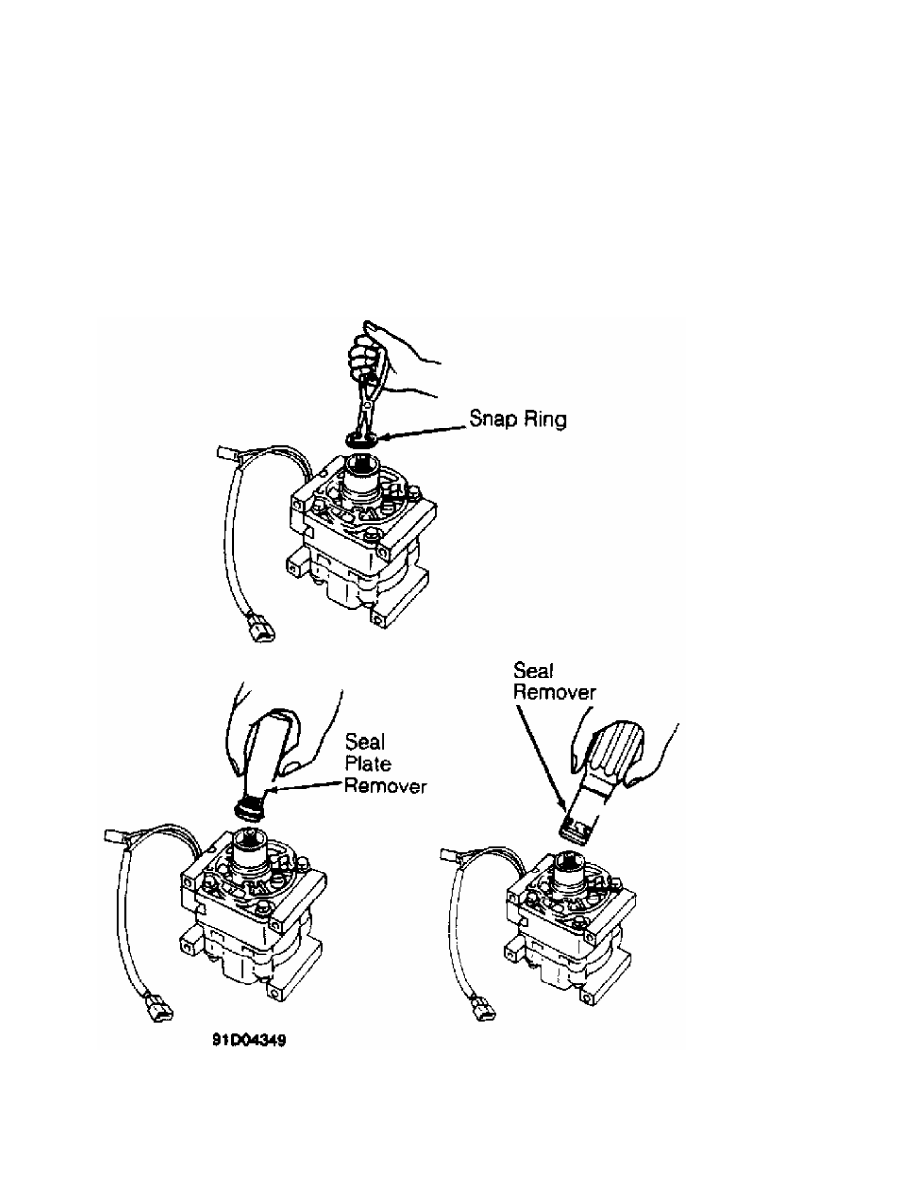
Remove clutch and coil. Remove seal plate snap ring. Using
seal plate remover, engage seal and remove seal plate. Using seal
remover, engage seal ears and remove seal. See Fig. 16. To install,
reverse removal procedure. Coat new seal plate and seal with clean
refrigerant oil before installing. DO NOT touch seal surfaces with
fingers.
Fig. 16: Removing Rotary Vane Compressor Shaft Seal (Panasonic)
Courtesy of Chrysler Motors.
SANDEN SCROLL CLUTCH & SHAFT SEAL R & I
Нет комментариевНе стесняйтесь поделиться с нами вашим ценным мнением.
Текст