Mitsubishi Eclipse / Eclipse Spyder (2000-2002). Service and repair manual — part 129
MULTIPORT FUEL INJECTION (MFI) DIAGNOSIS
TSB Revision
MULTIPORT FUEL INJECTION (MFI) <2.4L ENGINE>
13A-215
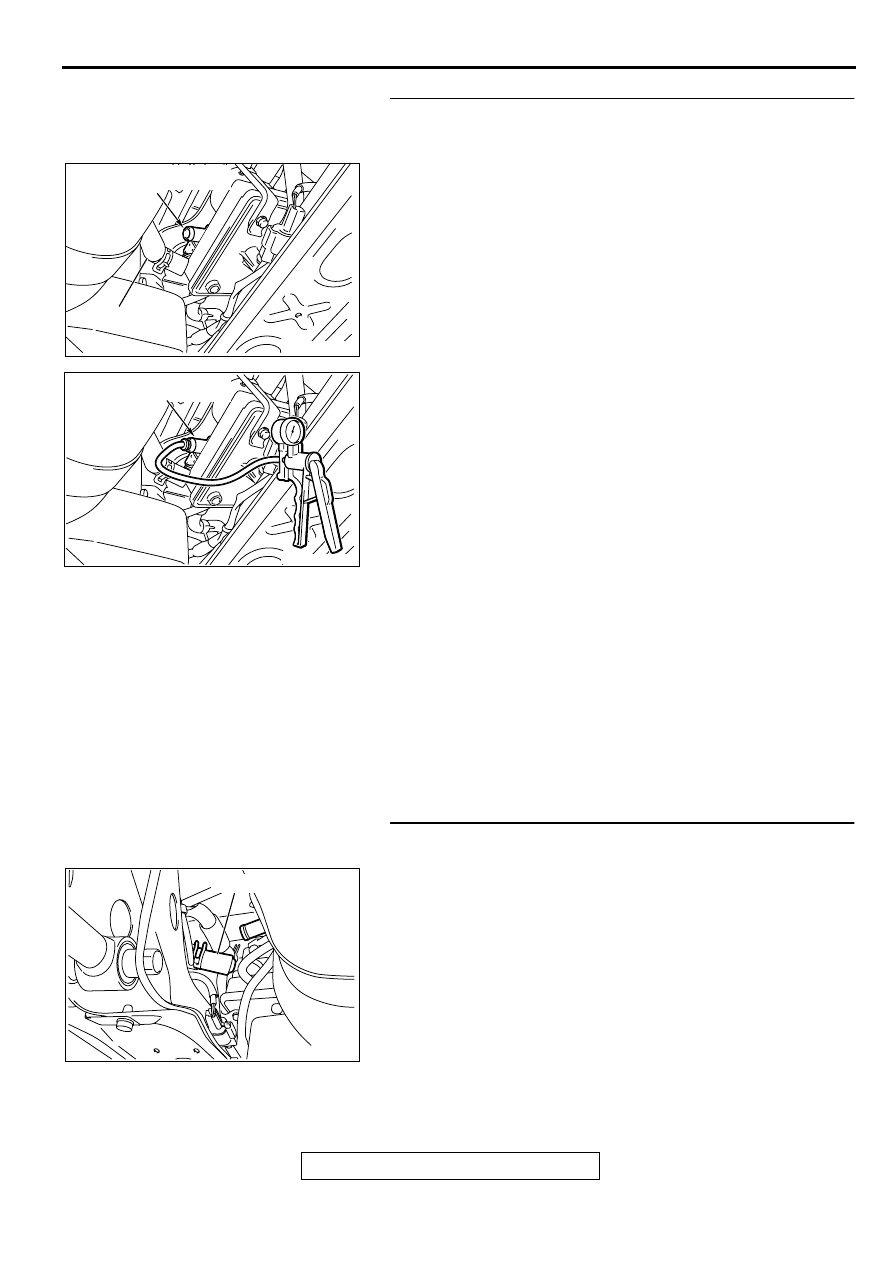
STEP 3. Check the evaporative emission ventilation
solenoid valve using the scan tool MB991502. (Actuator
test item 29.)
(1) Turn the ignition switch to the "ON" position, and disconnect
the hose E from the evaporative emission ventilation
solenoid side.
(2) Connect the hand vacuum pump to the nipple of the
evaporative emission ventilation solenoid from which the
hoses have been disconnected.
(3) Drive the evaporative emission ventilation solenoid with the
scan tool MB991502 actuator test, and confirm that the
vacuum does not fluctuate when the vacuum is applied with
the hand vacuum pump.
Q: Does the vacuum pump gauge indicate the atmospheric
pressure when the evaporative emission purge solenoid
is activated?
The evaporative emission purge solenoid valve
operates normally, and the vacuum pump gauge
reading returns to the atmospheric pressure : Go to
Step 1.
The evaporative emission purge solenoid valve
operates normally, but the vacuum pump gauge does
not indicate the atmospheric pressure : Replace the
evaporative emission purge solenoid. Then go to Step
1.
The evaporative emission purge solenoid valve does
not operate normally : Refer to
, evaporative
emission purge solenoid trouble code DTC P0446.
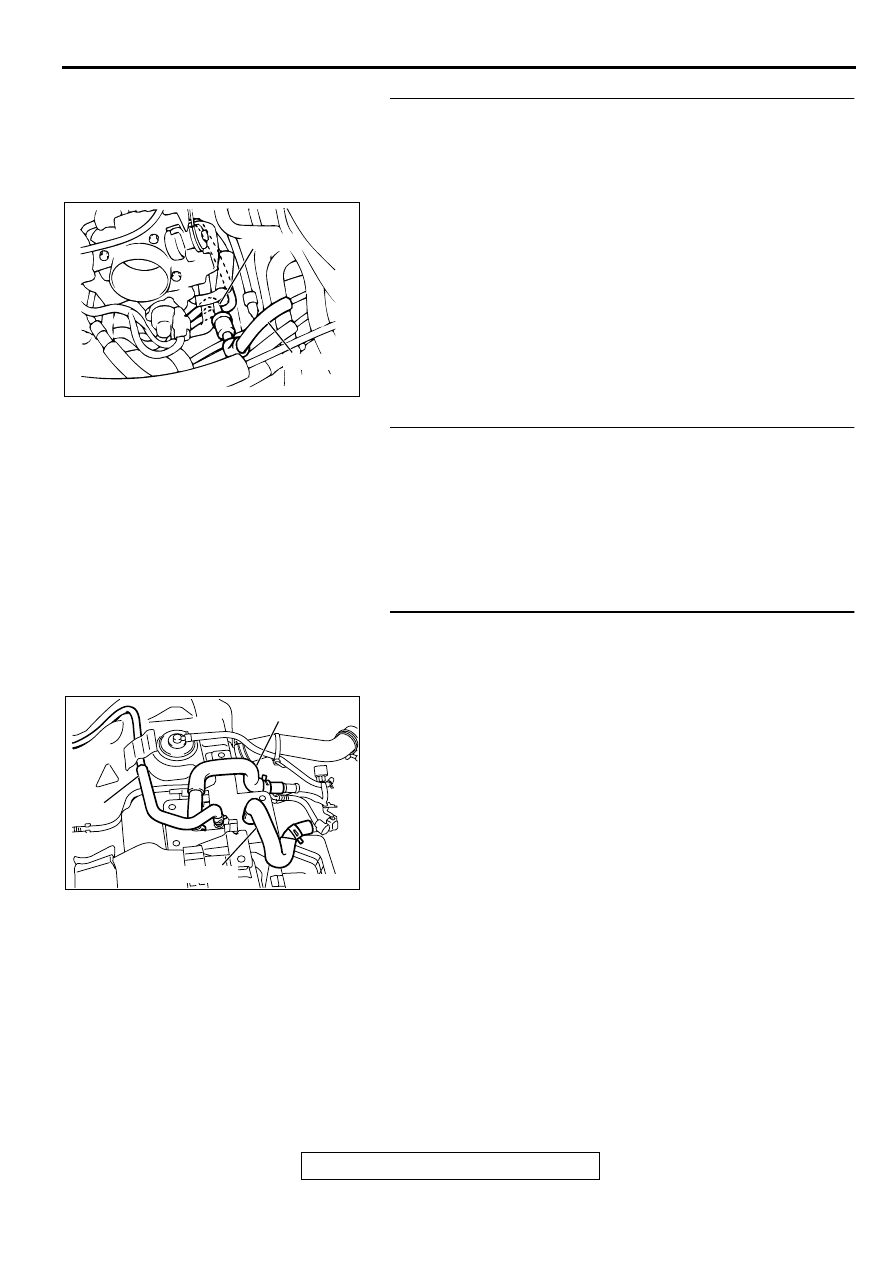
STEP 4. Pressure test for evaporator line from hose G to
hose N.
(1) Disconnect hose G from the evaporative emission canister
side, and plug the hose from which the pipes have been
disconnected.
(2) Perform the pressure test again.
Q: Are there any leaks in the evaporator line?
YES : Go to Step 9.
NO : Go to Step 5.
AC002030
EVAPORATIVE EMISSION
VENTILATION SOLENOID
HOSE E
AC
AC002031AB
EVAPORATIVE EMISSION
VENTILATION SOLENOID
AC002036 AC
HOSE G
MULTIPORT FUEL INJECTION (MFI) DIAGNOSIS
TSB Revision
MULTIPORT FUEL INJECTION (MFI) <2.4L ENGINE>
13A-216
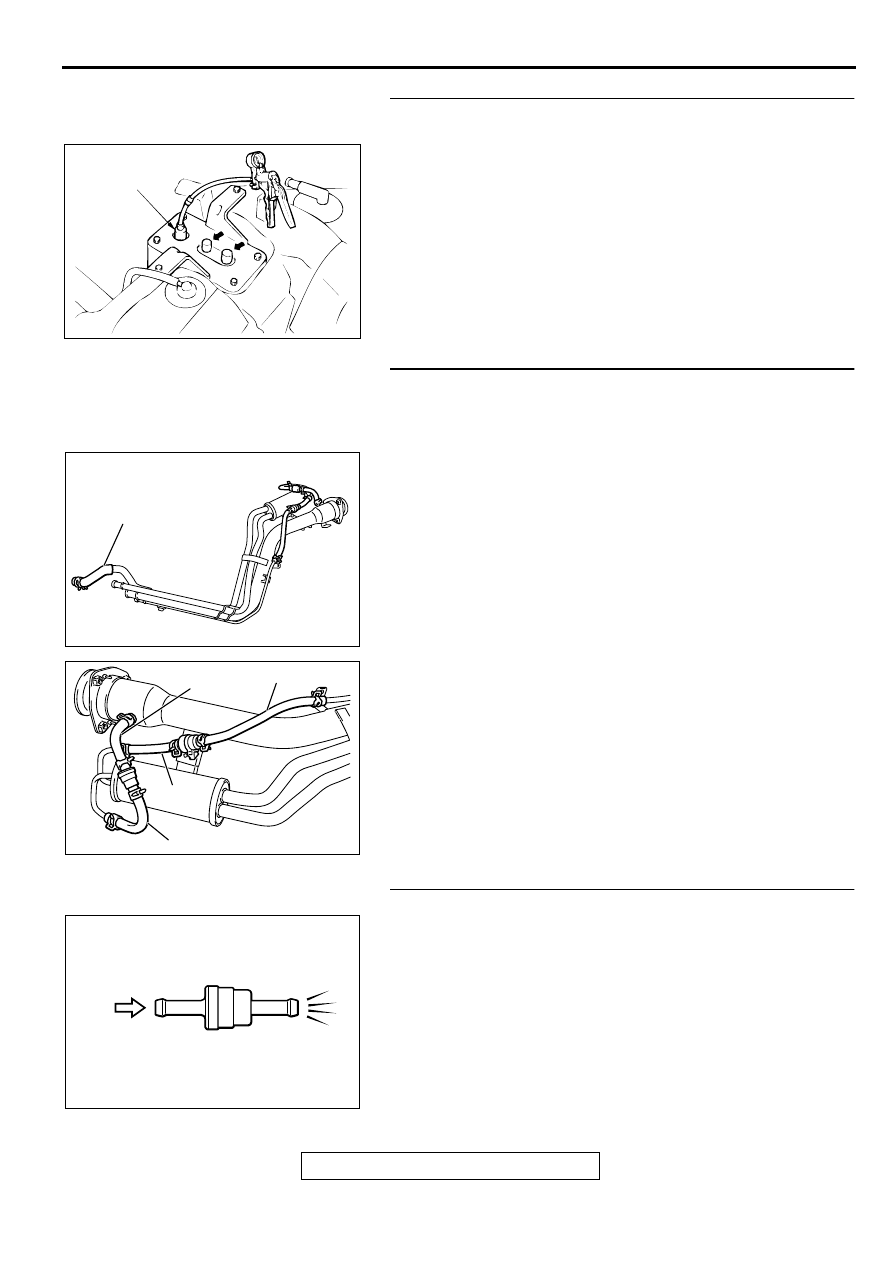
STEP 5. Check for leaks in the evaporator line hose B and
hose C.
(1) Remove the battery.
(2) Remove the air intake hose. (Refer to GROUP 15, Air
Cleaner
.)
(3) The leakage test with a hand vacuum pump on each hose
from hose B and hose C.
Q: Can the leaks be pinpointed?
YES : Replace the hose. Then go to Step 1.
NO : Go to Step 6.
STEP 6. Check for leaks in the chamber.
(1) Connect a hand vacuum pump to the nipple.
(2) Plug the other nipple.
(3) Apply vacuum with the hand vacuum pump, and confirm
that the applied vacuum does not fluctuate.
Q: Does the vacuum reading flutter?
YES : Replace the chamber, then go to Step 1.
NO : Go to Step 7.
STEP 7. Check for leaks in the evaporator line from hose D
to hose F.
(1) Remove the fuel tank. (Refer to GROUP 13C, Fuel Tank
(2) The leakage test with a hand vacuum pump on each hose
from hose D to hose F.
Q: Can the leaks be pinpointed?
YES : Replace that hose, reinstall the filler tank. Then go to
Step 1.
NO : Go to Step 8.
AC000223
HOSE B
AC
HOSE C
AC002037AE
HOSE D
HOSE F
HOSE E
MULTIPORT FUEL INJECTION (MFI) DIAGNOSIS
TSB Revision
MULTIPORT FUEL INJECTION (MFI) <2.4L ENGINE>
13A-217
STEP 8. Check for leaks in the evaporative emission
canister.
(1) Connect a hand vacuum pump to the vent nipple of the
evaporative emission canister.
(2) Plug the other two nipples or loop a hose between the other
nipples.
(3) Apply a vacuum with the hand vacuum pump, and confirm
that the applied vacuum does not fluctuate.
Q: Does the vacuum reading fluctuate?
YES : Replace the evaporative emission canister, reinstall
the fuel tank. Then go to Step 1.
NO : Go to Step 1.
STEP 9. Check for leaks in the evaporator line hose G, J, K,
L and M.
(1) Remove the fuel tank filler neck assembly. (Refer to
GROUP 13C, Fuel Tank
(2) The leakage test with a hand vacuum pump on each hose
from hose G, J, K, L and M.
Q: Can the leaks be pinpointed?
YES : Replace the hose, reinstall the fuel tank filler neck
assembly. Then go to Step 1.
NO : Go to Step 10.
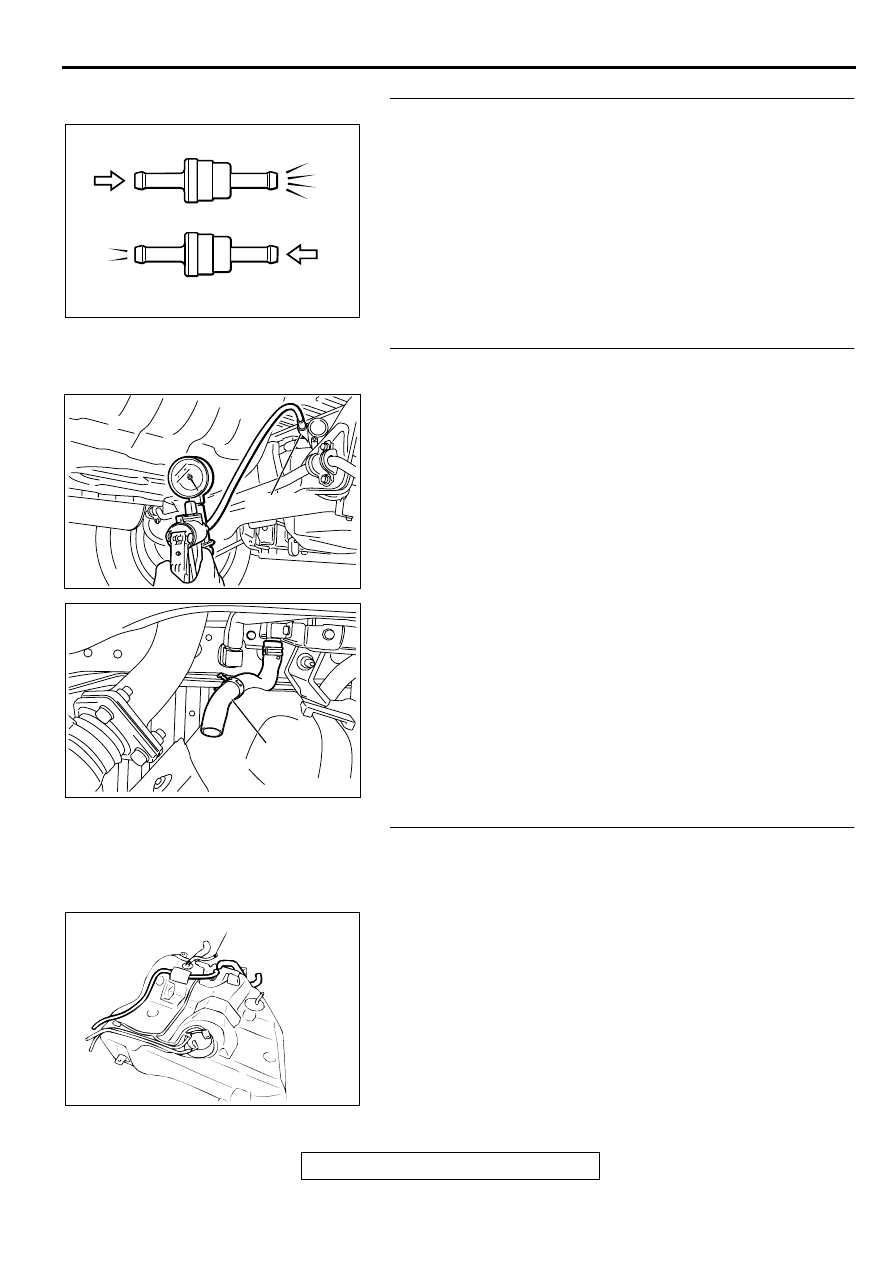
STEP 10. Check the check valve A.
(1) Only when you blow the check valve from the direction
shown, it should pass air.
(2) When you blow the check valve, on air should leak from the
check valve body.
Q: Is there any failure?
YES : Replace it, reinstall the filler neck assembly. Then go
to Step 1.
NO : Go to Step 11.
AC000191AB
VENT
NIPPLE
AC002032
AB
HOSE G
AC
AC002039
AB
HOSE L
AC
HOSE K
HOSE M
HOSE J
AC002076 AB
CHECK VALVE A
MULTIPORT FUEL INJECTION (MFI) DIAGNOSIS
TSB Revision
MULTIPORT FUEL INJECTION (MFI) <2.4L ENGINE>
13A-218
STEP 11. Check the check valve B.
(1) When you blow the check valve from the arrow direction
shown above, it should pass more air.
(2) When you blow the check valve from the arrow direction
shown below, it should pass less air.
(3) When you blow the check valve, on air should leak from the
check valve body.
Q: Is there any failure?
YES : Replace it, reinstall the filler neck assembly and filler
neck protector. Then go to Step 1.
NO : Go to Step 12.
STEP 12. Check for leaks in the evaporator line from hose
H to hose I.
(1) Disconnect hose H at the liquid separator, and then connect
a hand vacuum pump to the hose.
(2) Disconnect hose K at the fuel tank side, and then plug the
hose.
(3) Apply vacuum by using the hand vacuum pump.
Q: Is the pressure maintained in the evaporator line?
YES : Go to Step 13.
NO : Go to Step 16.
STEP 13. Check for leaks in the evaporator line from hose
N.
(1) Remove the fuel tank. (Refer to GROUP 13C, Fuel Tank
(2) The leakage test with a hand vacuum pump on each hose
from hose N.
Q: Can the leaks be pinpointed?
YES : Replace the hose, reinstall the fuel tank. Then go to
Step 1.
NO : Go to Step 14.
AC002078
CHECK VALVE B
AB
AC02040 AC
HOSE H
AC002038
HOSE I
AC
AC000195
HOSE N
AD
Нет комментариевНе стесняйтесь поделиться с нами вашим ценным мнением.
Текст