Mitsubishi Eclipse / Eclipse Spyder (2000-2002). Service and repair manual — part 346
ENGINE COOLING DIAGNOSIS
TSB Revision
COOLING SYSTEM
14-15
STEP 4. Check the harness wire between ECM connector
C-49 <2.4L-M/T>, C-51 <3.0L-M/T>or PCM connector C-50
<2.4L-A/T>, C-52 <3.0L-A/T> and fan controlLER connector
A-30.
NOTE: If intermediate connector C-07 is damaged, repair or
replace it. Refer to GROUP 00E, Harness Connector
Inspection
.
Q: Are the harness wires between ECM connector C-49
<2.4L-M/T>, C-51 <3.0L-M/T>or PCM connector C-50
<2.4L-A/T>, C-52 <3.0L-A/T> and fan controller
connector A-30 damaged?
YES : Repair or replace them, then go to Step 6.
NO : Go to Step 5.
STEP 5. Check the fan controller at ECM connector C-49
<2.4L-M/T>, C-51 <3.0L-M/T>or PCM connector C-50 <2.4L-
A/T>, C-52 <3.0L-A/T>.
(1) Connect ECM connector C-49 <2.4L-M/T>, C-51 <3.0L-M/
T> or PCM connector C-50 <2.4L-A/T>, C-52 <3.0L-A/T>.
(2) Turn the ignition switch to " ON" position.
(3) Pull out the terminal number 21 <2.4L-M/T> or 18 <2.4L-A/
T, 3.0L> and connect it to the body ground.
Q: Do the radiator fan motor and condenser fan motor
stop?
YES : Replace the ECM <M/T> or PCM <A/T>. Then go to
Step 6.
NO : Replace the radiator fan motor and fan controller
assembly. Then go to Step 6.
STEP 6. Check the symptoms.
Q: Do the radiator fan and condenser fan operate
correctly?
YES : This diagnosis is complete.
NO : Return to Step 1.
INSPECTION PROCEDURE 5: Radiator Fan does not Operate
TECHNICAL DESCRIPTION
The cause could be a malfunction of the radiator fan
motor or an open circuit between the fan controller
and the radiator fan motor.
TROUBLESHOOTING HINTS
•
Malfunction of radiator fan motor
•
Malfunction of fan controller
AC000245 AE
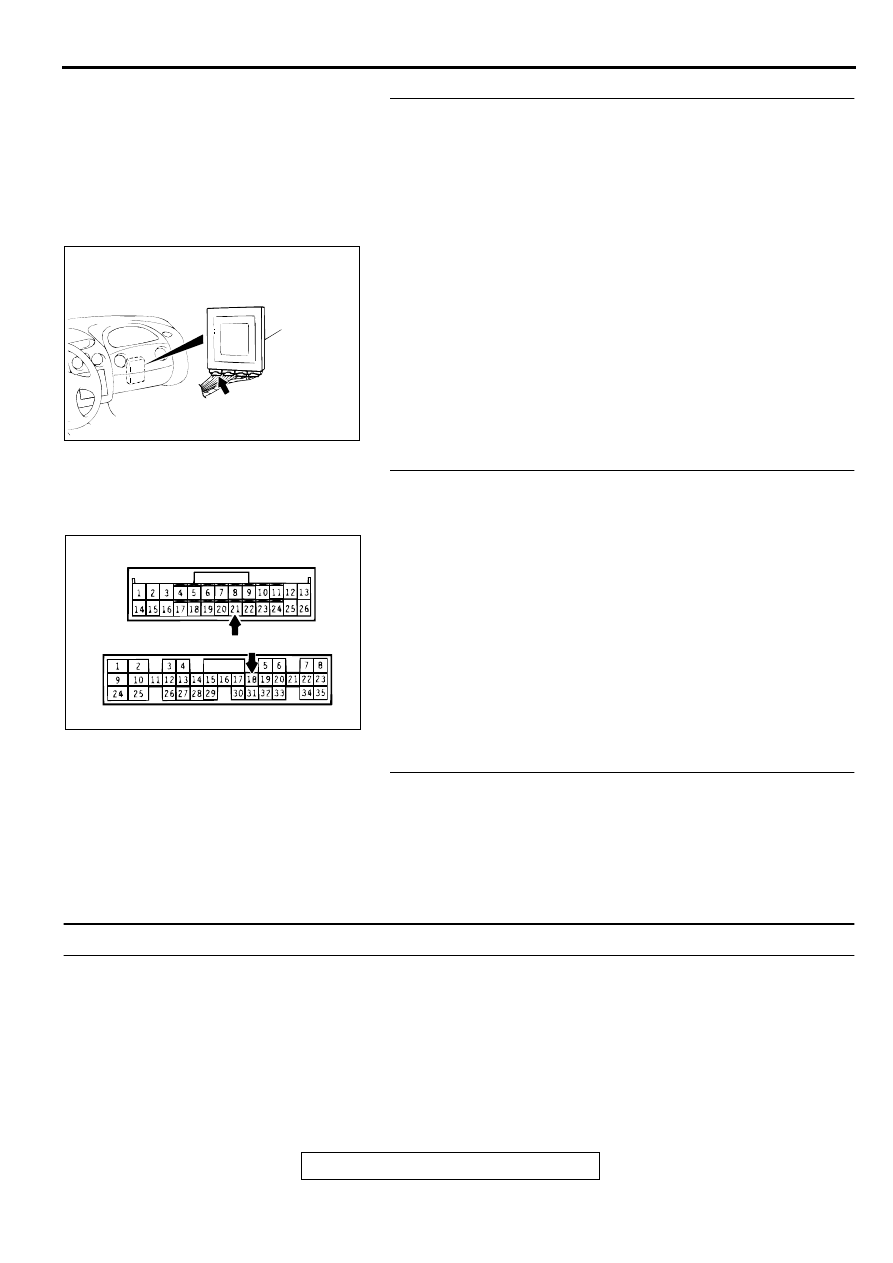
CONNECTOR:
C-49 <2.4L-M/T>, C-50 <2.4L-A/T>
C-51 <3.0L-M/T>, C-52 <3.0L-A/T>
ECM <M/T>
OR
PCM <A/T>
AC000257
<2.4L-M/T>
<2.4L-A/T, 3.0L>
CONNECTOR C-49
CONNECTOR C-50, C-51, C-52
AC
ENGINE COOLING DIAGNOSIS
TSB Revision
COOLING SYSTEM
14-16
DIAGNOSIS
Replace the radiator fan motor and fan controller assembly.
Q: Does the radiator fan operate correctly?
YES : There is no action to be taken.
NO : Repair the wiring harness between the fan controller
and the radiator fan motor.
INSPECTION PROCEDURE 6: Condenser Fan does not Operate
Radiator Fan and Condenser Fan Drive Circuit
Refer to
CIRCUIT OPERATION
•
The fan controller is powered from fusible link
number 5.
•
The ECM <M/T> or PCM <A/T> judges the
required revolution speed of radiator fan motor
and condenser fan motor using the input signals
transmitted from A/C switch, automatic
compressor controller, vehicle speed sensor and
engine coolant temperature sensor. The ECM
<M/T> or PCM <A/T> activates the fan controller
to drive the radiator fan motor and condenser fan
motor.
TECHNICAL DESCRIPTION
The cause could be a malfunction of the condenser
fan motor or of the fan controller.
TROUBLESHOOTING HINTS
•
Malfunction of condenser fan motor
•
Malfunction of fan controller
DIAGNOSIS
STEP 1. Check the condenser fan motor.
Refer to GROUP 55, Condenser and Condenser Fan Motor
Q: Is the condenser fan in good condition?
YES : Replace the radiator fan motor and fan controller
assembly. Then go to Step 3.
NO : Go to Step 2.
STEP 2. Check the fan controller.
Refer to
.
Q: Is the fan controller in good condition?
YES : Go to Step 3.
NO : Replace the fan controller, then go to Step 3.
STEP 3. Check the symptoms.
Q: Does the condenser fan operate correctly?
YES : This diagnosis is complete.
NO : Return to Step1.
ON-VEHICLE SERVICE
TSB Revision
COOLING SYSTEM
14-17
O N -VEH IC LE SERVIC E
ENGINE COOLANT LEAK CHECK
M1141001000098
WARNING
When pressure testing the cooling system, slowly
release cooling system pressure to avoid getting
burned by hot coolant.
CAUTION
•
Be sure to completely clean away any moisture from
the places checked.
•
When the tester is taken out, be careful not to spill any
coolant from it.
•
Be careful when installing and removing the tester and
when testing not to deform the filler neck of the
radiator.
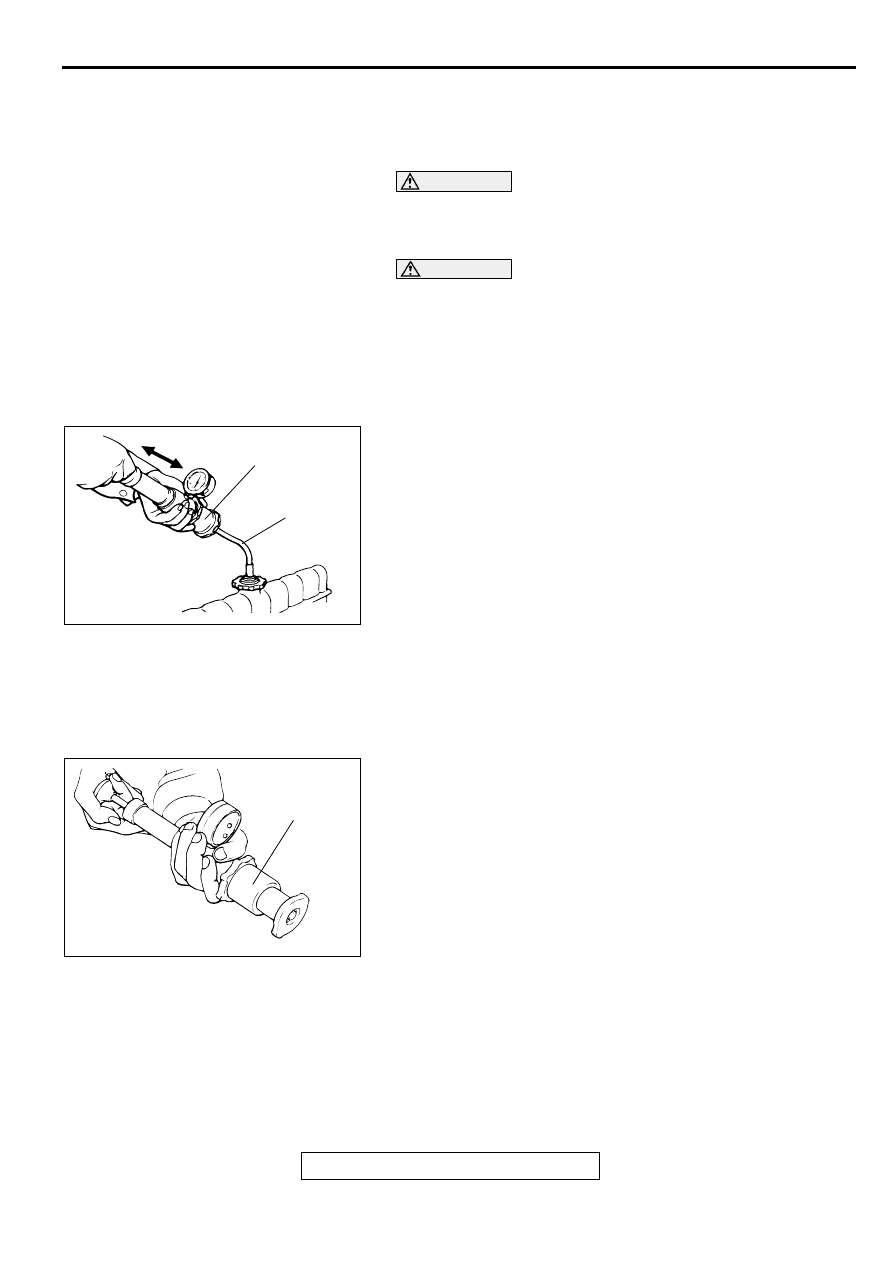
1. Check that the coolant level is up to the filler neck. Install a
radiator cap tester and apply 160 kPa (23 psi) pressure, and
then check for leakage from the radiator hose or
connections.
2. If there is leakage, repair or replace the appropriate part.
RADIATOR CAP PRESSURE CHECK
M1141001300099
NOTE: Be sure that the cap is clean before testing, since rust
or other foreign material on the cap seal will cause an improper
indication.
1. Use a cap adapter to attach the cap to the tester.
2. Increase the pressure until the indicator of the gauge stops
moving.
Minimum limit: 64 kPa (9.2 psi)
Standard value: 73
−
103 kPa (11
−
15 psi)
3. Replace the radiator cap if the reading does not remain at or
above the limit.
ENGINE COOLANT REPLACEMENT
M1141001200122
Refer to GROUP 00, Maintenance Service
−
Engine Coolant
ACX01844 AB
CAP ADAPTER
ADAPTER
ACX01845 AB
CAP ADAPTER
ON-VEHICLE SERVICE
TSB Revision
COOLING SYSTEM
14-18
ENGINE COOLANT CONCENTRATION TEST
M1141001100095
Refer to GROUP 00, RECOMMENDED LUBRICANTS AND
LUBRICANT CAPACITIES TABLE
FAN CONTROLLER CHECK
M1141006100067
1. Remove condenser fan motor connector.
2. Start the engine and run it at idle.
3. Turn the A/C switch to ON and maintain the coolant
temperature at 80
°
C (176
°
F) or less.
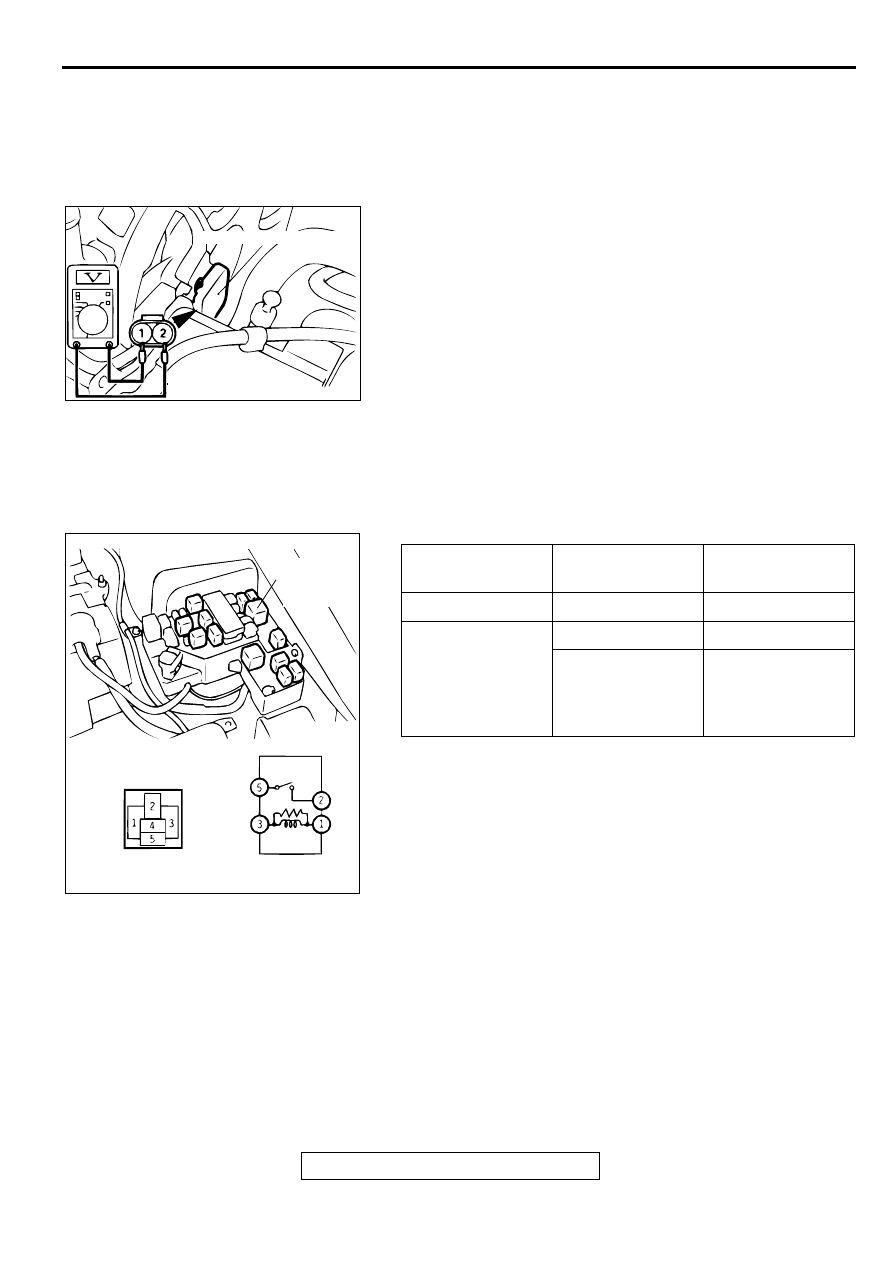
4. When measuring the voltage between the fan controller-side
connector terminals, check that the value changes
repeatedly as indicated by (1)
−
(3) below.
(1) 0 V
(2) 8.2
±
2.6 V
(3) Battery positive voltage
±
2.6 V
5. If the voltage does not repeatedly change as indicated,
replace the radiator fan motor and the fan controller
assembly.
FAN CONTROL RELAY CONTINUITY CHECK
M1141006200064
AC000274 AC
FAN CONTROLLER
TESTER
CONNECTION
BATTERY
VOLTAGE
SPECIFIED
CONDITION
1
−
3
Not applied
Approximately 2
Ω
2
−
5
Not applied
Open circuit
Applied (Connect
"+" to the terminal
3 and "
−
" to the
terminal 1.)
Less than 2
Ω
AC000275 AB
FAN
CONTROL
RELAY
Нет комментариевНе стесняйтесь поделиться с нами вашим ценным мнением.
Текст