Mitsubishi Eclipse / Eclipse Spyder (2000-2002). Service and repair manual — part 628

DOOR
TSB Revision
BODY
42-59
SYMPTOM PROCEDURES
INSPECTION PROCEDURE 1: Water leak through door window glass
DIAGNOSIS
STEP 1. Check the door window glass
installation.
Q: Is the door window glass installed correctly?
YES :
Go to Step 2.
NO :
Adjust it. (Refer to
.) Then go to
Step 3.
STEP 2. Check the clearance at the top of the
window glass.
Q: Is the clearance at the top of the window glass
correct?
YES :
Go to Step 3.
NO :
Adjust it. (Refer to
.) Then go to
Step 3.
STEP 3. Check symptoms.
Q: Is any water leaking?
YES :
Return to Step 1.
NO :
This diagnosis is complete.
INSPECTION PROCEDURE 2: Door window malfunction
DIAGNOSIS
STEP 1. Check the door window installation
condition.
Q: Is the door window installation condition good?
YES :
Go to Step 2.
NO :
Adjust it. (Refer to
.) Then go to
Step 4.
STEP 2. Check the door sash.
Q: Is the door sash in good condition?
YES :
Go to Step 3.
NO :
Repair or replace it, then go to Step 4.
STEP 3. Inspect the window regulator assembly.
Q: Is the window regulator assembly in good
condition?
YES :
Go to Step 4.
NO :
Repair or replace it, then go to Step 4.
STEP 4. Check symptoms.
Q: Does the door window operate correctly?
YES :
This diagnosis is complete.
NO :
Return to Step 1.
INSPECTION PROCEDURE 3: Water leak through door edge
DIAGNOSIS
STEP 1. Check the weatherstrip.
Q: Is the weatherstrip in good condition?
YES :
Go to Step 2.
NO :
Replace it, then go to Step 3.
STEP 2. Check door fit (alignment).
Q: Is the door fit (alignment) correct?
YES :
Go to Step 3.
NO :
Adjust it. (Refer to
.) Then go to
Step 3.
STEP 3. Check symptoms.
Q: Is any water leaking?
YES :
Return to Step 1.
NO :
This diagnosis is complete.

DOOR
TSB Revision
BODY
42-60
INSPECTION PROCEDURE 4: Water leak through door center
DIAGNOSIS
STEP 1. Check the drain hole.
Q: Is the drain hole clogged?
YES :
Replace it, then go to Step 3.
NO :
Go to Step 2.
STEP 2. Check the waterproof film.
Q: Is the waterproof film in good condition?
YES :
Go to Step 3.
NO :
Repair or replace it, then go to Step 3.
STEP 3. Check symptoms.
Q: Is any water leaking?
YES :
Return to Step 1.
NO :
This diagnosis is complete.
INSPECTION PROCEDURE 5: Door hard to open
DIAGNOSIS
STEP 1. Adjust the latch and striker engagement.
(Refer to
Q: Is the latch and striker engagement adjusted?
YES :
Go to Step 2.
NO :
Adjust it. (Refer to
.) Then go to
Step 4.
STEP 2. Check for possible lock rod damage.
Q: Is the possible lock rod damaged?
YES :
Repair or replace it, then go to Step 4.
NO :
Go to Step 3.
STEP 3. Check door handle flexibility (amount of
movement of handle required to open door).
Q: Is the door handle flexibility good?
YES :
Go to Step 4.
NO :
Adjust it. (Refer to
Then go to Step 4.
STEP 4. Check symptoms.
Q: Does the door open easily?
YES :
This diagnosis is complete.
NO :
Return to Step 1.
INSPECTION PROCEDURE 6: Door does open or close completely
DIAGNOSIS
STEP 1. Check the door hinge position.
Q: Is the door hinge position correct?
YES :
Go to Step 2.
NO :
Adjust it. (Refer to
.) Then go to
Step 4.
STEP 2. Check the door.
Q: Is the door in good condition?
YES :
Go to Step 3.
NO :
Repair or replace it, then go to Step 4.
STEP 3. Check the grease.
Q: Is the door check or door hinge grease sufficient?
YES :
Go to Step 4.
NO :
Apply the grease, then go to Step 4.
STEP 4. Check symptoms.
Q: Does the door open and close correctly?
YES :
This diagnosis is complete.
NO :
Return to Step 1.
DOOR
TSB Revision
BODY
42-61
INSPECTION PROCEDURE 7: Uneven gap between body
DIAGNOSIS
Adjust the door fit. (Refer to
.) Then check
that the gap has been improved.
INSPECTION PROCEDURE 8: Wind noise around door
DIAGNOSIS
STEP 1. Check the weatherstrip for holding
condition.
Q: Is the weatherstrip installed properly?
YES :
Go to Step 2.
NO :
Repair or replace it. Then go to Step 5.
STEP 2. Check the weatherstrip for installation
condition.
Q: Is the weatherstrip installed properly?
YES :
Go to Step 3.
NO :
Repair or replace it. Then go to Step 5.
STEP 3. Check the clearance.
Q: Is the clearance between the door glass and the
door weatherstrip holder proper?
YES :
Go to Step 4.
NO :
Adjust it. (Refer to
.) Then go to
Step 5.
STEP 4. Check the door.
Q: Is the door deformed?
YES :
Repair or replace it. Then go to Step 5.
NO :
Go to Step 5.
STEP 5. Check symptoms.
Q: Has the wind noise been improved?
YES :
Return to Step 1.
NO :
This diagnosis complete.
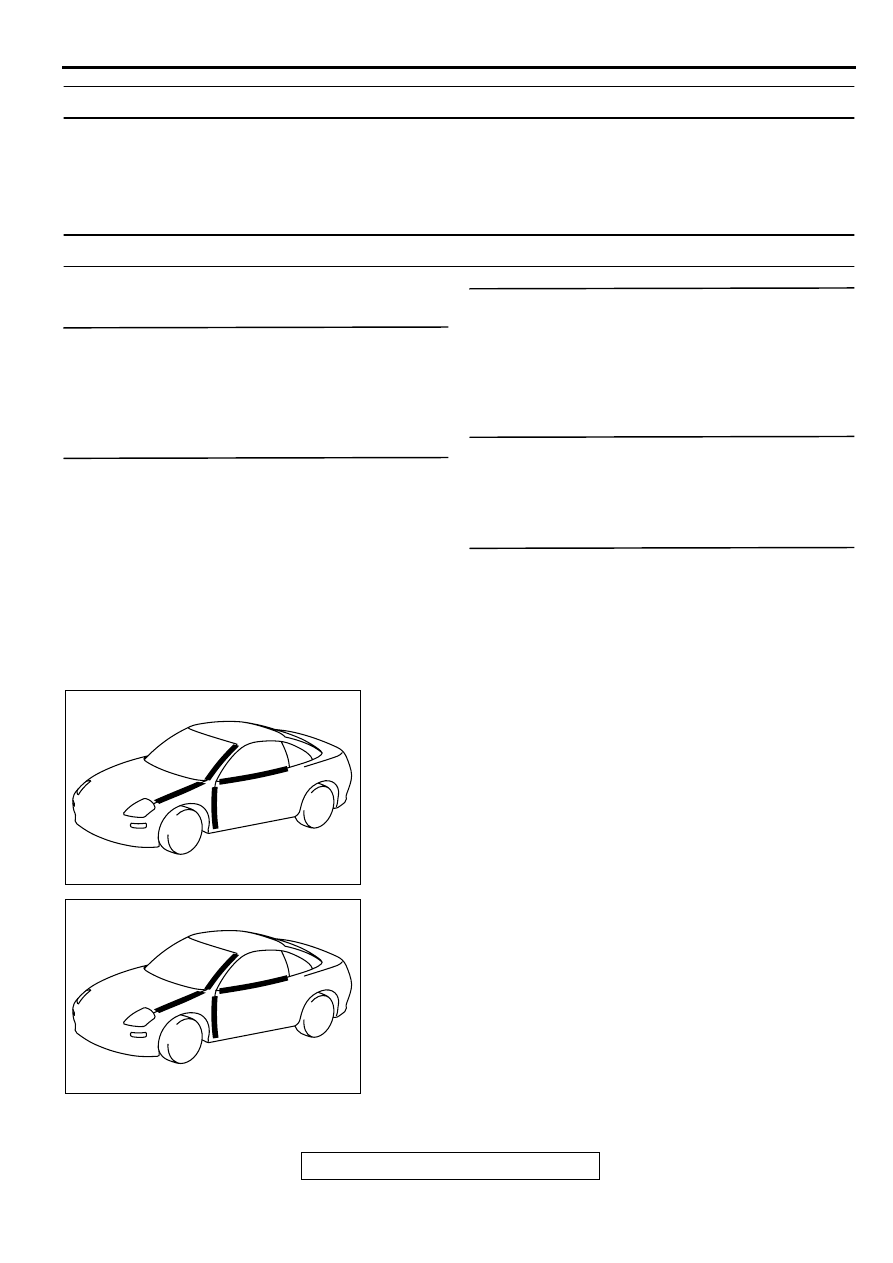
HOW TO LOCATE WIND NOISES
M1421004200067
1. Attach cloth tape to every place, such as panel seams,
projections, molding seams, glass and body seams, etc.
which might conceivably be the source of wind noise.
2. Then make a road test to check that the places not covered
by tape are not sources of wind noise.
3. Remove the strips of tape one by one, making a road test
after each is removed, until a wind noise source is
discovered.
AC000466
AC000466

DOOR
TSB Revision
BODY
42-62
4. When such a place is found, cover it again and repeat the
procedure to check if there are any other noise source.
5. If no others are found, the last remaining tape is the only
source.
6. Cut the remaining piece of tape into smaller pieces, attach it
again as it was before, and then remove the pieces one by
one to narrow down the source.
7. Check that wind noise occurs when the last remaining tape
is removed, and that noise does not occur when it is re-
attached.
8. When the source(s) of the wind noise is finally located,
attach butyl tape, body sealer or similar material to obstruct
this source as much as possible.
AC000467
AC000468
AC000469
Нет комментариевНе стесняйтесь поделиться с нами вашим ценным мнением.
Текст