Mitsubishi Eclipse / Eclipse Spyder (2000-2002). Service and repair manual — part 13
MAINTENANCE SERVICE
TSB Revision
GENERAL <BODY AND CHASSIS>
00-49
12. MANUAL TRANSMISSION OIL
M1001002800074
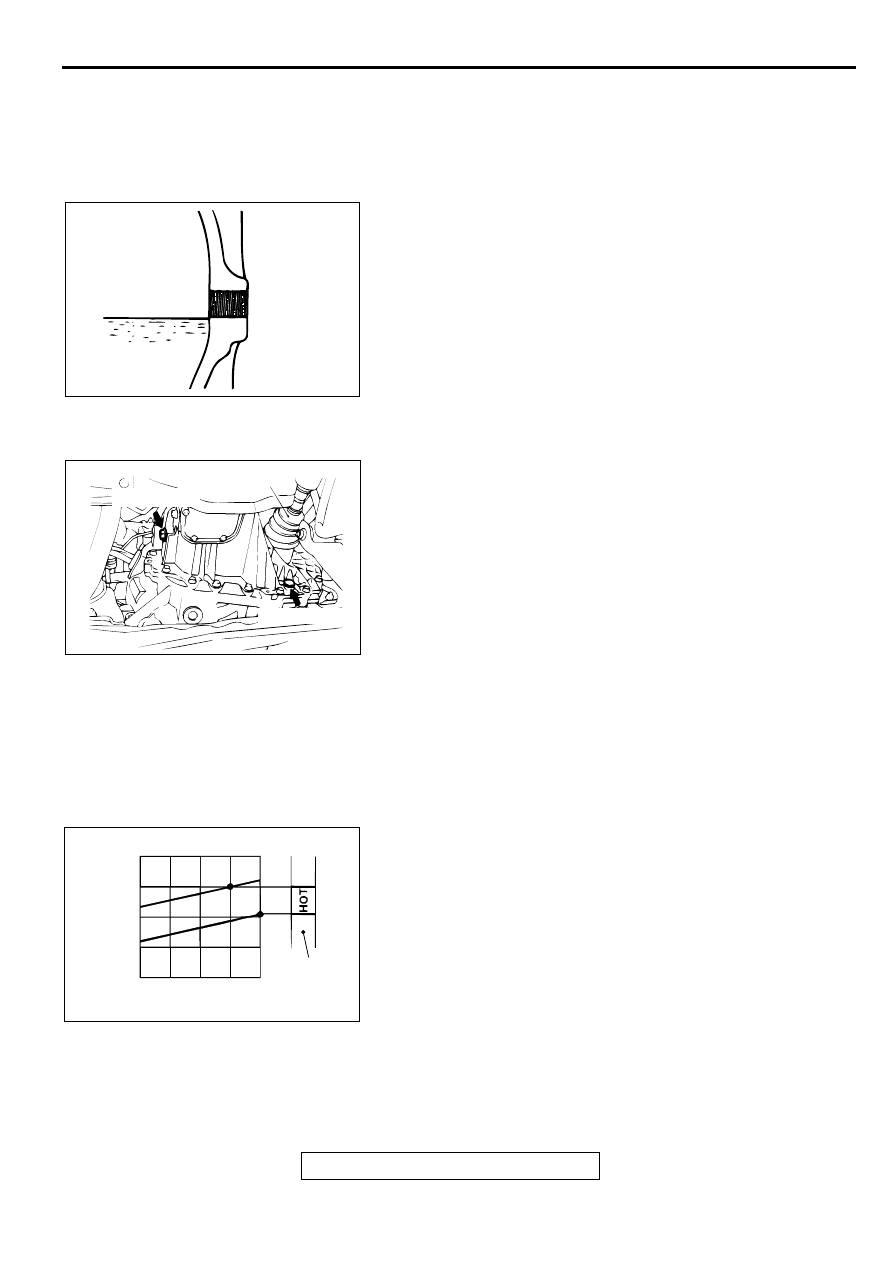
Check oil level
Inspect each component for evidence of leakage, and check
the oil level by removing the filler plug. If the oil is
contaminated, replace with new oil.
1. Remove the filler plug.
2. Check that the oil is not noticeably dirty, and that it has a
suitable viscosity.
3. Tighten the filler plug to the specified torque.
Tightening torque: 32
±
2 N
⋅
m (24
±
1 ft-lb)
Change oil
1. Remove the filler plug.
2. Remove the drain plug and drain the oil.
3. Tighten the drain plug to the specified torque.
Tightening torque: 32
±
2 N
⋅
m (24
±
1 ft-lb)
4. Fill with Hypoid gear oil SAE 75W-90 or 75W-85W
conforming to API classification GL-4 until the level comes
to the lower portion of filler plug hole.
Quantity:
<2.4L Engine> 2.2 dm
3
(2.3 quarts)
<3.0L Engine> 2.8 dm
3
(3.0 quarts)
5. Tighten the filler plug to the specified torque.
Tightening torque: 32
±
2 Nm (24
±
1 ft-lb)
13. AUTOMATIC TRANSMISSION FLUID
M1001002900093
Checking A/T fluid level
1. Drive the vehicle until the A/T fluid temperature rises to the
normal temperature [70
−
80
°
C (158
−
176
°
F)].
NOTE: The A/T fluid temperature is measured with MUT-II.
NOTE: If it takes some amount of time until the A/T fluid
reaches its normal operating temperature [70
−
80
°
C (158
−
176
°
F
)
], check the A/T fluid level by referring to the left
diagram.
2. Park the vehicle on a level surface.
3. Move the selector lever through all positions to fill the torque
converter and the hydraulic circuits with A/T fluid, and then
move the selector lever to the "N" position.
4. After wiping off any dirt around the dipstick, remove the
dipstick and check the condition of the A/T fluid.
AC000094
TRANSMISSION
OIL
AB
AC000095AB
DRIVE SHAFT <LH>
FILLER PLUG
DRAIN PLUG
AC002477
80
DIPSTICK
60
40
(176)
(140)
(104)
FLUID TEMPERATURE [˚C (˚F)]
– 30 (– 1.2)
– 20 (– 0.8)
– 10 (– 0.4)
0 (0)
10 (0.4)
FLUID LEVEL [mm (in)]
AB

MAINTENANCE SERVICE
TSB Revision
GENERAL <BODY AND CHASSIS>
00-50
NOTE: If the fluid smells as if it is burnt, it means that the A/
T fluid has been contaminated by fine particles from the
bushings and friction materials, a transaxle overhaul and
flashing the cooler line flushing may be necessary.
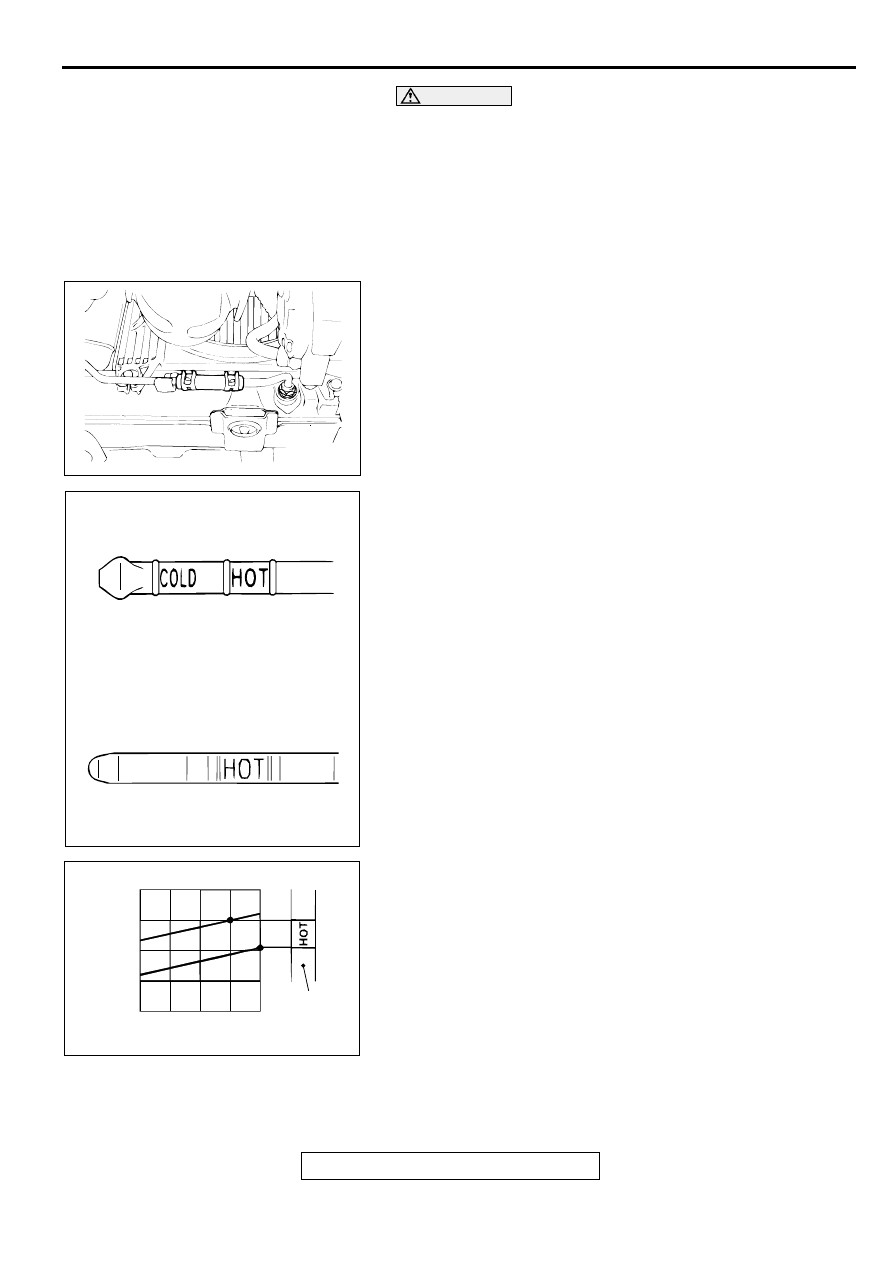
5. Check that the A/T fluid level is at the "HOT" mark on the
dipstick. If the A/T fluid level is lower than this, pour in more
DIAMOND ATF SP-II M or SP-III or equivalent until the level
reaches the "HOT" mark.
NOTE: If the A/T fluid level is too low, the oil pump will draw
in air along with the A/T fluid, which will cause bubbles to
form. This will in turn cause the hydraulic pressure to drop,
which will result in late shifting and slipping of the clutches
and brakes.
In either case, air bubbles can interfere with normal valve,
clutch, and brake operation. Foaming can cause A/T fluid to
escape from the transaxle vent, in which case it may be
mistaken for a leak.
6. Securely insert the dipstick.
NOTE: The A/T fluid should always be replaced when:
.
•
When trouble shooting the transaxle
•
When overhauling the transaxle
•
When the oil is noticeably dirty or burnt (vehicle was
driven under severe conditions)
Change A/T fluid
If you have a A/T fluid changer, use this changer to replace the
A/T fluid. If you do not have a A/T fluid changer, replace the A/T
fluid by the following procedure.
1. Disconnect the hose shown in the illustration which
connects the transaxle and the oil cooler (inside the
radiator). Place a container under the hose to collect the
discharge.
CAUTION
The engine should be stopped within one minute after it is
started. If the A/T fluid has all drained out before then, the
engine should be stopped at that point. Discharge volume:
Approximately 3.5 dm
3
(3.7 quarts)
2. Start the engine and let the A/T fluid drain out.
Running conditions: "N" range with engine idling
3. Remove the drain plug from the bottom of the transaxle case
to drain the A/T fluid.
Discharge volume: Approximately 2.0 dm
3
(2.1 quarts)
4. Install the drain plug with a new gasket, and tighten it to the
specified torque.
Tightening torque: 32
±
2 N
⋅
m (24
±
1 ft-lb)
5. Pour new AT fluid in through the oil filler tube.
Adding volume: Approximately 5.5 dm
3
(5.8 quarts)
AC000098
<2.4L ENGINE>
<3.0L ENGINE>
AB
AC000099
AC000100
MAINTENANCE SERVICE
TSB Revision
GENERAL <BODY AND CHASSIS>
00-51
CAUTION
Stop pouring if the full volume of A/T fluid cannot be
poured in.
6. Repeat the procedure in Step 2. (to pump out the rest of the
contaminated A/T fluid)
7. Pour the new A/T fluid in through the oil filler tube.
NOTE: Check the A/T fluid for contamination or burnt smell.
If A/T fluid is still contaminated or burnt, repeat Steps 6 and
7 before proceeding to Step 8.
8. Reconnect the hose which was disconnected in step 1
above, and firmly replace the dipstick.
9. Start the engine and run it at idle for 1
−
2 minutes.
10. Move the selector lever through all positions, and then
move it to the "N" position.
11.Check that the A/T fluid level is at the "COLD" mark on the
dipstick. If the level is lower than this, pour in more A/T fluid.
12.Drive the vehicle until the A/T fluid temperature rises to the
normal temperature [70
−
80
°
C (158
−
176
°
F)], and then
check the A/T fluid level again. If it takes some amount of
time until the A/T fluid reaches its normal operating
temperature [70
−
80
°
C (158
−
176
°
F)], check the A/T fluid
level by referring to the diagram at left. The A/T fluid level
must be at the "HOT" mark.
NOTE: The A/T fluid temperature is measured with scan tool
(MUT-II). The "COLD" level is for reference only; the "HOT"
level should be regarded as the standard level.
NOTE: If it takes some amount of time until the A/T fluid
reaches its normal operating temperature [70
−
80
°
C
(158 -
176
°
F
)
], check the A/T fluid level by referring to the left
diagram.
13. Firmly insert the dipstick into the oil filler tube.
AC000101
AC000098
<2.4L ENGINE>
<3.0L ENGINE>
AB
AC002477
80
DIPSTICK
60
40
(176)
(140)
(104)
FLUID TEMPERATURE [˚C (˚F)]
– 30 (– 1.2)
– 20 (– 0.8)
– 10 (– 0.4)
0 (0)
10 (0.4)
FLUID LEVEL [mm (in)]
AB
MAINTENANCE SERVICE
TSB Revision
GENERAL <BODY AND CHASSIS>
00-52
14. ENGINE COOLANT (CHANGE)
M1001003100090
Check the cooling system parts such as the radiator, heater
and oil cooler hoses, thermostat and the connections for
leakage and damage.
Changing Coolant
1. Set the temperature control knob to the "HOT" position.
2. Let the engine operate until the engine coolant warms, and
then stop the engine.
CAUTION
When removing the radiator cap, use care to avoid contact
with hot coolant or steam. Place a shop towel over the cap
and turn the cap counterclockwise a little to let the
pressure escape through the vinyl tube. After relieving the
steam pressure, remove the cap by slowly turning it
counterclockwise.
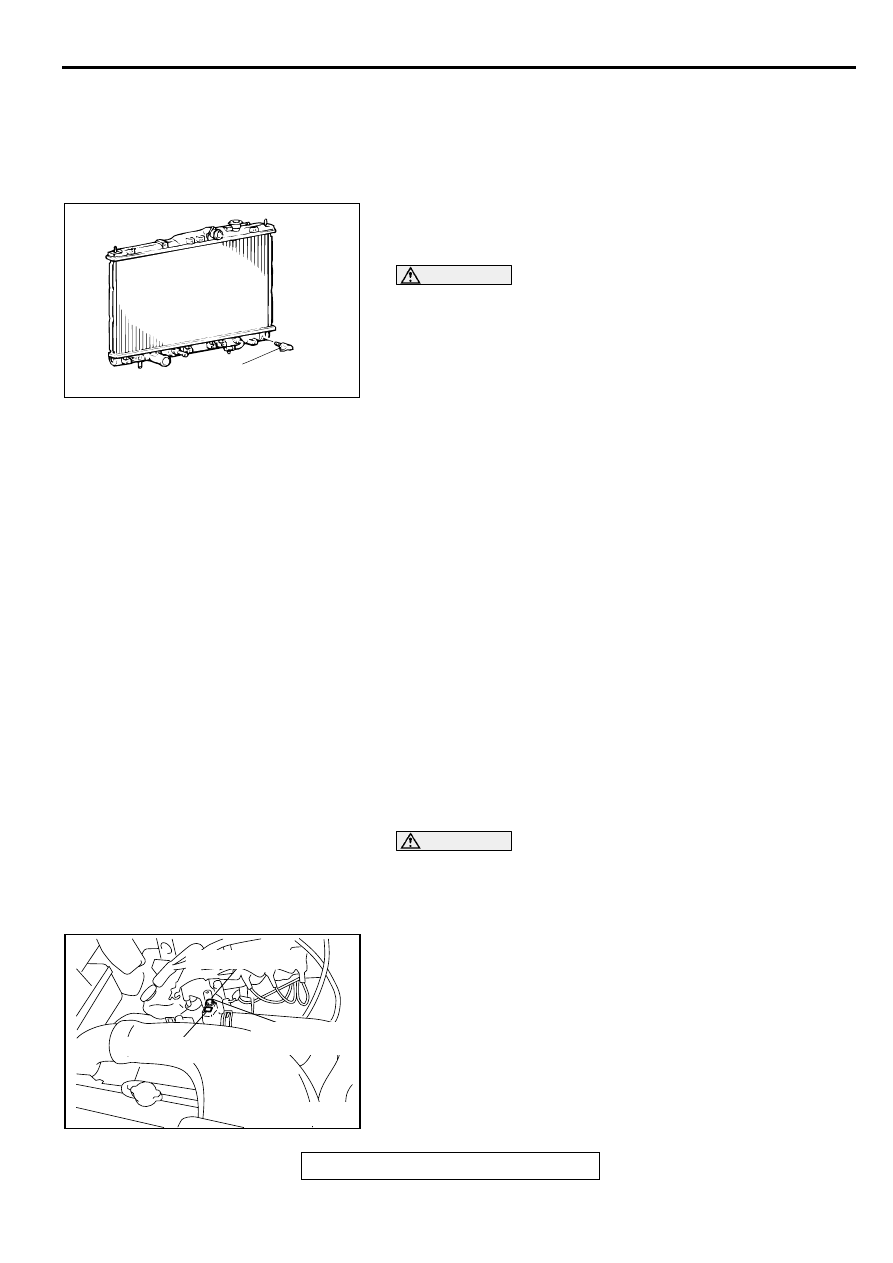
3. Remove the radiator cap, radiator drain plug and engine
drain plug to drain the coolant.
4. Remove the reserve tank and drain the coolant.
5. After completely draining the coolant, reinstall the drain
plugs and flush the engine and radiator using a radiator
cleaning fluid.
6. After the flushing is completed, completely drain the
cleaning fluid and install the radiator and engine drain plugs.
7. By referring to the section on coolant, select an appropriate
concentration for safe operation for safe operating
temperature within the range of 30 to 60%. Refill the coolant
at the selected concentration. A convenient mixture is a 50%
water and 50% antifreeze solution [freezing point:
−
31
°
C (
−
32.8
°
F)].
Recommended antifreeze:
MITSUBISI GENUINE Part NO.MD970389 or equivalent
Quantity:
<2.4L Engine> 7.0 dm
3
(7.4 quarts)
<3.0L Engine> 8.0 dm
3
(8.5 quarts)
CAUTION
Do not use alcohol or methanol anti-freeze or any engine
coolants mixed with alcohol or methanol anti-freeze. The
use of an improper anti-freeze can cause the corrosion of
the aluminum components.
8. Reinstall the radiator cap.
9. Start the engine and let it warm up until the thermostat
opens.
10.After repeatedly revving the engine up to 3,000 r/min
several times, then stop the engine.
11.Remove the radiator cap after the engine has become cold,
and pour in coolant up to the brim. Reinstall the cap.
AC000106
DRAIN
PLUG
AB
ACX01422 AB
CAUTION LABEL
AIR BLEED BOLT
14 ±1 N·m
120 ± 13 in-lb
Нет комментариевНе стесняйтесь поделиться с нами вашим ценным мнением.
Текст