Mitsubishi Eclipse / Eclipse Spyder (2000-2002). Service and repair manual — part 603
POWER STEERING DIAGNOSIS
TSB Revision
POWER STEERING
37A-7
INSPECTION PROCEDURE 5: Squealing Noise
DIAGNOSIS
STEP 1. Check the belt tension.
Refer to GROUP 00, Maintenance Service
−
Drive
Belts
.
Q: Is the belt tension incorrect?
YES :
Adjust the belt tension. (Refer to GROUP
00, Maintenance Service
−
Drive Belts
NO :
Go to Step 2.
STEP 2. Check for seizure in the oil pump.
Q: Is there seizure?
YES :
Replace the part. Then go to Step 3.
NO :
Go to Step 3.
STEP 3. Check symptoms.
Confirm that no noise is generated.
Q: Is there noise?
YES :
Repeat from Step 1.
NO :
Diagnosis is complete.
INSPECTION PROCEDURE 6: Hissing Noise
DIAGNOSIS
STEP 1. Check for entry of air.
Q: Has air entered?
YES :
Bleed the air (Refer to
.). Then go
to Step 4.
NO :
Go to Step 2.
STEP 2. Check each hose for crushing or
twisting.
Q: Is there fault?
YES :
Repair or replace the hose. Then go to Step
NO :
Go to Step 3.
STEP 3. Check the steering gear box for damage.
Q: Is there damage?
YES :
Repair or replace the part. Then go to Step
NO :
Go to Step 4.
STEP 4. Check symptoms.
Confirm that no noise is generated.
Q: Is there noise?
YES :
Repeat from Step 1.
NO :
Diagnosis is complete.
INSPECTION PROCEDURE 7: Droning Noise
DIAGNOSIS
STEP 1. Check the oil pump or oil pump bracket
installation.
Q: Is the oil pump or oil pump bracket installation
correct?
YES :
Go to Step 2.
NO :
Repair it. Then go to Step 3.
STEP 2. Check the oil pump for damage.
If a slight "beat noise" is produced by the oil pump
when the steering wheel is turned fully and held in
that position, this is not a malfunction.
Q: Is there damage?
YES :
Replace the oil pump. Then go to Step 3.
NO :
Go to Step 3.
STEP 3. Check symptoms.
Confirm that no noise is generated.
Q: Is there noise?
YES :
Repeat from Step 1.
NO :
Diagnosis is complete.
POWER STEERING DIAGNOSIS
TSB Revision
POWER STEERING
37A-8
INSPECTION PROCEDURE 8: Squeaking Noise
DIAGNOSIS
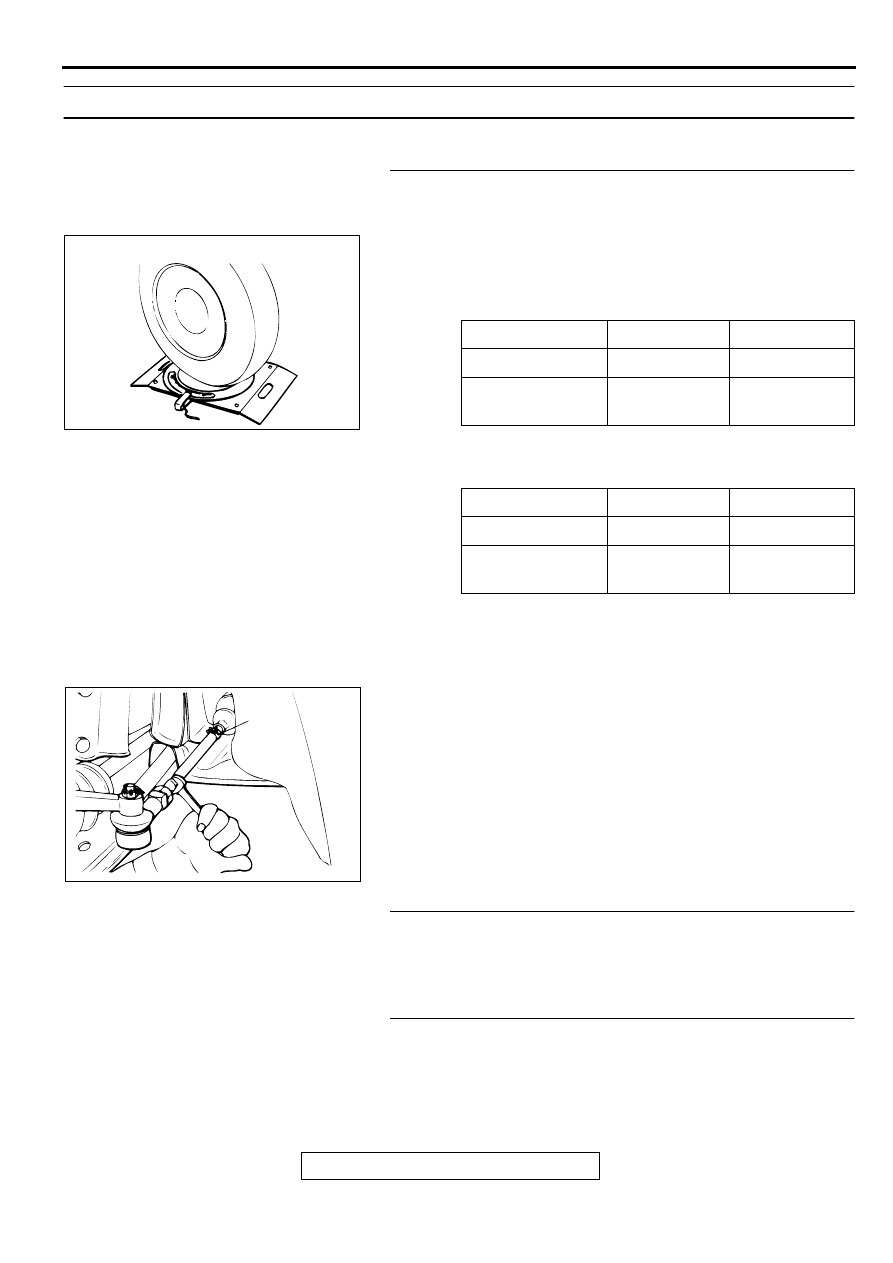
STEP 1. Check for interference of the wheel and vehicle
body.
If interfering, adjust the steering angle.
(1) Place the front wheel on a turning radius gauge and
measure the steering angle.
Standard value:
<ECLIPSE>
<ECLIPSE SPYDER>
(2) If the steering angle is not within the standard value, adjust
the toe-in.
Standard value: 0
±
3 mm (0
±
0.12 inch)
(3) Adjust the toe-in by undoing the clip and turning the left and
right tie rod turnbuckles by the same amount (in opposite
directions).
NOTE: The toe will move out as the left turnbuckle is turned
toward the front of the vehicle and the right turnbuckle is
turned toward the rear of the vehicle.
Q: Is the steering angle normal?
YES : Go to Step 2.
NO : Adjust the steering angle. Then go to Step 3.
STEP 2. Check the steering gear box for damage.
Q: Is there damage?
YES : Repair or replace the part. Then go to Step 3.
NO : Go to Step 3.
STEP 3. Check symptoms.
Confirm that no noise is generated.
Q: Is there noise?
YES : Repeat from Step 1.
NO : Diagnosis is complete.
ITEMS
2.4L ENGINE
3.0L ENGINE
Inside wheel
36
°
12'
±
2
°
00'
31
°
00'
±
2
°
00'
Outside wheel
(reference)
30
°
24'
27
°
00'
ITEMS
2.4L ENGINE
3.0L ENGINE
Inside wheel
36
°
12'
±
2
°
00'
33
°
60'
±
2
°
00'
Outside wheel
(reference)
30
°
24'
28
°
30'
AC000756AB
AC001078 AB
CLIP
POWER STEERING DIAGNOSIS
TSB Revision
POWER STEERING
37A-9
INSPECTION PROCEDURE 9: Vibration
NOTE: A slight vibration may be felt when the stationary steering effort is made due to the condition of the
road surface. To check whether the vibration actually exists or not, test-drive the vehicle on a dry concrete or
asphalt surface. Moreover, a very slight amount of vibration is not a malfunction.
DIAGNOSIS
STEP 1. Check for entry of air.
Q: Has air entered?
YES :
Bleed the air (Refer to
.). Then go
to Step 3.
NO :
Go to Step 2.
STEP 2. Check the steering gear box for damage.
Q: Is there damage?
YES :
Repair or replace the part. Then go to Step
NO :
Go to Step 3.
STEP 3. Check symptoms.
Confirm that no noise is generated.
Q: Is there noise?
YES :
Repeat from Step 1.
NO :
Diagnosis is complete.
INSPECTION PROCEDURE 10: Oil Leakage from Hose Connection
DIAGNOSIS
STEP 1. Check for loosening of the flare nut.
Q: Is the flare nut loose?
YES :
Tighten it to 15
±
3 N
⋅
m (11
±
2 ft-lb). Then
go to Step 3.
NO :
Go to Step 2.
STEP 2. Check the insertion of the hose and the
clamp installation state.
Q: Are they correct?
YES :
Go to Step 3.
NO :
Repair or replace the part. Then go to Step
3.
STEP 3. Check symptoms.
Check that no oil is leaking.
Q: Is there oil leakage?
YES :
Repeat from Step 1.
NO :
Diagnosis is complete.
INSPECTION PROCEDURE 11: Oil Leakage from Hose Assembly
DIAGNOSIS
STEP 1. Check the hose for damage or clogging.
Q: Is the hose damaged or clogged?
YES :
Repair or replace it. Then go to Step 2.
NO :
Go to Step 2.
STEP 2. Check symptoms.
Check that no oil is leaking.
Q: Is there oil leakage?
YES :
Repeat from Step 1.
NO :
Diagnosis is complete.
POWER STEERING DIAGNOSIS
TSB Revision
POWER STEERING
37A-10
INSPECTION PROCEDURE 12: Oil Leakage from Oil Reservoir
DIAGNOSIS
STEP 1. Check the oil reservoir for damage.
Q: Is there damage?
YES :
Repair or replace it. Then go to Step 3.
NO :
Go to Step 2.
STEP 2. Check for overflowing.
Q: Is there overflowing?
YES :
Adjust fluid level. Then go to Step 3.
NO :
Go to Step 3.
STEP 3. Check symptoms.
Q: Is there oil leakage?
YES :
Repeat from to Step 1.
NO :
Diagnosis is complete.
INSPECTION PROCEDURE 13: Oil Leakage from Oil Pump
DIAGNOSIS
STEP 1. Check the oil pump body for damage.
Q: Is there damage?
YES :
Replace the part. Then go to Step 3.
NO :
Go to Step 2.
STEP 2. Check the O-ring or oil seal for damage.
Q: Is there damage?
YES :
Replace the part. Then go to Step 3.
NO :
Go to Step 3.
STEP 3. Check symptoms.
Check that no oil is leaking.
Q: Is there oil leakage?
YES :
Repeat from Step 1.
NO :
Diagnosis is complete.
INSPECTION PROCEDURE 14: Oil Leakage from Gear Box
DIAGNOSIS
STEP 1. Check the gear box housing for damage.
Q: Is there damage?
YES :
Replace the part. Then go to Step 3.
NO :
Go to Step 2.
STEP 2. Check the oil-ring or oil seal for damage.
Q: Is there damage?
YES :
Replace the part. Then go to Step 3.
NO :
Go to Step 3.
STEP 3. Check symptoms.
Check that no oil is leaking.
Q: Is there oil leakage?
YES :
Repeat from Step 1.
NO :
Diagnosis is complete.
Нет комментариевНе стесняйтесь поделиться с нами вашим ценным мнением.
Текст