Mitsubishi Colt Ralliart. Manual — part 482

HEADLAMP
CHASSIS ELECTRICAL
54A-73
FRONT TURN SIGNAL LAMP BULB
REPLACEMENT
CAUTION
Don't touch the bulb surface with bare hands or
dirty gloves. If the bulb surface (glass part) gets
dirty, clean it with alcohol or thinner immediately
and dry well, and then install it.
AC205029
AC
Front turn-signal lamp
Disconnect the connector, and twist the front turn sig-
nal lamp socket to remove it.
REMOVAL AND INSTALLATION
M1542001800686
AC509607
1
4.9 ± 0.7 N·m
4.9 ± 0.7 N·m
1.5 ± 0.3 N·m
AB
Removal step
•
Front bumper assembly (Refer to
GROUP 51, Front bumper
assembly and radiator grille
)
1.
Headlamp assembly
Main
Index
Group
TOC
HEADLAMP
CHASSIS ELECTRICAL
54A-74
INSPECTION
M1542011202733
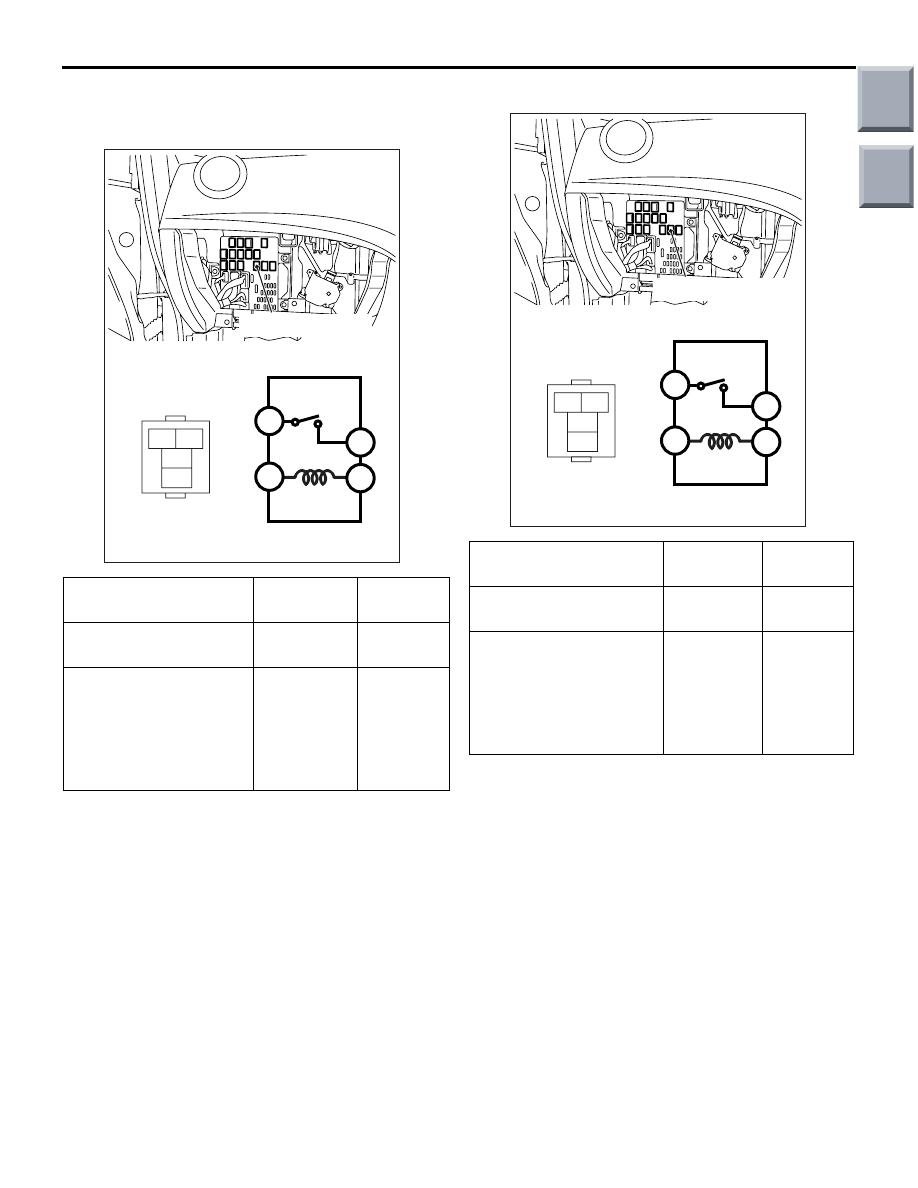
HEADLAMP RELAY (LO) CHECK
AC208719
;
AK
2
4
1
3
3
1
4
2
Headlamp relay (LO)
Battery voltage
Tester
connection
Specified
condition
Not supplied
3
− 4
Open
circuit
• Connect terminal 1 to
the positive battery
terminal
• Connect terminal 2 to
the negative battery
terminal
3
− 4
Continuity
exists (2
Ω
or less)
HEADLAMP RELAY (HI) CHECK
AC208719
;
AP
2
4
1
3
3
1
4
2
Headlamp relay (HI)
Battery voltage
Tester
connection
Specified
condition
Not supplied
3
− 4
Open
circuit
• Connect terminal 1 to
the positive battery
terminal
• Connect terminal 2 to
the negative battery
terminal
3
− 4
Continuity
exists (2
Ω
or less)
Main
Index
Group
TOC

FOG LAMP
CHASSIS ELECTRICAL
54A-75
FOG LAMP
SERVICE SPECIFICATION
M1542000301034
Item
Standard value
Front fog lamp aiming
Vertical direction
60 mm (1.15
°) below horizontal
(H)
SPECIAL TOOL
M1542000602470
Tool
Number
Name
Use
MB990784
MB990784
Ornament remover Removal of fog lamp switch panel
and front fog lamp bezel
ON-VEHICLE SERVICE
FOG LAMP AIMING
M1542001100922
<EXCEPT FOR RALLIART VERSION-R>
AC402040
AD
Lamp centre
3 m
Screen
1. Measure the centre of the front fog lamps, as
shown in the illustration.
2. Set the distance between the screen and the
centre of the front fog lamps as shown in the
illustration.
3. Inflate the types to the specified pressures and
there should be no other load in the vehicles other
than driver or substituted weight of approximately
75 kg placed in the driver’s position.
4. With the engine running at 2,000 r/min, aim the
front fog lamp.
AC405218 AB
Service hole
Adjusting screw
Phillips screwdriver
5. Insert a Phillips screwdriver into the service hole
and place it on the adjusting screw.
NOTE: If the adjusting screw cannot be seen from
the service hole, remove the fog lamp bezel so
that it will be easier to see the position of the
adjusting screw.
Main
Index
Group
TOC

AC600650
Phillips
screwdriver
Lamp centre
High intensity zone
Cut off line
Vertical direction
AE
H
V
Adjusting
screw
Fog lamp unit
FOG LAMP
CHASSIS ELECTRICAL
54A-76
6. Adjust the cut off line (boundary between light and
dark) position to the standard value with the
adjusting screw.
Standard value:
(Vertical direction) 60 mm (1.15
°) below hori-
zontal (H)
CAUTION
When marking the aiming adjustment, be sure to
mask those lamps which are not being adjusted.
NOTE: The horizontal direction is non-adjustable. If
the deviation of the light beam axis exceeds the
standard value, check to be sure that the mounting
location or some other point is not defective.
<RALLIART VERSION-R>
AC601057
AD
Lamp centre
Screen
3 m
1. Measure the centre of the front fog lamps, as
shown in the illustration.
2. Remove the front fog lamps bezel.
3. Set the distance between the screen and the
centre of the front fog lamps as shown in the
illustration.
4. Inflate the types to the specified pressures and
there should be no other load in the vehicles other
than driver or substituted weight of approximately
75 kg placed in the driver’s position.
5. With the engine running at 2,000 r/min, aim the
front fog lamp.
AC600800
AC
Phillips screwdriver
Adjusting screw
6. Insert a Phillips screwdriver into the service hole
and place it on the adjusting screw.
Main
Index
Group
TOC
Нет комментариевНе стесняйтесь поделиться с нами вашим ценным мнением.
Текст