Mitsubishi Colt Ralliart. Manual — part 599

TRANSMISSION CONTROL
MANUAL TRANSAXLE(TRANSMISSION)
22A-6
REMOVAL SERVICE POINTS
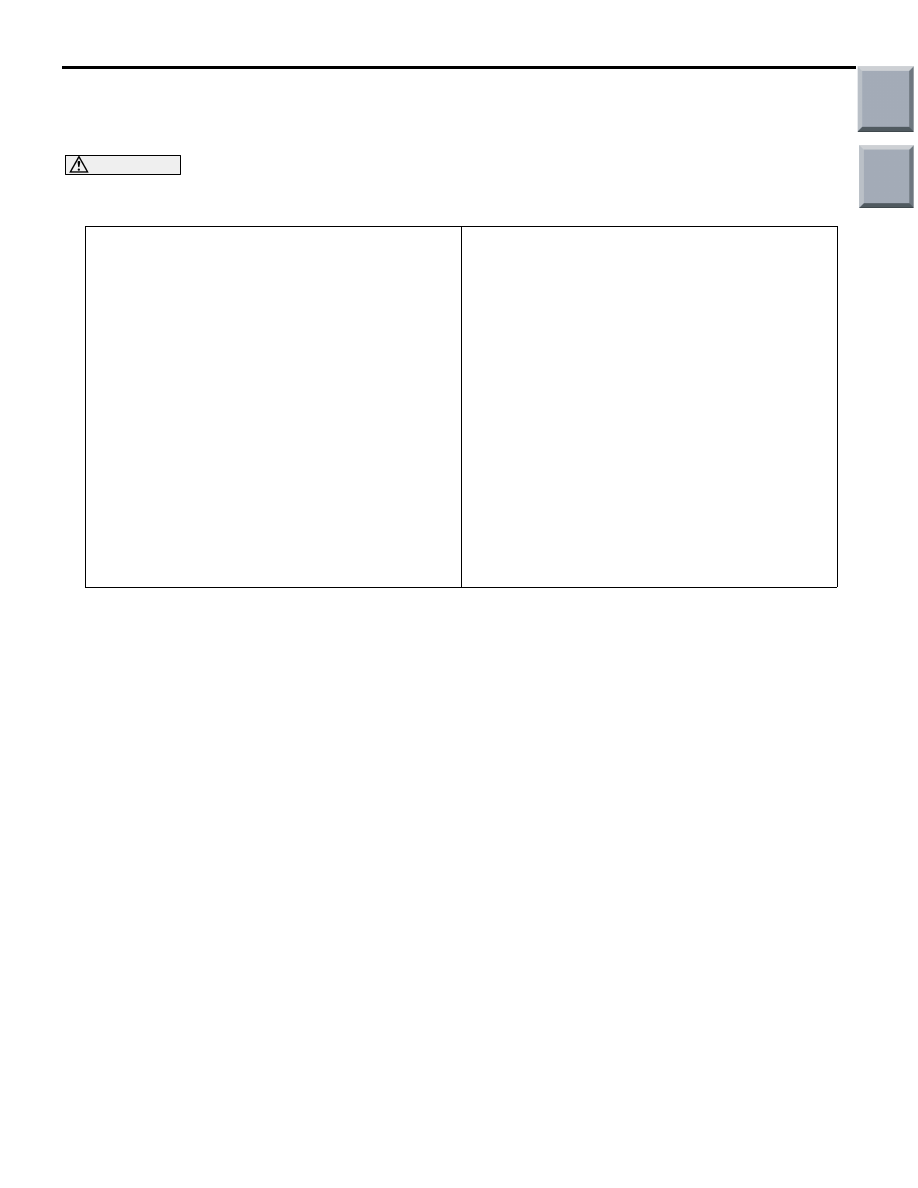
<<A>> GEARSHIFT CABLE/SELECT
CABLE (GEARSHIFT LEVER SIDE) DIS-
CONNECTION
AC313117
AB
Cable
Section A - A
A
A
A
A
Gearshift and select cables
1. Disconnect the gearshift lever assembly from the
ends of the gearshift and select cables.
AC313116
A
A
A
A
AB
Cable
Section A - A
Bracket
Lock
Gearshift and select cables
CAUTION
Be careful not to damage the connection of the
gearshift and select cables when disconnecting
them. Do not reuse gearshift and select cables, if
they are damaged.
2. Release the gearshift and select cables from the
gearshift lever assembly-side cable brackets by
compressing their locks with a flat-tipped
screwdriver.
<<B>> GEARSHIFT CABLE/SELECT
CABLE (TRANSMISSION SIDE)
DISCONNECTION
AC311252AB
Transmission lever
Cable
Section A - A
Lever
Gearshift and select cables
A
A
A
A
1. Disconnect the transmission
assembly-transmission lever from the ends of the
gearshift and select cables.
AC311253AB
Cable
Section A - A
Bracket
Gearshift and
select cables
Lock
Control cable bracket
A
A
A
A
CAUTION
Be careful not to damage the connection of the
gearshift and select cables when disconnecting
them. Do not reuse gearshift and select cables, if
they are damaged.
2. Release the gearshift and select cables from the
transmission-side cable brackets by compressing
their locks with a flat-tipped screwdriver.
•
Exhaust centre pipe (Refer to
GROUP 15
− Exhaust Pipe and
Main Muffler
<4A9>,
<4G1>).
•
Heat protector
8.
Gearshift cable and select cable
assembly
Gearshift cable and select cable
assembly removal steps
Main
Index
Group
TOC
TRANSMISSION ASSEMBLY
MANUAL TRANSAXLE(TRANSMISSION)
22A-7
TRANSMISSION ASSEMBLY
REMOVAL AND INSTALLATION
M1221002700783
CAUTION
The part indicated * mark should be temporarily tightened and then should be fully tightened with the
engine weight applied on the vehicle body.
Pre-removal Operation
• Engine Room Centre Under Cover Removal
• Engine Room Side Cover Removal
• Transmission Oil Draining (Refer to
• Air Cleaner Assembly Removal (Refer to GROUP 15, Air
Cleaner
<4G1>).
• Battery and Battery Tray Removal
• Wiper Arm and Blade Assembly and Front Deck Garnish
Removal (Refer to GROUP 51, Windshield Wiper
• Cowl Top Panel Removal (Refer to GROUP 42, Loose
Panel
• Strut Tower Bar Removal (Refer to GROUP 42, Strut
Tower Bar
).
• Front Exhaust Pipe Removal (Refer to GROUP 15,
Exhaust Pipe and Main Muffler
<4A9>,
<4G1>).
• Drive Shaft Removal (Refer to GROUP 26,
• Front Bumper Assembly Removal (Refer to GROUP 51,
Front Bumper Assembly and Radiator Grille
• Inter Cooler Removal (Refer to GROUP 15, Inter Cooler
).
Post-installation Operation
• Drive Shaft Installation (Refer to
).
• Front Exhaust Pipe Installation (Refer to GROUP 15,
Exhaust Pipe and Main Muffler
<4A9>,
<4G1>).
• Strut Tower Bar Installation (Refer to GROUP 42, Strut
Tower Bar
).
• Cowl Top Panel Installation (Refer to GROUP 42, Loose
Panel
• Wiper Arm and Blade Assembly and Front Deck Garnish
Installation (Refer to GROUP 51, Windshield Wiper
• Battery and Battery Tray Installation
• Air Cleaner Assembly Installation (Refer to GROUP 15,
Air Cleaner
<4A9>,
<4G1>).
• Engine Room Side Cover Installation
• Engine Room Centre Under Cover Installation
• Inter Cooler Installation (Refer to GROUP 15, Inter Cooler
).
• Front Bumper Assembly Installation (Refer to GROUP 51,
Front Bumper Assembly and Radiator Grille
• Transmission Oil Filling (Refer to
Main
Index
Group
TOC

AC404308AC
20 ± 1 N·m
58 ± 6 N·m*
58 ± 6 N·m*
7.6 ± 0.8 N·m
34 ± 3 N·m
18 ± 3 N·m
23 ± 2 N·m
43 ± 4 N·m
N
N
14 ± 1 N·m
N
N
N
N
N
N
1
2
3
4
6
7
8
9
10
12
23 ± 3 N·m <4A9>
5
<4A9>
N
20 ± 1 N·m
N
48 ± 6 N·m <4G1>
5
<4G1>
23 ± 3 N·m <4A9>
11
<4A9>
N
48 ± 6 N·m <4G1>
11
<4G1>
Removal steps
1.
Starter connector and terminal
2.
Back-up lamp switch connector
3.
Transmission control cable
connection
4.
Starter
<<
A
>>
5.
Transmission assembly upper part
mounting bolts
6.
Clutch release cylinder connection
7.
Transmission housing front lower
cover stay
8.
Engine mounting stay
9.
Engine roll stopper rod assembly
•
Raise the engine and transmission
assembly to the position where the
engine weight is not applied to the
transmission mounting insulator.
•
Engine assembly supporting
10. Transmission mounting insulator
<<
B
>>
•
Engine assembly supporting
11. Transmission assembly lower part
mounting bolts
12. Transmission assembly
TRANSMISSION ASSEMBLY
MANUAL TRANSAXLE(TRANSMISSION)
22A-8
Removal steps (Continued)
Main
Index
Group
TOC

TRANSMISSION ASSEMBLY
MANUAL TRANSAXLE(TRANSMISSION)
22A-9
REMOVAL SERVICE POINTS
<<A>> TRANSMISSION ASSEMBLY
UPPER PART COUPLING BOLTS
REMOVAL
Only loosen the bolts from the engine and transmis-
sion assembly (do not remove).
<<B>> ENGINE ASSEMBLY SUPPORTING
AC207441AB
Apply a protective
tape.
Windshield
1. Wrap a protective tape to avoid damage to the
windshield.
2. <Engine hanger (special tool MB991928) is used>
(1) Assemble the engine hanger (special tool
MB991928). Set following parts to the base
hanger.
• Slide bracket (HI)
• Foot (standard) (MB991932)
•
AC207439
<Right rear>
AB
MB991928
MB991932
Slide bracket (HI)
AC207437AB
MB991928
MB991932
Slide bracket (HI)
<Left rear>
Engine hanger attachment (MB991925)
(2) Set the foot (standard) (Special tool:
MB991932) to the front fender strut assembly
mounting nut shown in the figure.
AC207440
<Right front>
MB991925
AB
MB991928
Welded
part
AC207438AB
MB991925
MB991928
<Left front>
Welded part
(3) Set the engine hanger attachment (Special
tool: MB991925) to the front side member
welded part shown in the figure.
NOTE: Adjust the engine hanger balance by
sliding the engine hanger attachment
(MB991925) and the slide bracket (HI).
AC402622
MB991928
MB991454
MB991527
AB
(4) Set the chains of the engine hanger (Special
tool: MB991527) and the engine hanger
balancer (Special tool: MB991454) to support
the engine and transmission assembly.
Remove the transmission assembly upper part
coupling bolts that have been loosened
previously.
Main
Index
Group
TOC
Нет комментариевНе стесняйтесь поделиться с нами вашим ценным мнением.
Текст