Mitsubishi Colt Ralliart. Manual — part 496

AC402179
AC506025
AC402180
A
A
B
B
B
B
6
6
6
12
12
12
AC
NOTE
: Clip positions
Clip
Section A – A
Section B – B
Damper removal step
1. Damper
Hood latch and hood lock release
cable removal steps
•
Front bumper assembly (Refer to
GROUP 51, Front Bumper and
Radiator Grille
<Except for
RALLIART Version-R>,
<RALLIART Version-R>).
2. Hood latch cover <RALLIART
Version-R>
3. Hood latch
4. Hood lock release handle
•
Splash shield (Refer to
).
5. Hood lock release cable
Hood removal steps
6. Hood insulator <5M/T>
7. Hood weatherstrip
8. Hood weatherstrip front
9. Hood weatherstrip rear
10. Hood air inlet duct plate <RALLIART
Version-R>
11. Hood air outlet garnish <RALLIART
Version-R>
•
Washer hose, Washer nozzle (Refer
to GROUP 51, Windshield Washer
).
12. Hood
13. Hood support rod
•
Front deck garnish (Refer to GROUP
51,Windshield Wiper
).
14. Hood hinge
HOOD
BODY
42-6
Main
Index
Group
TOC
FENDER
BODY
42-7
FENDER
SPECIAL TOOL
M1421000600375
Tool
Number
Name
Use
MB990784
MB990784
Ornament remover
Side turn-signal lamp removal
FENDER
REMOVAL AND INSTALLATION
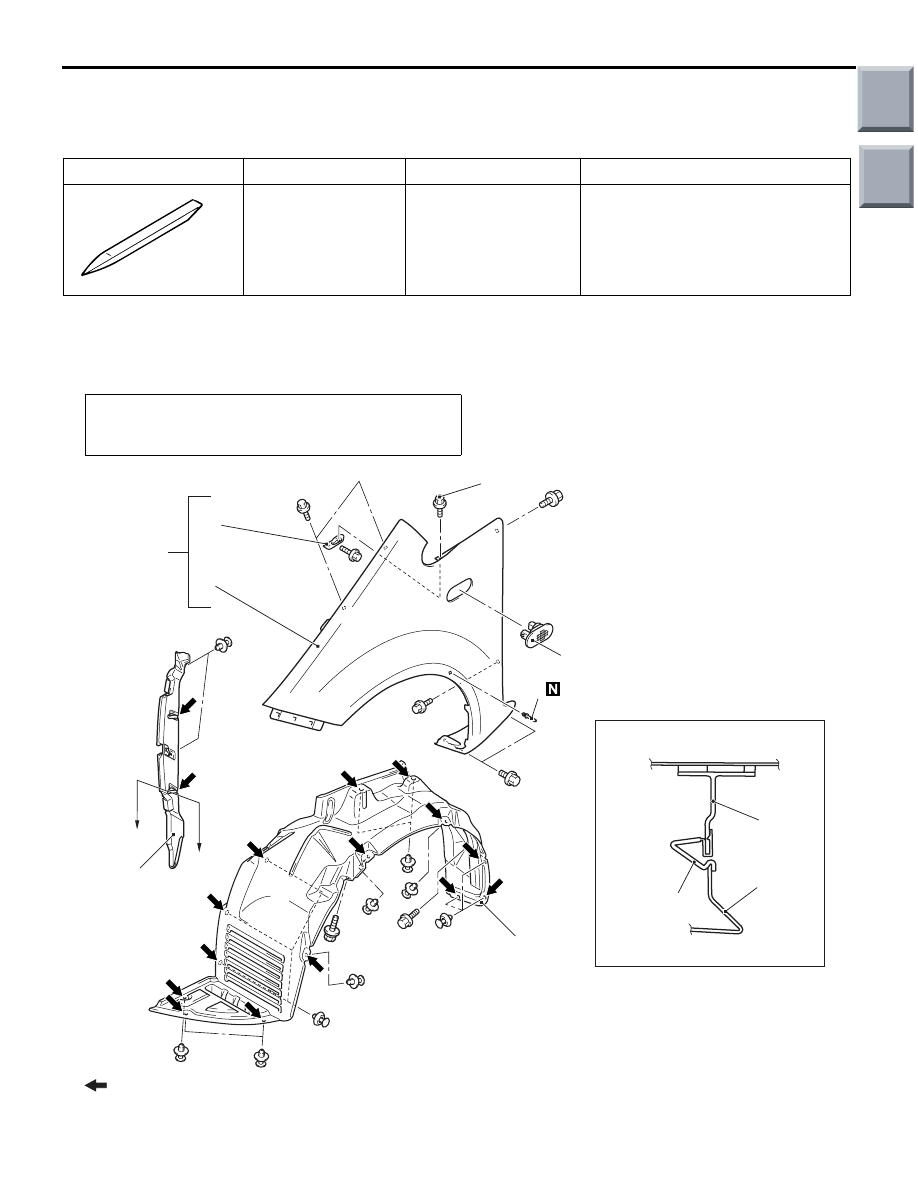
M1421001900971
Pre-removal Operation
• Overfender Removal <Vehicles with overfender> (Refer to
GROUP 51, Overfender
AC601318
1
2
2
3
5
6
7
8
8
AC
A
A
4
NOTE
: Clip positions
Clip
Section A – A
Main
Index
Group
TOC

Splash shield removal step
1. Splash shield
Fender removal steps
1. Splash shield
2. Fender rear protector
•
Front deck garnish (Refer to GROUP
51, Windshield Wiper
).
•
Front side bracket (Refer to GROUP
51, Front Bumper and Radiator Grille
Version-R>,
Version-R>.)
•
Headlamp assembly (Refer to
GROUP 54A, Headlamp
).
•
Side air dam <Vehicles with side air
dam> (Refer to GROUP 51, Side Air
Dam
<Except for RALLIART
Version-R>,
<RALLIART
Version-R>.)
<<
A
>> >>
A
<< 3. Side turn signal lamp
<<
B
>> >>
B
<< 4. Rivet <Vehicles with RALLIART
Version-R>
5. Fender assembly
6. Fender bracket mounting bolt
7. fender bracket
8. Fender
FENDER
BODY
42-8
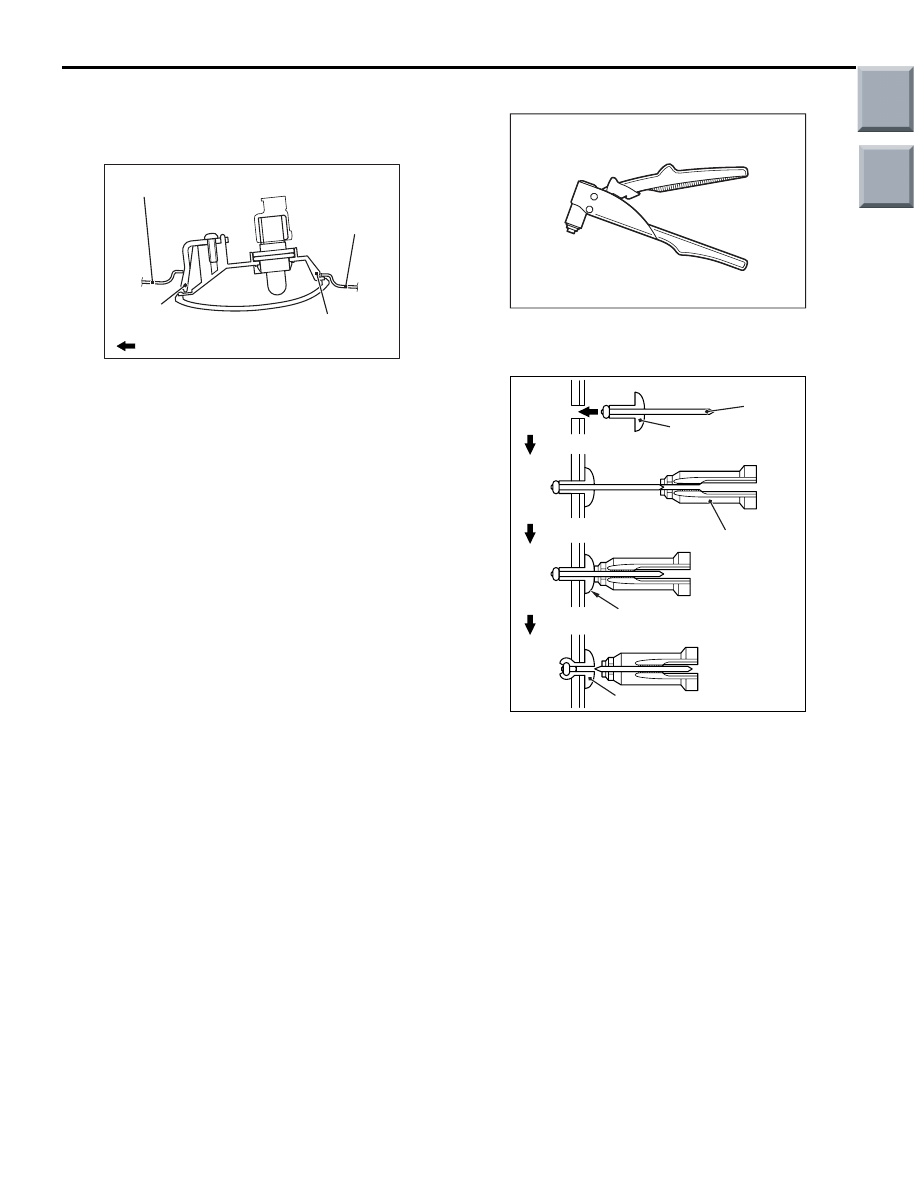
REMOVAL SERVICE POINT
<<A>> SIDE TURN -SIGNAL LAMP
REMOVAL
AC207528
Claw
Fender panel
AC
: Front of vehicle
MB990784
Section A – A
A
A
Hook
Side turn signal lamp
Insert the special tool Ornament Remover
(MB990784) as shown to compress the hook and
then disengage the claw. Then remove the side turn
signal lamp.
<<B>> RIVET REMOVAL
AC303663AH
Rivet
Drill
Upper frame to
front pillar brace
Use a drill (4.0 mm) to make a hole in the rivet to
break it, and then remove the rivet.
Fender removal steps (Continued)
Main
Index
Group
TOC
FENDER
BODY
42-9
INSTALLATION SERVICE POINT
>>A<< SIDE TURN -SIGNAL LAMP
INSTALLATION
AC207529
Hook
Fender panel
Claw
Fender panel
AC
: Front of vehicle
Engage the claw and then the hook into the fender
panel to install the side turn signal lamp.
>>B<< RIVET INSTALLATION
AC205819AB
Recommended tool
Use recommended tool shown in the illustration to
connect the rivet by the following procedure.
AC601325
AC
1
2
3
4
Section A
Flange
Rivet
Rivet
Recommended
tool
1. Insert the rivet into the base material (upper frame
to front pillar brace and front fender side bracket).
2. Place the recommended tool over section A of the
rivet.
3. While pushing the flange surface of the rivet with
the recommended tool, press the handle of the
tool.
4. The thin part of section A of the rivet will break
and the rivet will then be attached.
Main
Index
Group
TOC
Нет комментариевНе стесняйтесь поделиться с нами вашим ценным мнением.
Текст