Mitsubishi Colt Ralliart. Manual — part 584

AIR BAG MODULE AND SEAT BELT PRE-TENSIONER DISPOSAL PROCEDURES
SUPPLEMENTAL RESTRAINT SYSTEM (SRS)
52B-174
5. Cut the inflator and the air bag with a cutter.
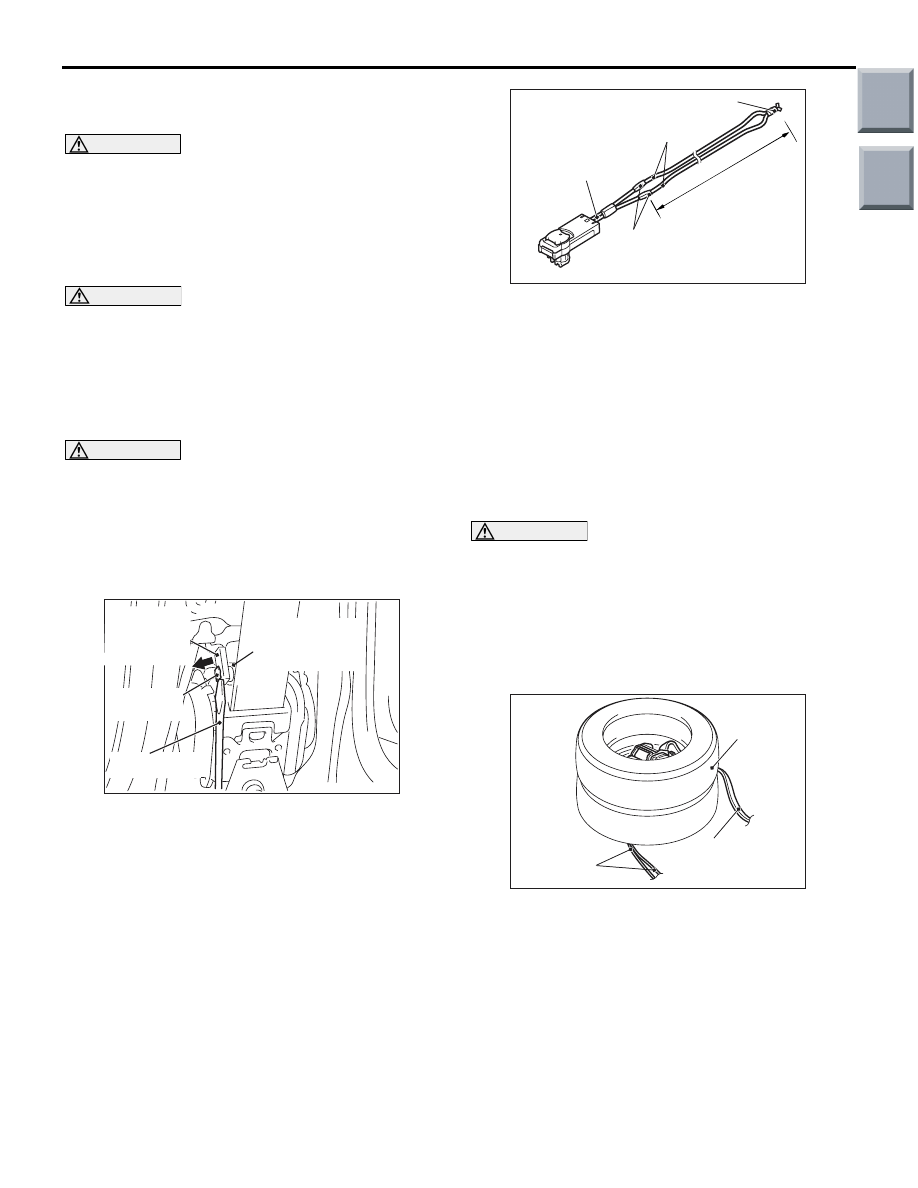
6. Connect deployment wires longer than 6 m to
each special tool SRS air bag adapter harness
(MB991885) and insulate the connections with
insulator tape. Also, connect the deployment
wires in the other ends to short, thereby
preventing the curtain air bag from accidental
deployment caused by static etc.
7. Feed a thick wire through the bracket of the
inflator, and connect it to an old tyre with a wheel.
8. Connect the SRS air bag adapter harness
(MB991885) to the inflator connector.
9. Place three old tyres without wheels on top of the
tyre secured to the air bag module, and secure all
tyres together with ropes (four locations).
WARNING
•
Before deployment, check carefully to be
sure that no one is nearby.
•
The inflator will be quite hot immediately
following the deployment, so wait at least
30 minutes to allow it to cool before
attempting to handle it. Although not poi-
sonous, do not inhale gas from air bag
deployment. See Deployed Air Bag Mod-
ule and Operated Seat Belt Pre-tensioner
Disposal (Refer to
) for
post-deployment handling instructions.
•
If the air bag fails to deploy, do not go
near the module. Contact your distributor.
10.At a location as far away from the air bag module
as possible, and from a shielded position,
disconnect the two connected wires from each
other, and connect them to the two terminals of
the battery (which has been removed from the
vehicle) to deploy the air bag.
11.Discard the deployed inflator as specified in
Deployed Air Bag Module and Operated Seat Belt
Pre-tensioner Disposal (Refer to
AC208386AC
Inflator
Air bag
AC300447
AC
Connection
Deployment wires
MB991885
Insulator tape
6 m or longer
AC208387AC
Inflator
Wire
Old tyre
without wheel
MB991885
AC300521
Tyres without wheels
Deployment wires
AB
AC300522
Deployment wires
AB
Main
Index
Group
TOC
AIR BAG MODULE AND SEAT BELT PRE-TENSIONER DISPOSAL PROCEDURES
SUPPLEMENTAL RESTRAINT SYSTEM (SRS)
52B-175
DEPLOYMENT OUTSIDE THE VEHICLE
<SEAT BELT PRE-TENSIONER>
WARNING
•
This should be carried out in a wide, flat
area at least 6 m away from obstacles and
other people.
•
Do not operate outside if wind is high.
Even in a soft wind, ignite to windward of
the seat belt pre-tensioner.
DANGER
Wait at least 60 seconds after disconnecting
the battery cables before doing any further
work (Refer to
1. Disconnect the negative and positive battery
cables from the battery terminals, and then
remove the battery from the vehicle.
WARNING
Store the operated seat belt pre-tensioner
the correct way up with its operation surface
upper most on a flat surface. Do not place
anything on top of them.
2. Remove the seat belt pre-tensioner from the
vehicle (Refer to
).
3. Use a flat-tipped screwdriver to pull out forward
and unlock the locking button of the harness-side
connector (2-pin, black).
4. Disconnect the C-20 or C-28 harness side
connector.
5. Connect deployment wires longer than 6 m to
each special tool SRS air bag adapter harness
(MB991885) and insulate the connections with
insulator tape. Also, connect the deployment
wires in the other ends to short, thereby
preventing the seat belt pre-tensioner from
accidental deployment caused by static etc.
6. Connect the special tool SRS air bag adapter
harness (MB991885), which the deployment wires
is attached to, to the seat belt pre-tensioner
connector.
CAUTION
The adapter harness below the wheel should be
loose. If it is too tight, the reaction when the seat
belt pre-tensioner operates could damage the
adapter harness.
7. Pass the thick wires through the hole on the seat
belt pre-tensioner bracket and secure them to the
front (raised part) of the wheel on two place.
8. Pull the seat belt out the outside of the tyre, and
then place one tyre without a wheel inside on top
of the existing tyre.
AC208430AG
Locking
button
Flat-tipped
screwdriver
C-20 or C-28
Harness side
connector
(2-pin, black)
C-20 or C-28
Seat belt
pre-tensioner
connector (2-pin)
AC300447
AC
Connection
Deployment wires
MB991885
Insulator tape
6 m or longer
AC300552 AC
Tyre
without
wheel
Seat belt
Deployment
wires
Main
Index
Group
TOC

AIR BAG MODULE AND SEAT BELT PRE-TENSIONER DISPOSAL PROCEDURES
SUPPLEMENTAL RESTRAINT SYSTEM (SRS)
52B-176
WARNING
•
Before operation, check carefully to be
sure that no one is nearby.
•
The inflator will be quite hot immediately
following the operation, so wait at least 30
minutes to allow it to cool before attempt-
ing to handle it. Although not poisonous,
do not inhale gas from seat belt pre-ten-
sioner operation. See Deployed Air Bag
Module and Operated Seat Belt pre-ten-
sioner Disposal (Refer to
) for
post-operation handling instructions.
•
If the seat belt pre-tensioner fails to oper-
ate, do not go near the seat belt pre-ten-
sioner. Contact your distributor.
9. At a location as far away from the air bag module
as possible, and from a shielded position,
disconnect the two connected wires from each
other, and connect them to the two terminals of
the battery (which has been removed from the
vehicle) to operated seat belt pre-tensioner.
10.Discard the operated seat belt pre-tensioner as
specified in Deployed Air Bag Module and Seat
Belt pre-tensioner Disposal (Refer to
DEPLOYED AIR BAG MODULE AND
OPERATED SEAT BELT PRE-TEN-
SIONER DISPOSAL
After deployment and operation, the air bag module
and seat belt pre-tensioner should be disposed of in
the same manner as any other scrap parts, adhering
to local laws and/or legislation. Observe the following
precautions during air bag or seat belt pre-tensioner
disposal:
1. The inflator will be quite hot immediately following
deployment, so wait at least 30 minutes to allow it
cool before attempting to handle it.
2. Do not put water or oil on the air bag after
deployment or on the seat belt pre-tensioner after
operation.
WARNING
If after following these precautions, any
material does get into the eyes or on the
skin, immediately rinse the affected area with
a large amount of clean water. If any irritation
develops, seek medical attention.
3. There may be material on the deployed air bag
module or the operated seat belt pre-tensioner,
that could irritate the eye and/or skin. Wear gloves
and safety glasses when handling a deployed air
bag module or the operated seat belt
pre-tensioner.
4. Tightly seal the air bag module and seat belt
pre-tensioner in a strong plastic bag for disposal.
5. Be sure to always wash your hands after
completing this operation.
AC300555 AC
Deployment wires
Vehicle battery
AC300562 AB
Air bag module
Strong plastic bag
Main
Index
Group
TOC
GROUP 51
EXTERIOR
CONTENTS
FRONT BUMPER ASSEMBLY AND
RADIATOR GRILLE. . . . . . . . . . . . . .
ADHESIVE . . . . . . . . . . . . . . . . . . . . . . . . .
REMOVAL AND INSTALLATION . . . . . . . .
DISASSEMBLY AND REASSEMBLY. . . . .
REAR BUMPER ASSEMBLY . . . . . .
REMOVAL AND INSTALLATION . . . . . . . .
OVERFENDER
<RALLIART Version-R> . . . . . . . . . .
ADHESIVE . . . . . . . . . . . . . . . . . . . . . . . . .
REMOVAL AND INSTALLATION . . . . . . . .
MOULDINGS . . . . . . . . . . . . . . . . . . .
SPECIAL TOOL . . . . . . . . . . . . . . . . . . . . .
MOULDINGS . . . . . . . . . . . . . . . . . . . . . . .
REMOVAL AND INSTALLATION . . . . . . . .
DOOR SASH TAPE . . . . . . . . . . . . . .
SPECIAL TOOL . . . . . . . . . . . . . . . . . . . . .
DOOR SASH TAPE . . . . . . . . . . . . . . . . . .
REMOVAL AND INSTALLATION . . . . . . . .
SIDE AIR DAM . . . . . . . . . . . . . . . . . .
ADHESIVE . . . . . . . . . . . . . . . . . . . . . . . . .
SIDE AIR DAM . . . . . . . . . . . . . . . . . . . . . .
REMOVAL AND INSTALLATION
<EXCEPT RALLIART Version-R> . . . . . . .
REMOVAL AND INSTALLATION
<RALLIART Version-R> . . . . . . . . . . . . . . .
GARNISHES
<RALLIART Version-R>. . . . . . . . . .
ADHESIVE . . . . . . . . . . . . . . . . . . . . . . . . .
REMOVAL AND INSTALLATION
<RALLIART VERSION-R> . . . . . . . . . . . . .
TAILGATE SPOILER . . . . . . . . . . . . .
ADHESIVE . . . . . . . . . . . . . . . . . . . . . . . . .
REMOVAL AND INSTALLATION . . . . . . . .
WINDSHIELD WIPER AND
WASHER. . . . . . . . . . . . . . . . . . . . . . .
SERVICE SPECIFICATION . . . . . . . . . . . .
TROUBLESHOOTING . . . . . . . . . . . . . . . .
ON-VEHICLE SERVICE . . . . . . . . . . . . . . .
WINDSHIELD WIPER . . . . . . . . . . . . . . . . .
REMOVAL AND INSTALLATION . . . . . . . .
INSPECTION. . . . . . . . . . . . . . . . . . . . . . . .
WINDSHIELD WASHER . . . . . . . . . . . . . . .
REMOVAL AND INSTALLATION . . . . . . . .
INSPECTION. . . . . . . . . . . . . . . . . . . . . . . .
REAR WIPER AND WASHER . . . . . .
TROUBLESHOOTING . . . . . . . . . . . . . . . .
ON-VEHICLE SERVICE . . . . . . . . . . . . . . .
REAR WIPER AND WASHER . . . . . . . . . .
REMOVAL AND INSTALLATION . . . . . . . .
INSPECTION. . . . . . . . . . . . . . . . . . . . . . . .
MARK . . . . . . . . . . . . . . . . . . . . . . . . .
REMOVAL AND INSTALLATION . . . . . . . .
DOOR MIRROR . . . . . . . . . . . . . . . . .
TROUBLESHOOTING . . . . . . . . . . . . . . . .
DOOR MIRROR . . . . . . . . . . . . . . . . . . . . .
REMOVAL AND INSTALLATION . . . . . . . .
INSPECTION. . . . . . . . . . . . . . . . . . . . . . . .
Main
Index
Нет комментариевНе стесняйтесь поделиться с нами вашим ценным мнением.
Текст