Mitsubishi Colt Ralliart. Manual — part 592

Wiper blade assembly removal
steps
1.
Wiper blade assembly
>>
A
<<
2.
Wiper blade
Windshield wiper motor removal
steps
>>
B
<<
3.
Wiper arm and blade assembly
4.
Hood weather strip
5.
Front deck garnish
6.
Windshield wiper motor and link
assembly
7.
Windshield wiper link
<<
A
>>
8.
Windshield wiper motor
WINDSHIELD WIPER AND WASHER
EXTERIOR
51-30
NOTE: For removal and installation of the wiper and
washer switch, refer to GROUP 54A, Column switch
REMOVAL SERVICE POINT
<<A>> WINDSHIELD WIPER MOTOR
REMOVAL
1. Remove the windshield wiper motor mounting
bolts.
CAUTION
Don't remove the crank arm of the windshield
wiper motor if not necessary, because it is
installed to the motor body to the specified
auto-stop angle. If it is necessary to remove the
crank arm, make the mating marks on the crank
arm and the motor body.
AC207096
AB
Wiper motor
Wiper link
assembly
Flat-tipped
screwdriver
2. Disconnect the crank arm of the windshield wiper
motor and the windshield wiper link assembly with
a flat-tipped screwdriver, and then remove the
windshield wiper motor.
INSTALLATION SERVICE POINT
>>A<< WIPER BLADE INSTALLATION
AC101090
AE
A
A
Wiper blade
Backing
Backing
Section A – A
Wiper
blade
Backing
CAUTION
Ensure that the backings are bent in the shown
direction, and then install the backings to the
wiper blade.
>>B<< WIPER BLADE ASSEMBLY
INSTALLATION
AC207110
40 ± 5 mm
25 ± 5 mm
AB
Wiper arm and
blade assembly (LH)
Front deck
garnish terminal
Wiper arm and
blade assembly (RH)
Install the wiper arm and blade assembly so that its
tip is positioned as shown.
Windshield wiper motor removal
steps (Continued)
Main
Index
Group
TOC

WINDSHIELD WIPER AND WASHER
EXTERIOR
51-31
INSPECTION
M1511019101032
WINDSHIELD WIPER MOTOR CHECK
OPERATION CHECK OF THE WIND-
SHIELD WIPER MOTOR WHEN IT IS
WORKING AT LOW OR HIGH SPEED
1
4
2 3
5
1
4
2 3
5
1
4
2 3
5
AC208222
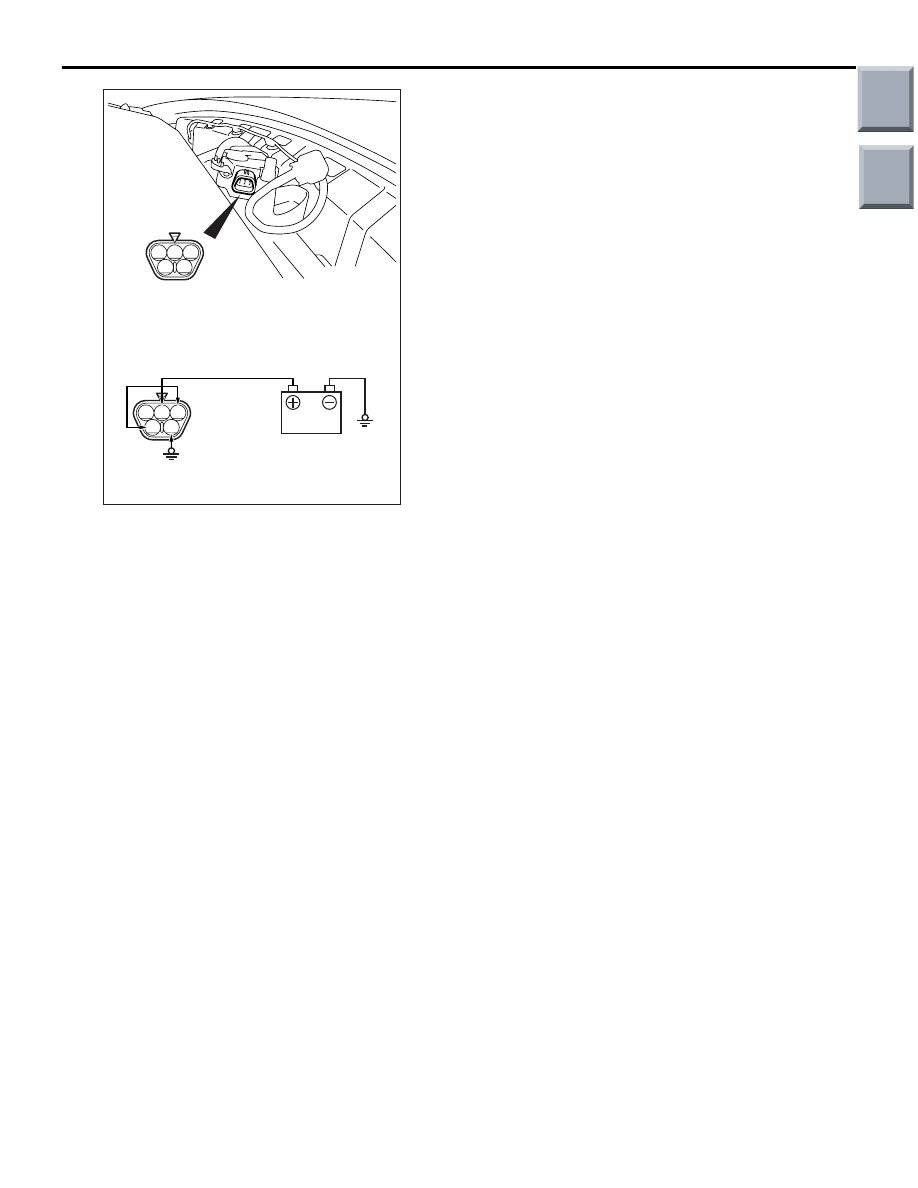
1. Connect the positive battery terminal to
windshield wiper motor connector terminal No.4
as shown. Check the low-speed operation of the
motor by earthing windshield wiper motor
connector terminal No.5.
2. Connect the positive battery terminal to
windshield wiper motor connector terminal No.1
as shown. Check the high-speed operation of the
motor by earthing windshield wiper motor
connector terminal No.5.
CHECK OF STOP POSITION OF THE
WINDSHIELD WIPER MOTOR
Prior to this check, ensure that there is no excessive
play at the windshield wiper link.
1
4
2 3
5
1
4
2 3
5
AC208257
1. Connect the positive battery terminal to
windshield wiper motor connector terminal No.4
as shown. Operate the motor at low speed by
earthing the motor.
2. Disconnect the battery cable from motor
connector terminal No.4. The motor should stop.
Main
Index
Group
TOC
1
4
2 3
5
1
4
2 3
5
AC208258
WINDSHIELD WIPER AND WASHER
EXTERIOR
51-32
3. Connect the positive battery terminal to motor
connector terminal No.2 as shown.
4. Connect motor connector terminal No.3 to No.4
as shown.
5. Check to see that the motor runs at low speed
and then stops at the automatic stop position.
WINDSHIELD WIPER SWITCH CHECK
Check the input signals (mist, intermittent, low speed
and high speed) from the windshield wiper switch.
(Refer to GROUP 54B, Troubleshooting
or
GROUP 54C, Troubleshooting
Main
Index
Group
TOC

WINDSHIELD WIPER AND WASHER
EXTERIOR
51-33
WINDSHIELD WASHER
REMOVAL AND INSTALLATION
M1511008200690
AC403712
AC402056
2
1
5.0 ± 1.0 N·m
5.0 ± 1.0 N·m
1
1
6
4
7
8
5
2
2
3
A
A
AC
Claw
Claw
Section A – A
Windshield washer nozzle
removal steps
•
Hood insulator
1.
Windshield washer nozzle
2.
Front washer hose
Washer tank removal steps
•
Headlamp assembly mounting clips
•
Washer motor connector
connection
•
Windshield washer hose
connection
3.
Rear washer hose connection
4.
Washer tank assembly
5.
Washer tank
6.
Cap
Washer motor removal steps
•
Splash shield mounting clips
•
Washer motor connector
connection
•
Windshield washer hose connector
connection
•
Rear washer hose connector
connection
<<
A
>>
7.
Washer motor
8.
Gasket
Washer tank removal steps
Main
Index
Group
TOC
Нет комментариевНе стесняйтесь поделиться с нами вашим ценным мнением.
Текст