Mitsubishi Colt Ralliart. Manual — part 500
WINDOW GLASS
BODY
42-22
REMOVAL SERVICE POINT
<<A>>DELTA WINDOW GLASS ASSEM-
BLY REMOVAL
1. In order to protect the body (paint surface), apply
protective tape to all body areas around the
installed delta window glass.
AC303408AE
Protective tape
2. Stick adhesive tape to avoid the delta window
glass from dropping.
3. Using a sharp-point drill, make hole in the delta
window glass adhesive.
CAUTION
Do not let the piano wire touch the edge of the
delta window glass.
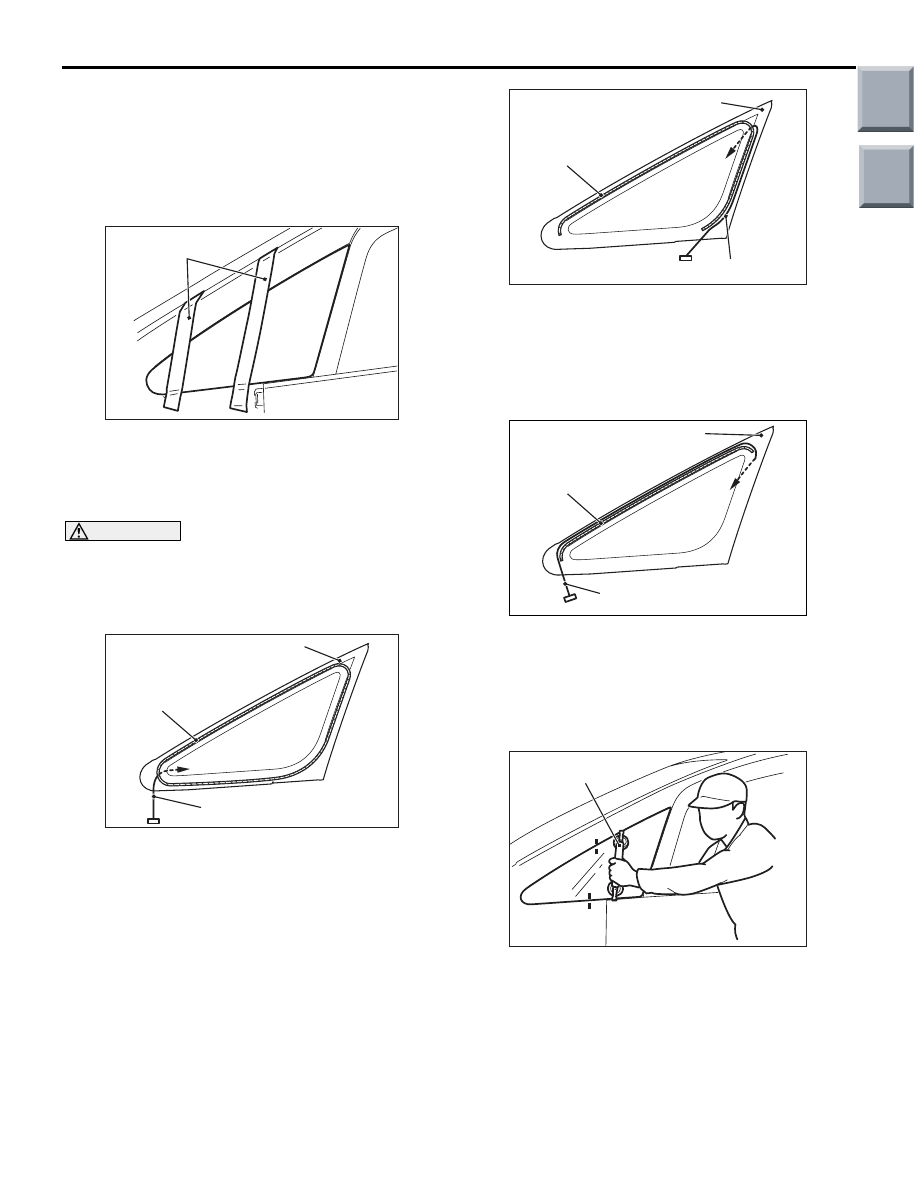
4. Cut off the delta window glass adhesive according
to the procedure below.
AC303409AC
Seal line
Delta window
glass assemble
Piano wire
(1) To remove the adhesive from the bottom of the
delta window glass, feed a piano wire into the
passenger compartment through the hole, and
then cut off the adhesive by pulling the piano
wire alternately from the inside and outside of
the vehicle.
AC303410 AC
Seal line
Delta window
glass assembly
Piano wire
(2) To remove the adhesive from the rear of the
delta window glass, feed a piano wire into the
passenger compartment through the hole, and
then cut off the adhesive by pulling the piano
wire alternately from the inside and outside of
the vehicle.
AC303411AC
Seal line
Delta window
glass assembly
Piano wire
(3) To remove the adhesive from the front of the
delta window glass, feed a piano wire into the
passenger compartment through the hole, and
then cut off the adhesive by pulling the piano
wire alternately from the inside and outside of
the vehicle.
AC303412 AC
MB990480
5. Make mating marks on the delta window glass
and body, and use the special tool (window glass
holder, MB990480) to remove the delta window
glass.
Main
Index
Group
TOC

ACX00476 AB
WINDOW GLASS
BODY
42-23
CAUTION
• Be careful not to remove more adhesive than
is necessary.
• Be careful also not to damage the paintwork
on the body surface with the knife. If the
paintwork is damaged, repair the damaged
area with repair paint or anti-rust agent.
6. Use a knife to cut away the remaining adhesive so
that the thickness is within 2 mm around the entire
circumference of the body flange.
7. Finish the flange surfaces so that they are
smooth.
8. If the delta window glass is reused, scrape away
all traces of old adhesive from the glass.
INSTALLATION SERVICE POINT
>>A<<FASTENER INSTALLATION
AC207281AC
Attach the faster
in line with the
convexes.
Convex on the
body flange
Fastener
1. Install the fasteners to the specified positions on
the body flange.
2. Install the fasteners to the delta window glass at
the positions which correspond to the fasteners
on the body flange.
>>B<<GASKET/CLIP/DELTA WINDOW
GLASS ASSEMBLY INSTALLATION
1. If the delta window glass is reused, follow the
procedure below.
CAUTION
Do not forget gasket.
(1) Fit clips into body.
AC103606 AC
Cut off these convex parts
(2) Cut away clip fitting convex on quarter window
glass.
NOTE: Convex gets broken when quarter win-
dow glass is removed.
CAUTION
Leave the degreased parts for 3 or more minutes
to dry well, before starting on the next step. Do
not touch the degreased parts.
2. Use isopropyl alcohol to degrease the inside and
outside of the delta window glass and the body
flanges.
3. Apply the primer and adhesive.
4. Install the delta window glass by the same
procedure as for the windshield (Refer to
Main
Index
Group
TOC

WINDOW GLASS
BODY
42-24
QUARTER WINDOW GLASS
REMOVAL AND INSTALLATION
M1422002500593
Pre-removal and Post-installation Operation
• Quarter Trim Upper Removal and Installation (Refer to
).
AC207279 AC
N
1
2
3
4
1
1
1
B
B
C
C
A
A
Section B – B
Section C – C
Units: mm
N
15
12
15
12
15
12
N
Apply the primer and adhesive along the fictitious
lines (seal line) between each of the marks.
Section A – A
Ceramic line
Seal line
Mark
Centre of
seal line
Primer
Primer
Centre of
seal line
Centre of
seal line
Primer
Adhesive: 3M ATD Part No. 8609 Super Fast Urethane Auto Glass Sealant or equivalent and
3M ATD Part No. 8608 Super Fast Urethane Primer or equivalent
Removal steps
<<
A
>> >>
B
<< 1. Quarter window glass
>>
B
<< 2. Clip
>>
B
<< 3. Gasket
>>
A
<< 4. Fastener
Removal steps (Continued)
Main
Index
Group
TOC

WINDOW GLASS
BODY
42-25
REMOVAL SERVICE POINT
<<A>> QUARTER WINDOW GLASS
REMOVAL
1. In order to protect the body (paint surface), apply
protective tape to all body areas around the
installed quarter window glass.
AC207284
Protective tape
AD
2. Apply adhesive tape to protect the quarter window
glass.
AC002060
3. Use glass adhesive knife to cut away adhesive.
AC206381AD
Glass adhesive knife
CAUTION
Inserting the adhesive knife too deeply into wind-
shield adhesive may damage quarter window
glass.
4. Working inside the vehicle, insert the tip of a
windshield knife into the sealed part of the quarter
window glass.
5. Keep the glass adhesive knife at right angles with
body flange (from inside the vehicle), and put the
blade at body flange. Then cut away adhesive
along the body flange.
AC208808
AB
Piano wire
Clips
Seal line
6. Separate the clips by using a piano wire.
AC207285 AC
MB990480
7. Make mating marks on the quarter window glass
and body.
8. Use special tool window glass holder (MB990480)
to remove the quarter window glass.
Main
Index
Group
TOC
Нет комментариевНе стесняйтесь поделиться с нами вашим ценным мнением.
Текст