Honda Accord Hybrid (2022 year). Manual in english — page 32
511
uu
Braking
u
Brake Assist System
Driving
Brake Assist System
Designed to assist the driver by generating greater braking force when you depress
the brake pedal hard during emergency braking.
■
Brake assist system operation
Press the brake pedal firmly for more powerful braking.
When brake assist operates, the pedal may wiggle slightly and an operating noise
may be heard. This is normal. Keep holding the brake pedal firmly down.
512
Driving
Parking Your Vehicle
When Stopped
1.
Depress the brake pedal firmly.
2.
With the brake pedal depressed, pull up the electric parking brake switch slowly,
but fully.
3.
Change the shift position to
(
P
.
4.
Turn off the power system.
u
The parking brake and brake system indicator (red) goes off in about 30
seconds.
1
Do not park your vehicle near flammable objects,
such as dry grass, oil, or timber.
Heat from the exhaust can cause a fire.
3
WARNING
The vehicle can roll away if left unattended
without confirming that Park is engaged.
A vehicle that rolls away could cause a crash
resulting in serious injury or death.
Always keep your foot on the brake pedal
until you have confirmed that
(
P
is shown
on the shift position indicator.
1
NOTICE
The following can damage the driveline:
•
Depressing the accelerator and brake pedals
simultaneously.
•
Changing into
(
P
before the vehicle stops
completely.
When facing uphill, do not hold the vehicle by
depressing the accelerator pedal.
Doing so may cause the power system to overheat
and fail.
513
uu
Parking Your Vehicle
u
When Stopped
Driving
Always set the parking brake, in particular if you are parked on an incline.
1
In extremely cold temperatures, the parking brake
may freeze up if applied. If such temperatures are
expected, do not apply the parking brake but, if
parking on a slope, either turn the front wheels so
they will contact the curb if the vehicle rolls down the
slope or block the wheels to keep the vehicle from
moving. If you do not take either precaution, the
vehicle may roll unexpectedly, leading to a crash.

514
uu
Parking Your Vehicle
u
Parking Sensor System
*
Driving
Parking Sensor System
*
The corner and center sensors monitor obstacles around your vehicle, and the
beeper, driver information interface and audio/information screen let you know the
approximate distance between your vehicle and the obstacle.
■
The sensor location and range
1
Even when the system is on, always confirm if there is
no obstacle near your vehicle before parking.
The system may not work properly when:
•
The sensors are covered with snow, ice, mud, or
dirt.
•
The vehicle is on uneven surface, such as grass,
bumps, or a hill.
•
The vehicle has been out in hot or cold weather.
•
The system is affected by devices that emit
ultrasonic waves.
•
Driving in bad weather.
The system may not sense:
•
Thin or low objects.
•
Sonic-absorptive materials, such as snow, cotton,
or sponge.
•
Objects directly under the bumper.
Do not put any accessories on or around the sensors.
Within about 24 in (60 cm) or less
Front Corner Sensors
Rear Corner Sensors
Front
*
: Within about 39 in (100 cm) or less
Rear: Within about 43 in (110 cm) or less
Rear Center Sensors
Front Center Sensors
*
* Not available on all models
Continued
515
uu
Parking Your Vehicle
u
Parking Sensor System
*
Driving
■
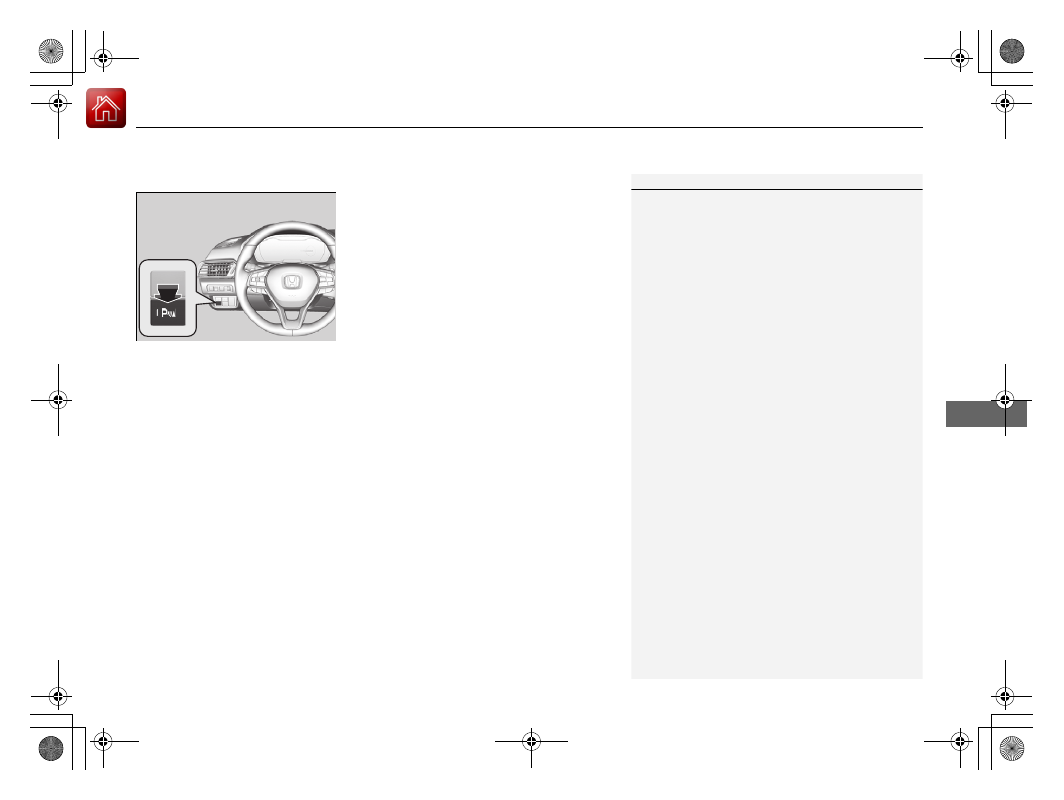
Parking sensor system on and off
With the power mode in ON, press the
parking sensor system button to turn on or off
the system. The indicator in the button comes
on when the system is on.
The front corner, rear corner and rear center
sensors start to detect an obstacle when the
transmission is in
(
R
, and the vehicle speed is
less than 5 mph (8 km/h).
The front center
*
and front corner sensors
start to detect an obstacle when the
transmission is in any position other than
(
P
,
and the vehicle speed is less than 5 mph (8
km/h).
1
When you set the power mode to ON, the system will
be in the previously selected condition.
* Not available on all models

uu
Parking Your Vehicle
u
Parking Sensor System
*
516
Driving
■
Screen Operation
You can switch between split view off and
split view on by touching the split screen tab.
1
The split screen tab disappears, and the split view
returns to the last camera view mode under the
following conditions:
•
If the parking sensor system is turned off.
•
If there is a malfunction in the system.
Split Screen
Tab
Split View Off
Split View On

517
uu
Parking Your Vehicle
u
Parking Sensor System
*
Continued
Driving
■
When the distance between your vehicle and obstacles behind becomes shorter
*1:At this stage, only the center sensors detect obstacles.
Interval between
beeps
Distance between the Bumper and Obstacle
Indicator
Audio/Information Screen
Driver Information Interface
Corner Sensors
Center Sensors
Moderate
—
Front
*
: About 39-24 in
(100-60 cm)
Rear: About 43-24 in
(110-60 cm)
Comes on in Yellow
*1
Short
About 24-18 in
(60-45 cm)
About 24-18 in
(60-45 cm)
Comes on in Amber
Very short
About 18-14 in
(45-35 cm)
About 18-14 in
(45-35 cm)
Continuous
About 14 in
(35 cm) or less
About 14 in
(35 cm) or less
Comes on in Red
Indicators light up where the
sensor detects an obstacle.
Indicators light up where the
sensor detects an obstacle.
Audio/information screen
Driver information interface
* Not available on all models
uu
Parking Your Vehicle
u
Parking Sensor System
*
518
Driving
1.
Make sure that the parking sensor system is not activated. Set the power mode to
VEHICLE OFF.
2.
Press and hold the parking sensor system button, and set the power mode to ON.
3.
Keep pressing the button for ten seconds. Release the button when the indicator
in the button blinks.
u
The beeper sounds once.
4.
Press the button again. The indicator in the button goes off.
u
The beeper sounds twice. The rear sensors are now turned off.
To turn the rear sensors on again, follow the above procedure. The beeper sounds
three times when the rear sensors come back on.
■
Turning off All Rear Sensors
1
When you put the transmission into
(
R
, the indicator
in the parking sensor system button blinks as a
reminder that the rear sensors have been turned off.
519
uu
Parking Your Vehicle
u
Cross Traffic Monitor
*
Continued
Driving
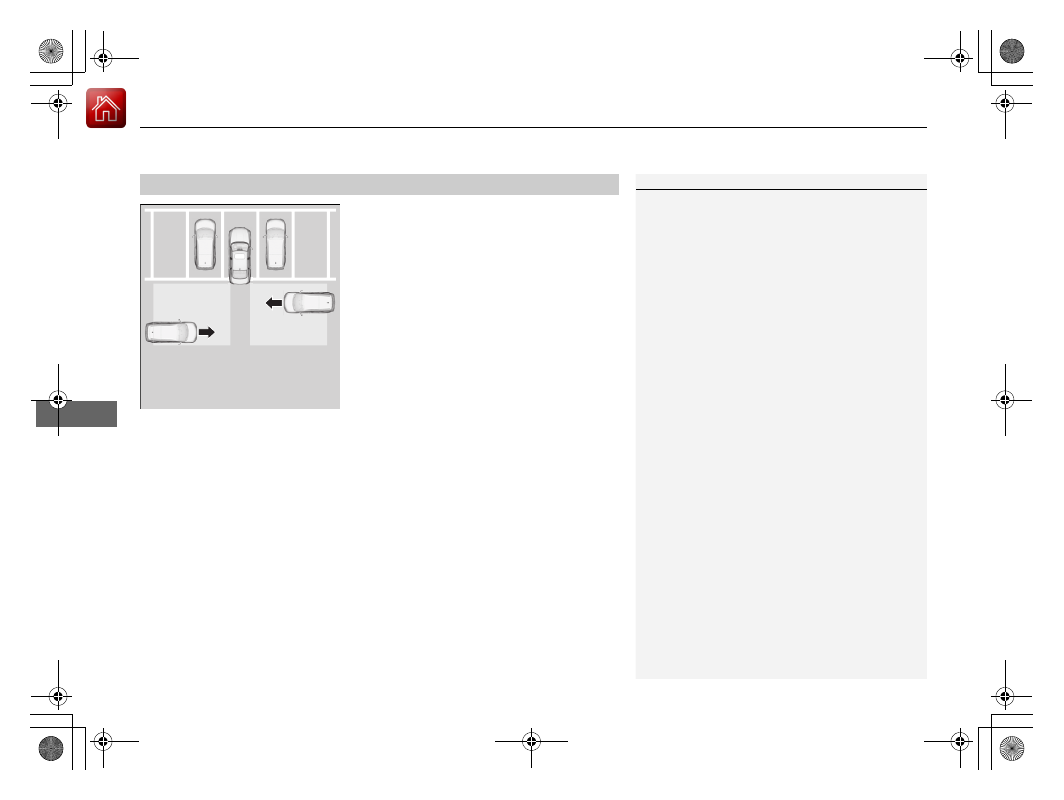
Cross Traffic Monitor
*
Monitors the rear corner areas using the radar sensors when reversing, and alerts
you if a vehicle approaching from a rear corner is detected.
The system is convenient when you are backing out of a parking space.
1
The parking sensor system’s alerting buzzer overrides
the Cross Traffic Monitor buzzer when the sensors
are detecting obstacles at the closest range.
3
CAUTION
Cross Traffic Monitor cannot detect all
approaching vehicles and may not detect
an approaching vehicle at all.
Failure to visually confirm that it is safe to
back up the vehicle before doing so may
result in a collision.
Do not solely rely on the system when
reversing; always also use your mirrors, and
look behind and to the sides of your vehicle
before reversing.
Models with parking sensor system
* Not available on all models
uu
Parking Your Vehicle
u
Cross Traffic Monitor
*
520
Driving
The system activates when:
•
The power mode is in ON.
•
The Cross Traffic Monitor system is turned
on.
2
Cross Traffic Monitor On and Off
P. 522
•
The transmission is in
(
R
.
•
Your vehicle is moving at 3 mph (5 km/h) or
lower.
When a vehicle is detected approaching from a rear corner, Cross Traffic Monitor
alerts you with a buzzer and a displayed warning.
The system will not detect a vehicle that approaches from directly behind your
vehicle, nor will it provide alerts about a detected vehicle when it moves directly
behind your vehicle.
The system does not provide alerts for a vehicle that is moving away from your
vehicle, and it may alert for pedestrians, bicycles, or stationary objects.
■
How the System Works
1
Cross Traffic Monitor may not detect or may delay
alerting an approaching vehicle, or may alert without
an approaching vehicle under the following
conditions:
•
An obstacle, such as another vehicle and a wall,
near your vehicle’s rear bumper, is blocking the
radar sensor’s scope.
•
Your vehicle is moving at the speed of about 3 mph
(5 km/h) or higher.
•
A vehicle is approaching at the speed other than
between about 6 mph (10 km/h) and 16 mph (25
km/h).
•
The system picks up external interference such as
other radar sensors from another vehicle or strong
radio wave transmitted from a facility nearby.
•
Either corner of the rear bumper is covered with
snow, ice, mud or dirt.
•
When there is bad weather.
•
Your vehicle is on an incline.
•
Your vehicle is tilted due to a heavy load in the rear.
•
Your vehicle is reversing towards a wall, a pole, a
vehicle, and so on.
The rear bumper or the sensors have been improperly
repaired or the rear bumper has been deformed.
Have your vehicle checked by a dealer.
For proper operation, always keep the rear bumper
corner area clean.
Do not cover the rear bumper corner area with labels
or stickers of any kind.
Radar sensors:
Underneath the rear bumper
corners
* Not available on all models
Continued
521
uu
Parking Your Vehicle
u
Cross Traffic Monitor
*
Driving
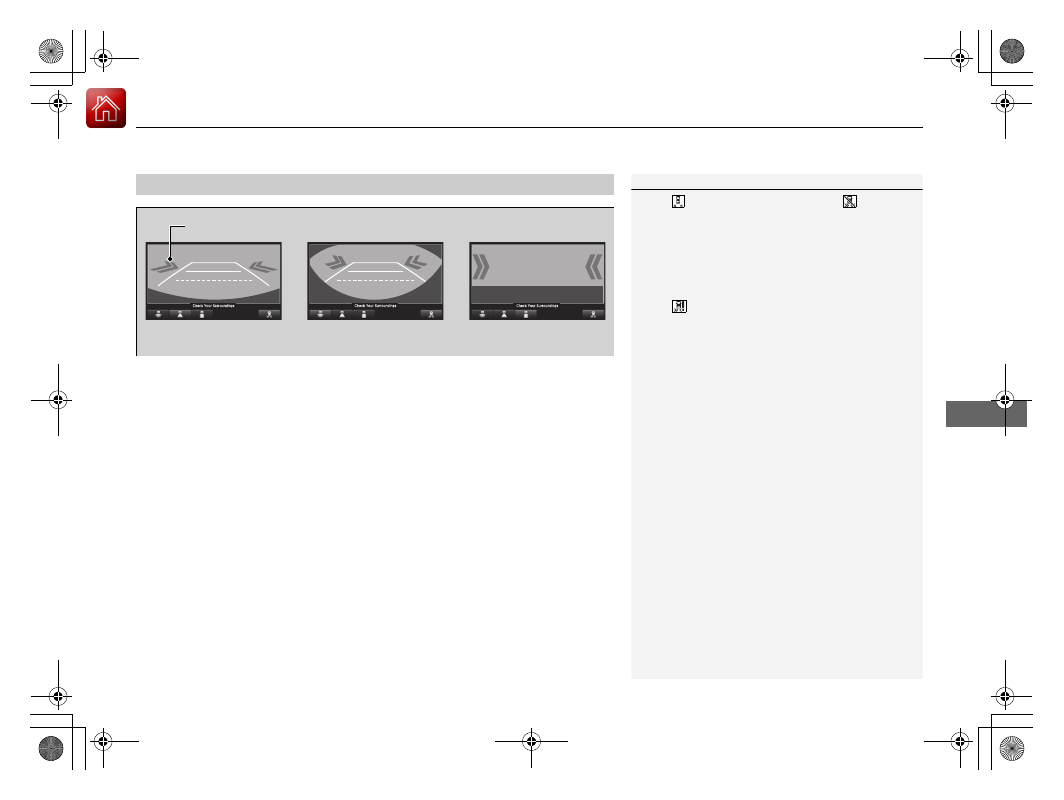
An arrow icon appears on the side a vehicle is approaching on the audio/information
screen.
■
When the System Detects a Vehicle
1
When the System Detects a Vehicle
If the
on the lower right changes to
in amber
when the transmission is in
(
R
, mud, snow or ice,
etc. may have accumulated in the vicinity of the
sensor. The system is temporarily canceled. Check the
bumper corners for any obstructions, and thoroughly
clean the area if necessary.
If the
comes on when the transmission is in
(
R
,
there may be a problem with the Cross Traffic
Monitor system. Do not use the system and have your
vehicle checked by a dealer.
If the display remains the same with the transmission
in
(
R
, there may be a problem with the rear camera
system and the Cross Traffic Monitor system.
Do not use the system and have your vehicle checked
by a dealer.
Wide View
Normal View
Arrow Icon
Top Down View
522
uu
Parking Your Vehicle
u
Cross Traffic Monitor
*
Driving
You can switch the system on and off using the audio/information screen.
1.
Press the
button.
2.
Select
Settings
.
3.
Select
Camera
.
4.
Select
Cross Traffic Monitor
.
5.
Select
ON
or
OFF
, then select
Save
.
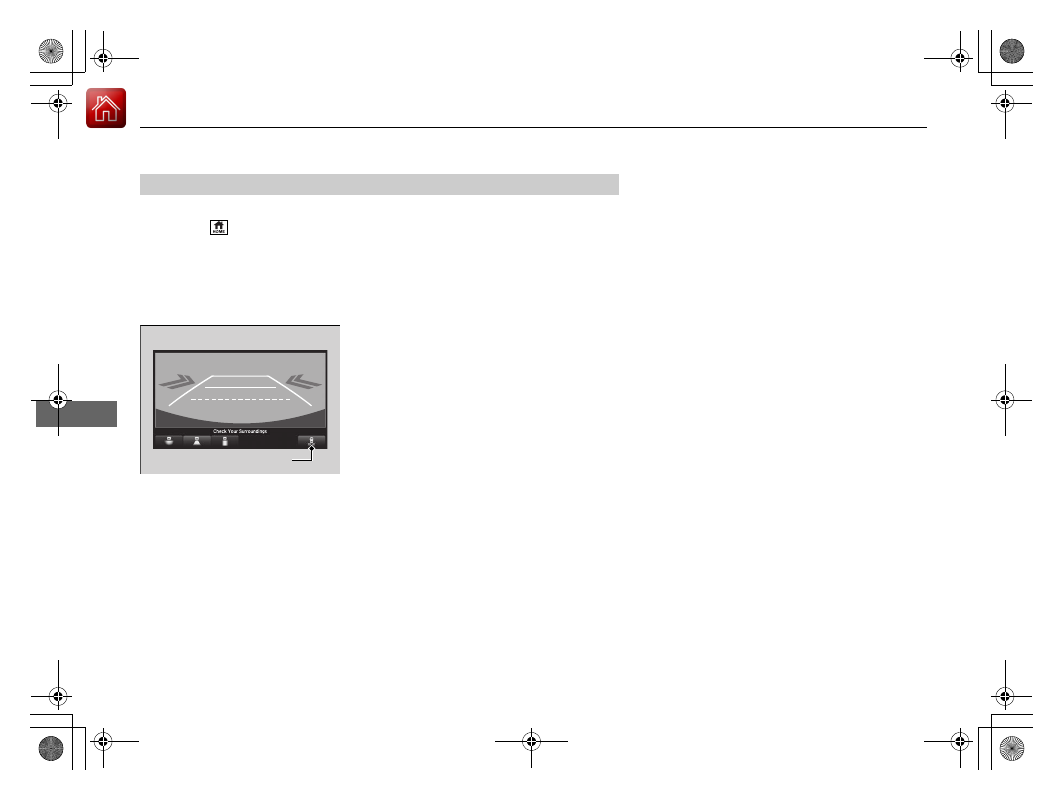
The system can also be turned on and off on
the audio/information screen by pressing the
Cross Traffic Monitor icon.
■
Cross Traffic Monitor On and Off
Cross Traffic Monitor Icon
523
Continued
Driving
Multi-View Rear Camera
About Your Multi-View Rear Camera
The audio/information screen can display your vehicle’s rear view. The display
automatically changes to the rear view when the transmission is put into
(
R
.
■
Multi-View Rear Camera Display Area
1
About Your Multi-View Rear Camera
The rear camera view is restricted. You cannot see
the corner ends of the bumper or what is underneath
the bumper. Its unique lens also makes objects
appear closer or farther than they actually are.
Visually confirm that it is safe to drive before backing
up. Certain conditions (such as weather, lighting, and
high temperatures) may also restrict the rear view. Do
not rely on the rearview display which does not give
you all information about conditions at the back of
your vehicle.
If the camera lens is covered with dirt or moisture,
use a soft, moist cloth to keep the lens clean and free
of debris.
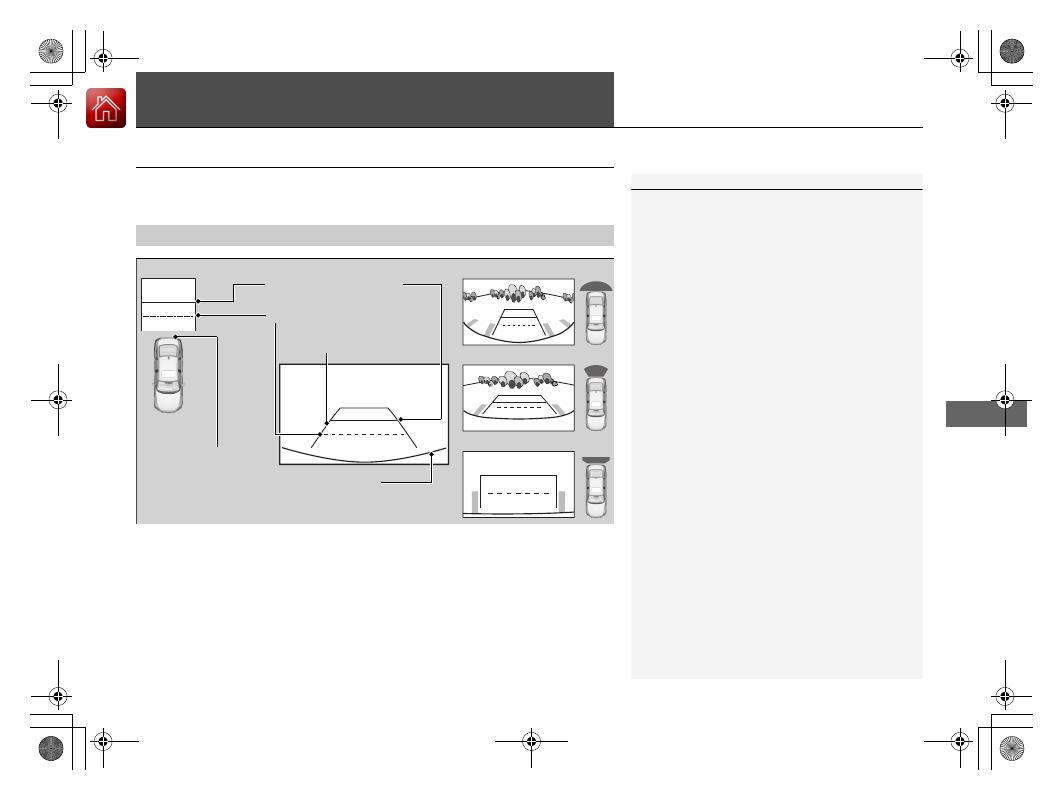
You can change the
Fixed Guideline
and
Dynamic
Guideline
settings.
2
P. 357
Fixed Guideline
ON
: Guidelines appear when you put the
transmission into
(
R
.
OFF
: Guidelines do not appear.
Dynamic Guideline
ON
: Guidelines move according to the steering wheel
direction.
OFF
: Guidelines do not move.
Top Down View Mode
Normal View Mode
Wide View Mode
Guidelines
Bumper
Camera
Approx. 20 inches (50 cm)
Approx. 39 inches (1 m)
524
uu
Multi-View Rear Camera
u
About Your Multi-View Rear Camera
Driving
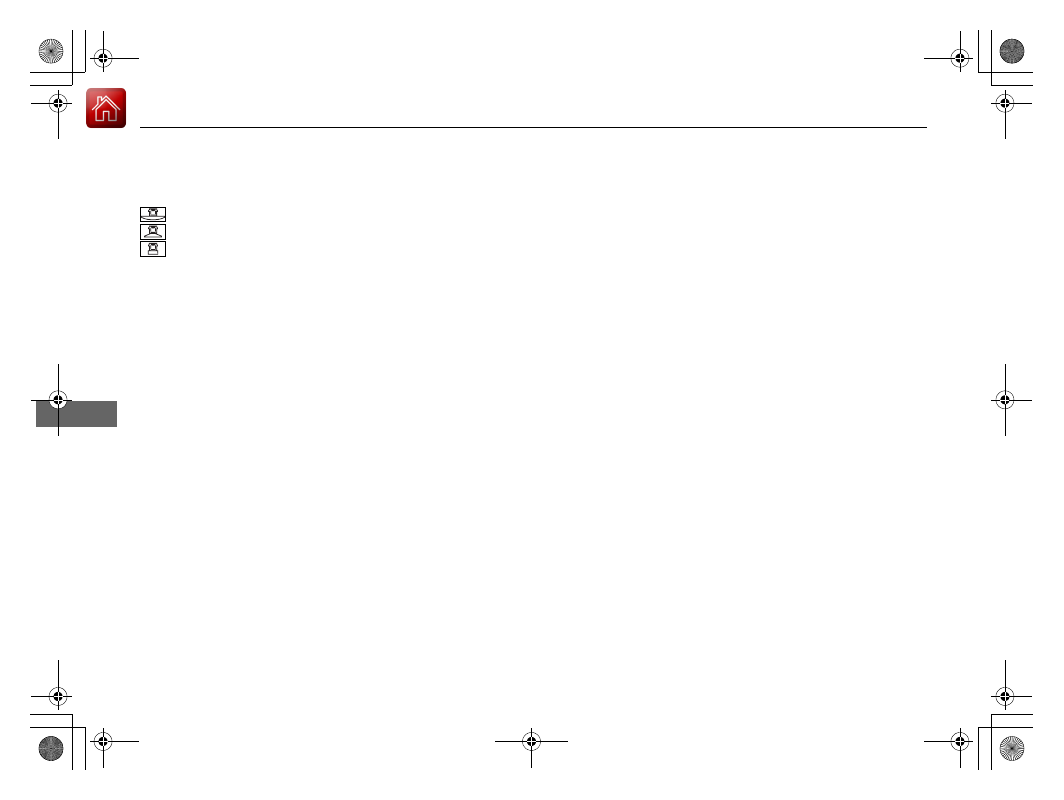
You can view three different camera modes on the audio/information screen.
Touch the appropriate icon to switch the modes.
: Wide view mode
: Normal view mode
: Top down view mode
•
If you were last using Wide view mode or Normal view mode, the same view
mode will be activated the next time you put the transmission into
(
R
.
•
If you were using Top down view mode before turning off the power system, the
next time you set the power mode to ON and put the transmission into
(
R
, the
view mode you were using just before using Top down view mode (Wide view
mode or Normal view mode) will be activated.
•
If you were using Top down view mode and 10 seconds elapsed after you took
the transmission out of
(
R
, the view mode you were using just before selecting
Top down view mode (Wide view mode or Normal view mode) will be activated
the next time you put the transmission into
(
R
.
525
Driving
Refueling
Fuel Information
■
Fuel recommendation
Use of a lower octane gasoline can cause a persistent, heavy metallic knocking noise
that can lead to engine damage.
■
Top tier detergent gasoline
Because the level of detergency and additives in gasoline vary in the market, Honda
endorses the use of “TOP TIER Detergent Gasoline” where available to help
maintain the performance and reliability of your vehicle. TOP TIER Detergent
Gasoline meets a new gasoline standard jointly established by leading automotive
manufacturers to meet the needs of today’s advanced engines.
Qualifying gasoline retailers will, in most cases, identify their gasoline as having met
“TOP TIER Detergent Gasoline” standards at the retail location. This fuel is
guaranteed to contain the proper level of detergent additives and be free of metallic
additives. The proper level of detergent additives, and absence of harmful metallic
additives in gasoline, help avoid buildup of deposits in your engine and emission
control system.
For further important fuel-related information for your vehicle, or on information on
gasoline that does not contain MMT, visit
www.hondacars.com.
In Canada, visit
www.honda.ca
for additional information on gasoline. For more information on top
tier gasoline, visit
www.toptiergas.com
.
■
Fuel tank capacity: 12.81 US gal (48.5 L)
Unleaded gasoline, pump octane number 87 or higher
1
NOTICE
We recommend quality gasoline containing
detergent additives that help prevent fuel system and
engine deposits. In addition, in order to maintain
good performance, fuel economy, and emissions
control, we strongly recommend the use of gasoline
that does NOT contain harmful manganese-based
fuel additives such as MMT, if such gasoline is
available.
Use of gasoline with these additives may adversely
affect performance, and cause the malfunction
indicator lamp on your instrument panel to come on.
If this happens, contact a dealer for service.
Some gasoline today is blended with oxygenates such
as ethanol. Your vehicle is designed to operate on
oxygenated gasoline containing up to 15% ethanol
by volume. Do not use gasoline containing methanol.
If you notice any undesirable operating symptoms, try
another service station or switch to another brand of
gasoline.
526
uu
Refueling
u
How to Refuel
Driving
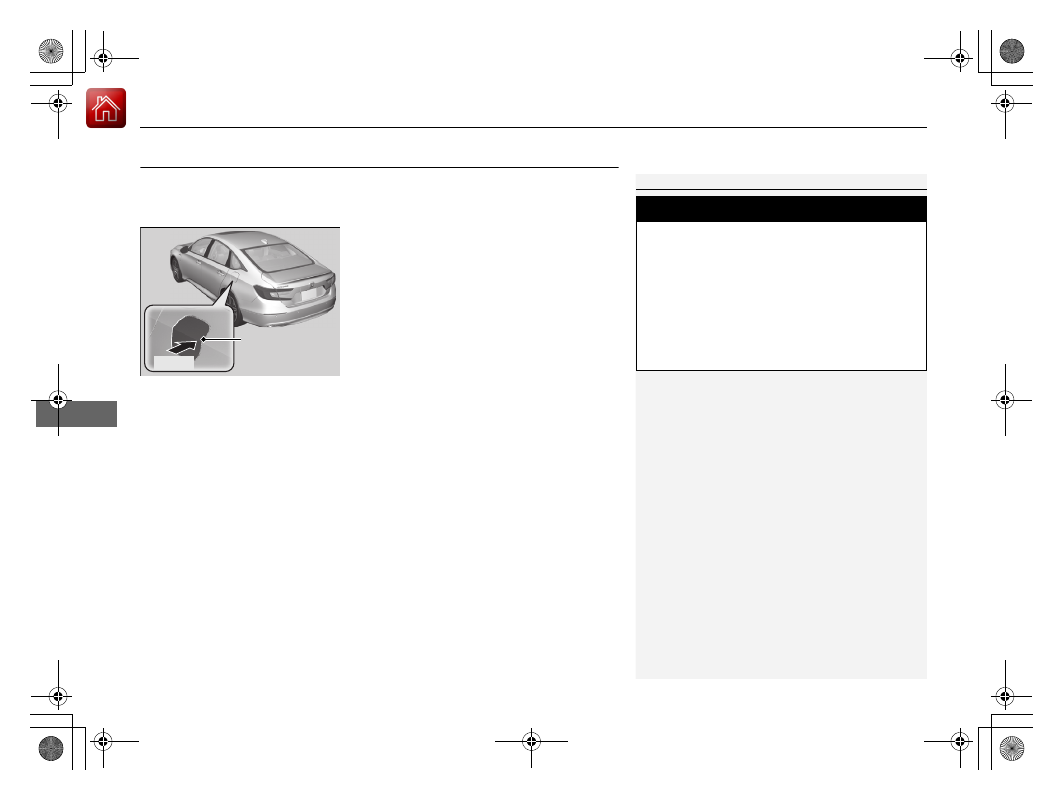
How to Refuel
Your fuel tank is not equipped with a fuel filler cap. You can insert the filler nozzle
directly into the filler neck. The tank seals itself again when you pull out the filler
nozzle.
1.
Stop your vehicle with the service station
pump on the left side of the vehicle in the
rear.
2.
Turn off the power system.
3.
Unlock the driver’s door.
u
The fuel fill door on the outer side of the
vehicle will unlock.
4.
Press and release the area indicated by the
arrow to release the fuel fill door. You will
here a click and the lid will open slightly.
5.
Manually pull the fuel fill door to a fully
open position.
1
The fuel filler opening is designed to accept only
service station filler nozzles for refueling. Use of
smaller diameter tubes (e.g., those used to siphon
fuel for other uses) or other non-service station
devices can damage the area in and around the filler
opening.
Use the master door lock switch to unlock the fuel fill
door.
The vehicle doors and fuel fill door automatically
relock if the remote unlock function is used. This can
be deactivated by briefly opening then closing the
driver’s door.
3
WARNING
Gasoline is highly flammable and explosive.
You can be burned or seriously injured
when handling fuel.
•
Turn the power system off, and keep
heat, sparks, and flames away.
•
Handle fuel only outdoors.
•
Wipe up spills immediately.
Press
Fuel Fill Door
Нет комментариевНе стесняйтесь поделиться с нами вашим ценным мнением.
Текст