Honda Accord Hybrid (2022 year). Manual in english — page 37

uu
If a Tire Goes Flat
u
Temporarily Repairing a Flat Tire
592
Han
d
lin
g the U
n
expected
7.
Press the inflator switch to turn on the kit.
u
The compressor starts injecting sealant
and air into the tire.
u
When the sealant injection is complete,
continue to add air.
8.
After the air pressure reaches to specified
pressure, turn off the kit.
u
To check the pressure, occasionally turn
off the compressor and read the gauge.
u
Refer to the driver’s doorjamb label for
the specified pressure.
9.
Unplug the power plug from the accessory
power socket.
10.
Unscrew the sealant/air hose from the tire
valve stem. Reinstall the valve cap.
11.
Press the pressure relief button until the
gauge returns to 0 psi (0 kPa).
12.
Apply the repair notification label to the
flat surface of the wheel.
u
The wheel surface must be clean to
ensure the label adheres properly.
1
If the required air pressure is not reached within 10
minutes, the tire may be too severely damaged for
the kit to provide the necessary seal, and your vehicle
will need to be towed.
See a dealer for a replacement sealant bottle and
proper disposal of an empty bottle.
Pressure Gauge
ON
OFF
Sealant/Air Hose
Tire Valve Stem
Pressure Relief
Button
Repair Notification Label
U.S.
Canada

593
uu
If a Tire Goes Flat
u
Temporarily Repairing a Flat Tire
Continued
Han
d
lin
g the U
n
expected
1.
Apply the speed restriction label to the
location as shown.
2.
Drive the vehicle for about 10 minutes.
u
Do not exceed 50 mph (80 km/h).
3.
Stop the vehicle in a safe place.
4.
Recheck the air pressure using the sealant/
air hose on the compressor.
■
Distributing the Sealant in the Tire
Speed Restriction Label
U.S.
Canada
Sealant/Air Hose
uu
If a Tire Goes Flat
u
Temporarily Repairing a Flat Tire
594
Han
d
lin
g the U
n
expected
5.
Turn the selector knob to
AIR
.
u
Do not turn the air compressor on to
check the pressure.
2
Inflating an Under-inflated Tire
P. 597
1
Distributing the Sealant in the Tire
3
WARNING
Running the engine with the vehicle in an
enclosed or even partly enclosed area can
cause a rapid buildup of toxic carbon
monoxide.
Breathing this colorless, odorless gas can
cause unconsciousness and even death.
Only run the engine to power the air
compressor with the vehicle outdoors.
AIR
Side
Center Pocket
Console Compartment
595
uu
If a Tire Goes Flat
u
Temporarily Repairing a Flat Tire
Continued
Han
d
lin
g the U
n
expected
6.
If the air pressure is
•
Less than 25 psi (175 kPa):
Do not add air or continue driving. The leak is too severe. Call for help and have
your vehicle towed.
2
•
Front: 33 psi (230 kPa)/rear: 33 psi (225 kPa) or more:
•
33 psi (225 kPa) or more:
Continue driving for another 10 minutes or until you reach the nearest service
station, whichever is sooner. Do not exceed 50 mph (80 km/h). If you have not
reached a service station, stop and check the tire pressure.
u
If the air pressure does not go down after the 10 minute drive, you do not
need to check the pressure any more. Drive to the nearest service station to
fix or replace the tire.
Models with 225/50R17 tires
Models with 235/40R19 tires

596
uu
If a Tire Goes Flat
u
Temporarily Repairing a Flat Tire
Han
d
lin
g the U
n
expected
•
Greater than 25 psi (175 kPa), but less than front: 33 psi (230 kPa)/rear: 33
psi (225 kPa):
Turn the air compressor on to inflate the tire until the tire pressure reaches front:
33 psi (230 kPa)/rear: 33 psi (225 kPa).
2
Inflating an Under-inflated Tire
P. 597
•
Greater than 25 psi (175 kPa), but less than 33 psi (225 kPa):
Turn the air compressor on to inflate the tire until the tire pressure reaches 33
psi (225 kPa).
2
Inflating an Under-inflated Tire
P. 597
Then, drive carefully for 10 more minutes or until you reach the nearest service
station, whichever is sooner. Do not exceed 50 mph (80 km/h). If you have not
reached a service station, stop and check the tire pressure.
u
You should repeat this procedure as long as the air pressure is within this
range.
7.
Unplug the kit from the accessory power
socket.
8.
Unscrew the sealant/air hose from the tire
valve stem. Reinstall the valve cap.
9.
Press the pressure relief button until the
gauge returns to 0 psi (0 kPa).
10.
Repackage and properly stow the kit.
Models with 225/50R17 tires
Models with 235/40R19 tires
All models
Pressure Relief Button
Continued
597
uu
If a Tire Goes Flat
u
Temporarily Repairing a Flat Tire
Han
d
lin
g the U
n
expected
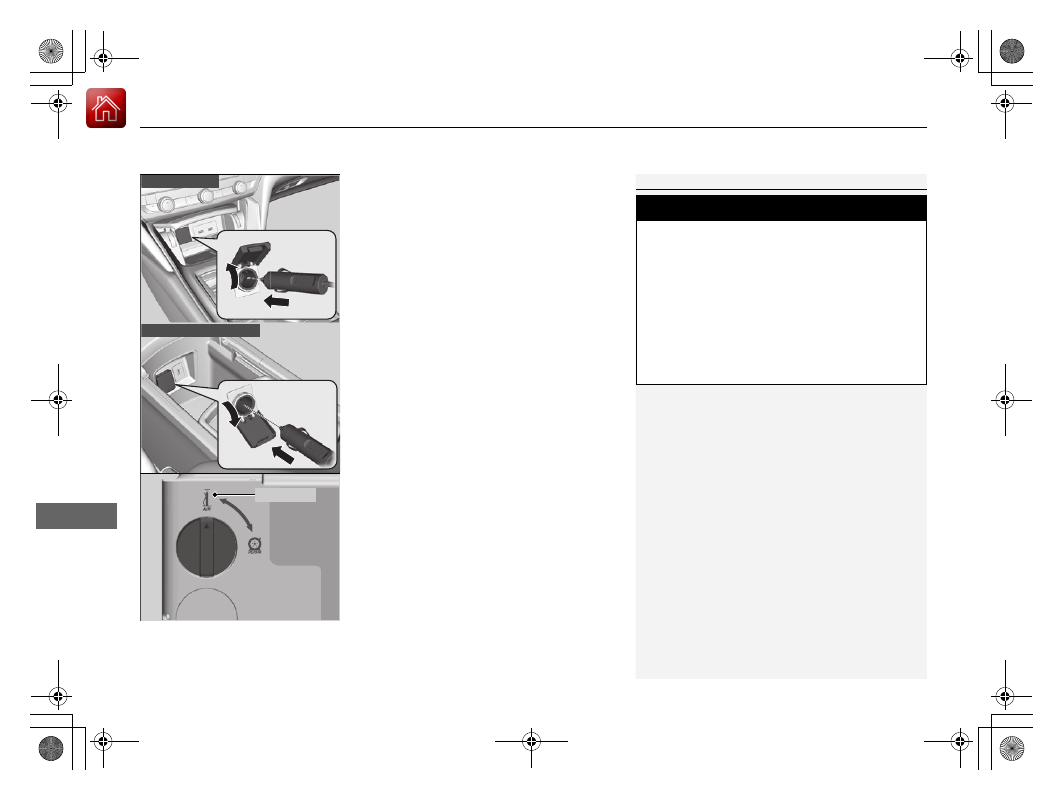
You can use the kit to inflate a non-punctured under-inflated tire.
1.
Open the trunk floor lid.
2
Getting Ready to Temporarily Repair
the Flat Tire
2.
Remove the kit from the case.
3.
Place the kit, face up, on flat ground near
the tire to be inflated, away from traffic.
Do not place the kit on its side.
4.
Remove the sealant/air hose from the kit.
5.
Remove the valve cap.
6.
Attach the sealant/air hose onto the tire
valve stem. Screw it until it is tight.
■
Inflating an Under-inflated Tire
1
Inflating an Under-inflated Tire
NOTICE
Do not operate the temporary tire repair kit
compressor for more than 15 minutes. The
compressor can overheat and become permanently
damaged.
Sealant/
Air Hose
Valve Cap
Tire Valve Stem
Sealant/Air Hose

uu
If a Tire Goes Flat
u
Temporarily Repairing a Flat Tire
598
Han
d
lin
g the U
n
expected
7.
Plug in the kit to the accessory power
socket.
u
Be careful not to pinch the cord in a
door or window.
u
Do not plug any other electronic
devices into other accessory power
sockets.
2
P. 235
8.
Turn the power system on.
2
P. 416
u
Keep the power system on while
injecting air.
2
P. 84
9.
Turn the selector knob to
AIR
.
10.
Press the inflator switch to turn on the kit.
u
The compressor starts to inject air into
the tire.
11.
Inflate the tire to the specified air pressure.
1
Inflating an Under-inflated Tire
3
WARNING
Running the engine with the vehicle in an
enclosed or even partly enclosed area can
cause a rapid buildup of toxic carbon
monoxide.
Breathing this colorless, odorless gas can
cause unconsciousness and even death.
Only run the engine to power the air
compressor with the vehicle outdoors.
Center Pocket
Console Compartment
AIR
Side
ON
599
uu
If a Tire Goes Flat
u
Temporarily Repairing a Flat Tire
Han
d
lin
g the U
n
expected
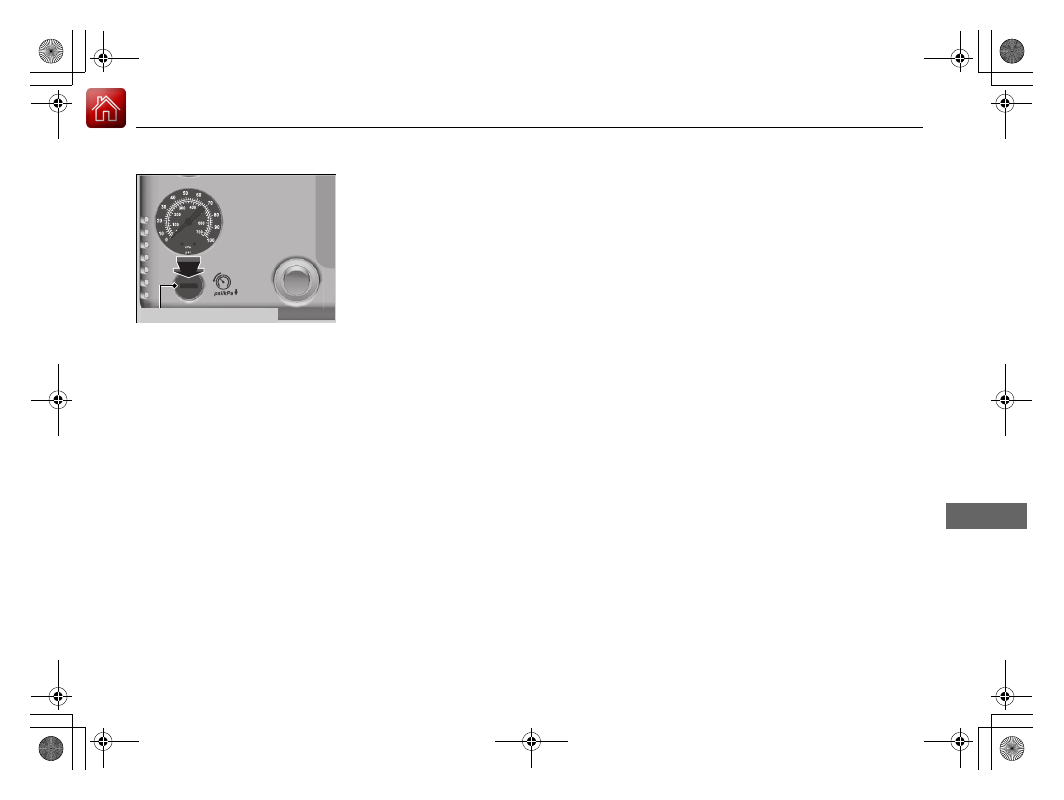
12.
Turn off the kit.
u
Check the pressure gauge on the air
compressor.
u
If overinflated, press the pressure relief
button.
13.
Unplug the kit from the accessory power
socket.
14.
Unscrew the sealant/air hose from the tire
valve stem. Reinstall the valve cap.
15.
Press the pressure relief button until the
gauge returns to 0 psi (0 kPa).
16.
Repackage and properly stow the kit.
Pressure Relief Button

600
Han
d
lin
g the U
n
expected
Handling of the Jack
Your vehicle has jacking points as shown.
When replacing your tires, consult a dealer.
Jacking Points

601
Han
d
lin
g the U
n
expected
Power System Won’t Start
Checking the Procedure
When the
READY
indicator does not come on and the
Ready To Drive
message
does not appear on the driver information interface, check the following items and
take appropriate action.
Checklist
Condition
What to Do
Check if the related
indicator or driver
information interface
messages come on.
The
Temperature Is Too Cold For Vehicle To Operate
message appears.
2
Driver Information Interface Warning and
Information Messages
The
To Start, Hold Remote Near Start Button
message
appears.
u
Make sure the keyless remote is in its operating range.
2
P. 197
2
If the Keyless Remote Battery is Weak
P. 602
The
POWER SYSTEM
indicator comes on.
Have your vehicle checked by a dealer.
The transmission system indicator blinks and
Transmission
System Problem. Apply Parking Brake When Parked. See
Your Dealer.
message appears.
2
If the Transmission System Indicator Blinks
along with the Warning Message
Check the brightness
of the interior lights.
The interior lights are dim or do not come on at all.
Have the 12-volt battery checked by a dealer.
The interior lights come on normally.
Check all fuses, or have your vehicle checked by
a dealer.
2
P. 619
Check the shift
position.
The transmission is not in
(
P
.
Put the transmission into
(
P
.
Check the
immobilizer system
indicator.
When the immobilizer system indicator is blinking, the power
system cannot be turned on.
2
1
If you must start the vehicle immediately, use an
assisting vehicle or booster battery to jump start it.
2
If the 12-Volt Battery Is Dead
P. 604
602
uu
Power System Won’t Start
u
If the Keyless Remote Battery is Weak
Han
d
lin
g the U
n
expected
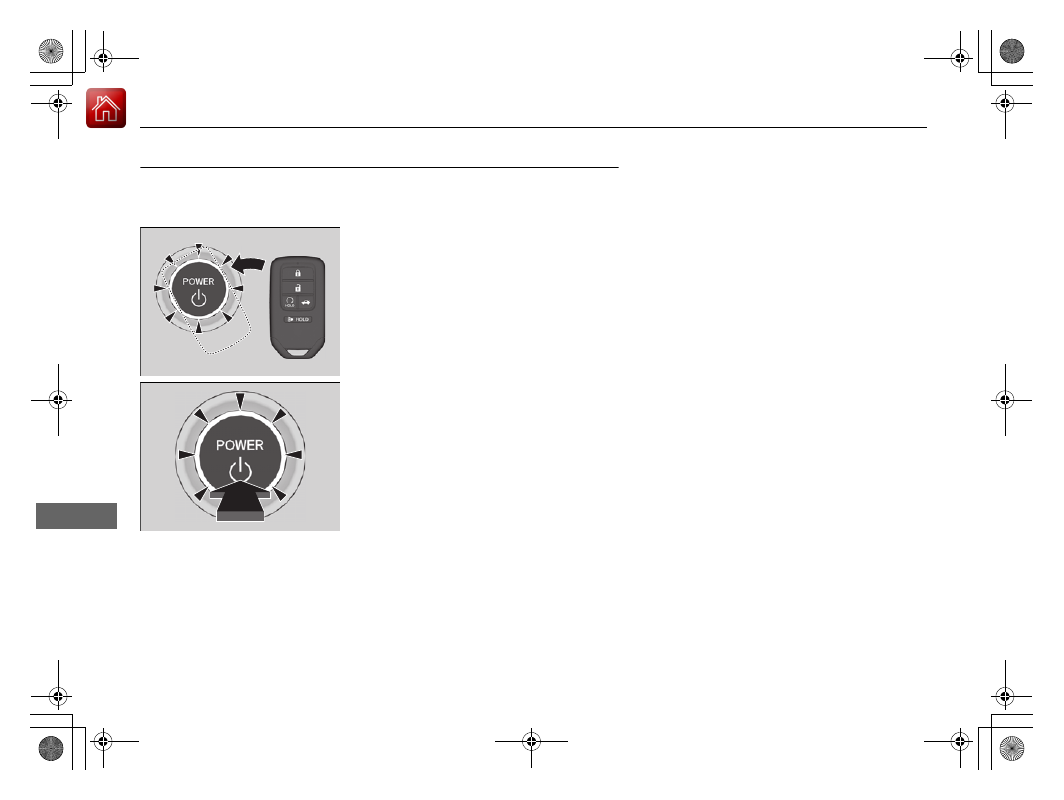
If the Keyless Remote Battery is Weak
If the beeper sounds, the
To Start, Hold Remote Near Start Button
message
appears on the driver information interface, the
POWER
button flashes, and the
READY
indicator does not come on, turn on the power system as follows:
1.
Touch the center of the
POWER
button
with the
H
logo on the keyless remote while
the
POWER
button is flashing. The buttons
on the keyless remote should be facing you.
u
The
POWER
button flashes for about 30
seconds.
2.
Depress the brake pedal and press the
POWER
button within 10 seconds after the
beeper sounds and the
POWER
button
changes from flashing to on.
u
The
READY
indicator comes on.
u
If you don’t depress the pedal, the mode
will change to ACCESSORY.
603
uu
Power System Won’t Start
u
Emergency Power System Off
Han
d
lin
g the U
n
expected
Emergency Power System Off
The
POWER
button may be used to turn the power system off due to an emergency
situation even while driving. If you must turn the power system off, do either of the
following operations:
•
Press and hold the
POWER
button for about two seconds.
•
Firmly press the
POWER
button three times.
The steering wheel will not lock. However, because turning off the power system
disables the power assist the power system provides to the steering and braking
systems, it will require significantly more physical effort and time to steer and slow
the vehicle. Use both feet on the brake pedal to slow down the vehicle and stop
immediately in a safe place.
The transmission automatically changes to
(
P
after the vehicle comes to a complete
stop. Then, the power mode changes to VEHICLE OFF.
1
Do not press the
POWER
button while driving unless
it is absolutely necessary for the power system to be
turned off.
If you press the
POWER
button while driving, the
beeper sounds.

604
Han
d
lin
g the U
n
expected
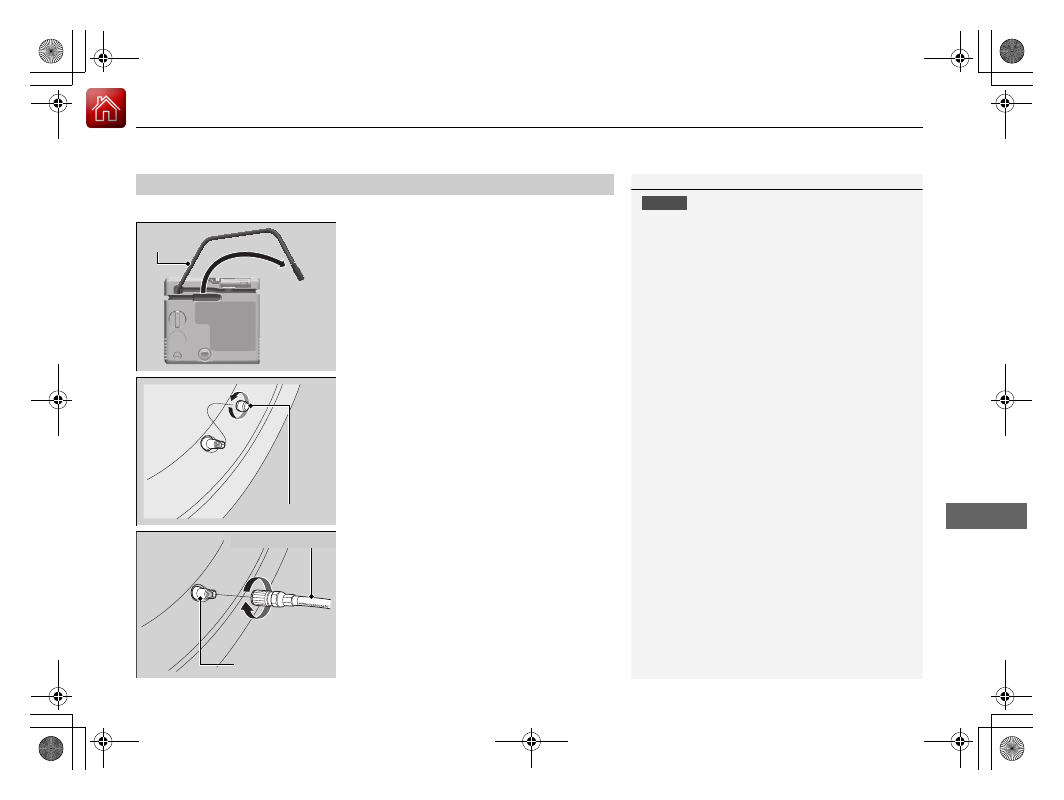
If the 12-Volt Battery Is Dead
Jump Starting Procedure
Turn off the power to electric devices, such as audio and lights. Turn off the power
system, then open the hood.
1.
Open the cover on the positive
+
terminal.
2.
Connect the first jumper cable to your
vehicle’s 12-volt battery
+
terminal.
3.
Connect the other end of the first jumper
cable to the booster battery
+
terminal.
u
Use a 12-volt booster battery only.
u
When using an automotive battery
charger to boost your 12-volt battery,
select a lower charging voltage than 15-
volt. Check the charger manual for the
proper setting.
4.
Connect the second jumper cable to the
booster battery
-
terminal.
5.
Connect the other end of the second
jumper cable to the upper torque mounting
bolt as shown. Do not connect this jumper
cable to any other part.
6.
If your vehicle is connected to another
vehicle, start the assisting vehicle’s engine
and increase its rpm slightly.
7.
Attempt to start your vehicle’s engine. If it
turns over slowly, check that the jumper
cables have good metal-to-metal contact.
1
Securely attach the jumper cables clips so that they
do not come off when the engine vibrates. Be careful
not to tangle the jumper cables or allow the cable
ends to touch each other while attaching or
detaching the jumper cables.
12-volt battery performance degrades in cold
conditions and may prevent the engine from starting.
3
WARNING
A 12-volt battery can explode if you do not
follow the correct procedure, seriously
injuring anyone nearby.
Keep all sparks, open flames, and smoking
materials away from the 12-volt battery.
Booster Battery
605
uu
If the 12-Volt Battery Is Dead
u
Jump Starting Procedure
Han
d
lin
g the U
n
expected
Once your vehicle’s engine has started, remove the jumper cables in the following
order.
1.
Disconnect the jumper cable from your vehicle’s ground.
2.
Disconnect the other end of the jumper cable from the booster battery
-
terminal.
3.
Disconnect the jumper cable from your vehicle’s 12-volt battery
+
terminal.
4.
Disconnect the other end of the jumper cable from the booster battery
+
terminal.
Have your vehicle inspected by a nearby service station or a dealer.
■
What to Do After the Engine Starts
1
The Vehicle Stability Assist
TM
(VSA
®
) system, Vehicle
Stability Assist
TM
(VSA
®
) OFF, Adaptive Cruise Control
(ACC) with Low Speed Follow, safety support, and
low tire pressure/TPMS indicators may come on in
amber along with a message in the driver information
interface when you set the power mode to ON after
re-connecting a 12-volt battery.
Drive a short distance at more than 12 mph (20 km/h).
Each indicator should go off. If any do not, have your
vehicle checked by a dealer.
606
Han
d
lin
g the U
n
expected
Overheating
How to Handle Overheating
Overheating symptoms are as follows:
•
The
Power System Temperature High. Power May Be Reduced.
message
appears on the driver information interface.
•
The
Engine Temperature Too Hot. Do Not Drive. Allow Engine To Cool.
message appears on the driver information interface.
•
Steam or spray comes out of the engine compartment.
The
Power System Temperature High. Power May Be Reduced.
message
appears on the driver information interface when the power system temperature is
high.
2
Driver Information Interface Warning and Information Messages
1.
Immediately park the vehicle in a safe place.
u
Set the parking brake, and put the transmission into
(
P
. Turn off all accessories
and turn on the hazard warning lights.
2.
Keep the power mode in ON, and wait until the message disappears.
u
If the message does not disappear, have your vehicle inspected at a dealer.
■
The Power System Temperature High. Power May Be
Reduced. Message Appears on the Driver Information
Interface
Continued
607
uu
Overheating
u
How to Handle Overheating
Han
d
lin
g the U
n
expected
■
First thing to do
1.
Immediately park the vehicle in a safe place.
2.
Turn off all accessories and turn on the hazard warning lights.
u
No steam or spray present:
Keep the power system on and open the hood.
u
Steam or spray is present:
Turn off the power system and wait until it
subsides. Then, open the hood.
■
The Engine Temperature Too Hot. Do Not Drive. Allow
Engine To Cool. Message Appears on the Driver Information
Interface
1
NOTICE
Continuing to drive with the
Engine Temperature
Too Hot. Do Not Drive. Allow Engine To Cool.
message on the driver information interface may
damage the engine.
3
WARNING
Steam and spray from an overheated
engine can seriously scald you.
Do not open the hood if steam is coming
out.
Нет комментариевНе стесняйтесь поделиться с нами вашим ценным мнением.
Текст