Honda Accord Hybrid (2022 year). Manual in english — page 14
222
uu
Seats
u
Rear Seats
Co
ntrols
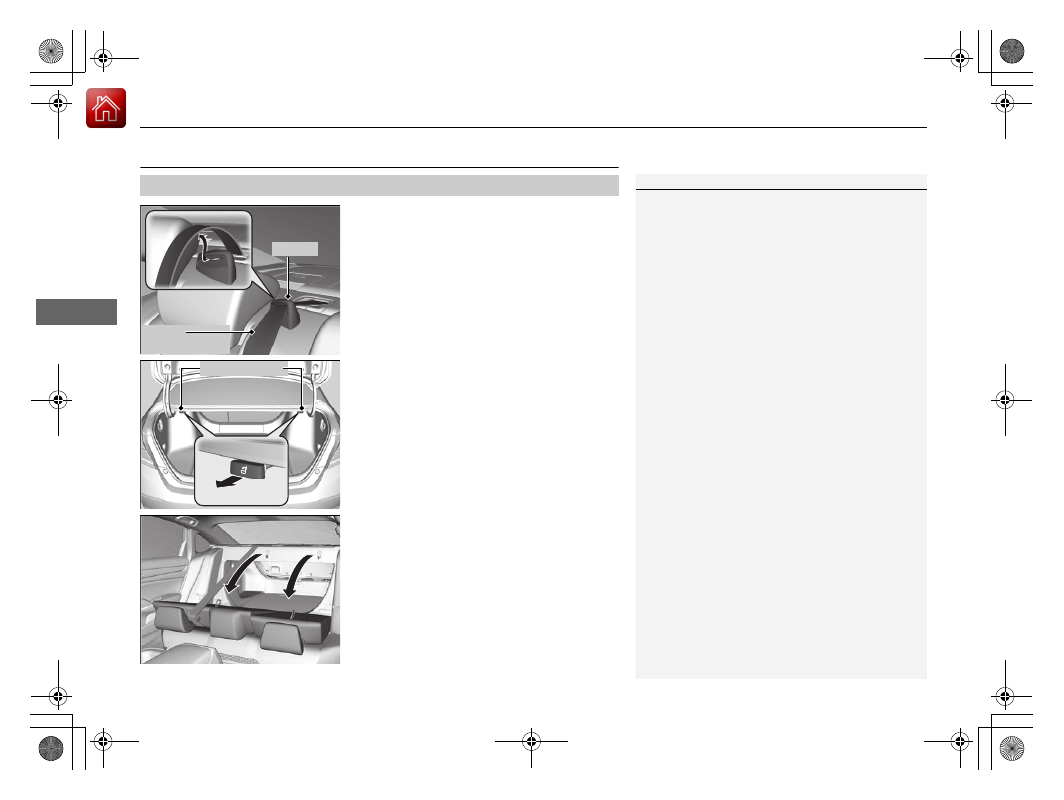
Rear Seats
1.
Remove the center shoulder belt from the
guide.
2.
Pull the release lever in the trunk to release
the lock.
3.
Fold the seat-back down.
■
Folding Down the Rear Seats
1
The rear seat-backs can be folded down to
accommodate bulkier items in the trunk.
Never drive with the seat-back folded down and the
trunk lid open.
2
P. 84
To lock a seat-back upright, push it backwards until it
locks.
When returning the seat-back to its original position,
push it firmly back. Also, make sure all rear shoulder
belts are positioned in front of the seat-back, and the
center shoulder belt is re-positioned in the guide.
Make sure that the folded seat-back does not press
against the front passenger seat, as this can cause the
weight sensors in the front passenger seat to work
improperly.
2
Passenger Airbag Off Indicator
P. 68
Make sure all items in the trunk or items
extending through the opening into the rear
seat is properly secured. Loose items can fly
forward if you have to brake hard.
The front seat(s) must be far enough forward so they
do not interfere with the rear seats as they fold
down.
Guide
Center
Shoulder Belt
Release Lever

223
uu
Seats
u
Rear Seats
Co
ntrols
This feature alerts you to the possible presence of passengers or items in the rear
seats before you exit the vehicle. It activates when the vehicle is set to VEHICLE OFF
if the rear doors were opened shortly before or after the vehicle was set to ON.
A reminder appears on the driver information
interface and an alert will sound when the
power mode is set to VEHICLE OFF.
■
Rear Seat Reminder
1
When the power mode is set to VEHICLE OFF, the
reminder comes on briefly, then the function is
deactivated.
The reminder will not work if the power mode has
not been set to ON within 10 minutes of operating
the rear doors.
The system does not detect passengers in the rear
seats. Instead, it can detect when a rear door is
opened and closed, indicating that there may be
something in the rear seats.
You can turn off the notification setting
*
.
2
P. 357
* Not available on all models
224
uu
Seats
u
Maintain a Proper Sitting Position
Co
ntrols
Maintain a Proper Sitting Position
After all occupants have adjusted their seats and head restraints, and put on their
seat belts, it is very important that they continue to sit upright, well back in their
seats, with their feet on the floor, until the vehicle is safely parked and the power
system is off.
Sitting improperly can increase the chance of injury during a crash. For example, if
an occupant slouches, lies down, turns sideways, sits forward, leans forward or
sideways, or puts one or both feet up, the chance of injury during a crash is greatly
increased.
In addition, an occupant who is out of position in the front seat can be seriously or
fatally injured in a crash by striking interior parts of the vehicle or being struck by an
inflating front airbag.
1
Maintain a Proper Sitting Position
3
WARNING
Sitting improperly or out of position can
result in serious injury or death in a crash.
Always sit upright, well back in the seat,
with your feet on the floor.

225
uu
Seats
u
Head Restraints
Continued
Co
ntrols
Head Restraints
Your vehicle is equipped with head restraints in all seating positions.
Head restraints are most effective for
protection against whiplash and other rear-
impact crash injuries when the center of the
back of the occupant’s head rests against the
center of the restraint. The tops of the
occupant’s ears should be level with the
center height of the restraint.
To raise the head restraint:
Pull it upward.
To lower the head restraint:
Push it down
while pressing the release button.
■
Adjusting the Front and Rear Outer Head Restraint Positions
1
In order for the head restraint system to work
properly:
•
Do not hang any items on the head restraints, or
from the restraint legs.
•
Do not place any objects between an occupant and
the seat-back.
•
Install each restraint in its proper location.
3
WARNING
Improperly positioning head restraints
reduces their effectiveness and increases
the likelihood of serious injury in a crash.
Make sure head restraints are in place and
positioned properly before driving.
Position head in the center
of the head restraint.
uu
Seats
u
Head Restraints
226
Co
ntrols
Head restraints can be removed for cleaning or repair.
To remove a head restraint:
Pull the restraint up as far as it will go. Then, push the release button and pull the
restraint up and out.
To reinstall a head restraint:
Insert the legs back in place, then adjust the head restraint to an appropriate height
while pressing the release button. Pull up on the restraint to make sure it is locked
in position.
■
Removing and Reinstalling the Head Restraints
1
Removing and Reinstalling the Head Restraints
3
WARNING
Failure to reinstall, or correctly reinstall, the
head restraints can result in severe injury
during a crash.
Always replace the head restraints before
driving.
227
uu
Seats
u
Armrest
Co
ntrols
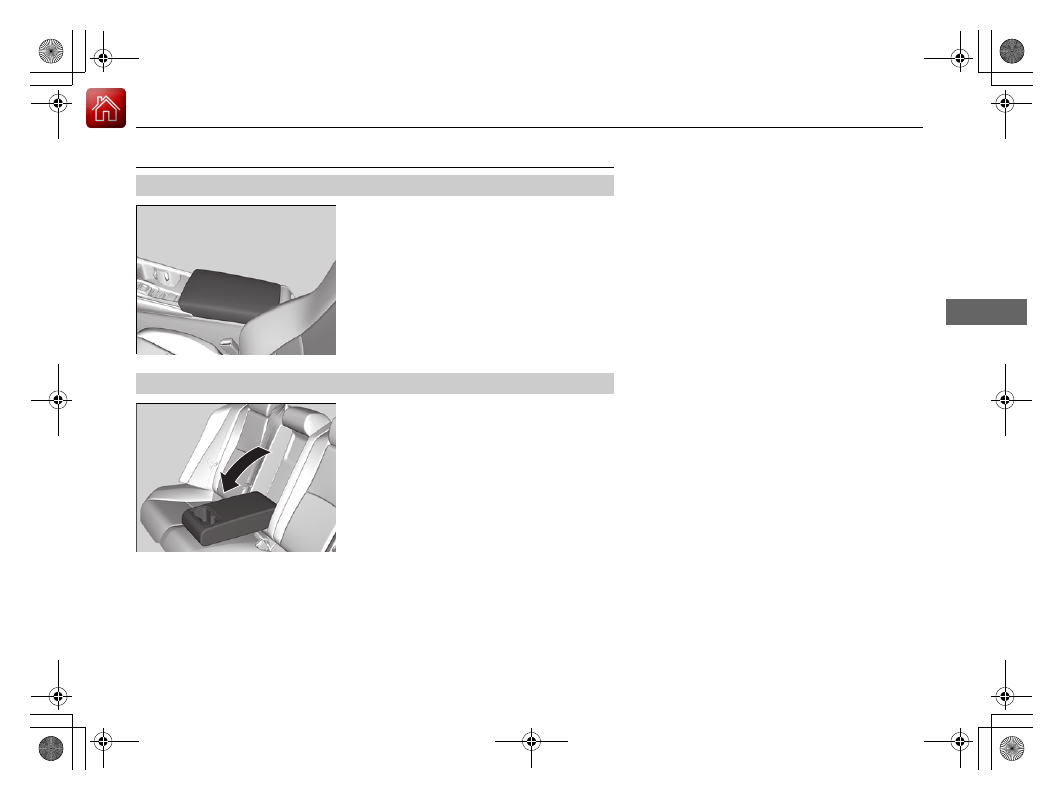
Armrest
The console lid can be used as an armrest.
Pull down the armrest in the center backrest.
■
Using the Front Seat Armrest
■
Using the Rear Seat Armrest

228
Co
ntrols
Interior Convenience Items
Interior Lights
■
ON
The interior lights come on regardless of
whether the doors are open or closed.
■
Door activated
The interior lights come on in the following
situations:
•
When any of the doors are opened.
•
You unlock the driver’s door.
•
When the power mode is set to VEHICLE
OFF.
■
OFF
The interior lights remain off regardless of
whether the doors are open or closed.
■
Interior Light Switches
1
In the door activated position, the interior lights fade
out and go off about 30 seconds after the doors are
closed.
The lights go off after 30 seconds in the following
situations:
•
When you unlock the driver’s door but do not open
it.
•
When you set the power mode to VEHICLE OFF but
do not open a door.
You can change the interior lights dimming time.
2
P. 357
The interior lights go off immediately in the following
situations:
•
When you lock the driver’s door.
•
When you set the power mode to ON.
•
When you close the driver’s door in ACCESSORY
mode.
If you leave any of the doors open in VEHICLE OFF
mode, the interior lights go off after about 15
minutes.
To avoid draining the 12-volt battery, do not leave
the interior light on for an extended length of time
when the power system is off.
Door Activated Position
Off
Door Activated
Position
On
Off
Front
*
Rear
* Not available on all models

229
uu
Interior Convenience Items
u
Interior Lights
Co
ntrols
The map lights can be turned on and off by
pressing the lenses.
■
Map Light Switches
1
When the interior light switch is in the door activated
position and any door is open, the map light will not
go off when you press the lens.
Models with moonroof

230
uu
Interior Convenience Items
u
Storage Items
Co
ntrols
Storage Items
Pull the handle to open the glove box.
You can lock the glove box with the built-in
key.
Push the cover to open the pocket.
■
Glove Box
1
3
WARNING
An open glove box can cause serious injury
to your passenger in a crash, even if the
passenger is wearing the seat belt.
Always keep the glove box closed while
driving.
Glove Box
Handle
To Lock
■
Center Pocket

Continued
231
uu
Interior Convenience Items
u
Storage Items
Co
ntrols
Pull the handle to open the console
compartment.
■
Removable tray
The tray in the console compartment is
detachable. Pull up the tray to remove it.
■
Console Compartment
1
The console compartment light
*
comes on when the
parking lights are on.
* Not available on all models

uu
Interior Convenience Items
u
Storage Items
232
Co
ntrols
■
Front seat beverage holders
Are located in the console between the front
seats.
■
Door side beverage holders
Are located on both of front and rear door
side pockets.
■
Beverage Holders
1
NOTICE
Spilled liquids damage the upholstery, carpeting, and
electrical components in the interior.
Be careful when you are using the beverage holders.
Hot liquid can scald you.
Front
Rear

Continued
233
uu
Interior Convenience Items
u
Storage Items
Co
ntrols
■
Rear seat beverage holders
Fold the armrest down to use the rear seat
beverage holders.
To open the sunglasses holder, push and
release the indent. To close, push it again until
it latches.
You can store eyeglasses and other small
items in this holder.
■
Sunglasses Holder
1
Keep the holder closed while driving except when
accessing stored items.
Push

uu
Interior Convenience Items
u
Storage Items
234
Co
ntrols
There is a coat hook on the rear left grab
handle. Pull it down to use it.
The cargo hook in the trunk can be used to
install a net for securing items.
■
Coat Hook
1
The coat hook is not designed for large or heavy
items.
■
Cargo Hook
1
Heavy objects may damage the hook.
Make sure any items put on this hook weigh less than
6.6 lbs (3 kg).
Distribute cargo evenly on the floor of the trunk,
placing the heaviest items on the bottom and as far
forward as possible.
2
235
uu
Interior Convenience Items
u
Other Interior Convenience Items
Continued
Co
ntrols
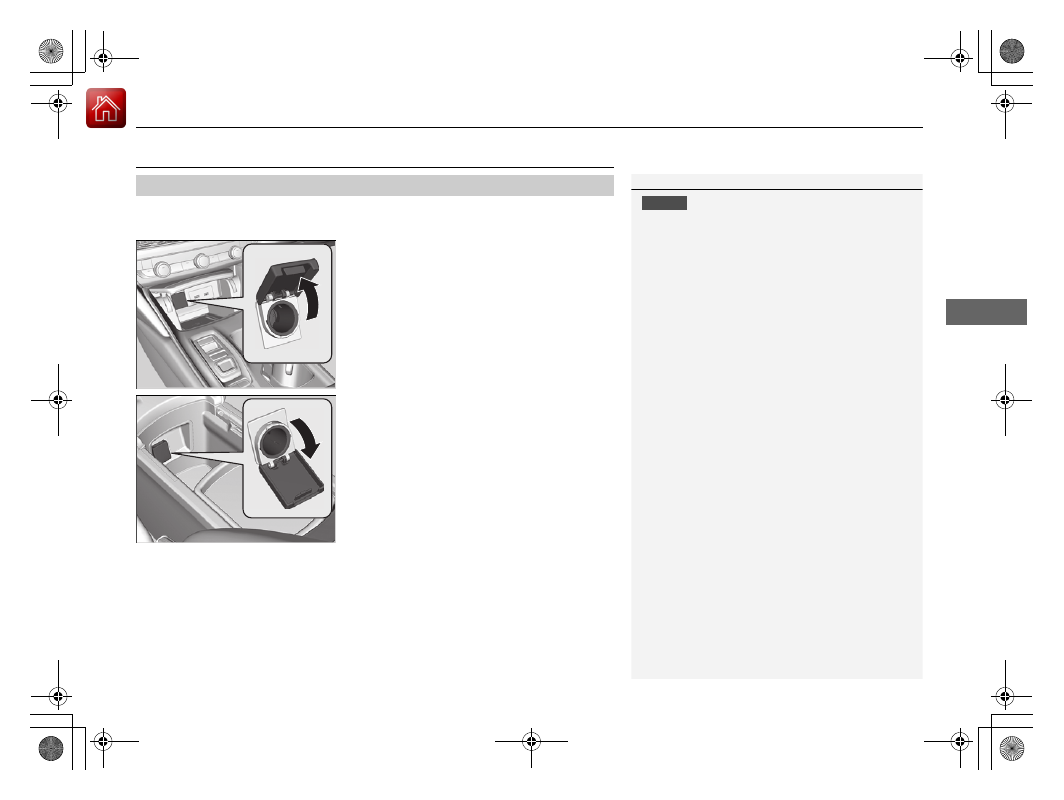
Other Interior Convenience Items
The accessory power sockets can be used when the power mode is in ACCESSORY
or ON.
■
Center pocket
Open the cover to use it.
■
Console compartment
Open the console lid and the cover to use it.
■
Accessory Power Sockets
1
NOTICE
Do not insert an automotive type cigarette lighter
element. This can overheat the accessory power
socket.
The accessory power socket is designed to supply
power for 12-volt DC accessories that are rated 180
watts (15 amps) or less.
To prevent 12-volt battery drain, only use the
accessory power socket with the power system on.
When both sockets are being used, the combined
power rating of the accessories should not exceed
180 watts (15 amps).
When the accessory power socket is not in use, close
the cover to prevent any small foreign objects from
getting into the accessory power socket.

uu
Interior Convenience Items
u
Other Interior Convenience Items
236
Co
ntrols
To use the wireless charger, the power mode must be in ACCESSORY or ON.
Charge any devices compatible with Qi wireless charging on the area indicated by
the
mark as follows:
1.
To turn the system on and off, press and
hold the
(power) button.
u
When the system is activated, the green
indicator light comes on.
2.
Place the device you want to charge on the
charging area.
u
The system will automatically start
charging the device, and the amber
indicator light will come on.
u
Make sure that the device is compatible
with the system, and placed with the
chargeable side in the center of the
charging area.
3.
When charging is completed, the green
indicator light will come on.
u
Depending on the device, the amber
indicator light will stay on.
■
Wireless Charger
*
1
RF Radiation Exposure Statement:
This equipment complies with FCC RF Radiation
exposure limits set forth for an uncontrolled
environment.
This device and its antenna must not be co-located or
operating in conjunction with any other antenna or
transmitter.
In order to use safely:
•
Remove any metal objects from the charge pad
before charging a device.
•
Do not open the charger case.
•
Do not use the charger if it malfunctions. Contact
your dealer.
If the charger interferes with radio communications,
attempt to correct the interference:
•
Press and hold the switch on the charger for a few
seconds to turn off the charger.
appears on the audio/information screen when
the device is being charged by the wireless charger.
Green Indicator
Amber Indicator
Charging Area
(Power) Button
* Not available on all models

Continued
237
uu
Interior Convenience Items
u
Other Interior Convenience Items
Co
ntrols
■
When charging does not start
Perform one of the solutions in the following table.
Indicator
Cause
Solution
Green
&
Amber
Blinking
simulta-
neously
There is an obstacle(s) between
the charging area and the
device.
Remove the
obstacle(s).
The device is not within the
charging area.
Pick up and reset the
device to the center of
the charging area
where
is located.
The temperature of the wireless
charger pad increases.
Temporarily suspend
charging the device.
Wait for the
temperature to drop
and attempt to charge
the device again.
Amber
Blinking
The wireless charger is faulty.
Contact a dealer for
repairs.
1
This system consumes a lot of power. Do not use the
system for a long time when the power system is off.
This may weaken the 12-volt battery, making it
difficult to turn the power system on.
When using the wireless charger, check the user’s manual that
came with the compatible device you want to charge.
3
CAUTION
Metal objects between the charge pad
and the device to be charged will get
hot and can burn you.
•
Always remove foreign objects from
the charge pad before charging the
device.
•
Be sure the surface is clear of dust and
other debris before charging.
•
Do not spill liquids (i. e. water, drinks,
etc.) on the charger and the device.
•
Do not use oil, grease, alcohol,
benzine or thinner for cleaning the
charge pad.
•
Do not cover the system with towels,
clothing, or other objects while
charging etc.
•
Avoid spraying aerosols which may
come in contact with the charge pad
surface.
* Not available on all models
Нет комментариевНе стесняйтесь поделиться с нами вашим ценным мнением.
Текст