
Opel Grandland X (2018 year). Manual — part 14
214
Vehicle care
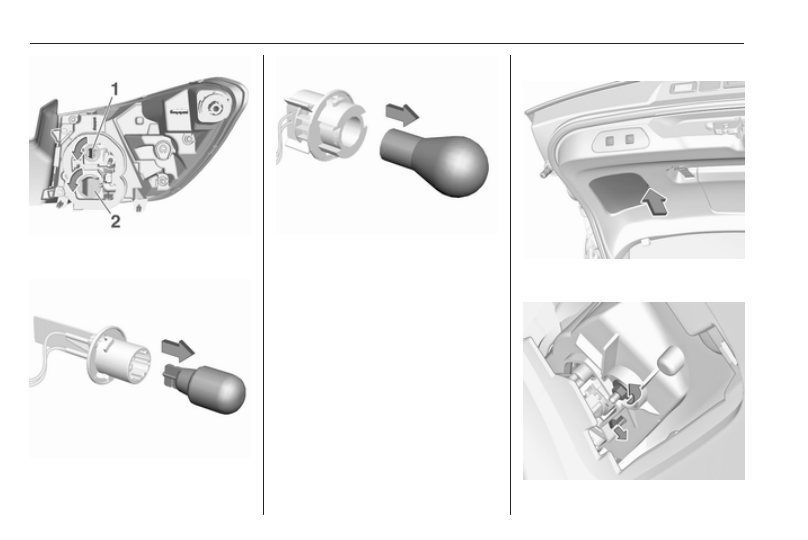
7. Detach the bulb from the bulb
socket and replace the bulb:
Brake light(1)
Turn signal light (2)
8. Insert the bulb socket into the light
assembly. Fit the light assembly in
the recess and tighten the lamp
fixing nut from the inside. Attach
the cover.
Light assembly in the tailgate
1. Open the tailgate and remove the
cover.
-------------------------------------------------------------------------------------------------------------------------------------------------------------
Vehicle care
215
2. Slacken the lamp fixing nut using
a box spanner or socket.
3. Manually unscrew and remove
the lamp fixing nut.
4. Disengage the retaining clip,
while pushing the light assembly
out slightly.
5. From the outside, carefully
withdraw light assembly from
recess and remove. Take care
that the cable duct remains in
position.
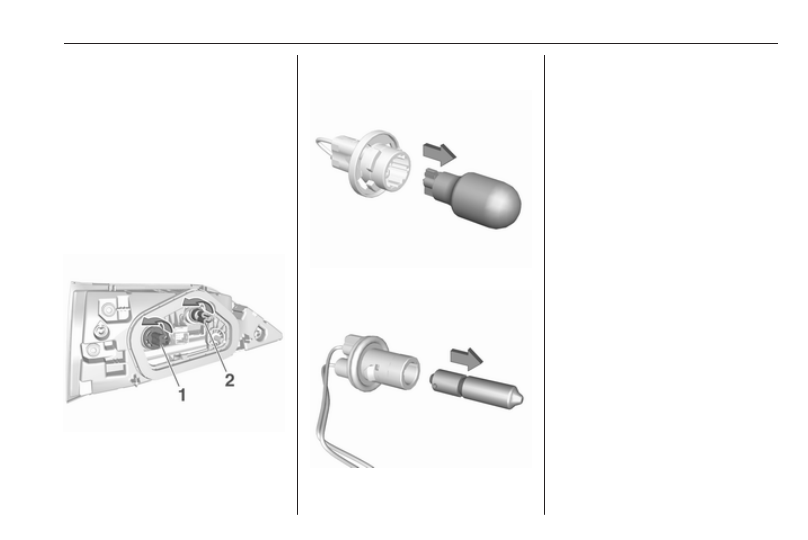
6. Turn the bulb socket
anticlockwise and remove it from
the light assembly.
7. Detach the bulb from the bulb
socket and replace the bulb:
Reverse light (1)
Rear fog light (2)
8. Insert the bulb socket into the light
assembly. Fit the light assembly in
the recess and tighten the lamp
fixing nut from the inside. Attach
the cover.
Centre high-mounted brake light
The centre high-mounted brake light
is designed as LED and can not be
changed.
Have lights repaired by a workshop in
case of failure.
Bulb check
Switch on the ignition, operate and
check all lights.
-------------------------------------------------------------------------------------------------------------------------------------------------------------
216
Vehicle care
Side turn signal lights
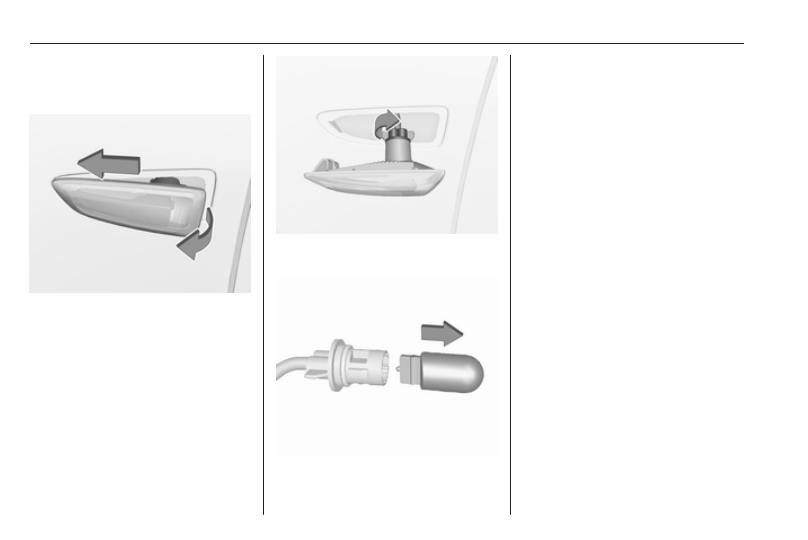
To replace bulb, remove lamp
housing:
1. Slide lamp to its left side and
remove with its right end.
2. Turn bulb socket clockwise and
remove from housing.
3. Detach the bulb from the bulb
socket and replace the bulb.
4. Insert bulb socket and turn
anticlockwise.
5. Insert left end of the lamp, slide to
the left and insert right end.
Number plate light
Number plate lights are designed as
LEDs and can not be changed.
Have lights repaired by a workshop in
case of failure.
Interior lights
Courtesy lights, reading lights
Have bulbs replaced by a workshop.
Load compartment light
Have bulbs replaced by a workshop.
Instrument panel
illumination
Have bulbs replaced by a workshop.
-------------------------------------------------------------------------------------------------------------------------------------------------------------
Vehicle care
217
Vehicle tools
Tools
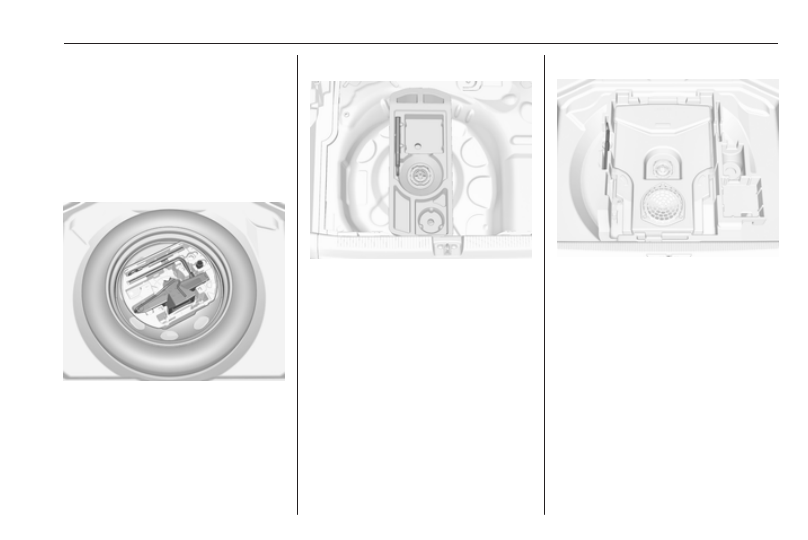
Vehicles with spare wheel
Open the floor cover of the load
compartment 3 74.
Remove the cover of the tool box.
The jack, the towing eye, chocks and
the tools are located in the tool box.
Vehicles without spare wheel
The towing eye and the chocks are
located in a box below the floor cover
in the load compartment.
Tyre repair kit 3 222.
Vehicles with audio speaker system
The towing eye and the chocks are
located in a box below the floor cover
in the load compartment.
Tyre repair kit 3 222.
-------------------------------------------------------------------------------------------------------------------------------------------------------------
218
Vehicle care
Wheels and tyres
Tyre condition, wheel condition
Drive over edges slowly and at right
angles if possible. Driving over sharp
edges can cause tyre and wheel
damage. Do not trap tyres on the kerb
when parking.
Regularly check the wheels for
damage. Seek the assistance of a
workshop in the event of damage or
unusual wear.
Winter tyres
Winter tyres improve driving safety at
temperatures below 7 °C and should
therefore be fitted on all wheels.
In accordance with country-specific
regulations, affix the speed sticker in
the driver's field of view.
All tyre sizes are permitted as winter
tyres 3 249.
Tyre designations
E.g. 225/55 R 18 98 V
225 : tyre width, mm
55 : cross-section ratio (tyre height
to tyre width), %
R
: belt type: Radial
RF : type: RunFlat
18 : wheel diameter, inches
98 : load index e.g. 98 is equivalent
to 750 kg
V
: speed code letter
Speed code letter:
Q : up to 160 km/h
S : up to 180 km/h
T : up to 190 km/h
H : up to 210 km/h
V : up to 240 km/h
W : up to 270 km/h
Choose a tyre appropriate for the
maximum speed of your vehicle.
The maximum speed is achievable at
kerb weight with driver (75 kg) plus
125 kg payload. Optional equipment
could reduce the maximum speed of
the vehicle.
Performance 3 246.
Directional tyres
Directional tyres should be mounted
so that they rotate in the correct
direction. The proper rotation
direction is indicated by a symbol
(e.g. an arrow) on the sidewall.
Tyre pressure
Check the pressure of cold tyres at
least every 14 days and before any
long journey. Do not forget the spare
wheel. This also applies to vehicles
with tyre pressure monitoring system.
Tyre pressure 3 249.
-------------------------------------------------------------------------------------------------------------------------------------------------------------
Vehicle care
219
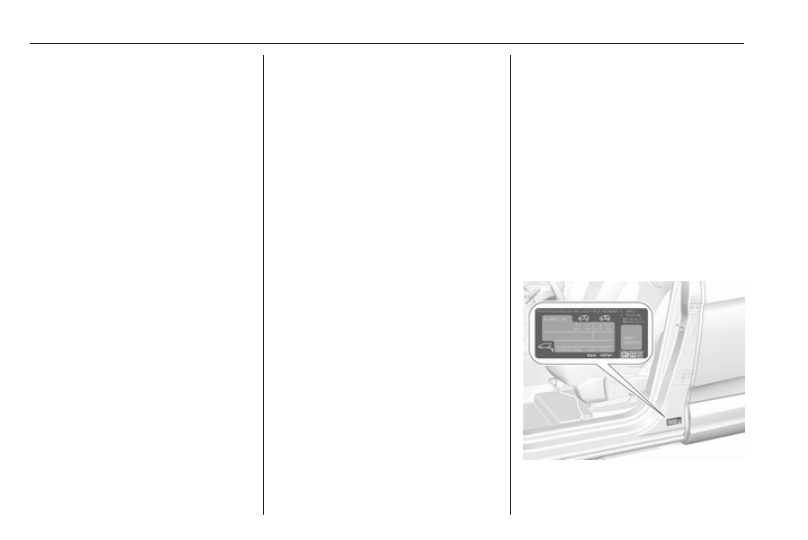
The tyre pressure information label
on the left door frame indicates the
original equipment tyres and the
correspondent tyre pressures.
The tyre pressure data refers to cold
tyres. It applies to summer and winter
tyres.
Always inflate the spare tyre to the
pressure specified for full load.
The ECO tyre pressure serves to
achieve the smallest amount of fuel
consumption possible.
Incorrect tyre pressures will impair
safety, vehicle handling, comfort and
fuel economy and will increase tyre
wear.
Tyre pressures differ depending on
various options. For the correct tyre
pressure value, follow the procedure
below:
1. Identify the engine identifier code.
Engine data 3 245.
2. Identify the respective tyre.
The tyre pressure tables show all
possible tyre combinations 3 249.
For the tyres approved for your
vehicle, refer to the EEC Certificate of
Conformity provided with your vehicle
or other national registration
documents.
The driver is responsible for correct
adjustment of tyre pressure.
9 Warning
If the pressure is too low, this can
result in considerable tyre warm-
up and internal damage, leading to
tread separation and even to tyre
blow-out at high speeds.
9 Warning
For specific tyres the
recommended tyre pressure as
shown in the tyre pressure table
may exceed the maximum tyre
pressure as indicated on the tyre.
Never exceed the maximum tyre
pressure as indicated on the tyre.
Temperature dependency
The tyre pressure depends on the
temperature of the tyre. During
driving, tyre temperature and
pressure increase. Tyre pressure
values provided on the tyre
information label and tyre pressure
chart are valid for cold tyres, which
means at 20 °C.
The pressure increases by nearly
10 kPa for a 10 °C temperature
increase. This must be considered
when warm tyres are checked.
The tyre pressure value displayed in
the Driver Information Centre shows
the real tyre pressure. A cooled down
tyre will show a decreased value,
which does not indicate an air leak.
Tyre deflation detection
system
The tyre deflation detection system
continually checks the rotation speed
of all four wheels and warns on low
tyre pressure condition once vehicle
is driving. This is achieved by
comparing tyre rolling circumference
with reference values.
-------------------------------------------------------------------------------------------------------------------------------------------------------------
220
Vehicle care
If a tyre loses pressure the control
indicator w illuminates and a warning
message is displayed in the Driver
Information Centre.
In this case reduce speed, avoid
sharp cornering and strong braking.
Stop at next safe opportunity and
check tyre pressure.
Control indicator w 3 99.
After adjusting tyre pressure initialise
system to extinguish the control
indicator and restart system.
Caution
Deflation detection system warns
just about low tyre pressure
condition and does not replace
regular tyre maintenance by the
driver.
In case of a system malfunction a
message is displayed in the Driver
Information Centre. Set correct tyre
pressure and reinitialise system. If the
failure continues to be displayed,
contact a workshop. The system is
inoperable when ABS or ESC has a
malfunction or a temporary spare
wheel is used. Once the road tyre has
been refitted, check the tyre pressure
with cold tyres and initialise the
system.
System initialisation
After tyre pressure correction or
wheel change, the system must be
initialised to learn new circumference
reference values:
1. Always ensure that all four tyres
have correct tyre pressure
249.
2. Apply manual parking brake.
3. Press w to reset deflation
detection system.
4. Reset is confirmed by pop-up
indication.
After initialisation system
automatically calibrates to new tyre
pressures during driving. After longer
drive the system will adopt and
monitor new pressures.
Always check tyre pressure with cold
tyres.
System has to be reinitialised when:
● Tyre pressure has been changed
● Load condition has been
changed
● Wheels have been swapped or
exchanged
The system will not warn
instantaneously on a tyre blow out or
a rapid deflation. This is due to
required calculation time.
Tread depth
Check tread depth at regular
intervals.
-------------------------------------------------------------------------------------------------------------------------------------------------------------
Vehicle care
221
Tyres should be replaced for safety
reasons at a tread depth of 2-3 mm
(4 mm for winter tyres).
For safety reasons, it is
recommended that the tread depth of
the tyres on one axle should not vary
by more than 2 mm.
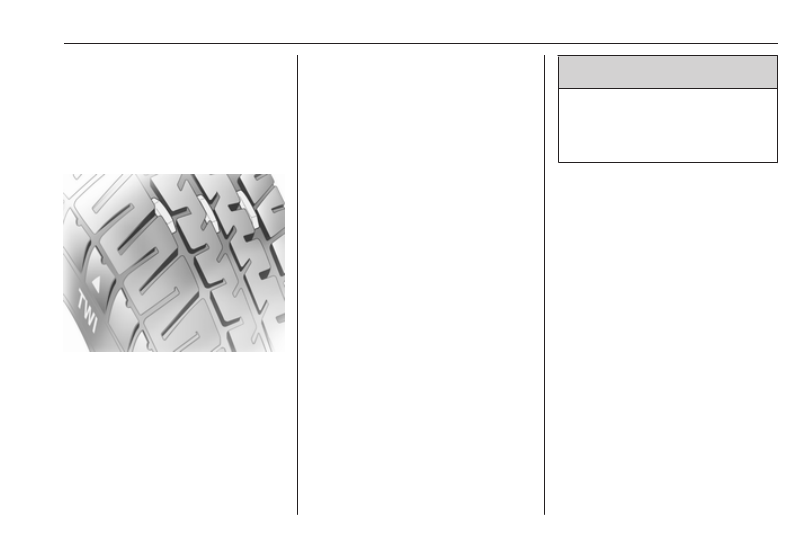
The legally permissible minimum
tread depth (1.6 mm) has been
reached when the tread has worn
down as far as one of the tread wear
indicators (TWI). Their position is
indicated by markings on the
sidewall.
If there is more wear at the front than
the rear, swap round front wheels and
rear wheels periodically. Ensure that
the direction of rotation of the wheels
remains the same.
Tyres age, even if they are not used.
We recommend tyre replacement
every 6 years.
Changing tyre and wheel
size
If tyres of a different size than those
fitted at the factory are used, it may be
necessary to reprogramme the
speedometer as well as the nominal
tyre pressure and make other vehicle
modifications.
After converting to a different tyre
size, have the label with tyre
pressures replaced and the tyre
deflation detection system
reinitialised. 3 219
9 Warning
The use of unsuitable tyres or
wheels may lead to accidents and
will invalidate the vehicle
operating permit.
Wheel covers
Wheel covers and tyres that are
factory approved for the respective
vehicle and comply with all of the
relevant wheel and tyre combination
requirements must be used.
If the wheel covers and tyres used are
not factory approved, the tyres must
not have a rim protection ridge.
Wheel covers must not impair brake
cooling.
-------------------------------------------------------------------------------------------------------------------------------------------------------------
222
Vehicle care
9 Warning
Use of unsuitable tyres or wheel
covers could lead to sudden
pressure loss and thereby
accidents.
Vehicles with steel wheels: When
using locking wheel nuts, do not
attach wheel covers.
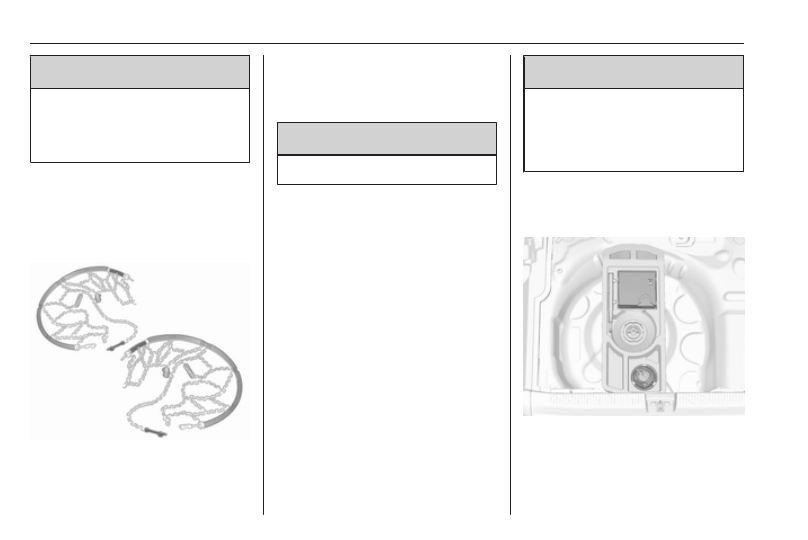
Tyre chains
Tyre chains are only permitted on the
front wheels.
Always use fine mesh chains that add
no more than 9 mm to the tyre tread
and the inboard sides (including chain
lock).
9 Warning
Damage may lead to tyre blowout.
Tyre chains are permitted on tyres of
size 215/70R16, 215/65 R17,
225/55 R18 and 205/55 R19.
Temporary spare wheel
The use of tyre chains is not permitted
on the temporary spare wheel.
Tyre repair kit
Minor damage to the tyre tread can be
repaired with the tyre repair kit.
Do not remove foreign bodies from
the tyres.
Tyre damage exceeding 4 mm or that
is at tyre's sidewall cannot be repaired
with the tyre repair kit.
9 Warning
Do not drive faster than 80 km/h.
Do not use for a lengthy period.
Steering and handling may be
affected.
If you have a flat tyre:
Apply the parking brake and engage
first gear, reverse gear or P.
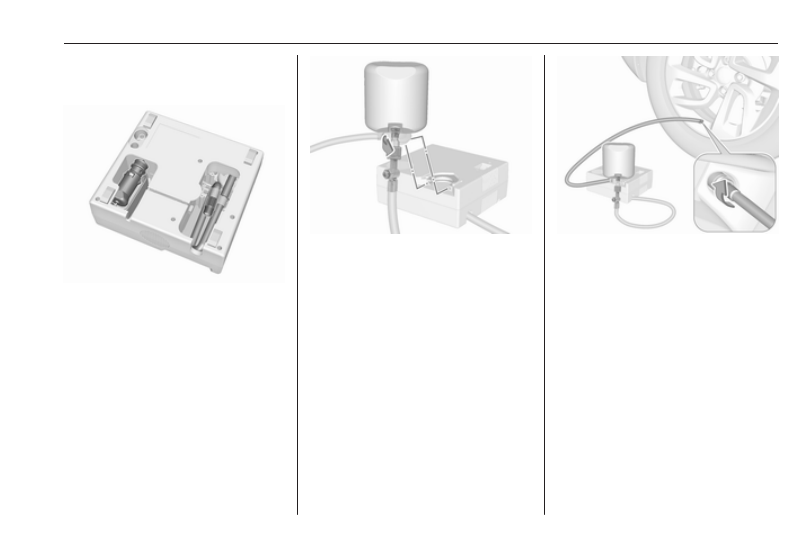
The tyre repair kit is in the load
compartment below the floor cover.
1. Remove the sealant bottle and the
compressor.
-------------------------------------------------------------------------------------------------------------------------------------------------------------
Vehicle care
223
2. Pull speed limit label from sealant
bottle and place it in driver's
visible area.
3. Remove the electrical connection
cable and air hose from the
stowage compartments on the
underside of the compressor.
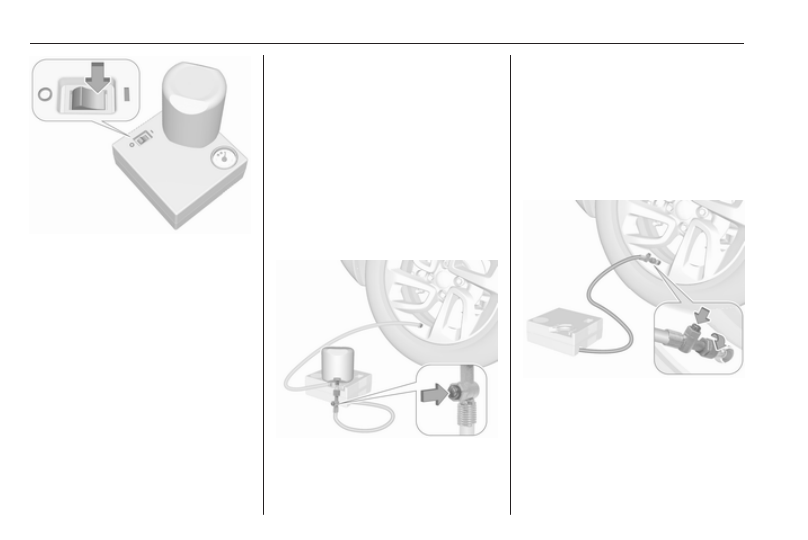
4. Screw the compressor air hose to
the connection on the sealant
bottle.
5. Fit the sealant bottle into the
bracket on the compressor.
Set the compressor near the tyre
in such a way that the sealant
bottle is upright.
6. Unscrew valve cap from defective
tyre.
7. Screw the filler hose to the tyre
valve.
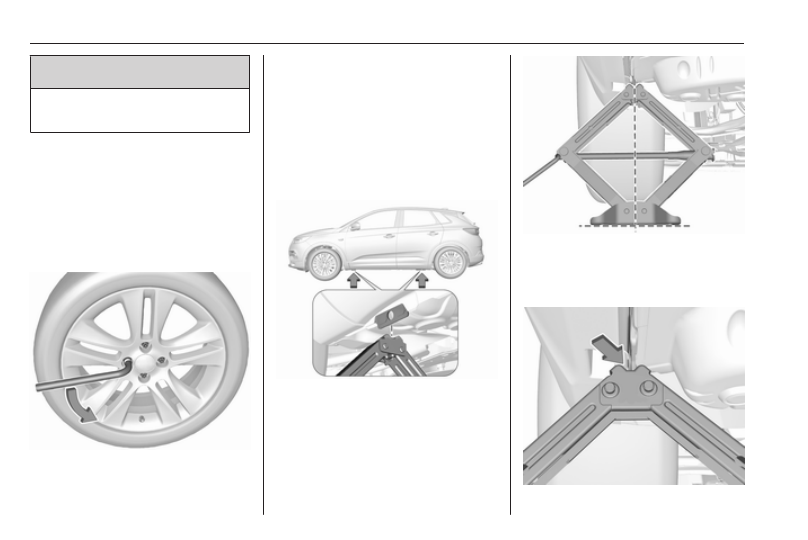
8. The switch on the compressor
must be set to J.
9. Connect the compressor plug to
the power outlet or cigarette
lighter socket.
To avoid discharging the battery,
we recommend running the
engine.
-------------------------------------------------------------------------------------------------------------------------------------------------------------
224
Vehicle care
10. Set the rocker switch on the
compressor to I. The tyre is filled
with sealant.
11. The compressor pressure gauge
briefly indicates up to 6 bar whilst
the sealant bottle is emptying
(approx. 30 seconds). Then the
pressure starts to drop.
12. All of the sealant is pumped into
the tyre. Then the tyre is being
inflated.
13. The prescribed tyre pressure
should be obtained within ten
minutes.
Tyre pressure 3 249.
When the correct pressure is
obtained, switch off the
compressor.
If the prescribed tyre pressure is
not obtained within ten minutes,
remove the tyre repair kit. Move
the vehicle one tyre rotation.
Reattach the tyre repair kit and
continue the filling procedure for
ten minutes. If the prescribed tyre
pressure is still not obtained, the
tyre is too badly damaged. Seek
the assistance of a workshop.
Drain excess tyre pressure with
the button on the air hose.
Do not run the compressor longer
than ten minutes.
14. Detach the tyre repair kit. Remove
sealant bottle from bracket. Screw
the filler hose to the free
connection of the sealant bottle.
This prevents sealant from
escaping. Stow tyre repair kit in
load compartment.
15. Remove any excess sealant
using a cloth.
16. Continue driving immediately so
that sealant is evenly distributed
in the tyre. After driving approx.
5 km (but no more than ten
minutes), stop and check tyre
pressure. Screw compressor air
hose directly onto tyre valve when
doing this. Fill tyre as described
-------------------------------------------------------------------------------------------------------------------------------------------------------------
Vehicle care
225
before. Drain excess tyre
pressure with the button on the air
hose.
If tyre pressure hasn't decreased
under 1.5 bar, set it to the correct
value. Otherwise the vehicle must
not be used. Seek assistance of a
workshop.3 249
Repeat the checking procedure
once more after driving further
10 km (but no more than ten
minutes) to check that there is no
more loss of pressure
If the tyre pressure has fallen
below 1.5 bar, the vehicle must
not be used. Seek the assistance
of a workshop.
17. Stow away tyre repair kit in load
compartment.
Note
The driving characteristics of the
repaired tyre are severely affected,
therefore have this tyre replaced.
If unusual noise is heard or the
compressor becomes hot, turn
compressor off for at least
30 minutes.
The built-in safety valve opens at a
pressure of seven bar.
Note the expiry date of the kit. After
this date its sealing capability is no
longer guaranteed. Pay attention to
storage information on sealant
bottle.
Replace the used sealant bottle.
Dispose of the bottle as prescribed
by applicable laws.
The compressor and sealant can be
used from approx. -30 °C.
Wheel changing
Some vehicles are equipped with a
tyre repair kit instead of a spare wheel
Make the following preparations and
observe the following information:
● Park the vehicle on a level, firm
and non-skid surface. The front
wheels must be in the straight-
ahead position.
● If necessary, place a chock under
the wheel diagonally opposite the
wheel to be changed.
● Apply the parking brake and
engage first gear, reverse gear or
P.
● Remove the spare wheel 3 228.
● Never change more than one
wheel at once.
● Use the jack only to change
wheels in case of puncture, not
for seasonal winter or summer
tyre change.
● The jack is maintenance-free.
● If the ground on which the vehicle
is standing is soft, a solid board
(max. 1 cm thick) should be
placed under the jack.
● Take heavy objects out of the
vehicle before jacking up.
● No people or animals may be in
the vehicle when it is jacked-up.
● Never crawl under a jacked-up
vehicle.
● Do not start the vehicle when it is
raised on the jack.
● Before screwing in the wheel
bolts, clean them.
-------------------------------------------------------------------------------------------------------------------------------------------------------------
226
Vehicle care
9 Warning
Do not grease the thread of the
wheel bolt.
1. Disengage wheel bolt caps with
the wheel bolt cover remover.
Steel wheels with cover: Pull off
the wheel cover.
Alloy wheels: Disengage wheel
bolt caps with the wheel bolt cover
remover.
2. Fold out the wheel wrench and
install ensuring that it locates
securely and loosen each wheel
nut by half a turn.
The wheels might be protected by
locking wheel nuts. To loosen
these specific nuts first attach the
adapter onto the head of the nut
before installing the wheel
wrench. The adapter is located in
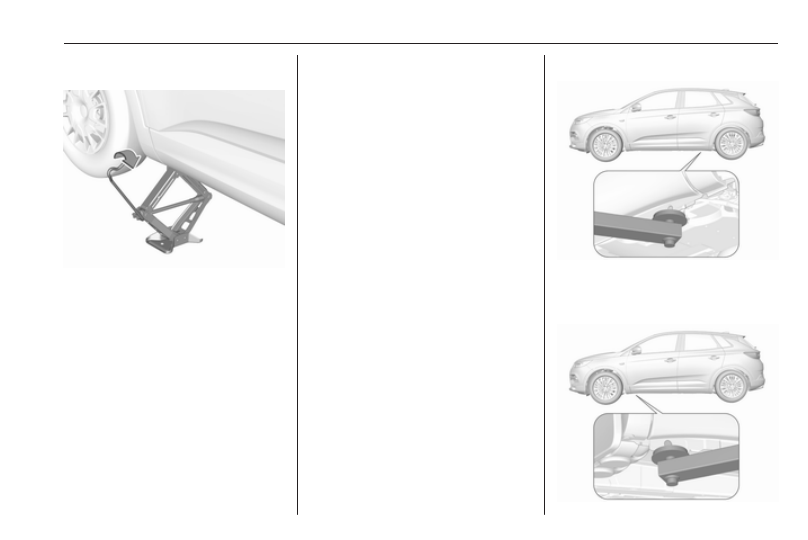
3. Ensure the jack is correctly
positioned under the relevant
vehicle jacking point.
4. Set the jack to the necessary
height. Position it directly below
the jacking point in a manner that
prevents it from slipping.
-------------------------------------------------------------------------------------------------------------------------------------------------------------
Vehicle care
227
Ensure that the edge of the body
fits into the notch of the jack.
Attach wheel wrench and with the
jack correctly aligned rotate wheel
wrench until wheel is clear of the
ground.
5. Unscrew the wheel nuts.
6. Change the wheel. Spare wheel
7. Screw on the wheel nuts.
8. Lower the vehicle and remove
jack.
9. Install the wheel wrench ensuring
that it is located securely and
tighten each bolt in a crosswise
sequence. Tightening torque is
115 Nm.
10. Align the valve hole in the wheel
cover with the tyre valve before
installing.
Install wheel nut caps.
11. Stow the replaced wheel 3 228,
the vehicle tools 3 217 and the
adapter for the locking wheel nuts.
12. Check the tyre pressure of the
installed tyre and the wheel nut
torque as soon as possible.
Have the defective tyre renewed or
repaired as soon as possible.
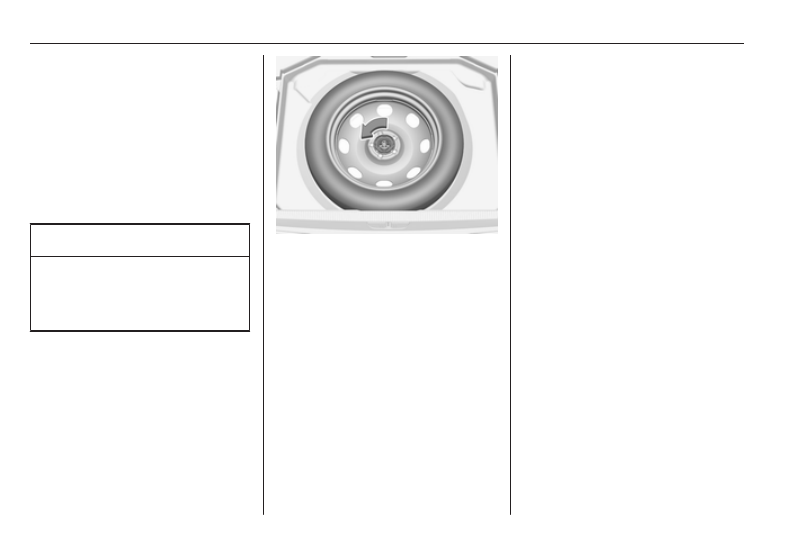
Jacking position for lifting platform
Rear arm position of the lifting
platform centrically under the relevant
vehicle jacking point.
-------------------------------------------------------------------------------------------------------------------------------------------------------------
228
Vehicle care
Front arm position of the lifting
platform centrically under the relevant
vehicle jacking point.
Spare wheel
Some vehicles are equipped with a
tyre repair kit instead of a temporary
Temporary spare wheel
Caution
The use of the temporary spare
wheel could affect driveability.
Have the defective tyre renewed
or repaired as soon as possible.
The spare wheel is located in the load
compartment beneath the floor
covering.
To remove:
1. Open the floor cover 3 74.
2. Remove the tool box.
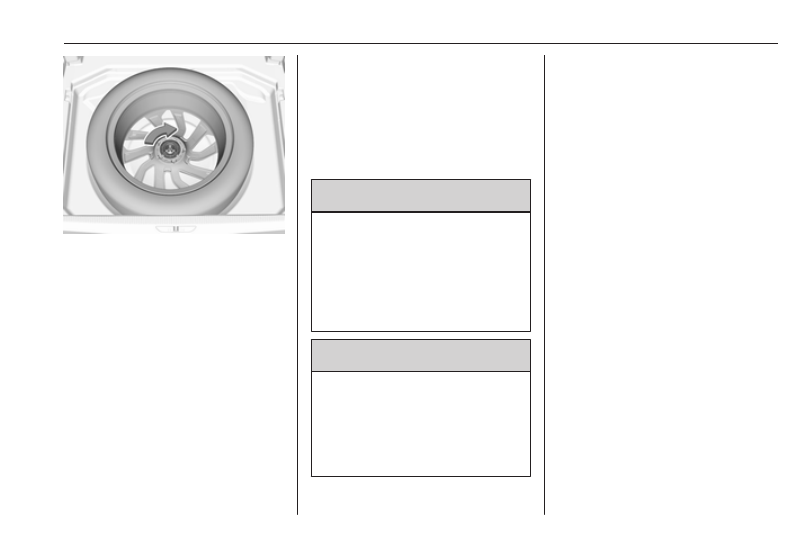
3. The temorary spare wheel is
secured with a wing nut. Unscrew
nut and take out the spare wheel.
4. When, after a wheel change, no
wheel is placed in the spare wheel
well, secure the tool box by
tightening the wing nut as far as it
will go and close floor cover.
5. After wheel change back to full
size wheel, place the temporary
spare wheel outside up in the well
and secure with the wing nut.
Only mount one temporary spare
wheel. The permissible maximum
speed on the label on the temporary
spare wheel is only valid for the
factory-fitted tyre size.
If your vehicle gets a flat tyre on the
rear while towing another vehicle,
mount the temporary spare wheel in
the front and the full size tyre in the
rear.
Tyre chains 3 222.
Stowing a damaged full size
wheel in the load compartment
All permitted wheel sizes can be
stowed in the spare wheel well. To
secure the wheel:
-------------------------------------------------------------------------------------------------------------------------------------------------------------
Vehicle care
229
1. Remove centre cap with the brand
emblem by pushing from the
inside.
2. Position the wheel outside down
in the wheel well.
3. Secure the defective wheel with
the wing nut.
4. Depending on the tyre size, the
floor cover can be placed on the
projecting wheel.
Jump starting
Do not start with quick charger.
A vehicle with a discharged vehicle
battery can be started using jump
leads and the vehicle battery of
another vehicle.
9 Warning
Be extremely careful when starting
with jump leads. Any deviation
from the following instructions can
lead to injuries or damage caused
by battery explosion or damage to
the electrical systems of both
vehicles.
9 Warning
Avoid contact of the battery with
eyes, skin, fabrics and painted
surfaces. The fluid contains
sulphuric acid which can cause
injuries and damage in the event
of direct contact.
● Never expose the vehicle battery
to naked flames or sparks.
● A discharged vehicle battery can
already freeze at a temperature
of 0 °C. Defrost the frozen battery
before connecting jump leads.
● Wear eye protection and
protective clothing when
handling a battery.
● Use a booster battery with the
same voltage (12 Volts). Its
capacity (Ah) must not be much
less than that of the discharged
vehicle battery.
● Use jump leads with insulated
terminals and a cross section of
at least 16 mm
2
(25 mm
2
for
diesel engines).
● Do not disconnect the discharged
vehicle battery from the vehicle.
● Switch off all unnecessary
electrical consumers.
● Do not lean over the vehicle
battery during jump starting.
● Do not allow the terminals of one
lead to touch those of the other
lead.
-------------------------------------------------------------------------------------------------------------------------------------------------------------
Нет комментариевНе стесняйтесь поделиться с нами вашим ценным мнением.
Текст