DAF 95XF. Manual — part 417
4
XE ENGINE FUEL SYSTEM
Removal and installation
95
XF series
4-2
Installing the injection lines
1.
Purge the injection lines with dry
compressed air.
2.
Check whether the injector side connection
is tightened to the specified tightening
torque, see main group “Technical data”.
3.
Fit the injection lines.
4.
Note:
When tightening the injection-line unions,
hold the injector’s side connection back
using an open-end spanner.
Tighten the union nuts of the injection lines
to the specified tightening torque, see main
group “Technical data”.
5
©
0008
4
95
XF series
Removal and installation
XE ENGINE FUEL SYSTEM
4-3
4.2
REMOVAL AND INSTALLATION OF INJECTORS
Because there is overpressure in
the fuel tank, fuel may penetrate the
cylinders when the injectors are
removed. Therefore, when removing
injectors, always take off the
fuel-tank cap first. Collect any fuel
leaving the injectors.
Note:
If the engine has been fitted with a DEB, the
latter must be removed before the injectors can
be removed.
While the DEB is being installed, both the DEB
clearance and the valve clearance must be
adjusted.
Removing the injectors
1.
Remove the injection lines.
2.
Remove the valve covers.
3.
Remove the DEB, if fitted.
4.
Remove the attachment bolt (3) of the
injector clamp.
5.
To remove the injector and the clamp, only
use the special tools (DAF no. 1329412 and
DAF no. 0694928).
Note:
If during removal one or more copper shims (1)
remain in the injector sleeve, the injector will be
reinstalled in a higher position.
-
As a result, instead of spraying into the
combustion chamber of the piston, the fuel
will be sprayed onto the piston ring. This
may seriously damage the piston.
-
There will be inadequate sealing between
the O-ring (2) of the injector and the cylinder
head. Fuel leaking from the injector can
freely flow into the engine and dilute the
lubricating oil.
3
2
1
I 400191
5
©
0008

4
XE ENGINE FUEL SYSTEM
Removal and installation
95
XF series
4-4
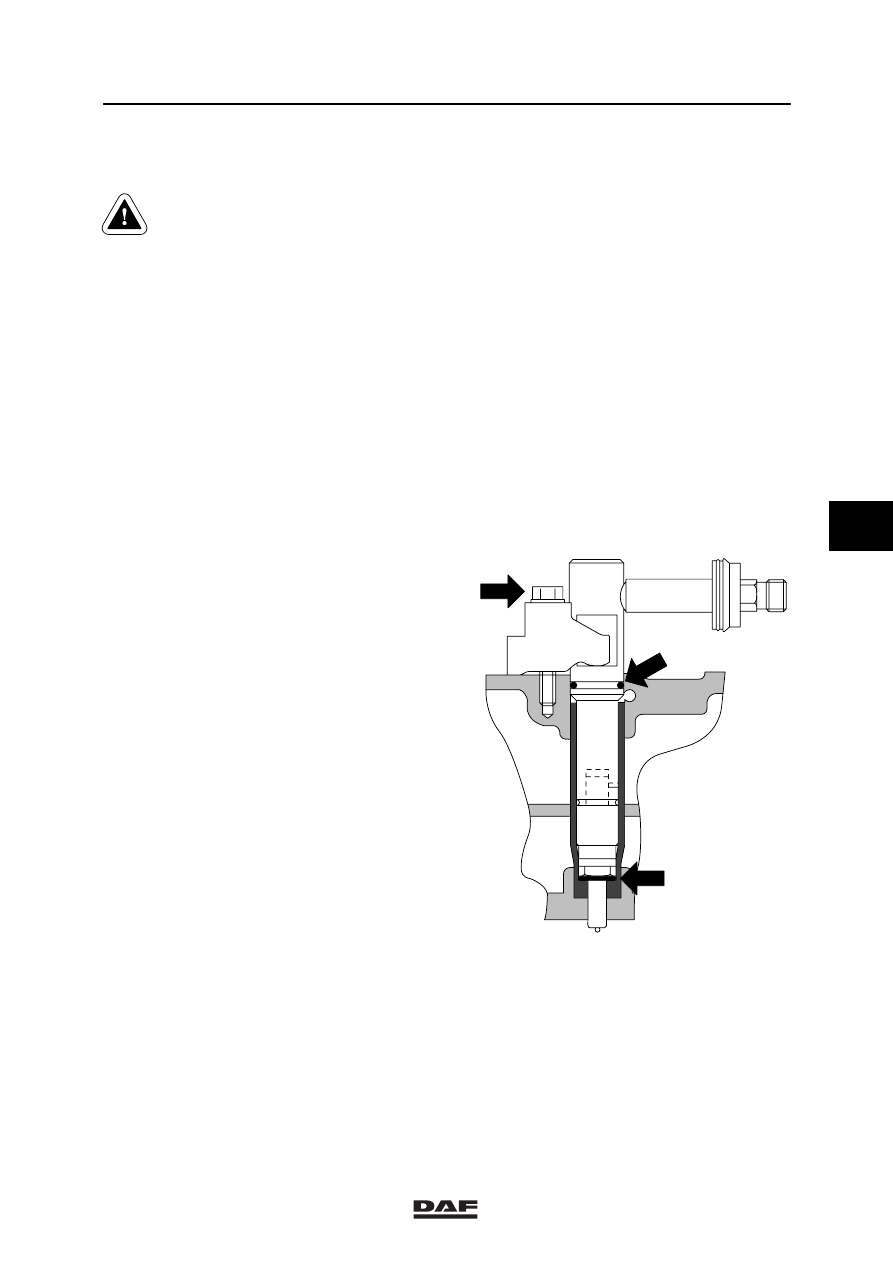
Installing the injectors
1.
Clean the injector sleeve, see chapter
“Cleaning”.
2.
Fit a new O-ring (1) and a new copper
shim (2) on the injector. Apply a little
acid-free grease to both rings.
3.
Check the valve-sleeve sealing ring (3) of
the injector. Replace it if leaking and/or
damaged.
4.
Note:
Make sure that the injector clamp (4) is
installed correctly.
Install the injector together with the injector
clamp (4) and tighten the attachment bolt to
the specified tightening torque, see main
group “Technical data”.
5.
Fit the injection lines.
6.
Check the injector seals for leaks, see
“Checking and adjustment”.
7.
Install the DEB, if present.
8.
Fit the valve covers.
i 400183
3
4
1
2
5
©
0008

4
95
XF series
Removal and installation
XE ENGINE FUEL SYSTEM
4-5
4.3
REMOVAL AND INSTALLATION OF INJECTOR SLEEVES
Removing the injector sleeve
1.
Drain part of the engine coolant.
2.
Remove the injection lines.
3.
Remove the injector.
4.
Insert a ball of crumpled paper into the
injector sleeve to prevent metal particles
from entering the engine.
5.
Cut thread (M22
1.5) in the injector
sleeve to be removed over a length (A) of
approx. 20 mm.
6.
Insert the special tool (DAF no. 1310425)
into the injector sleeve and use the special
tool (DAF no. 0694928) to remove the
injector sleeve.
Installing the injector sleeve
1.
Clean the injector-sleeve opening
thoroughly.
2.
Note:
Install the injector sleeve dry into the
cylinder head.
Use the special tool (DAF no. 1329305) to
tap the injector sleeve into the cylinder
head.
3.
Install the injector.
4.
Fit the injection lines.
5.
Fill the cooling system.
A
I 400195
5
©
0008
Нет комментариевНе стесняйтесь поделиться с нами вашим ценным мнением.
Текст