Acura RLX HYBRID (2020 year). Manual in english — page 31
uu
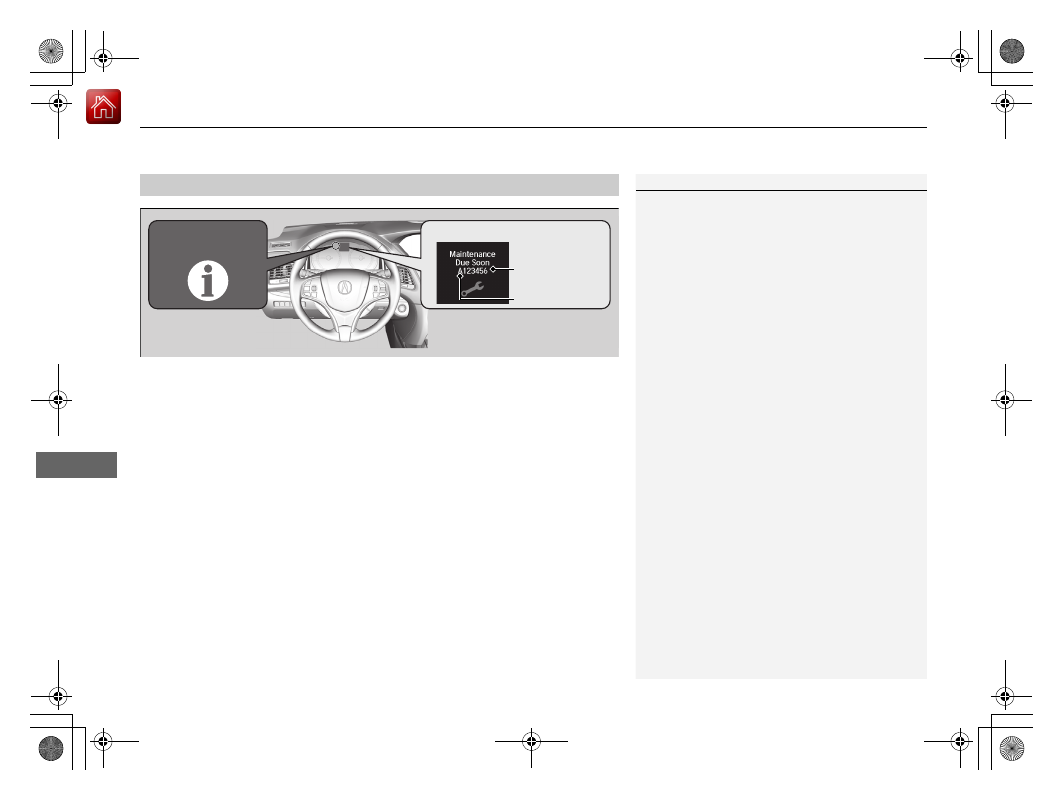
Maintenance Minder
TM
u
To Use Maintenance Minder
TM
498
Main
tenan
ce
■
Maintenance Service Items
1
•
Independent of the Maintenance Minder
information, replace the brake fluid every 3 years.
•
Adjust the valves during services A, B, 1, 2, or 3 if
they are noisy.
Maintenance Minder Message
System Message
Indicator
Main Item
Sub Items
-------------------------------------------------------------------------------------------------------------------------------------------------------------
499
uu
Maintenance Minder
TM
u
To Use Maintenance Minder
TM
Continued
Main
tenan
ce
*1: If a message
Maintenance Due Now
does not appear more than 12 months after the display is
reset, change the engine oil every year.
# : See information on maintenance and emissions warranty.
CODE
Maintenance Main Items
A
•
Replace engine oil
*1
B
•
Replace engine oil
*1
and oil filter
•
Inspect front and rear brakes
•
Check expiration date for temporary tire repair kit
bottle (if equipped)
•
Inspect tie rod ends, steering gearbox, and boots
•
Inspect suspension components
•
Inspect driveshaft boots
•
Inspect brake hoses and lines (Including ABS/VSA
®
)
•
Inspect all fluid levels and condition of fluids
•
Inspect exhaust system
#
•
Inspect fuel lines and connections
#
*2: If you drive in dusty conditions, replace the air cleaner element every 15,000 miles (24,000 km).
*3: If you drive primarily in urban areas that have high concentrations of soot in the air from industry and
from diesel-powered vehicles, replace the dust and pollen filter every 15,000 miles (24,000 km).
*4: Driving in mountainous areas at very low vehicle speeds results in higher transmission temperature.
This requires transmission fluid changes more frequently than recommended by the Maintenance
Minder. If you regularly drive your vehicle under this condition, have the transmission fluid changed at
30,000 miles (48,000 km), then every 25,000 miles (40,000 km).
*5: If you drive regularly in very high temperatures (over 110°F, 43°C), in very low temperatures (under
-20°F, -29°C), replace every 60,000 miles (100,000 km).
*6: Driving in mountainous areas at very low vehicle speeds results in higher level of mechanical (Shear)
stress to fluid. This requires Twin Motor Unit fluid changes more frequently than recommended by the
Maintenance Minder. If you regularly drive your vehicle under this condition, have the Twin Motor Unit
fluid changed at 7,500 miles (12,000 km), then every 15,000 miles (24,000 km).
CODE
Maintenance Sub Items
1
•
Rotate tires
2
•
Replace air cleaner element
*2
•
Replace dust and pollen filter
*3
•
Inspect drive belt
3
•
Replace transmission fluid
*4
4
•
Replace spark plugs
•
Replace timing belt and inspect water pump
*5
•
Inspect valve clearance
5
•
Replace engine coolant
6
•
Replace Twin Motor Unit fluid
*6
-------------------------------------------------------------------------------------------------------------------------------------------------------------
uu
Maintenance Minder
TM
u
To Use Maintenance Minder
TM
500
Main
tenan
ce
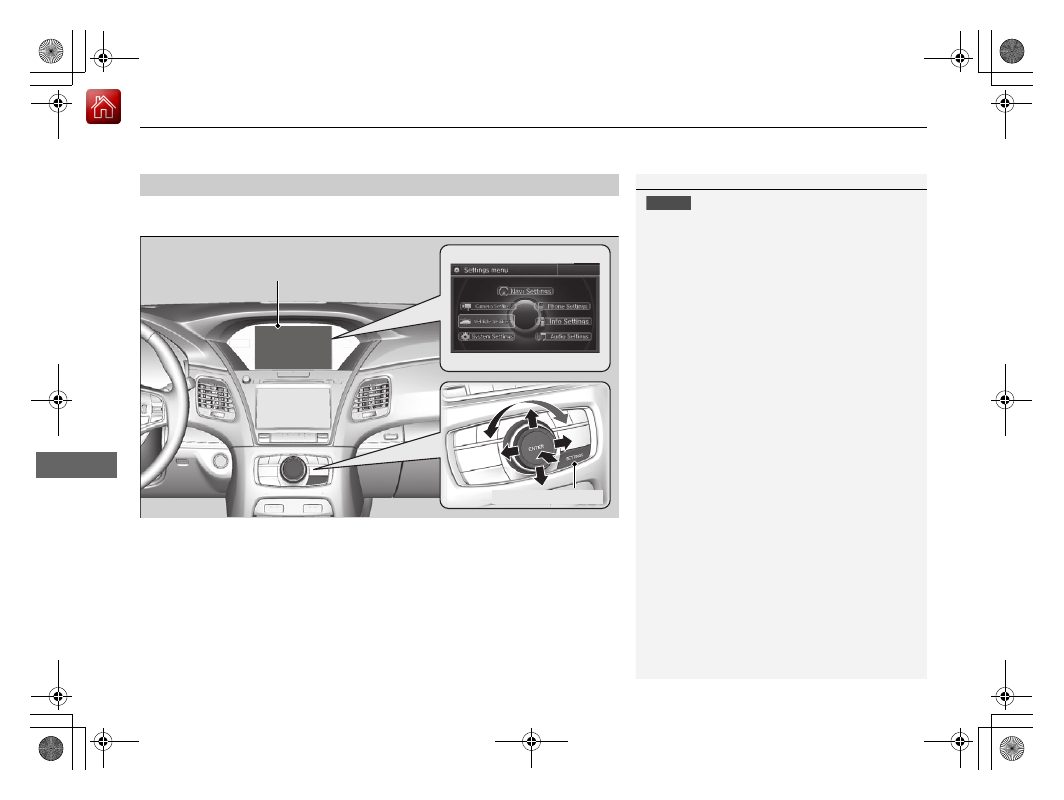
Reset the maintenance minder information display if you have performed the
maintenance service.
1.
Set the power mode to ON.
2.
Press the
SETTINGS
button.
3.
Select
Vehicle Settings
by rotating the interface dial, then press
ENTER
.
4.
Move the interface dial right or left to select
Maintenance Info.
tab.
5.
Rotate the interface dial to select
Maintenance Reset
, then press
ENTER
.
6.
Move the interface dial down to select
RESET
, then press
ENTER
.
u
A confirmation message appears on the audio/information screen.
7.
Rotate the interface dial to select
Reset
, then press
ENTER
.
u
The displayed maintenance items disappear, and the engine oil life returns to
100%.
To cancel the maintenance reset mode, select
Cancel
, then press
ENTER
.
■
Resetting the Display
1
NOTICE
Failure to reset the Maintenance Minder
TM
display
after a maintenance service results in the system
showing incorrect maintenance intervals, which can
lead to serious mechanical problems.
The dealer will reset the Maintenance Minder
TM
display after completing the required maintenance
service. If someone other than a dealer performs
maintenance service, reset the Maintenance
Minder
TM
display yourself.
SETTINGS
Button
Audio/Information Screen
-------------------------------------------------------------------------------------------------------------------------------------------------------------
501
Main
tenan
ce
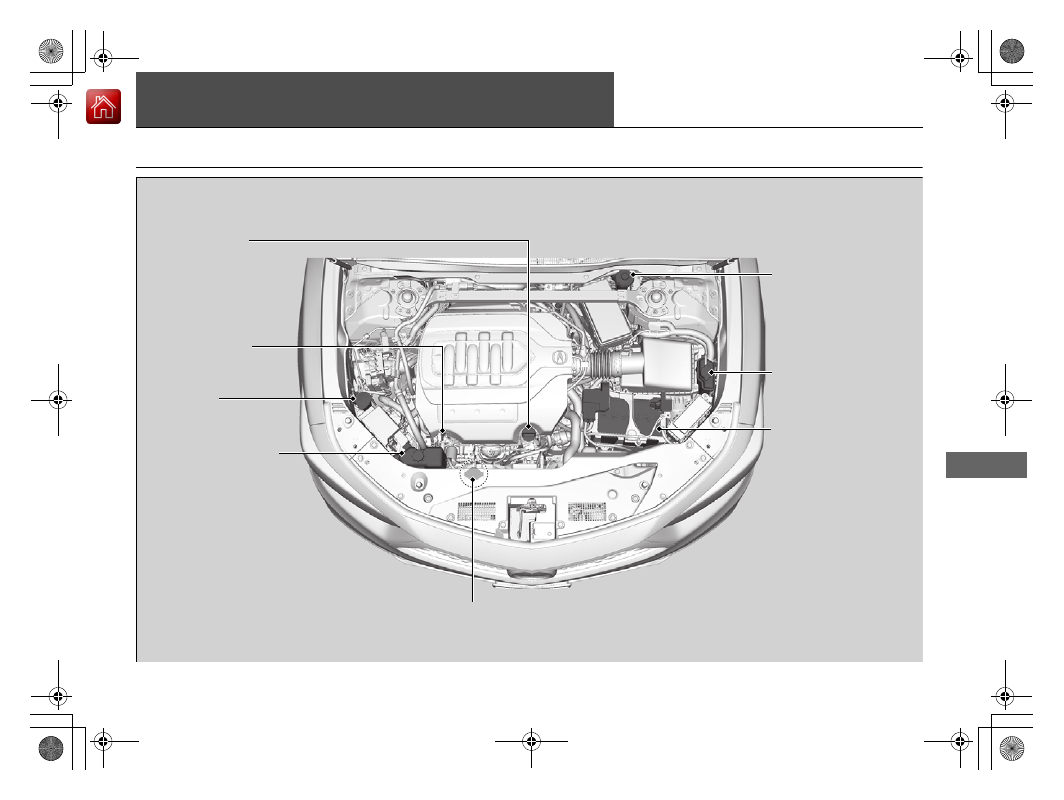
Maintenance Under the Hood
Maintenance Items Under the Hood
Brake Fluid
(Black Cap)
Washer Fluid
(Black Cap)
Engine Oil Dipstick
(Orange)
Engine Oil Fill Cap
12-Volt Battery
Engine Coolant Reserve
Tank
Radiator Cap
Inverter Coolant
Filler Tank
-------------------------------------------------------------------------------------------------------------------------------------------------------------
502
uu
Maintenance Under the Hood
u
Opening the Hood
Main
tenan
ce
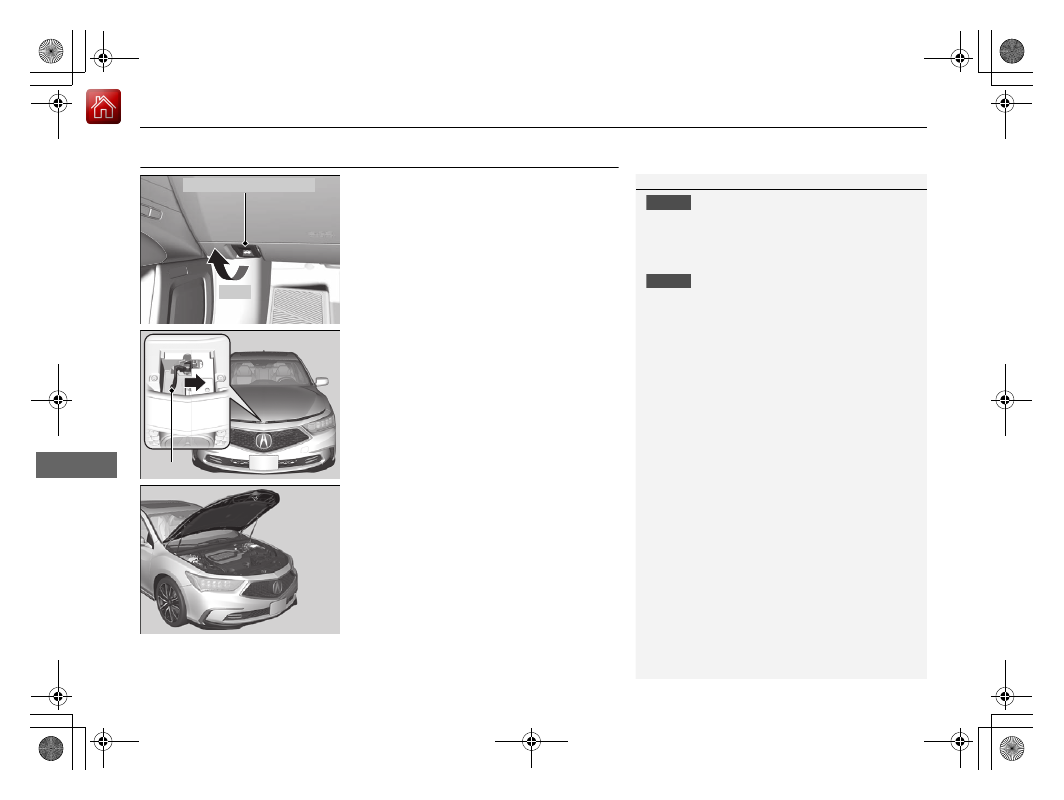
Opening the Hood
1.
Park the vehicle on a level surface, and set
the parking brake.
2.
Pull the hood release handle under the
driver’s side lower left corner of the
dashboard.
u
The hood will pop up slightly.
3.
Push the hood latch lever (located under
the front edge of the hood to the center) to
the side and raise the hood. Once you have
raised the hood slightly, you can release the
lever.
4.
Lift the hood up most of the way.
u
The hydraulic supports will lift it up the
rest of the way and hold it up.
When closing, lower it to approximately 12
inches (30 cm), then press down firmly with
your hands.
1
NOTICE
Do not open the hood when the wiper arms are
raised. The hood will strike the wipers, resulting in
damage to the hood and/or the wipers.
NOTICE
Do not press the engine cover forcibly. This may
damage the engine cover and component parts.
When closing the hood, check that the hood is
securely latched.
If the hood latch lever moves stiffly, or if you can
open the hood without lifting the lever, the latch
mechanism should be cleaned and lubricated.
Pull
Hood Release Handle
Lever
-------------------------------------------------------------------------------------------------------------------------------------------------------------
503
uu
Maintenance Under the Hood
u
Engine Compartment Cover
Main
tenan
ce
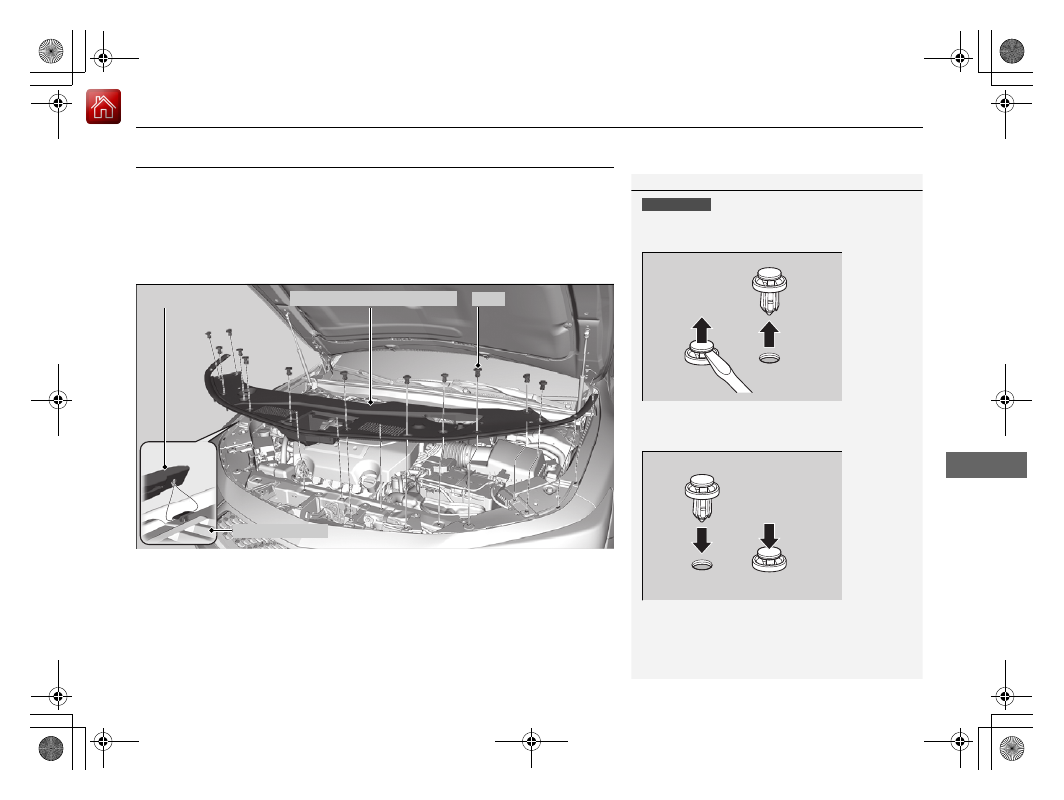
Engine Compartment Cover
The component parts in the engine compartment are protected by a cover.
You may need to remove the cover when you perform certain maintenance work.
To remove the cover:
1.
Remove the holding clips.
2.
Move the hood seal rubber back and forth to remove it from the fender garnish.
3.
Pull up on the engine compartment cover, remove it from the pins.
1
Insert a flat-tip screwdriver, lift and remove the center
pin to remove the clip.
Insert the clip with the center pin raised, and push
until it is flat.
Holding clip
Push until the
pin is flat
Engine Compartment Cover
Clip
Fender Garnish
Hood Seal Rubber
-------------------------------------------------------------------------------------------------------------------------------------------------------------
504
uu
Maintenance Under the Hood
u
Recommended Engine Oil
Main
tenan
ce
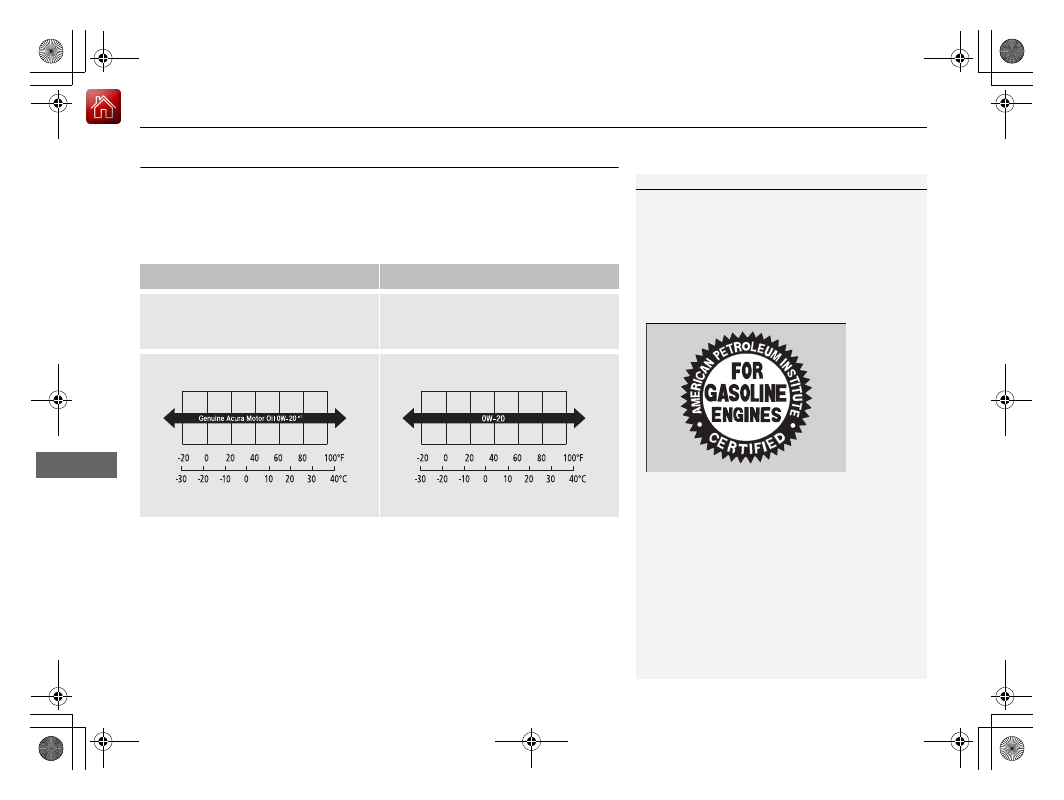
Recommended Engine Oil
Use a genuine engine oil or another commercial engine oil of suitable type and
viscosity (for the ambient temperature) as shown in the image that follows.
Oil is a major contributor to your engine’s performance and longevity. If you drive
the vehicle with insufficient or deteriorated oil, the engine may fail or be damaged.
*1:Formulated to improve fuel economy.
■
Synthetic oil
You may also use synthetic motor oil if it is labeled with the API Certification Seal
and is the specified viscosity grade.
Genuine Engine Oil
Commercial Engine Oil
•
Genuine Acura Motor Oil
•
Premium-grade 0W-20 detergent oil
with an API Certification Seal on the
container
1
Engine Oil Additives
Your vehicle does not require oil additives. In fact,
they may adversely affect the engine performance
and durability.
The following seal indicates the oil is energy
conserving and that it meets the American Petroleum
Institute’s latest requirements.
Ambient Temperature
0W-20
Ambient Temperature
-------------------------------------------------------------------------------------------------------------------------------------------------------------
505
uu
Maintenance Under the Hood
u
Oil Check
Main
tenan
ce
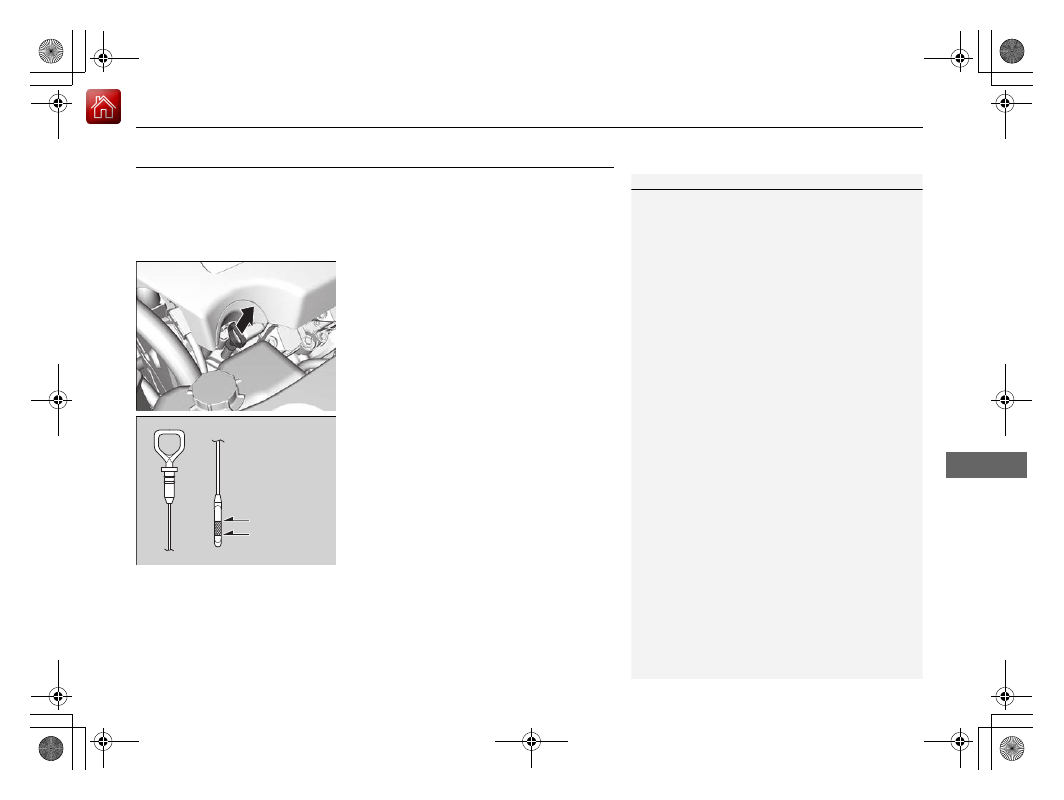
Oil Check
We recommend that you check the engine oil level every time you refuel.
Park the vehicle on level ground.
Turn off the power system. You can check the oil level without the engine having
run beforehand. If the engine has been running, wait approximately three minutes
before you check the oil.
1.
Remove the dipstick (orange).
2.
Wipe the dipstick with a clean cloth or
paper towel.
3.
Insert the dipstick back all the way into its
hole.
4.
Remove the dipstick again, and check the
level. It should be between the upper and
lower marks. Add oil if necessary.
1
If the oil level is near or below the lower mark, slowly
add oil being careful not to overfill.
Upper Mark
Lower Mark
-------------------------------------------------------------------------------------------------------------------------------------------------------------
506
uu
Maintenance Under the Hood
u
Adding Engine Oil
Main
tenan
ce
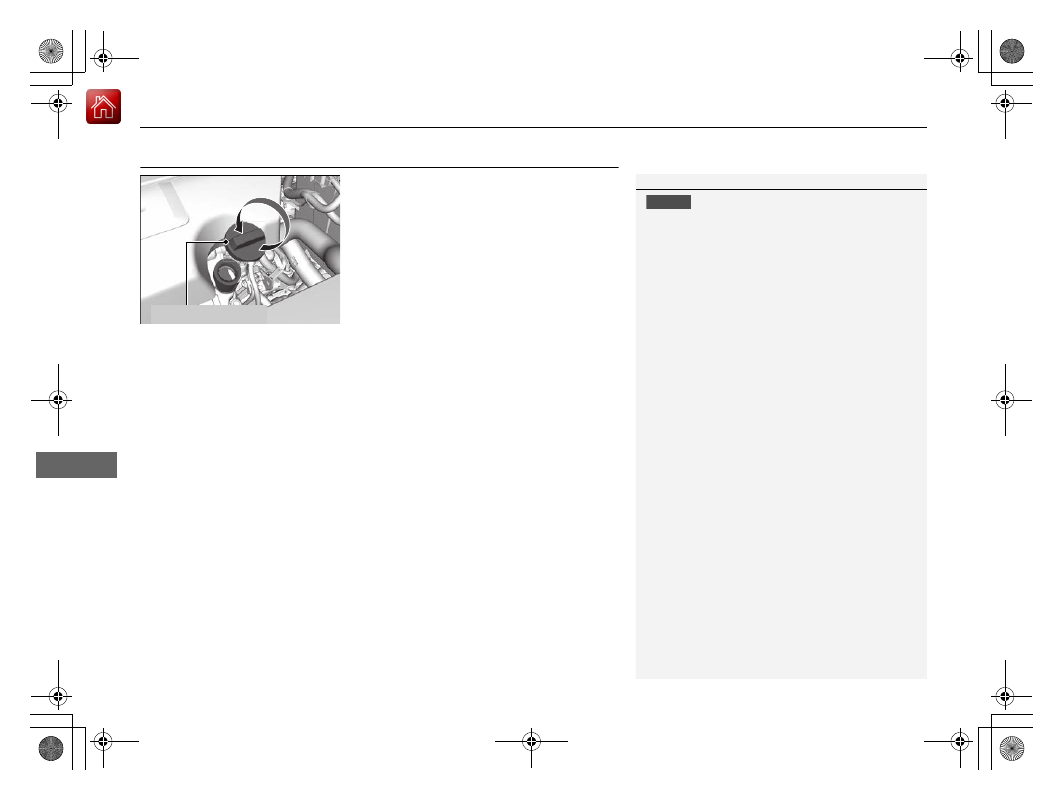
Adding Engine Oil
1.
Unscrew and remove the engine oil fill cap.
2.
Add oil slowly.
3.
Reinstall the engine oil fill cap, and tighten
it securely.
4.
Wait for three minutes and recheck the
engine oil dipstick.
1
NOTICE
Do not fill the engine oil above the upper mark.
Overfilling the engine oil may result in leaks and
engine damage.
If any oil spills, wipe it away immediately. Spilled oil
may damage the engine compartment components.
Engine Oil Fill Cap
-------------------------------------------------------------------------------------------------------------------------------------------------------------
507
uu
Maintenance Under the Hood
u
Changing the Engine Oil and Oil Filter
Continued
Main
tenan
ce
Changing the Engine Oil and Oil Filter
You must change the engine oil and oil filter regularly in order to maintain the
engine’s lubrication. The engine may be damaged if they are not changed regularly.
Turning the power system on automatically starts the engine if the following
conditions are met:
•
The SPORT mode is on.
2
Change the oil and filter in accordance with the maintenance message on the multi-
information display.
1.
Run the engine until it reaches normal
operating temperature, and then turn the
engine off.
2.
Open the hood and remove the engine oil
fill cap.
3.
Remove the drain bolt and washer from
the bottom of the engine, and drain the
oil into a suitable container.
4.
Remove the oil filter and dispose of the
remaining oil.
5.
Check that the filter gasket is not stuck to
the engine contact surface.
u
If it is stuck, you must detach it.
6.
Wipe away dirt and dust adhering to the
contact surface of the engine block, and
install a new oil filter.
u
Apply a light coat of new engine oil to
the filter gasket.
1
Changing the Engine Oil and Oil Filter
NOTICE
You may damage the environment if you do not
dispose of the oil in a suitable way. If you are
changing the oil by yourself, appropriately dispose of
the used oil. Put the oil in a sealed container and take
it to a recycling center. Do not throw the oil away
into a garbage can or onto the ground.
You will need a special wrench to replace the oil
filter. You can buy this wrench from a dealer.
When installing the new oil filter, follow the
instructions supplied with the oil filter.
Reinstall the engine oil fill cap. Start the engine. The
low oil pressure indicator should go off within five
seconds. If it does not, turn off the engine, and check
your work.
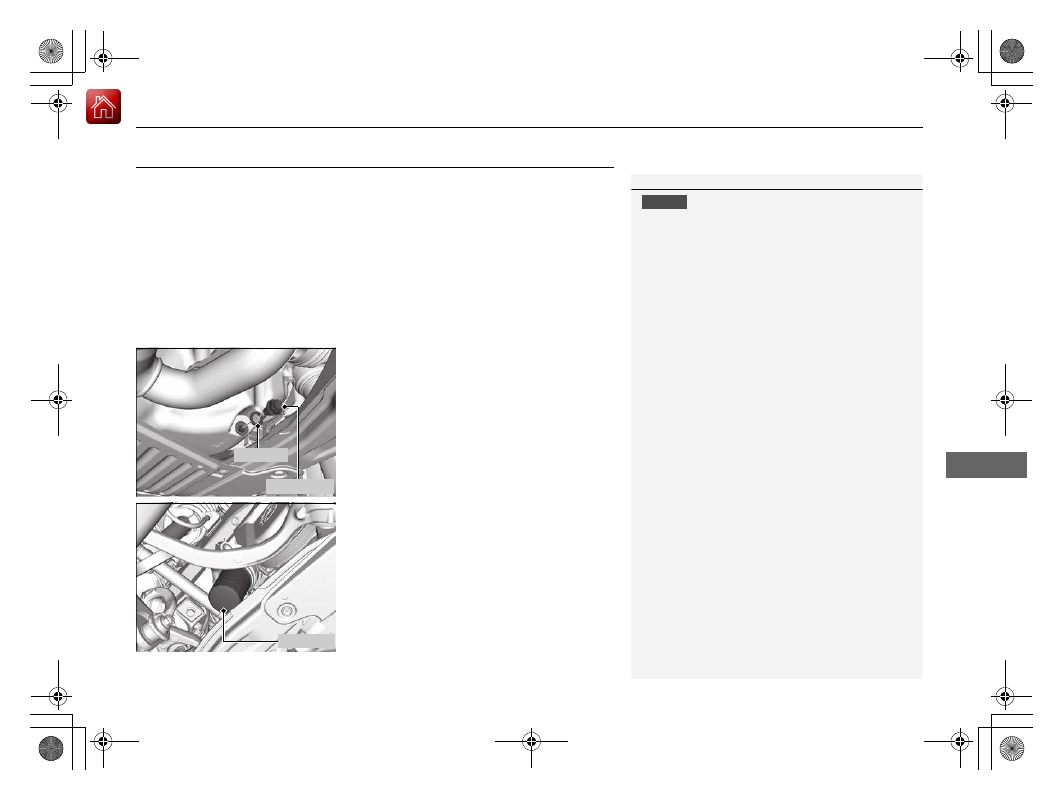
Drain Bolt
Washer
Oil Filter
-------------------------------------------------------------------------------------------------------------------------------------------------------------
508
uu
Maintenance Under the Hood
u
Changing the Engine Oil and Oil Filter
Main
tenan
ce
7.
Put a new washer on the drain bolt, then reinstall the drain bolt.
u
Tightening torque:
30 lbf∙ft (40 N∙m, 4.0 kgf∙m)
8.
Pour the recommended engine oil into the engine.
u
Engine oil change capacity (including filter):
4.5 US qt (4.3 L)
9.
Reinstall the engine oil fill cap securely and start the engine.
10.
Run the engine for a few minutes, and then check that there is no leak from the
drain bolt or oil filter.
11.
Stop the engine, wait for three minutes, and then check the oil level on the
dipstick.
u
If necessary, add more engine oil.
-------------------------------------------------------------------------------------------------------------------------------------------------------------
509
uu
Maintenance Under the Hood
u
Cooling System
Continued
Main
tenan
ce
Cooling System
This coolant is premixed with 50% antifreeze and 50% water. Do not add any
straight antifreeze or water.
We recommend you check the engine coolant level every time you refuel. Check the
reserve tank first. If it is completely empty, also check the coolant level in the
radiator. Add the engine coolant accordingly.
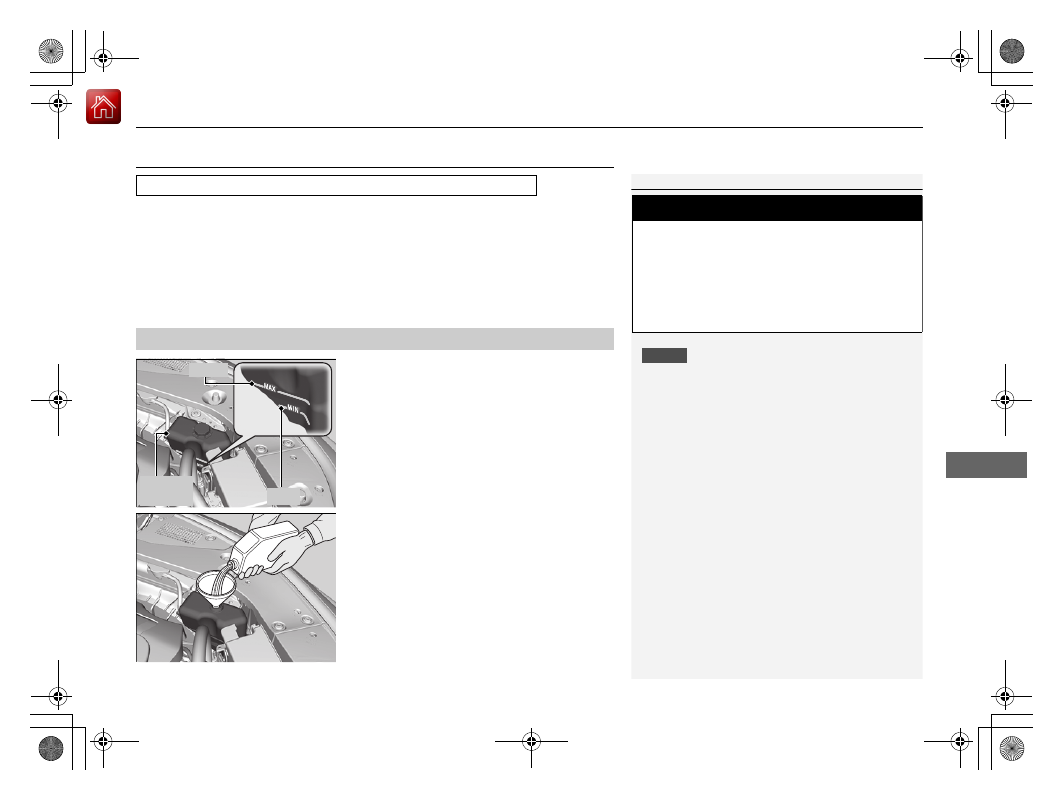
1. Make sure the engine and radiator are
cool.
2.
Check the amount of coolant in the reserve
tank.
u
If the coolant level is below the
MIN
mark, add the specified coolant until it
reaches the
MAX
mark.
3.
Inspect the cooling system for leaks.
Specified coolant: Acura Long Life Antifreeze/Coolant Type 2
■
Reserve Tank
1
NOTICE
Genuine Acura engine coolant is a 50/50 mixture of
antifreeze and water that can withstand freezing at
temperatures as low as about -31°F (-35°C). If your
vehicle is consistently subjected to temperatures
below this, the concentration of antifreeze in the
coolant should be increased. Consult a dealer for
details.
If Acura antifreeze/coolant is not available, you may
use another major brand of non-silicate coolant as a
temporary replacement. Check that it is a high quality
coolant recommended for aluminum engines.
Continued use of any non-Acura coolant can result in
corrosion, causing the cooling system to malfunction
or fail. Have the cooling system flushed and refilled
with Acura antifreeze/coolant as soon as possible.
Do not add rust inhibitors or other additives to your
vehicle’s cooling system. They may not be compatible
with the coolant or with the engine components.
3
WARNING
Removing the radiator cap while the
engine is hot can cause the coolant to spray
out, seriously scalding you.
Always let the engine and radiator cool
down before removing the radiator cap.
Reserve
Tank
MAX
MIN
-------------------------------------------------------------------------------------------------------------------------------------------------------------
uu
Maintenance Under the Hood
u
Cooling System
510
Main
tenan
ce
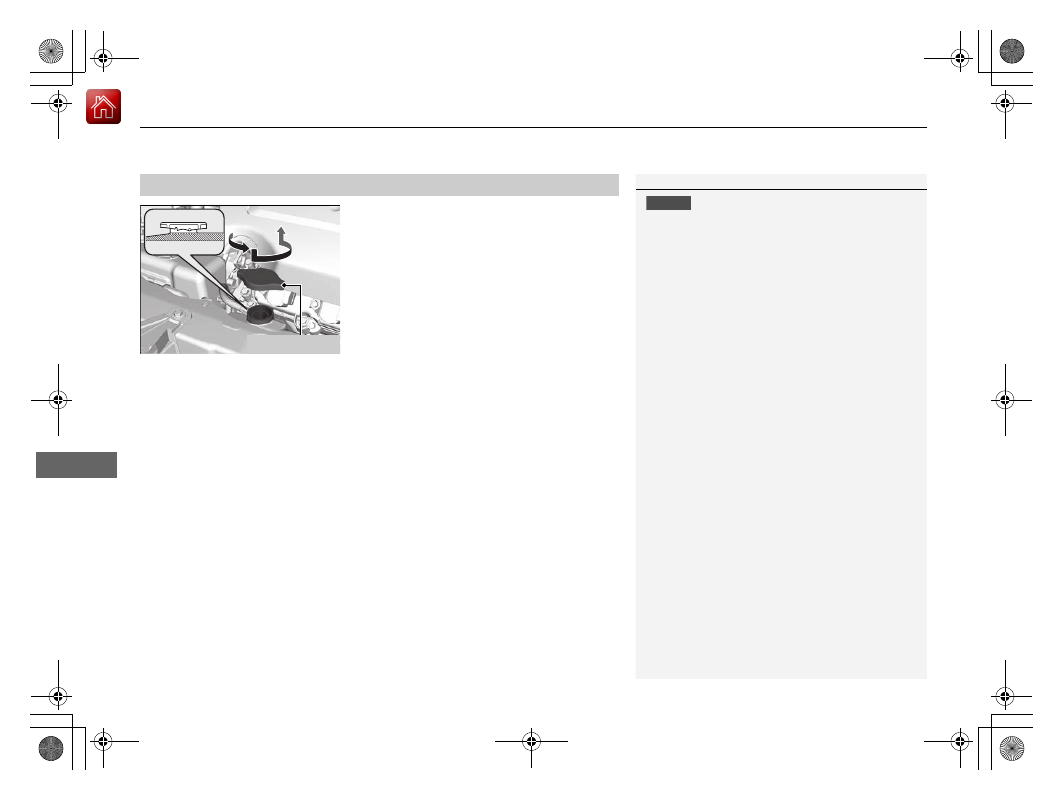
1. Make sure the engine and radiator are
cool.
2.
Remove the engine compartment cover.
2
3.
Turn the radiator cap 1/8 turn counter-
clockwise and relieve any pressure in the
cooling system.
4.
Push down and turn the radiator cap
counter-clockwise to remove it.
5.
The coolant level should be up to the base
of the filler neck. Add coolant if it is low.
6.
Put the radiator cap back on, and tighten it
fully.
■
Radiator
1
NOTICE
Pour the fluid slowly and carefully so you do not spill
any. Clean up any spills immediately; they can
damage components in the engine compartment.
Radiator Cap
-------------------------------------------------------------------------------------------------------------------------------------------------------------
511
uu
Maintenance Under the Hood
u
Inverter Coolant
Main
tenan
ce
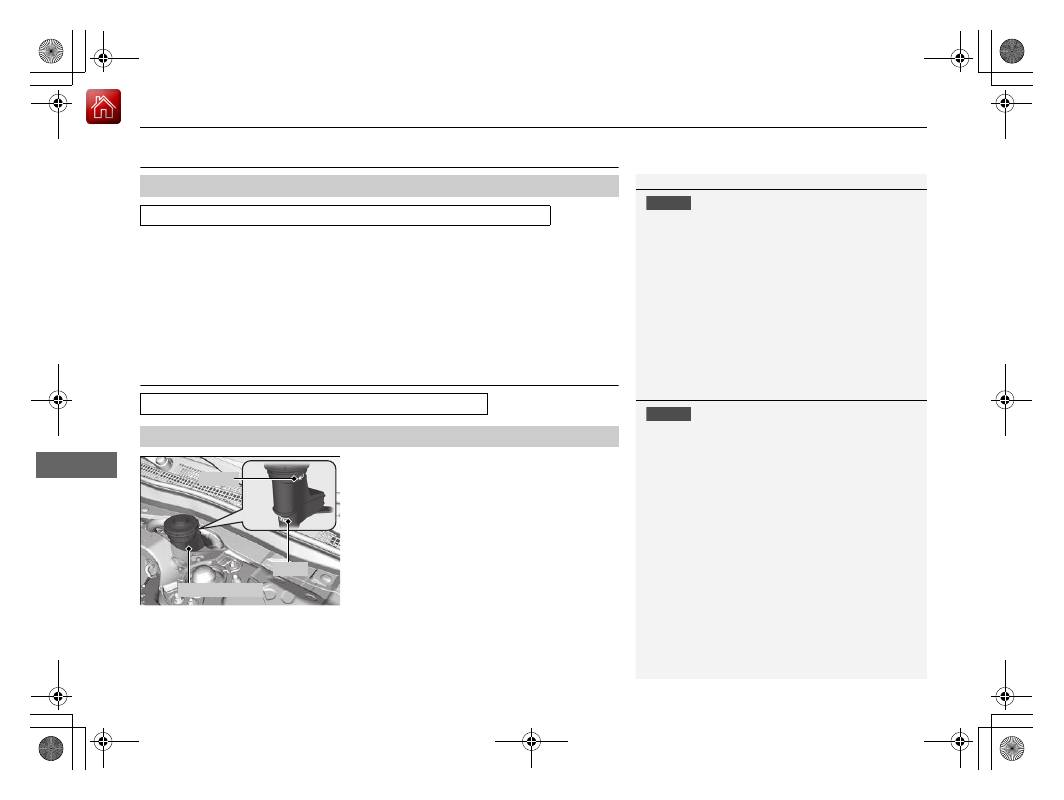
Inverter Coolant
This coolant is premixed with 50% antifreeze and 50% water. Do not add any
straight antifreeze or water.
We recommend you check the inverter coolant level every time you refuel.
Have a dealer replace the inverter coolant.
1.
Check the fluid level in the tank.
2.
If the coolant level has dropped below the
MIN
level, have your vehicle serviced at a
dealer.
u
Only a properly trained technician can
refill the coolant and check the system
for leaks.
Specified coolant: Acura Long Life Antifreeze/Coolant Type 2
■
Checking the Coolant
1
NOTICE
Genuine Acura engine coolant is a 50/50 mixture of
antifreeze and water that can withstand freezing at
temperatures as low as about -31°F (-35°C). If your
vehicle is consistently subjected to temperatures
below this, the concentration of antifreeze in the
coolant should be increased. Consult a dealer for
details.
If Acura antifreeze/coolant is not available, you may
use another major brand of non-silicate coolant as a
temporary replacement. Check that it is a high quality
coolant recommended for aluminum engines.
Continued use of any non-Acura coolant can result in
corrosion, causing the cooling system to malfunction
or fail. Have the cooling system flushed and refilled
with Acura antifreeze/coolant as soon as possible.
Do not add rust inhibitors or other additives to your
vehicle’s cooling system. They may not be compatible
with the coolant or with the motor components.
MAX
MIN
Filler
Tank
-------------------------------------------------------------------------------------------------------------------------------------------------------------
512
uu
Maintenance Under the Hood
u
Transmission Fluid
Main
tenan
ce
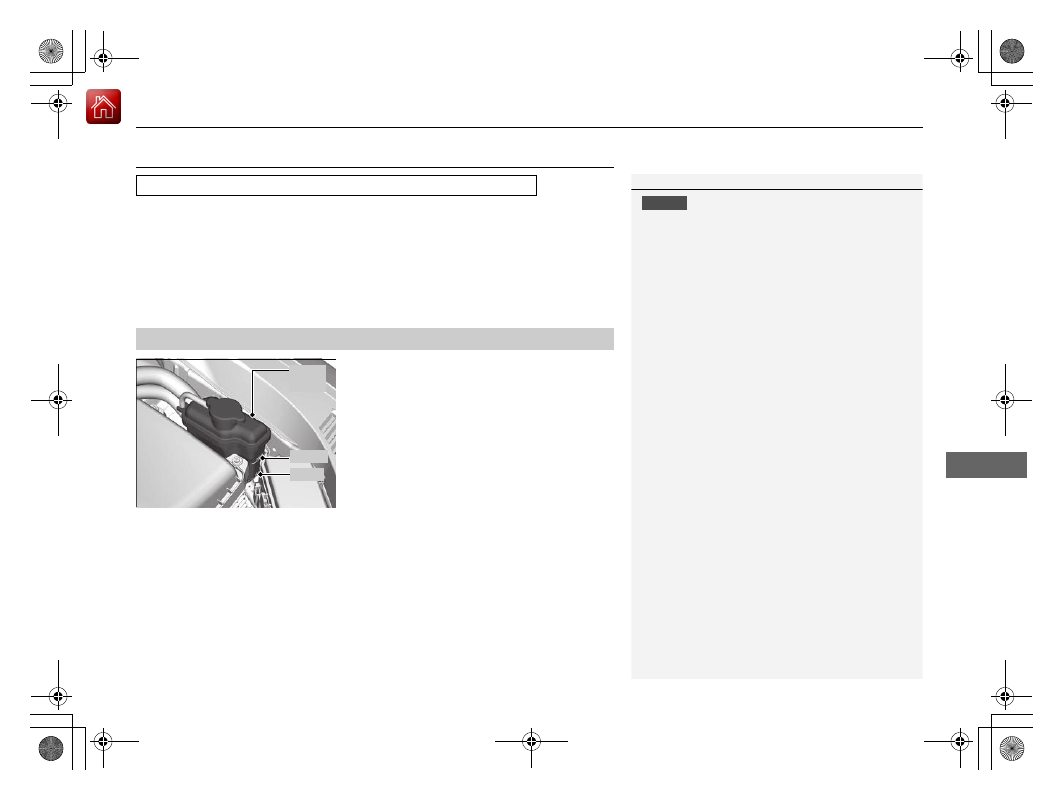
Transmission Fluid
Have a dealer check the fluid level and replace if necessary.
Do not attempt to check or change the automatic transmission fluid yourself.
Brake Fluid
The fluid level should be between the
MIN
and
MAX
marks on the side of the reserve
tank.
■
Dual Clutch Transmission Fluid
Specified fluid: Acura Automatic Transmission Fluid ATF DW-1
Specified fluid: Acura Heavy Duty Brake Fluid DOT 3
■
Checking the Brake Fluid
1
Dual Clutch Transmission Fluid
NOTICE
Acura ATF DW-1 must not be mixed with other
transmission fluids.
Using a transmission fluid other than Acura ATF
DW-1 may adversely affect the operation and
durability of your vehicle’s transmission, and damage
the transmission.
Any damage caused by using a transmission fluid that
is not equivalent to Acura ATF DW-1 is not covered
by Acura’s new vehicle limited warranty.
1
NOTICE
Brake fluid marked DOT 5 is not compatible with your
vehicle’s braking system and can cause extensive
damage.
If the specified brake fluid is not available, you should
use only DOT 3 or DOT 4 fluid from a sealed
container as a temporary replacement.
Using any non-Acura brake fluid can cause corrosion
and decrease the longevity of the system. Have the
brake system flushed and refilled with Acura Heavy
Duty Brake Fluid DOT 3 as soon as possible.
If the brake fluid level is at or below the
MIN
mark,
have a dealer inspect the vehicle for leaks or worn
brake pads as soon as possible.
MIN
Reserve Tank
MAX
-------------------------------------------------------------------------------------------------------------------------------------------------------------
513
uu
Maintenance Under the Hood
u
Refilling Window Washer Fluid
Main
tenan
ce
Refilling Window Washer Fluid
If the washer fluid is low, a message appears on the multi-information display.
Pour the washer fluid carefully. Do not overflow the reservoir.
1
NOTICE
Do not use engine antifreeze or a vinegar/water
solution in the windshield washer reservoir.
Antifreeze can damage your vehicle’s paint. A
vinegar/water solution can damage the windshield
washer pump.
Use only commercially available windshield washer
fluid.
Avoid prolonged use of hard water to prevent lime
scale build up.
-------------------------------------------------------------------------------------------------------------------------------------------------------------
Нет комментариевНе стесняйтесь поделиться с нами вашим ценным мнением.
Текст