Acura RLX HYBRID (2020 year). Manual in english — page 1
12
Quick
Referenc
e Guide
Energy Efficiency
As with a gasoline-powered vehicle, hybrid vehicle fuel efficiency and driving range is most impacted by your driving style. Aggressive
acceleration and high-speed driving can easily trigger the system to switch the propulsion source to the gasoline-powered engine.
In addition, heavy climate control system use negatively affects vehicle range and efficiency. Either of these use patterns will more quickly
reduce the High Voltage battery’s state of charge.
Battery Types
There are two types of batteries used in this vehicle; a standard 12-volt battery that powers the airbags, the interior and exterior lights, and
other standard 12-volt systems; and a high voltage battery that is used to power the propulsion motors and recharge the 12-volt battery.
Regenerative Energy and Regenerative Braking
When decelerating without the accelerator being depressed or the brake pedal being applied, or while driving downhill, the electric motors
act as generators that recovers a portion of the electrical energy that was used to accelerate the vehicle. This regenerative braking slows the
vehicle in a manner similar to engine braking in a gasoline-powered vehicle.
When the high voltage battery is fully charged or its condition is affected by extreme temperatures or other factors, regenerative braking
may not work.
-------------------------------------------------------------------------------------------------------------------------------------------------------------
13
Quick
Referenc
e Guide
Auto Engine Stop/Start
Your vehicle’s gasoline engine will automatically stop and start during vehicle operation as needed to meet driving and battery conditions.
These are some examples that could cause the gasoline engine to automatically start.
In the following cases, however, Auto Engine Stop may not activate.
●
The vehicle momentarily needs additional power for aggressive acceleration, or driving uphill or at high speed.
●
The climate control system is in heavy use.
●
The High Voltage battery temperature is high or low.
●
The High Voltage battery state of charge is low.
When in SPORT mode, Auto Engine Stop does not activate.
Sounds Unique to the SPORT HYBRID SH-AWD
®
System
When you first start driving this vehicle, you will likely hear some unfamiliar sounds, particularly when you turn on the power system, or
while you are driving or accelerating from a stop. Some of these sounds are unique to this vehicle‘s powertrain, fuel, and climate control
systems; others are similar to sounds generated by conventional automobiles that typically are masked by louder noises absent from a
vehicle of this design.
These sounds are not a cause for concern, and you will soon recognize them as normal and thus be able to detect any new or unusual noise
should one develop.
-------------------------------------------------------------------------------------------------------------------------------------------------------------
14
Quick
Referenc
e Guide
Safety Precautions
Do not touch the High Voltage system
Attempting to take a High Voltage system component apart or disconnect one of its wires
can cause severe electrical shock. Make sure that any maintenance or repairs to the High
Voltage system is performed by a Acura dealer.
If a crash occurs
●
Be careful of electric shock hazard.
u
If a severe crash damages your vehicle’s High Voltage system, there is a possibility of electrical shock
due to exposed High Voltage components or wires. If this happens, do not touch any of the High
Voltage system components or any of its orange wires.
●
Avoid contact with High Voltage battery fluid.
u
The High Voltage battery contains a flammable electrolyte that could leak as a result of a severe
crash. Avoid skin or eye contact with the electrolyte as it is corrosive. If you accidentally come into
contact with the electrolyte, rinse the exposed skin or flush your eyes with copious amounts of water
for at least five minutes, and seek medical attention immediately.
●
Use a fire extinguisher for an electrical fire.
u
Attempting to extinguish an electrical fire with a small quantity of water, from a garden hose for
instance, can be dangerous.
●
Anytime the vehicle is damaged in a crash, have it repaired by an Acura dealer.
Emergency Shutdown System for the High Voltage System
If the vehicle is involved in a crash, the emergency shutdown system will activate depending
on the severity of the impact. When the system activates, the High Voltage system
automatically shuts down, and the vehicle can no longer move under its own power. To
return the High Voltage system back to normal operation, consult an Acura dealer.
Acura collects and recycles High Voltage batteries used in its vehicles – consult an Acura
dealer for more information.
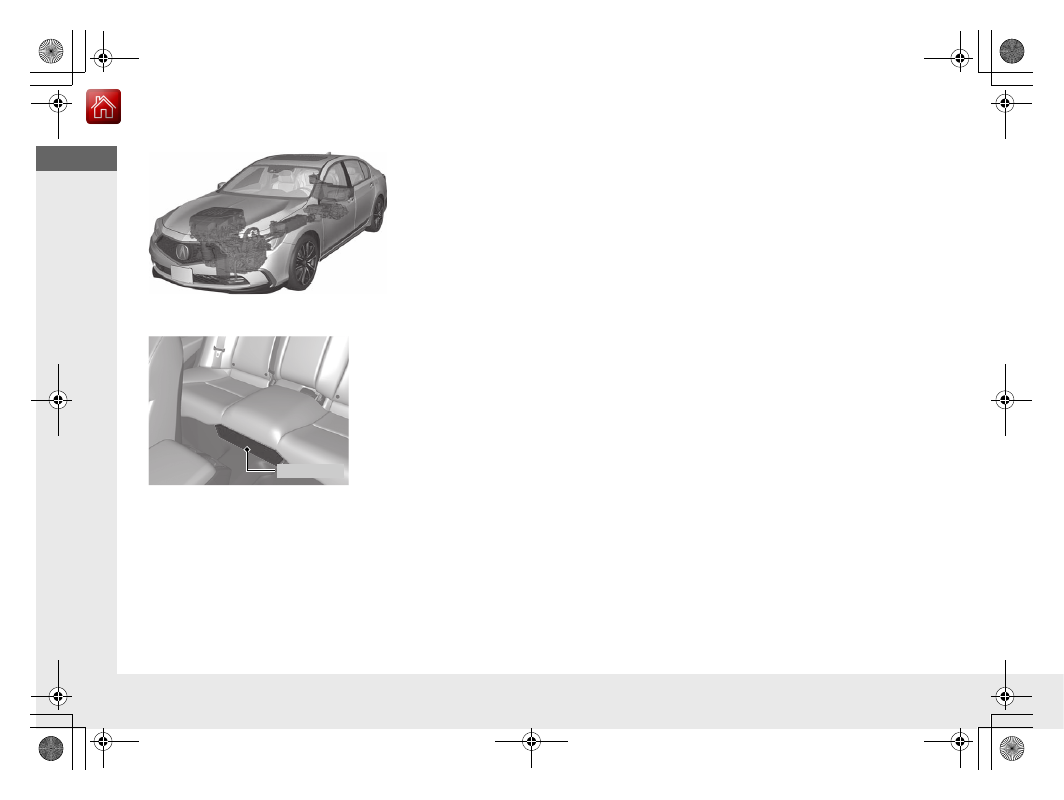
Do not cover the air intake.
If the air intake is obstructed
during vehicle operation, the High
Voltage battery can become too
hot. To protect the battery, the
system may limit the battery’s
output and cause the power
system and 12-volt battery
charging system indicators to come
on.
Air Intake
-------------------------------------------------------------------------------------------------------------------------------------------------------------
15
Quick
Referenc
e Guide
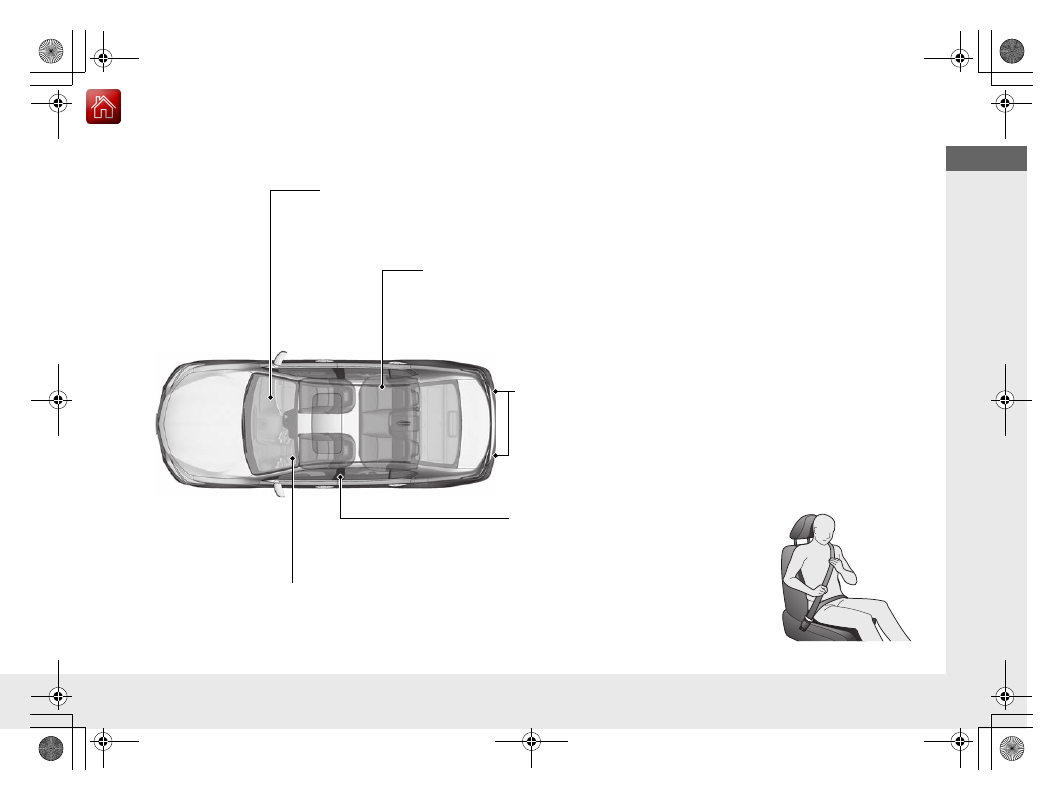
Safe Driving
(P 33)
Airbags
●
Your vehicle is fitted with airbags to help protect you and
your passengers during a moderate-to-severe collision.
Child Safety
●
All children 12 and younger should be seated in the rear seat.
●
Smaller children should be properly restrained in a forward-facing child seat.
●
Infants must be properly restrained in a rear-facing child seat.
Exhaust Gas Hazard
●
Your vehicle emits dangerous exhaust gases that contain carbon
monoxide. Do not run the engine in confined spaces where carbon
monoxide gas can accumulate.
Before Driving Checklist
●
Before driving, check that the front seats, head restraints,
steering wheel, and mirrors have been properly adjusted.
Seat Belts
●
Fasten your seat belt and sit upright well
back in the seat.
●
Check that your passengers are wearing
their seat belts correctly.
Fasten your lap belt as
low as possible.
-------------------------------------------------------------------------------------------------------------------------------------------------------------
16
Quick
Referenc
e Guide
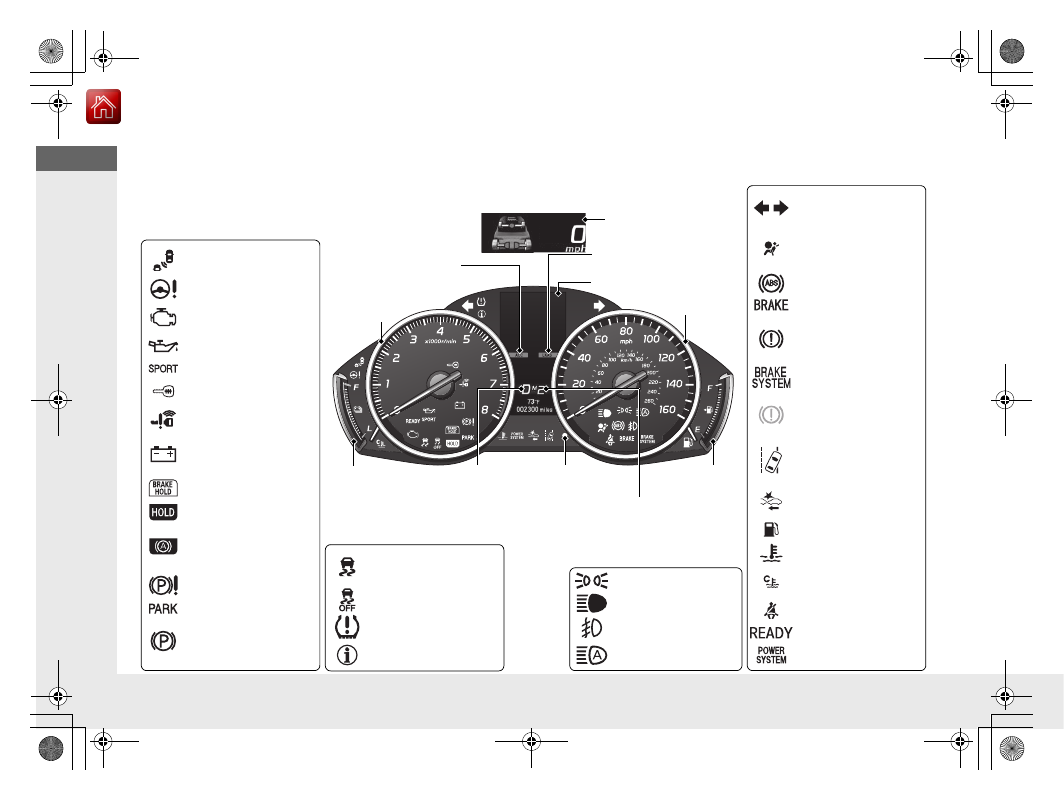
Instrument Panel
System Indicators
Malfunction Indicator
Lamp
Low Oil Pressure
Indicator
12-Volt Battery
Charging System
Indicator
Anti-lock Brake System
(
ABS
) Indicator
Vehicle Stability
Assist
TM
(VSA
®
) System
Indicator
VSA
®
OFF Indicator
Electric Power Steering
(EPS) System Indicator
Lights Indicators
Lights On Indicator
High Beam Indicator
Immobilizer System
Indicator
Seat Belt Reminder
Indicator
System Indicators
System Message
Indicator
Brake System
Indicator (Red)
Supplemental
Restraint System
Indicator
Low Temperature
Indicator
Low Fuel Indicator
Gauges
/Multi-Information Display
/
Head-Up Display
(P 119)
/System Indicators
Low Tire Pressure/
TPMS Indicator
Turn Signal and
Hazard Warning
Indicators
Keyless Access System
Indicator
High Voltage
Battery Charge
Level Gauge
Security System
Alarm Indicator
Fuel Gauge
Tachometer
Multi-Information Display
Speedometer
Gear Position
Indicator
M
(sequential mode) Indicator/
Sequential Mode Gear Selection
Indicator
Electric Parking Brake
System Indicator
Electric Parking Brake
Indicator
Automatic Brake Hold
System Indicator
Brake System
Indicator (Amber)
SPORT
Mode Indicator
Blind spot information
System Indicator
System Indicators
Collision Mitigation
Brake System
TM
(CMBS
TM
) Indicator
High Temperature
Indicator
Road Departure
Mitigation (RDM)
Indicator
Lane Keeping Assist
System (
LKAS
) Indicator
Adaptive Cruise Control
(
ACC
) with Low Speed
Follow Indicator
Automatic Brake Hold
Indicator
U.S.
Canada
U.S.
Canada
U.S.
Canada
U.S.
Canada
Fog Light Indicator
*
Head-Up Display
READY
Indicator
POWER SYSTEM
Indicator
Auto High-Beam
Indicator
-------------------------------------------------------------------------------------------------------------------------------------------------------------
17
Quick
Referenc
e Guide
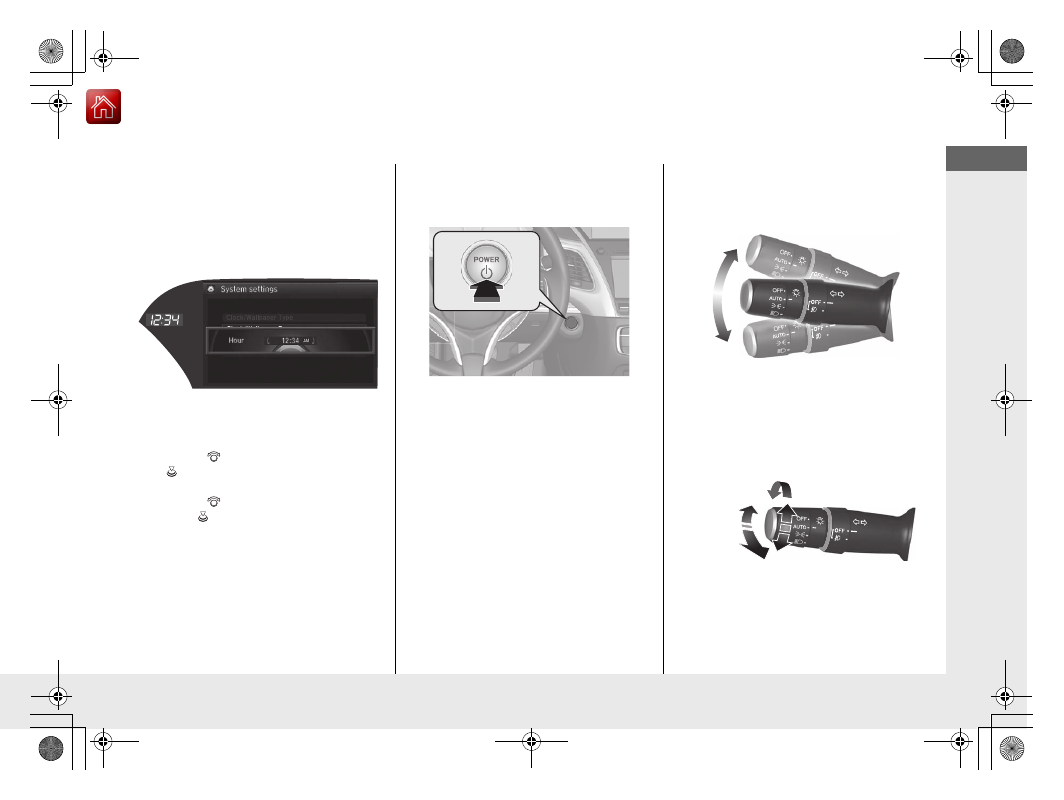
Controls
Clock
(P 128)
The navigation system receives signals from
GPS satellites, updating the clock
automatically.
You can also adjust the time manually.
a
Enter the
Clock Adjustment
screen.
2
b
Rotate
to change hour, then press
.
c
Rotate
to change minute, then
press .
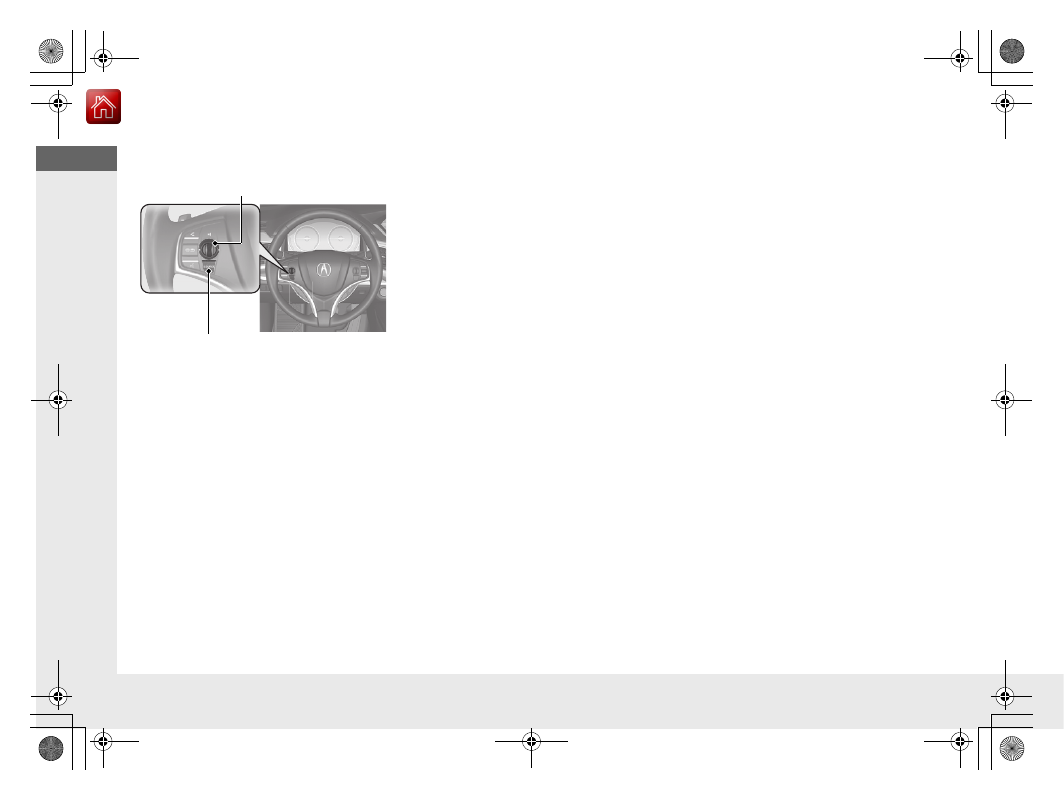
POWER Button
Press the button to changes the vehicle’s
power mode.
Turn Signals
Lights
Turn Signal Control Lever
Right
Left
Light Control Switches
Low Beam
High Beam
Flashing
*
Not available on all models
-------------------------------------------------------------------------------------------------------------------------------------------------------------
18
Quick
Referenc
e Guide
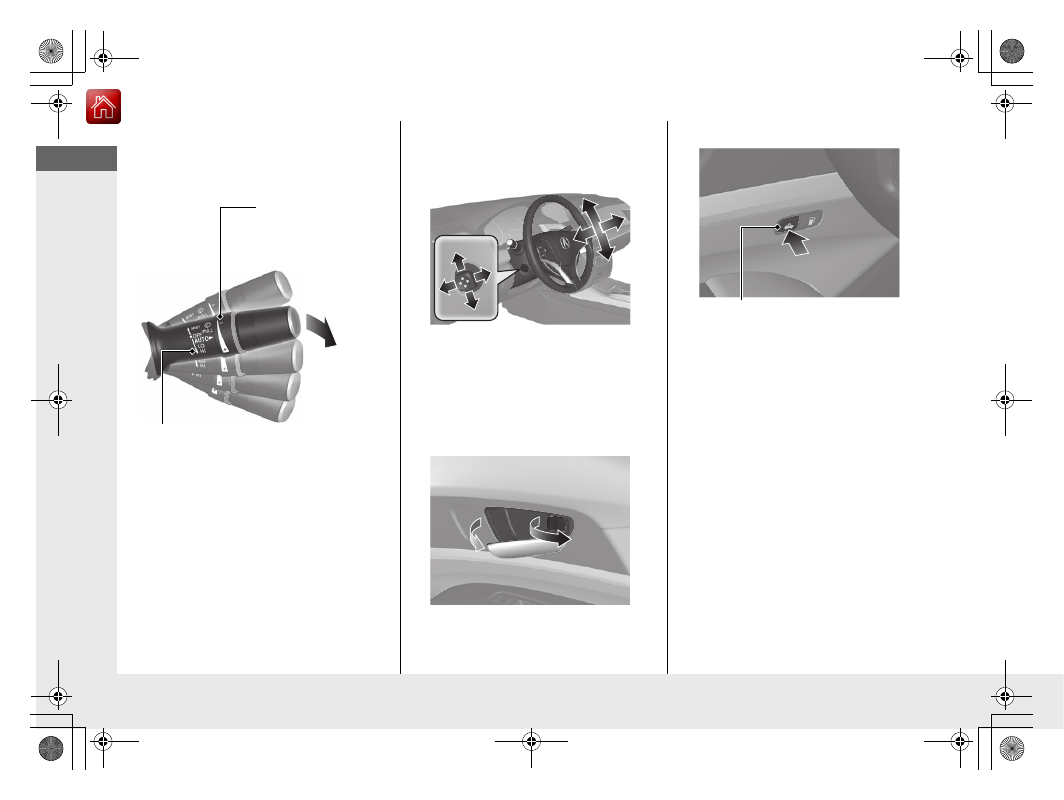
Wipers and Washers
AUTO
should always be turned
OFF
before
the following situation in order to prevent
severe damage to the wiper system:
●
Cleaning the windshield
●
Driving through a car wash
●
No rain present
Wiper/Washer Control Lever
Adjustment Ring
(
-
: Low Sensitivity
(
+
: High Sensitivity
MIST
OFF
AUTO
: Wiper speed varies automatically
LO
: Low speed wipe
HI
: High speed wipe
Pull toward
you to spray
washer fluid.
Steering Wheel
●
To adjust, push and hold the adjustment
switch to move the steering wheel to the
desired position.
Unlocking the Front
Doors from the Inside
●
Pull either front door inner handle to
unlock and open it in one motion.
●
Unlocking and opening the driver’s door
from the inner handle unlocks all the
other doors.
Trunk
●
To unlock and open the trunk:
•
Press the trunk opener on the driver’s
door.
•
Press the trunk release button on the
keyless access remote.
•
Press the trunk release button on the
trunk lid.
Trunk Opener
-------------------------------------------------------------------------------------------------------------------------------------------------------------
19
Quick
Referenc
e Guide
Power Door Mirrors
●
With the power mode in ON, move the
selector switch to
L
or
R
.
●
Push the appropriate edge of the
adjustment switch to adjust the mirror.
●
Press the folding button to fold in and
out the door mirrors.
Selector Switch
Adjustment Switch
Folding Button
Power Windows
●
With the power mode in ON, open and
close the power windows.
●
If the power window lock button is in the
off position, each passenger’s window
can be opened and closed with its own
switch.
●
If the power window lock button is in the
on position (indicator on), each
passenger’s window switch is disabled.
Power Window Lock Button
Window Switch
Indicator
-------------------------------------------------------------------------------------------------------------------------------------------------------------
20
Quick
Referenc
e Guide
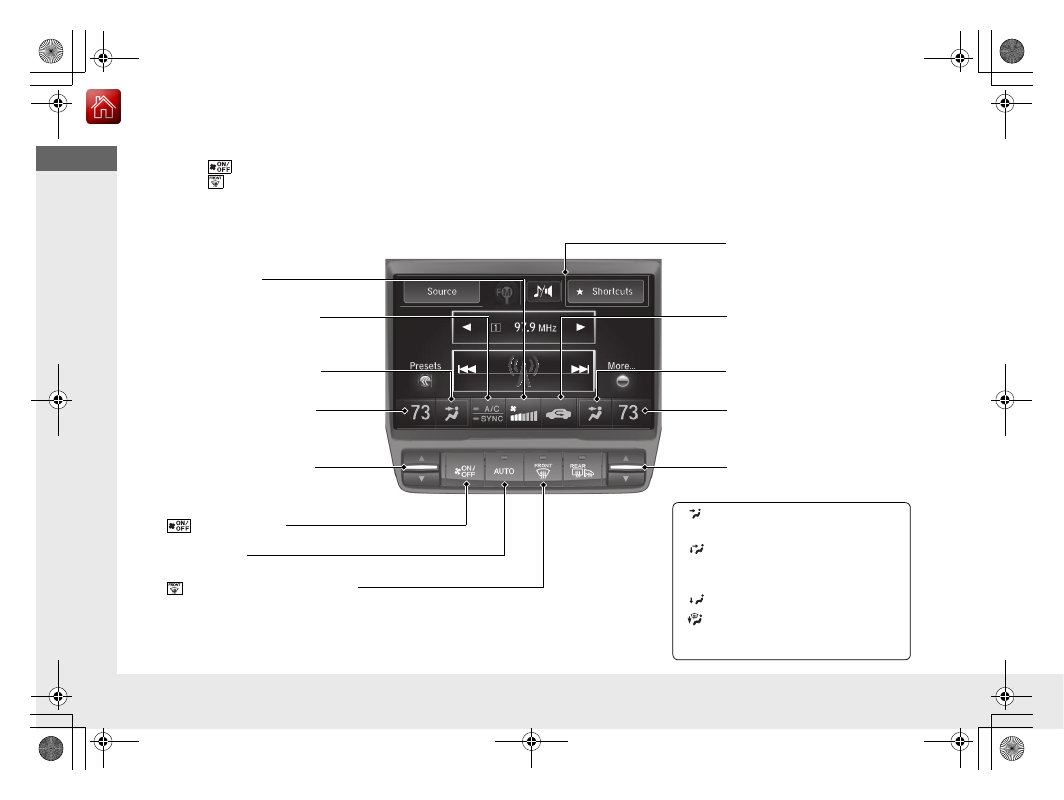
Climate Control System
●
Press the
AUTO
button to activate the climate control system.
●
Press the
button to turn the system on or off.
●
Press the
button to defrost the windshield.
The climate control system is voice operable.
Driver’s Side Temperature
Control Switch
Air flows from floor and
windshield defroster vents.
(driver’s side only)
Air flows from floor vents.
Air flows from floor and
dashboard vents, and back of
the center console.
Air flows from dashboard vents
and back of the center console.
AUTO
Button
Passenger’s Side Temperature
Control Switch
(On/off) Button
Driver’s Side Temperature
Icon
Passenger’s Side Temperature
Icon
On Demand Multi-Use Display
TM
(Windshield Defroster) Button
Driver’s Side Mode Control
Icon
A/C
(Air Conditioning) and
SYNC
(Synchronized) Icon
Passenger’s Side Mode Control
Icon
Recirculation/Fresh Air Mode
Icon
Fan Control Icon
-------------------------------------------------------------------------------------------------------------------------------------------------------------
21
Quick
Referenc
e Guide
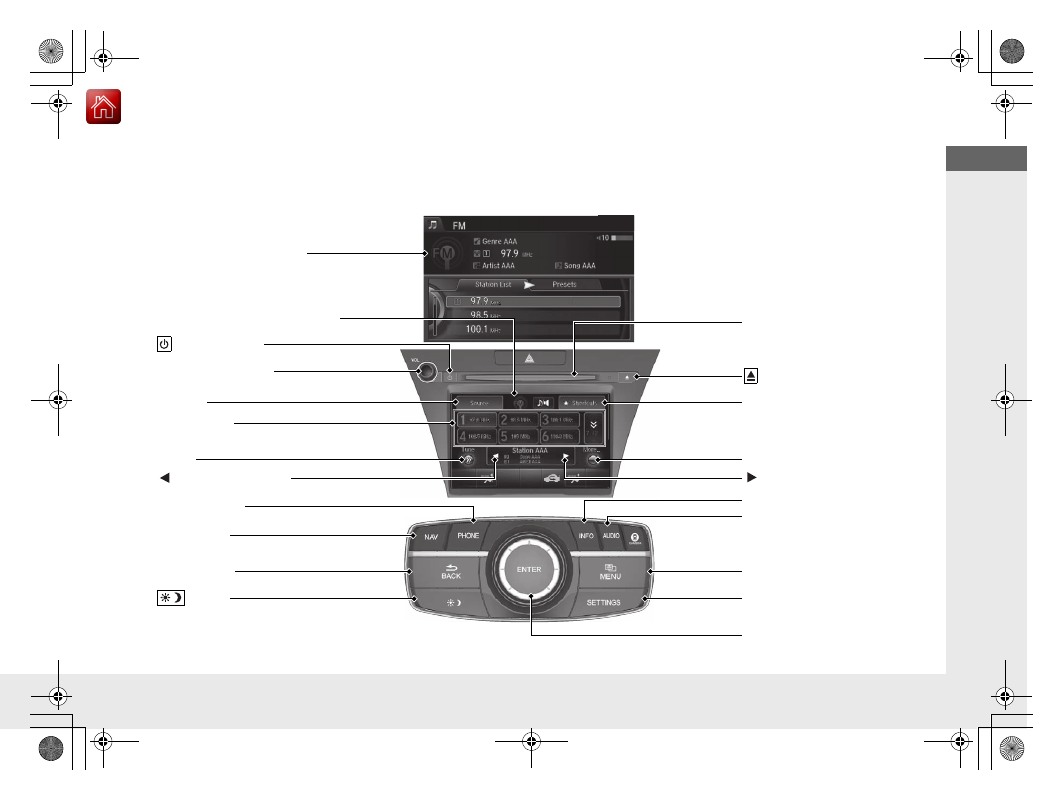
Features
Audio system
(P 216)
For navigation system operation
()
See the Navigation System Manual
*1:Icons that appear on the screen vary by the source selected.
Audio/Information Screen
Interface Dial/
ENTER
Button
(Power) Button
CD Slot
(CD Eject) Button
SETTINGS
Button
VOL
(Volume) Knob
BACK
Button
NAV
Button
AUDIO
Button
INFO
Button
On Demand Multi-Use Display
TM
PHONE
Button
Preset Icons
*1
(Tune Up) Icon
*1
Source
*1
(Tune Down) Icon
*1
Tune
*1
More
Button
Shortcuts
*1
MENU
Button
-------------------------------------------------------------------------------------------------------------------------------------------------------------
22
Quick
Referenc
e Guide
Audio Remote Controls
●
SOURCE
Button
Press to change the audio mode: FM/AM/
SiriusXM
®
/CD/HDD/USB/iPod/
Bluetooth
®
Audio/Pandora
®
*
/AUX.
●
Left Selector Wheel
Roll to adjust the volume up/down.
Radio:Shift to change the preset station.
Shift and hold to select the next or
previous strong station.
CD/HDD/USB device:
Shift to skip to the beginning of
the next song or return to the
beginning of the current song.
Shift and hold to change a folder.
Left Selector Wheel
SOURCE
Button
-------------------------------------------------------------------------------------------------------------------------------------------------------------
23
Quick
Referenc
e Guide
Driving
(P 371)
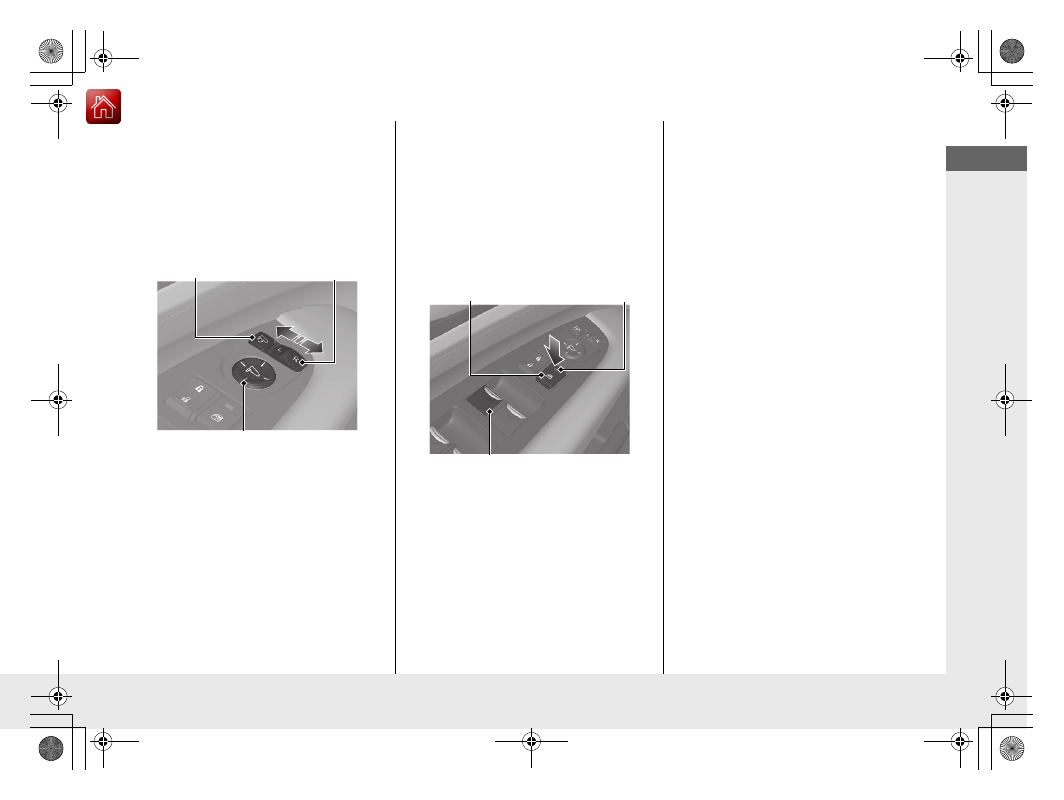
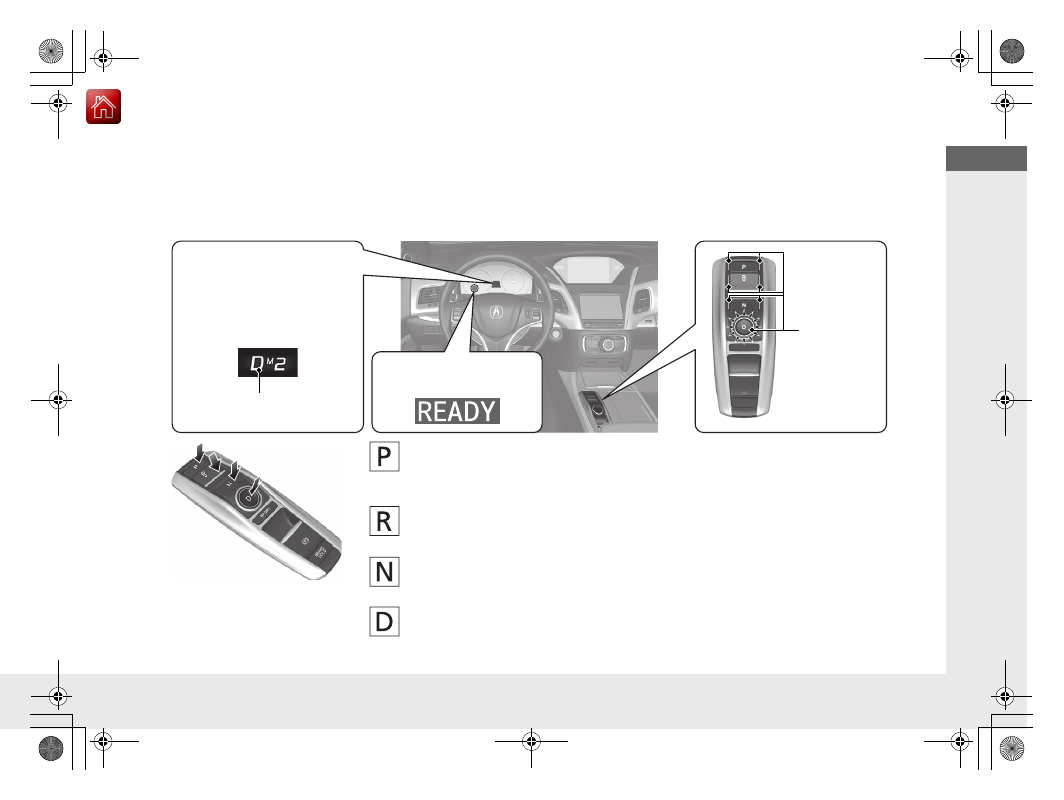
Electronic Gear Selector
(P 385)
●
Always depress the brake pedal before selecting
(
P
or changing the gear position from
(
P
.
●
Select
(
P
and depress the brake pedal when turning on the power.
●
Gear selection
Park
Press the
(
P
button.
Used when parking or before turning the power on or off.
Transmission is locked.
Reverse
Press back the
(
R
button.
Used when reversing.
Neutral
Press the
(
N
button.
Transmission is not locked.
Drive
Press the
(
D
button.
Used for normal driving.
The sequential shift mode can be used.
Gear Position Indicator
The gear position indicator
and the shift button indicator
indicate the current gear
selection.
Gear Position Indicator
Shift Button
Indicator
READY
Indicator
On: You can start to drive.
*
Not available on all models
-------------------------------------------------------------------------------------------------------------------------------------------------------------
24
Quick
Referenc
e Guide
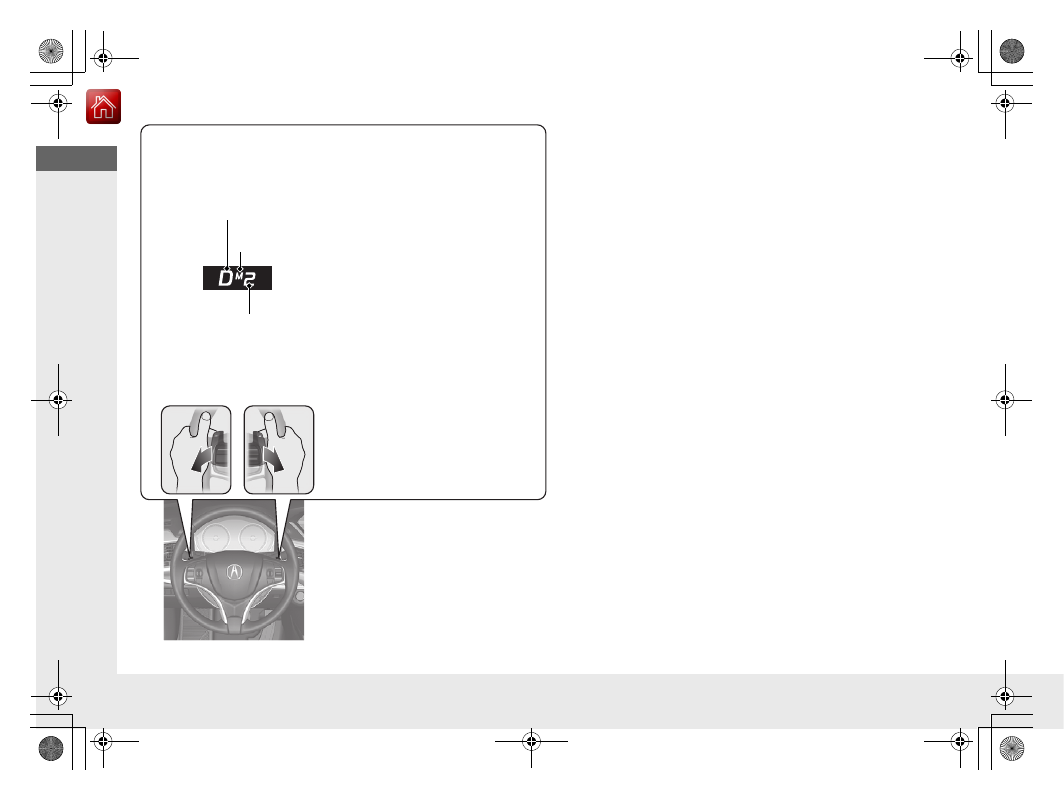
Paddle Shifters
●
Paddle shifters allow you to shift gears much like a manual
transmission (1st through 7th). This is useful for regenerative
braking.
●
D-paddle shift mode: The
transmission will shift back to
automatic mode once the system
detects that the vehicle is cruising.
●
Sequential mode gear selection:
Holds the selected gear, and the
M
(sequential mode) indicator
comes on, when the SPORT mode
is on.
●
The sequential mode gear
selection is shown in the
instrument panel.
Gear Position Indicator
Shift Down
(
-
Paddle Shifter
Shift Up
(
+
Paddle Shifter
Sequential Mode Gear
Selection Indicator
M
(sequential
mode) Indicator
-------------------------------------------------------------------------------------------------------------------------------------------------------------
25
Quick
Referenc
e Guide
VSA
®
On and Off
(P 440)
●
The Vehicle Stability Assist
TM
(VSA
®
)
system helps stabilize the vehicle during
cornering, and helps maintain traction
while accelerating on loose or slippery
road surfaces.
●
VSA
®
comes on automatically every time
you turn on the power system.
●
To partially disable or fully restore VSA
®
function, press and hold the button until
you hear a beep.
CMBS
TM
On and Off
●
When a possible collision is likely
unavoidable, the CMBS
TM
can help you to
reduce the vehicle speed and the severity
of the collision.
●
To turn the CMBS
TM
on or off, press and
hold the button until you hear a beep.
●
The CMBS
TM
is turned on every time you
turn the power system on.
Tire Pressure Monitoring
System (TPMS)
●
The TPMS monitors tire pressure.
●
The TPMS is turned on automatically
every time you turn on the power system.
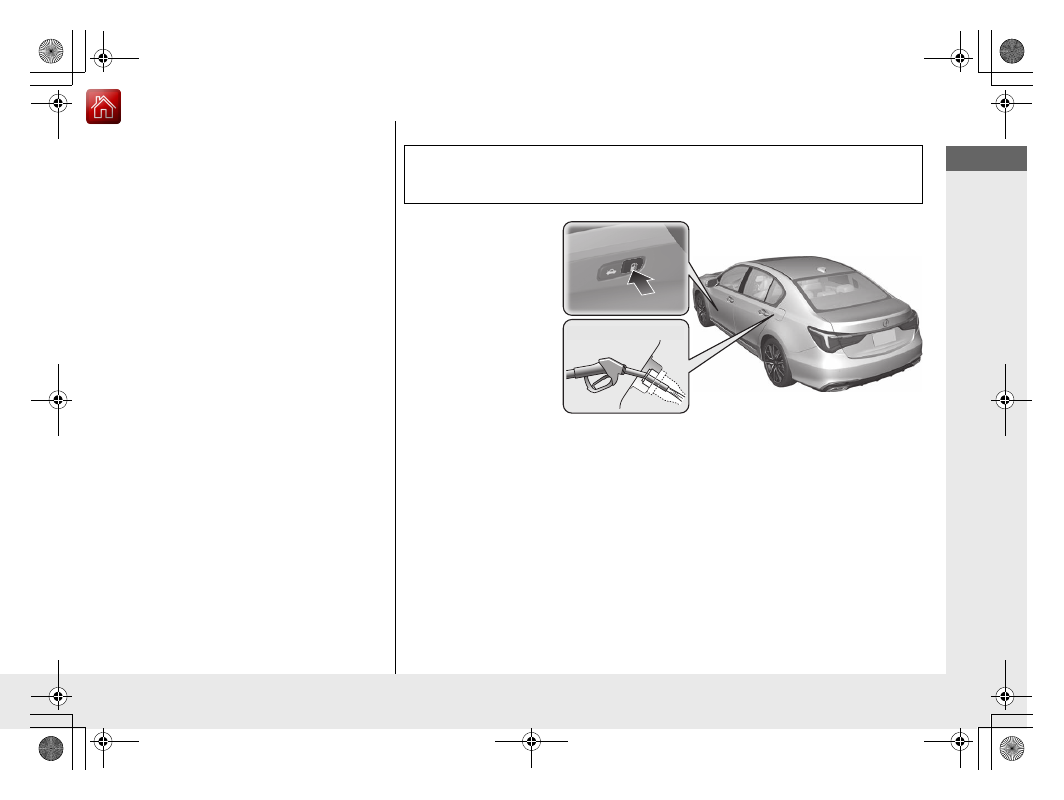
Refueling
a
Press the fuel fill
door release button.
b
After refueling, wait
for about five
seconds before
removing the filler
nozzle.
Fuel recommendation:
Unleaded premium gasoline, pump octane number 91 or
higher
Fuel tank capacity: 15.1 US gal (57 L)
Wait for five seconds
-------------------------------------------------------------------------------------------------------------------------------------------------------------
26
Quick
Referenc
e Guide
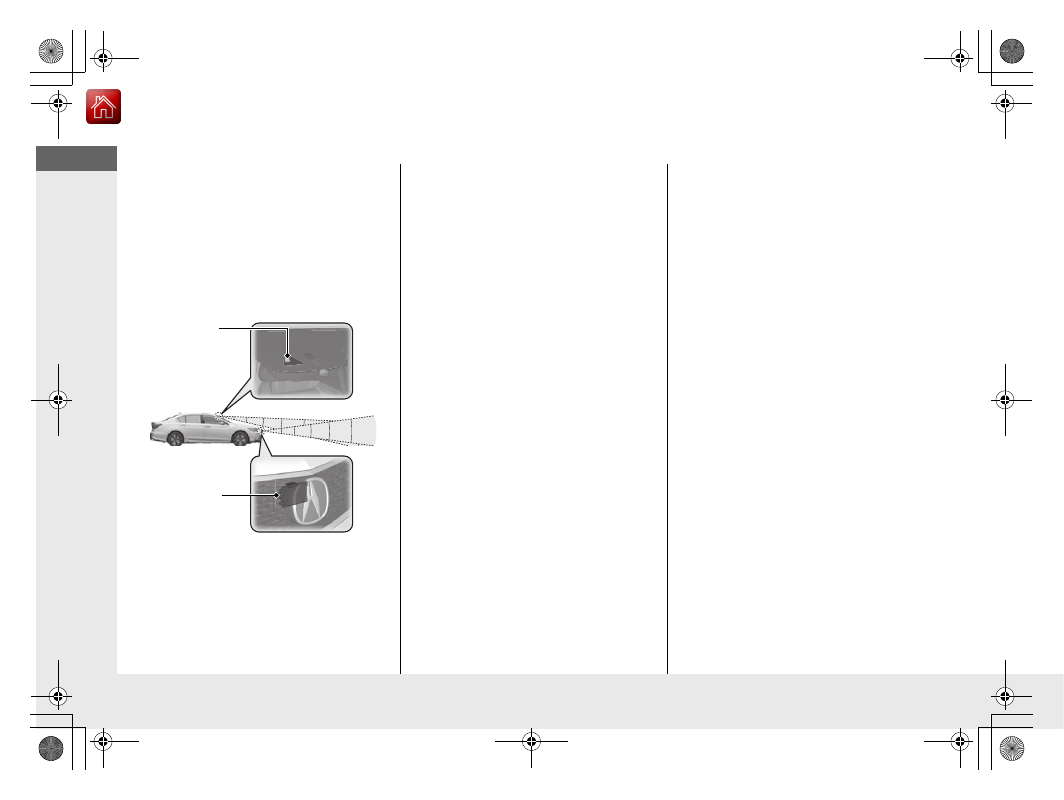
AcuraWatch
TM
AcuraWatch
TM
is a driver support system
which employs the use of two distinctly
different kinds of sensors, a radar sensor
located in the front grille and a front sensor
camera mounted to the interior side of the
windshield, behind the rearview mirror.
Front Sensor
Camera
The camera is located
behind the rearview
mirror.
Radar Sensor
The radar sensor is in
the front grille.
Adaptive Cruise Control
(ACC) with Low Speed
Follow
Helps maintain a constant vehicle speed and
a set following interval behind a vehicle
detected ahead of yours and, if the detected
vehicle comes to a stop, can decelerate and
stop your vehicle, without you having to
keep your foot on the brake or the
accelerator.
Lane Keeping Assist
System (LKAS)
Provides steering input to help keep the
vehicle in the middle of a detected lane and
provides tactile and visual alerts if the
vehicle is detected drifting out of its lane.
Road Departure
Mitigation (RDM) System
Alerts and helps to assist you when the
system detects a possibility of your vehicle
unintentionally crossing over detected lane
markings and/or leaving the roadway
altogether.
Collision Mitigation
Braking System
TM
(CMBS
TM
)
Can assist you when there is a possibility of
your vehicle colliding with a vehicle or a
pedestrian detected in front of yours. The
CMBS
TM
is designed to alert you when a
potential collision is determined, as well as
to reduce your vehicle speed to help
minimize collision severity when a collision is
deemed unavoidable.
Traffic Jam Assist
(P 428)
The traffic jam assist system uses a radar
sensor mounted inside the front grille and a
camera mounted to the upper portion of
the windshield to detect and monitor left
and right white (yellow) traffic lane lines as
well as any vehicle ahead. Based on inputs
from the radar sensor and camera, the
system adjusts the speed of your vehicle to
maintain a set interval between your vehicle
and the one detected ahead. It also applies
steering torque to keep your vehicle in the
center of the detected lane when you are
driving in heavy traffic.
-------------------------------------------------------------------------------------------------------------------------------------------------------------
27
Quick
Referenc
e Guide
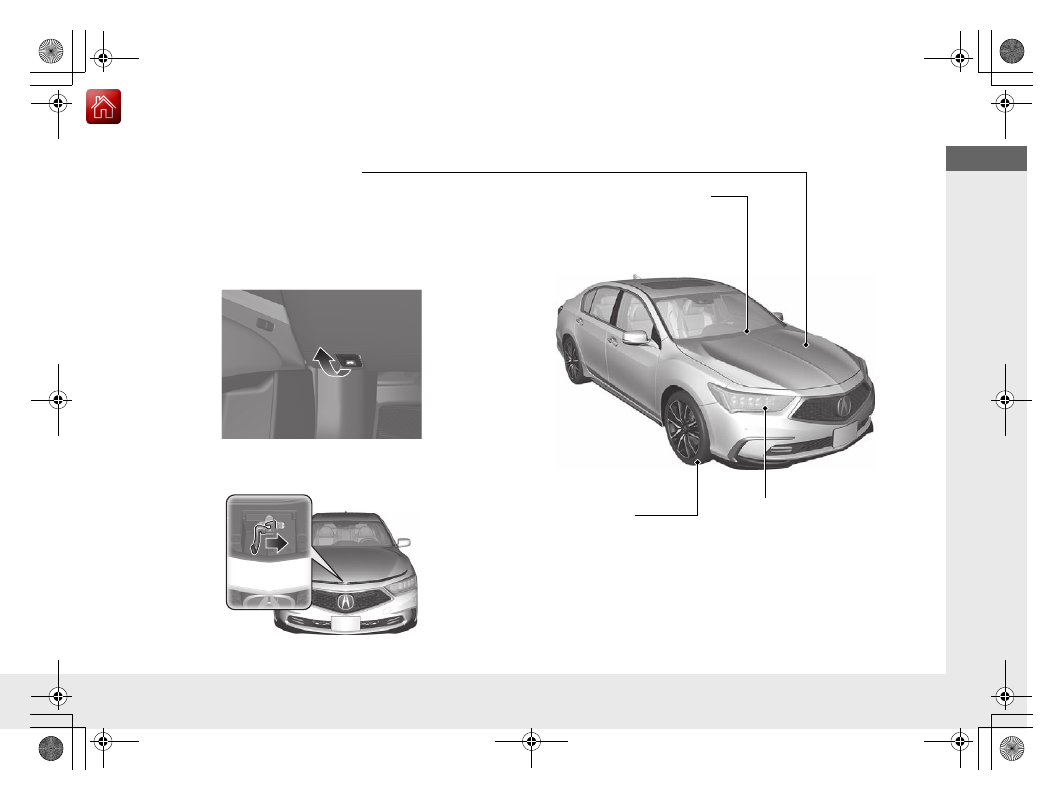
Maintenance
Under the Hood
●
Check engine oil, engine coolant, and inverter coolant. Add
when necessary.
●
Check brake fluid.
●
Check the 12-volt battery condition monthly.
a
Pull the hood release handle under the corner of the
dashboard.
b
Locate the hood latch lever, push it to the side, and then
raise the hood. Once you have raised the hood slightly, you
can release the lever.
c
When finished, close the hood and make sure it is firmly
locked in place.
Lights
●
Inspect all lights regularly.
Wiper Blades
●
Replace blades if they leave streaks
across the windshield.
Tires
●
Inspect tires and wheels regularly.
●
Check tire pressures regularly.
●
Install snow tires for winter driving.
-------------------------------------------------------------------------------------------------------------------------------------------------------------
Нет комментариевНе стесняйтесь поделиться с нами вашим ценным мнением.
Текст