Acura RL (1996-2004 year). Manual — part 682
Seat Belt Tensioner Handling and
Storage
Do not try to disassemble the seat belt tensioner assem-
bly. It has no serviceable parts. Once a seat belt tensioner
has been activated, it cannot be repaired or reused.
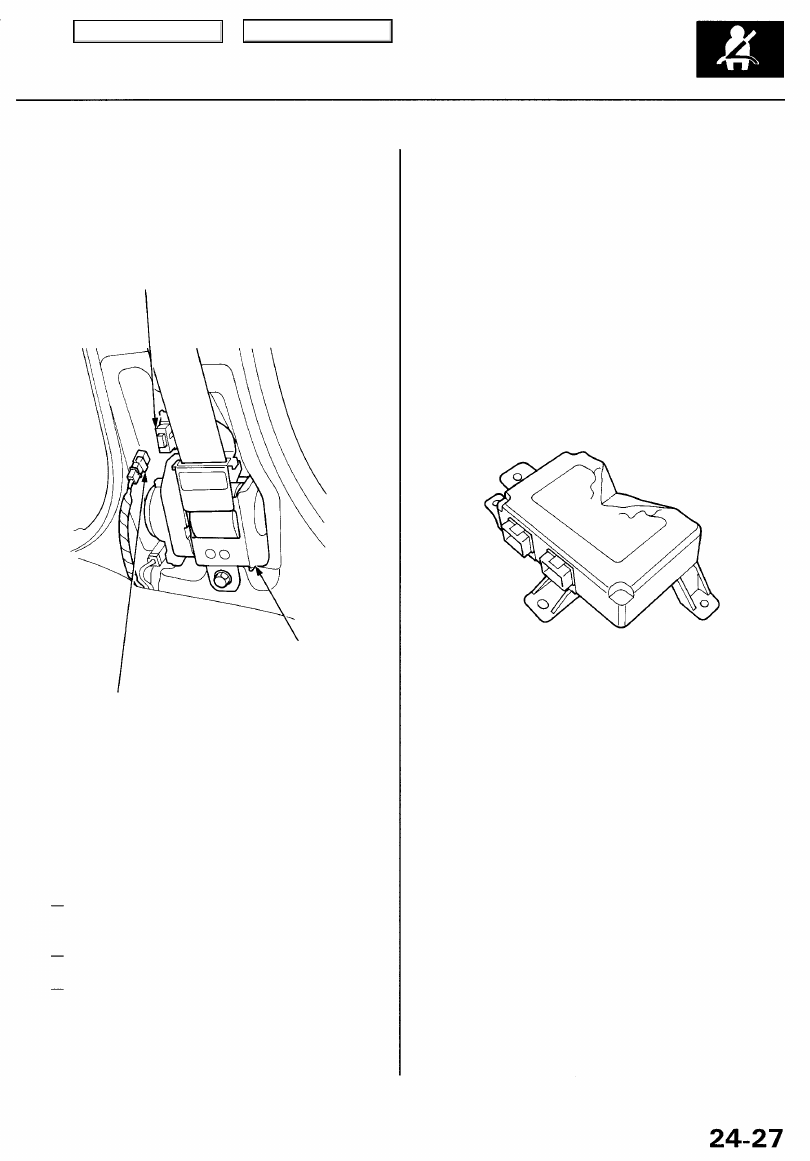
SEAT BELT TENSIONER
CONNECTOR
(With built-in short contact)
RETRACTOR
DRIVER'S SIDE: LEFT SIDE WIRE HARNESS 2P CONNECTOR
FRONT PASSENGER'S SIDE: RIGHT SIDE WIRE HARNESS
2P CONNECTOR
• Store the removed seat belt tensioner assembly on a
secure flat surface away from any high heat source
(exceeding 212°F/100°C) and free of any oil, grease,
detergent or water.
• Follow these precautions below during removal of a
tensioner.
Before you remove the seat belt tensioner, discon-
nect the seat belt tensioner connectors (with built-
in short contact).
Use only the test equipment specified in the Elec-
trical section.
Do not disassemble the tensioner or allow any
impact to it.
SRS Unit - '96 - 01 models and Side
Impact Sensor - '99 - 01 models
• Take extra care when painting or doing body work in
the area below the dashboard. Avoid direct exposure
of the SRS unit or wiring to heat guns, welding, or
spraying equipment.
• Disconnect the airbag or side airbag connector(s)
before disconnecting SRS harness connectors (see
page
).
• After a collision in which the airbags were deployed,
replace the SRS unit. After a collision in which the
side airbag was deployed, replace the side impact
sensor on the side where the side airbag deployed
and SRS unit. After a collision in which the airbags or
the side airbags did not deploy, inspect for any dam-
age or any deformation on the SRS unit and the side
impact sensor. If there is any damage, replace the
SRS unit and/or the side impact sensor.
• Do not disassemble the SRS unit or the side impact
sensor.
• Turn the ignition switch OFF, disconnect the battery
negative cable and wait at least 3 minutes before
beginning installation or replacement of the SRS unit,
and disconnect the connectors from the SRS unit.
• Be sure the SRS unit and side impact sensor are
installed securely.
• Do not spill water or oil on the SRS unit and side
impact sensor, and keep them away from dust.
• Store the SRS unit and side impact sensor in a cool
(less than 40°C/104°F) and dry (less than 80% relative
humidity, no moisture) area.
• Be careful not to bump or impact the SRS unit and
side impact sensor whenever the ignition switch is
ON (II) or within the first 3 minutes after the ignition
switch is turned OFF.
• During installation or replacement, be careful not to
bump (by impact wrench, hammer, etc.) the area
around the SRS unit and side impact sensor. The
airbags and side airbags could accidentally deploy
and cause damage or injury.
Main Menu
Table of Contents
2. To reinstall the connector, push it into position until
it clicks, then close its lid.
Precautions/Procedures
Inspection After Deployment
After a collision in which the airbags were deployed,
replace the deployed parts (airbag, seat belt tensioner
and side airbag), the SRS unit, the side impact sensor on
the side which deployed, and any related parts, and
inspect the following:
1. Inspect all the SRS wire harnesses. Replace, don't
repair, any damaged harnesses.
2. Inspect the cable reel for heat damage. If there is any
damage, replace the cable reel.
3. After the vehicle is completely repaired, turn the igni-
tion switch on. If the SRS indicator light comes on
for about 6 seconds and then goes off, the SRS sys-
tem is OK. If the indicator light does not function
properly, go to SRS Troubleshooting.
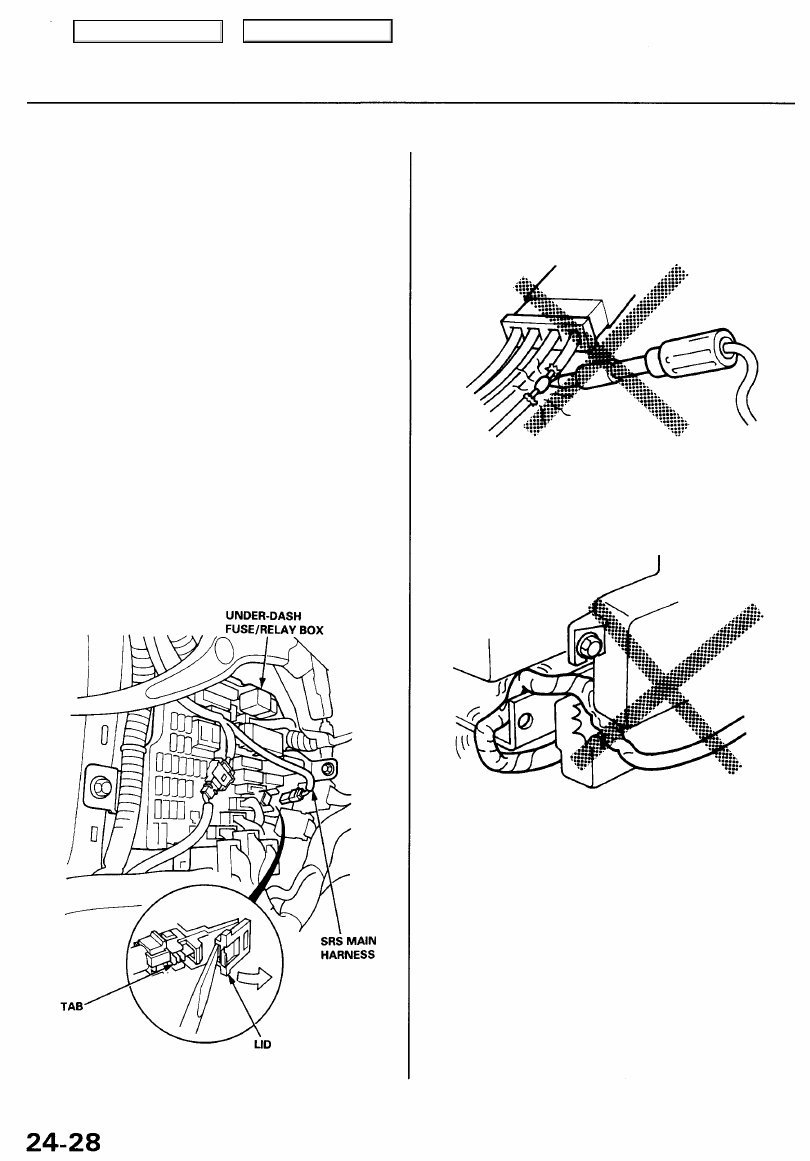
Disconnecting the SRS Connector
at the Fuse Box - '96 - 98 Models
CAUTION: Avoid breaking the connector; it's double-
locked.
1. First lift the connector lid with a thin screwdriver,
then press the connector tab down and pull the con-
nector out.
Wiring Precautions
• Never attempt to modify, splice or repair SRS wiring.
NOTE: SRS wiring harnesses are indicated by yellow
color.
• Be sure to install the harness wires so that they are not
pinched or interfering with other parts.
• Make sure all SRS ground locations are clean and
grounds are securely fastened for optimum metal-to-
metal contact. Poor grounding can cause intermittent
problems that are difficult to diagnose.
Main Menu
Table of Contents

Side Airbag Connector:
Disconnecting
To release the lock, pull the slider and the spring-loaded
sleeve while holding the opposite half of the connector.
Then pull the connector halves apart. Be sure to pull on
the sleeve and not on the connector half.
Spring-loaded Lock Connector
Some SRS system connectors have a spring-loaded lock.
Frontal Airbags and Seat Belt Tensioners:
Disconnecting
To release the lock, pull the spring-loaded sleeve toward
the stop while holding the opposite half of the connector.
Then pull the connector halves apart.
NOTE: Be sure to pull on the sleeve and not on the
connector half. SPRING-LOADED
SLEEVE
Connecting
1. Hold the pawl-side connector half, and press on the
back of the sleeve-side connector half in the direction
shown. As the two connector halves are pressed
together, the sleeve is pushed back by the pawl.
NOTE: Do not touch the sleeve.
2. When the connector halves are completely connected,
the pawl is released, and the spring-loaded sleeve
locks the connector.
SPRING-LOADED
SLEEVE
Connecting
Hold the both connector halves, and press them forcibly
until the projection of the sleeve-side connector clicks to
lock.
Main Menu
Table of Contents

Precautions/Procedures
Spring-loaded Lock Connector with
Built-in Short Contact
Both frontal airbags, the side airbags (if so equipped),
and the seat belt tensioners have a spring-loaded lock
connector with a built-in short contact. When this con-
nector is disconnected, the power terminal and the
ground terminal in the airbag connector are automati-
cally shorted.
Seats with Side Airbags -
'99 - 01 Models
• Seats with side airbags have a tag attached to the
seat-back. Because the component parts (seat-back
cover, cushion, etc.) of seats with and without airbags
are different, make sure you install only the correct
replacement parts.
• When cleaning, do not saturate the seat with liquid,
and do not spray steam on the seat.
• Do not repair torn or frayed seat-back covers. Replace
the seat-back cover.
• After a collision in which the side airbag was
deployed, replace the seat-back cover and the side
airbag with new parts. If the seat-back cushion is
split, it must be replaced. If the seat-back frame is
deformed, it must be replaced. If you are not sure if
the seat-back frame is deformed, check the side
airbag upper mount base as shown below. If the dis-
tance "a" is more than 24 mm, replace the seat-back
frame.
Main Menu
Table of Contents
Нет комментариевНе стесняйтесь поделиться с нами вашим ценным мнением.
Текст