Acura RL (1996-2004 year). Manual — part 32
Repair Procedures
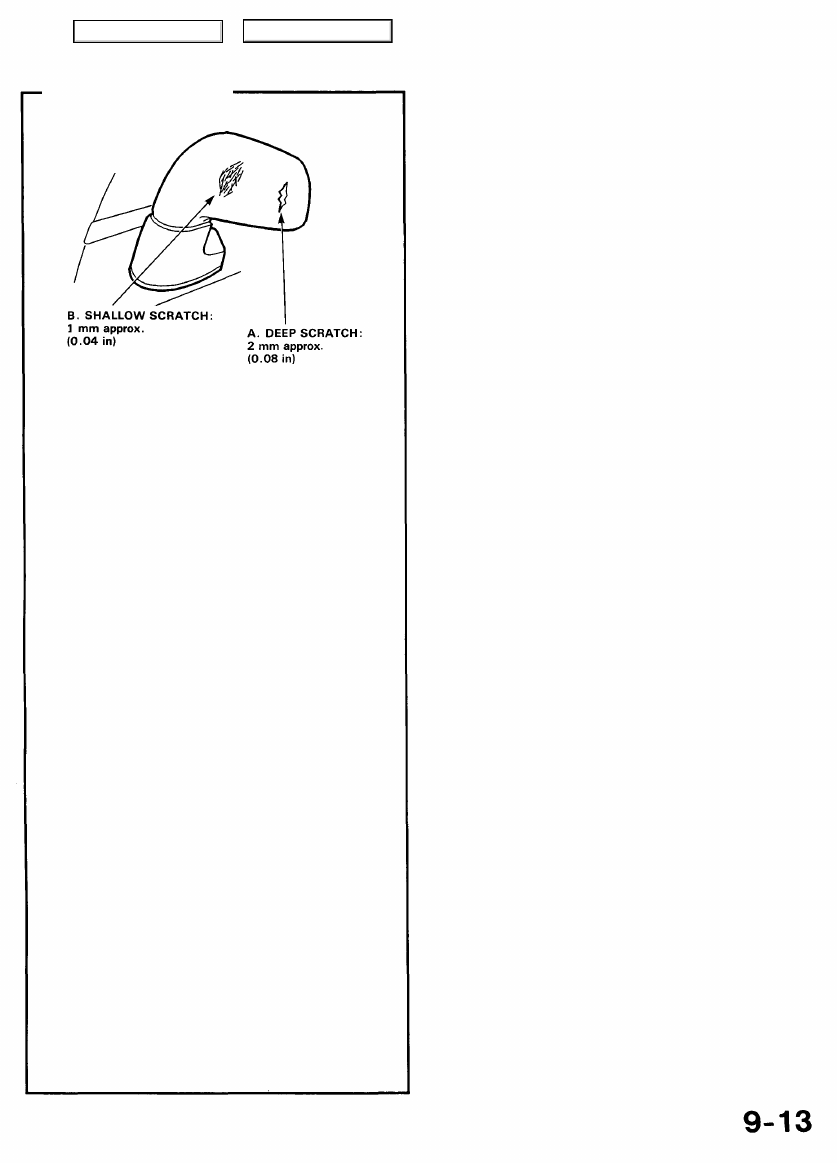
A. Deep scratches, when filling:
(1) Sand the damage section. (#120~#240)
(2) Apply the filler and dry.
(3) Sand the filler (#240~#400)
(4) Coat with the primer/primer surfacer and dry.
(5) Sand the primer surfacer. (#600~#800)
(6) Top coating.
B. Shallow scratches:
(1) Coat with the primer/primer surfacer.
(2) Sand the primer surfacer. (|600~#800)
(3) Top coating.
C. Repaint:
(1) Sand the primer surfacer. (#600~#800)
(2) Top coating.
Main Menu
Table of Contents
Refinishing Procedures
1. Base material reconditioning (sanding)
-1. Repaint and replacement part
Lightly sand the part with #400, #600 or #800.
-2. Slight scores or scratches
Use a flexible sanding block and wet sand the
damaged section with #400, #600.
NOTE: Sand level to remove damage.
-3. Deep scratches, when filling.
Use a flexible sanding block and wet sand the
damaged section with #240, #400.
2. Degreasing and cleaning
Clean the repaired area with wax and grease remover,
then blow with air dry.
• Do not use high air pressure; use only an ap-
proved, 210 kPa (2.1 kgf/cm
2
, 30 psi) air nozzle.
• Wear goggles or safety glasses to prevent eye
injury.
NOTE: Wipe dust off surface with a tack cloth.
3. Filling, drying and sanding
Apply the filler in several thin coats.
NOTE: Mix and apply the filler according to the
manufacturer's instructions.
-I. Dry the filler with an infrared dryer for 5 or 6
minutes.
Be sure to keep the dryer 40-50 cm (16-20 in) away
from the surface.
-2. Scratch the filled surface with your nail. If the
surface is white when scratched, dry sand and wet
sand with the #240-#400 paper. Be sure to sand
level.
4. Cleaning with compressed air, and degreasing
Blow the entire area to be coated with compressed air,
then clean with wax and grease remover.
• Do not use high air pressure; use only an ap-
proved, 210 kPa (2.1 kgf/cm
2
, 30 psi) air nozzle.
• Wear goggles or safety glasses to prevent eye
injury.
NOTE: Clean the whole surface to the help the masking
tape adhere securely.
(cont'd)
Main Menu
Table of Contents
ABS/PC Resin Parts
Refinishing Procedures (cont'd)
5. Masking
Use the masking tape and paper to mask the area that
should not be sprayed.
6. Coat with primer/primer surfacer, drying and sand-
ing.
• Spray the primer surfacer over the filled area.
8. Top coating
• Remove dust with a tack cloth before spraying.
• Spray the top coating. Spray until the primer sur-
facer is covered.
• The coating thickness should be 30-35 microns.
• Ventilate when spraying paint. Most paint
contains substances that are harmful if inhaled
or swallowed. Read the paint label before
opening the paint container.
• Avoid contact with skin. Wear an approved res-
pirator, gloves, eye protection and appropriate
clothing when painting.
• Paint is flammable. Store it in a safe place, and
keep it away from sparks, flames or cigarettes.
• Do not use high air pressure; use only an ap-
proved, 210 kPa (2.1kgf/cm
2
, 30 psi) air nozzle.
• Wear goggles or safety glasses to prevent eye
injury.
NOTE: For the recommended top coat paint, refer to
"Example of repair materials".
Solid color: Color enamel + color clear coat
Metallic: Metallic enamel + clear coat
Pearl: Pearl enamel + clear coat
9. Drying
After top coating for about 10 minutes, then dry with
an infrared dryer.
NOTE: Follow the paint manufacturer's specification to
dry properly.
• Ventilate when spraying paint. Most paint
contains substances that are harmful if inhaled
or swallowed. Read the paint label before
opening the paint container.
• Avoid contact with skin. Wear an approved res-
pirator, gloves, eye protection and appropriate
clothing when painting.
• Paint is flammable. Store it in a safe place, and
keep it away from sparks, flames or cigarettes.
• Do not use high air pressure; use only an ap-
proved, 210 kPa (2.1kgf/cm , 30 psi) air nozzle.
• Wear goggles or safety glasses to prevent eye
injury.
• The coating thickness should be 20-25 microns.
NOTE: Follow the primer/primer surfacer manufacturer's
instructions.
- 1 . Drying
• Let the primer surfacer dry naturally for 5 to 10
minutes, then dry with a infrared dryer.
Body parts being dried with an
industrial dryer can get hot enough to cause injury.
Do not touch parts being dried.
• Be sure to keep the dryer 40-50 cm (16-20 in)
away from the paint film.
-2. Sanding
Lightly dry sand the whole area to be painted with
#600, #800 sandpaper.
7. Blow off with compressed air, then clean with wax
and grease remover.
• Do not use high air pressure; use only an ap-
proved, 210 kPa (2.1kgf/crrv, 30 psi) air nozzle.
• Wear goggles or safety glasses to prevent eye
injury.
NOTE: Clean the whole surface to help the masking
tape adhere securely.
Main Menu
Table of Contents
9-15
Glossary
All paint
Painting of complete surface.
Air blow
Using compressed air to blow away dust and debris.
Block paint
Painting a section only, such as a door.
Clear paint (clear coat)
Clear paint without dye (pigment).
Double coat
Application of two paint coats.
Dry coat
Paint which left the spray gun and dried partially before it reached the surface, thereby
making the painted surface rough. Dry coating is caused by too little paint being fed, too
high an air pressure, too much distance between the painted surface and the gun, or
moving the gun too fast.
Dry film
Paint which has dried completely.
Dust coat
Paint is applied thinner than a dry coat. Painted surface becomes rough.
ED painting
Electrostatic discharge painting.
Enamel
Finishing paint pigmented with dye.
Featheredging
Smoothing off the edges of painted surfaces.
Flash off
Evaporation of the paint solvent. (Flash off time is the period between paint coat
applications.)
Ford cup
A type of viscosity meter .
Gun stroke
Movement of the paint gun.
Hardener
Hardening agent of two-liquid type paint or fillers. Polycyanates and oxides are used
for hardeners.
Heat-hardening acrylic
resin paint
Composed of acrylic resin and meramine resin, and hardened (forms a paint film) by
baking.
Main Menu
Table of Contents
Нет комментариевНе стесняйтесь поделиться с нами вашим ценным мнением.
Текст