Acura RL (1996-2004 year). Manual — part 13
5. Mold the related parts.
Fill any holes by MIG or gas welding, and even out with a
hammer and dolly.
To prevent eye injury and burns
when welding, wear an approved welding helmet,
gloves and safety shoes.
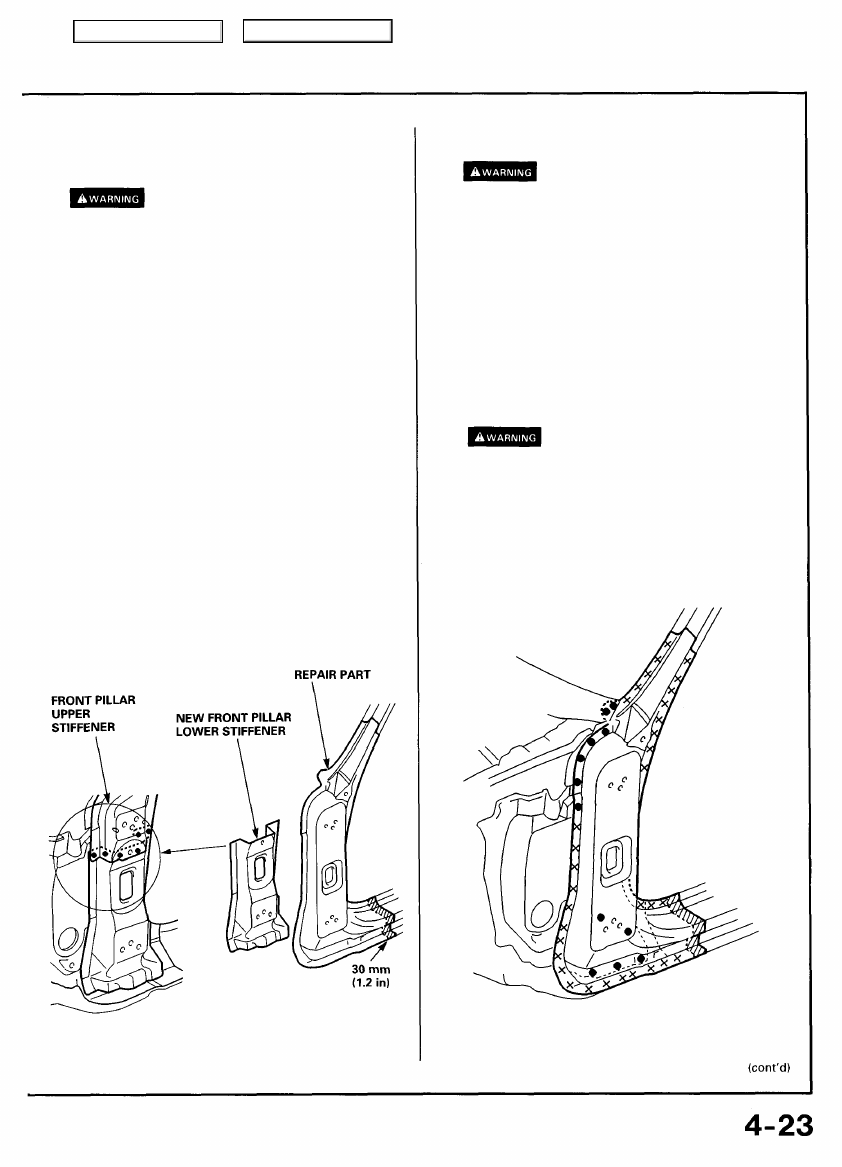
6. Set the new front pillar lower stiffener and repair part.
• Align the repair part with the top cut section, then
cut it with a handsaw.
NOTE: Cut the side sill joint with a handsaw leaving an
overlap of 30 mm (1.2 in).
• Remove the undercoat from both sides of the areas
to be spot welded with a sander to expose the steel
plate.
NOTE: Apply the spot sealer to the welding surface
when spot welding.
• Clamp the new front pillar lower stiffener and repair
part.
• Check the body dimensions (see
).
• Temporarally install the door, and check the door
hinge mounting position.
• Remove the repair part and MIG weld the front pillar
lower stiffener.
7. Tack weld the clamped sections.
To prevent eye injury and burns
when welding, wear an approved welding helmet,
gloves and safety shoes.
8. Temporarily mount the door and front fender.
• Remove the vise-grips, then mount the door.
• Check the clearance and level differences of the
door and fender.
9. Perform main welding.
• Weld the front pillar and side sill outer joints with a
MIG welder.
• Make 20% to 30% more spot welds than there were
holes drilled.
To prevent eye injury and burns
when welding, wear an approved welding helmet,
gloves and safety shoes.
• Make 5 mm (0.2 in) holes in the MIG weld holes with
the repair part, and weld the lower stiffener, upper
stiffener and dashboard upper side member with a
MIG welder.
Main Menu
Table of Contents
Front Pillar (Outer Panel)
Replacement (cont'd)
• Weld the front pillar extension.
10. Finish the welding areas.
• Finish grind the finishing allowance with a disc
sander until it is smooth.
To prevent eye injury, wear goggles
or safety glasses whenever sanding, cutting or
grinding.
• Smooth the flanged section of the door opening
with a hammer and dolly.
).
12. Apply the paint.
See Paint Repair section.
• Ventilate when spraying paint. Most paint
contains substances that are harmful if inhaled
or swallowed. Read the paint label before
opening the paint container.
• Avoid contact with skin. Wear an approved
respirator, gloves, eye protection and appropriate
clothing when painting.
• Paint is flammable. Store it in a safe place, and
keep it away from sparks, flames or cigarettes.
13. Apply anti-rust agent to the inside of the front pillar, front
pillar extension and side sill (see
).
14. Install the related parts.
• Install in the reverse order of removal.
• Check the door for proper installation and level
difference from the fenders.
15. Clean and check.
• After installing the dashboard, check the lights and
gauges for proper operation.
• Clean the passenger compartment and check for
water leaks.
Main Menu
Table of Contents
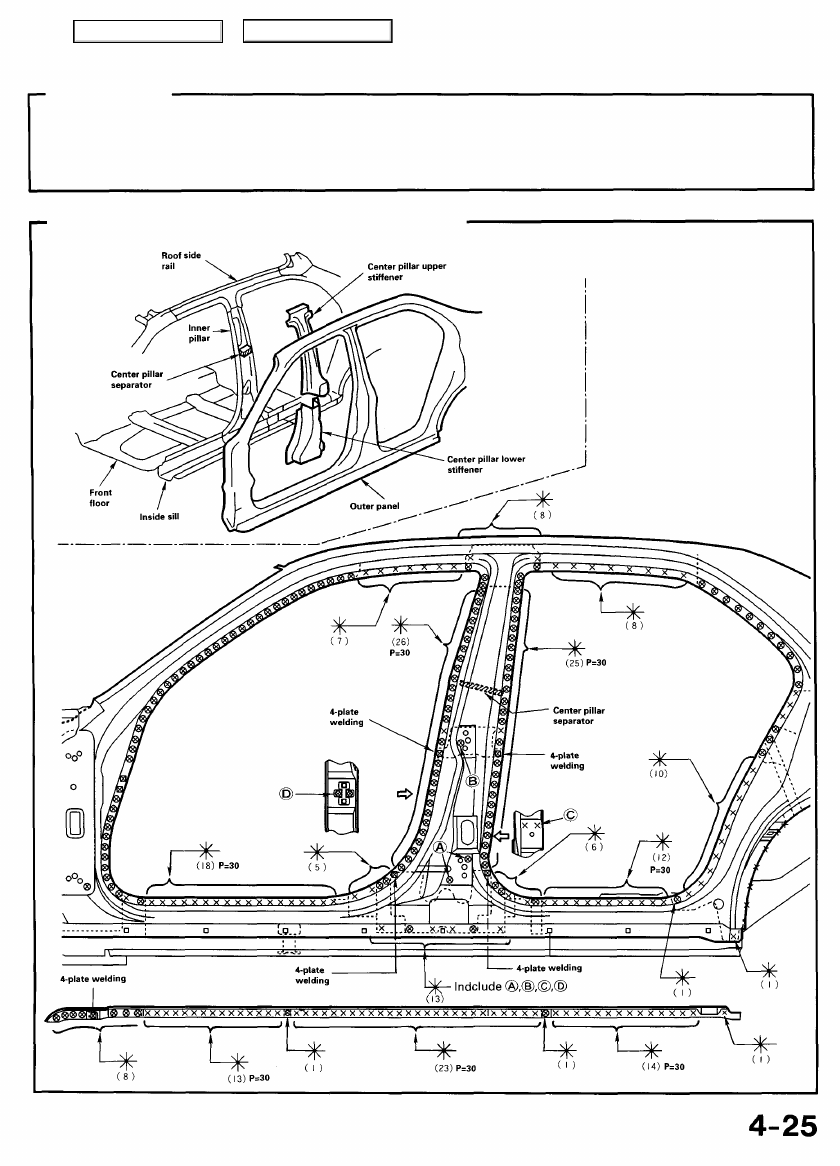
Side Sill (Outer Panel)
Description
The side sill should, depending on the degree of damage, be repaired as much as possible rather than replaced. (Repair by pulling
out with slide hammer with pin and washer welded on.)
Mass Production Body Welding Diagram
Main Menu
Table of Contents
Side Sill (Outer Panel)
Replacement
1. Remove the related parts.
• Front and rear doors
(remove according to part damaged)
• Side and center pillar trim
• Door opening trim
• Carpet
• Door switch
• Seat belt
2. Pull out and straighten the damaged area.
Damage may extend to the inner pillar, the inside sill and
floor. Determine the extent of the damage first, so that
the frame can be pulled out properly.
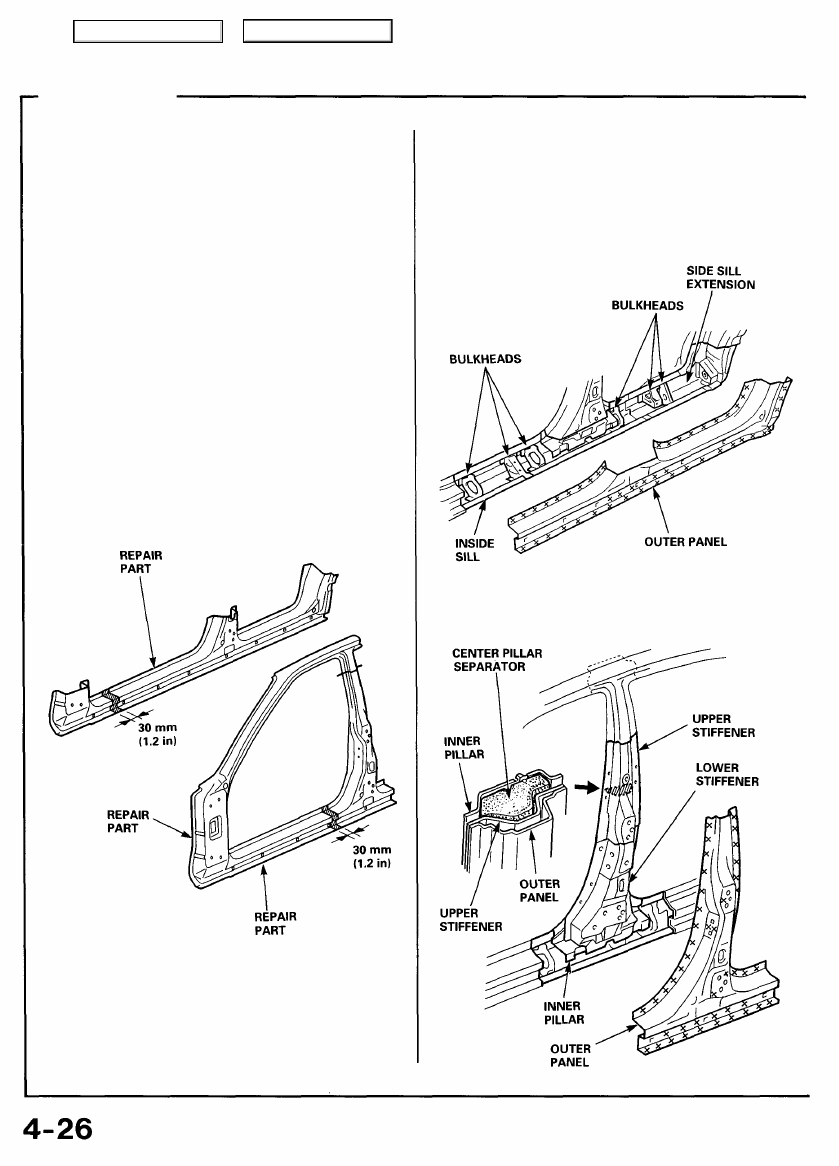
3. Cut and pry off the side sill.
• Check the damage on the outer side sill, then cut the
repair outer side sill so it will overlap by 30 mm (1.2 in)
in the front and back.
NOTE: Be careful not to cut the inside sill. This could
result in extensive repair.
• Center punch around the spot weld imprints on the
welded flange.
• Drill holes using the spot cutter.
• Pry off the welded flange with a chisel.
NOTE: Be careful not to let the holes penetrate down to
the inner section.
NOTE: Do not cut or damage the upper stiffener and
center pillar separator.
• If the damage involves part of the center pillar and
rear wheel arch, cut them as shown with a handsaw.
• Cut the side sill with a chisel leaving the weld flanges
intact.
Main Menu
Table of Contents
Нет комментариевНе стесняйтесь поделиться с нами вашим ценным мнением.
Текст