Acura RL (1996-2004 year). Manual — part 407
Emission Control System
Evaporative Emission (EVAP) Controls (cont'd)
The scan tool indicates Diagnostic Trouble Code (DTC) P1457: Evaporative Emission (EVAP) control system leak
detected (EVAP control canister system).
'96 - 99 models:
Troubleshooting Flowchart
The MIL has been reported on.
DTC P1457 is stored.
Do the fuel tank pressure sensor
).
Is the fuel tank pressure sensor OK?
Fuel tank pressure sensor is OK.
Do the EVAP purge control
solenoid valve.
EVAP purge control solenoid
valve test.
Check the EVAP purge control
solenoid valve:
1. Disconnect the vacuum hose
from the EVAP purge control
solenoid valve, and connect a
hose and a vacuum pump to
the EVAP purse control
solenoid valve.
2. Connect the PCM connector
terminal A23 to the body
ground with a jumper wire.
3. Turn the ignition switch ON (II).
4. Apply vacuum to the hose.
Dose the valve hold vacuum?
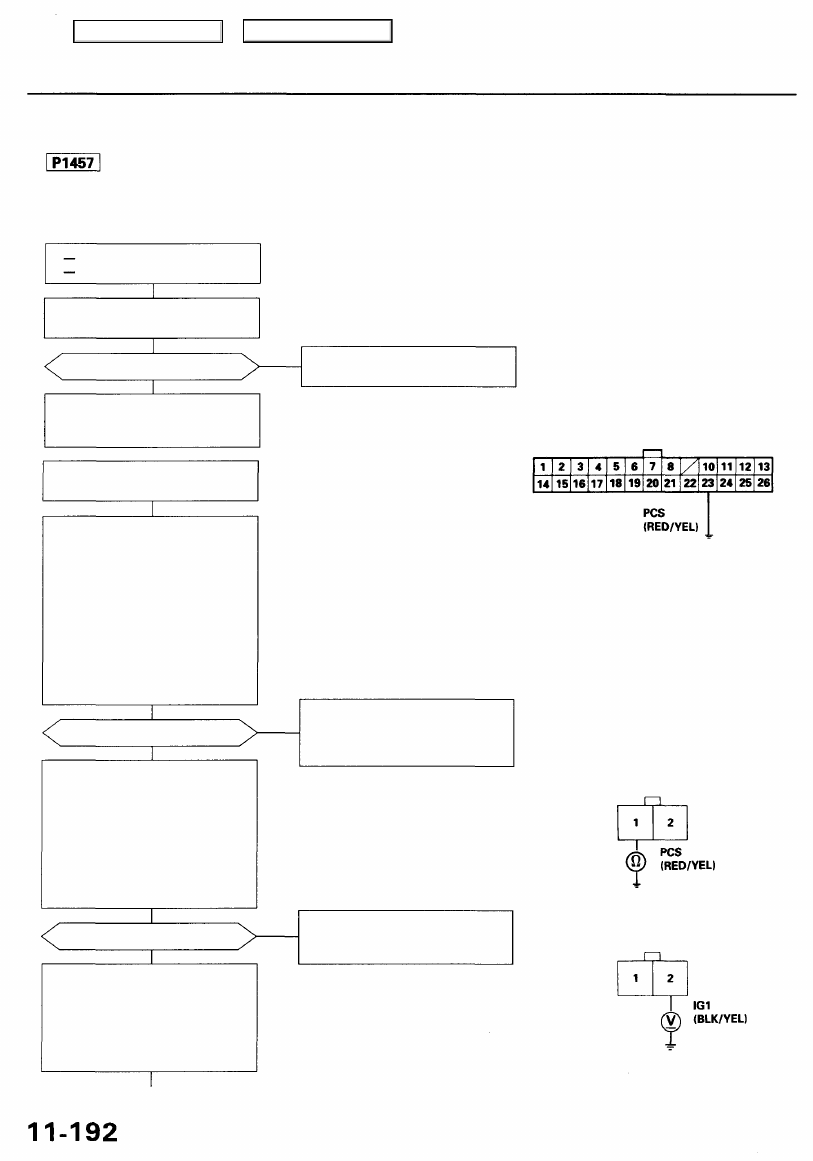
Check for an open in the wire
(PCS line):
1. Turn the ignition switch OFF.
2. Disconnect the EVAP purge
control solenoid valve 2P con-
nector.
3. Check for continuity between
the EVAP purge control
solenoid valve 2P connector ter-
minal No. 1 and body ground.
Is there continuity?
YES
Check for an open in the wire
(IG1 line):
1. Turn the ignition switch ON (II).
2. Measure voltage between the
EVAP bypass solenoid valve 2P
connector terminal No. 2 and
body ground.
Replace the fuel tank pressure
sensor.
PCM CONNECTOR A (26P)
Wire side of
female
terminals
EVAP purge control solenoid
valve is OK. Do the EVAP bypass
solenoid valve test (see page
).
EVAP PURGE CONTROL SOLENOID
VALVE 2P CONNECTOR (C127)
Repair open in the wire between
the EVAP purge control solenoid
valve and PCM (A23).
NO
Wire side of
female
terminals
YES
NO
JUMPER
WIRE
YES
NO
Main Menu
Table of Contents
Is there battery voltage?
NO
Repair open in the wire between
the EVAP purge control solenoid
valve and No. 20 ECU (PCM) (20
A) fuse.
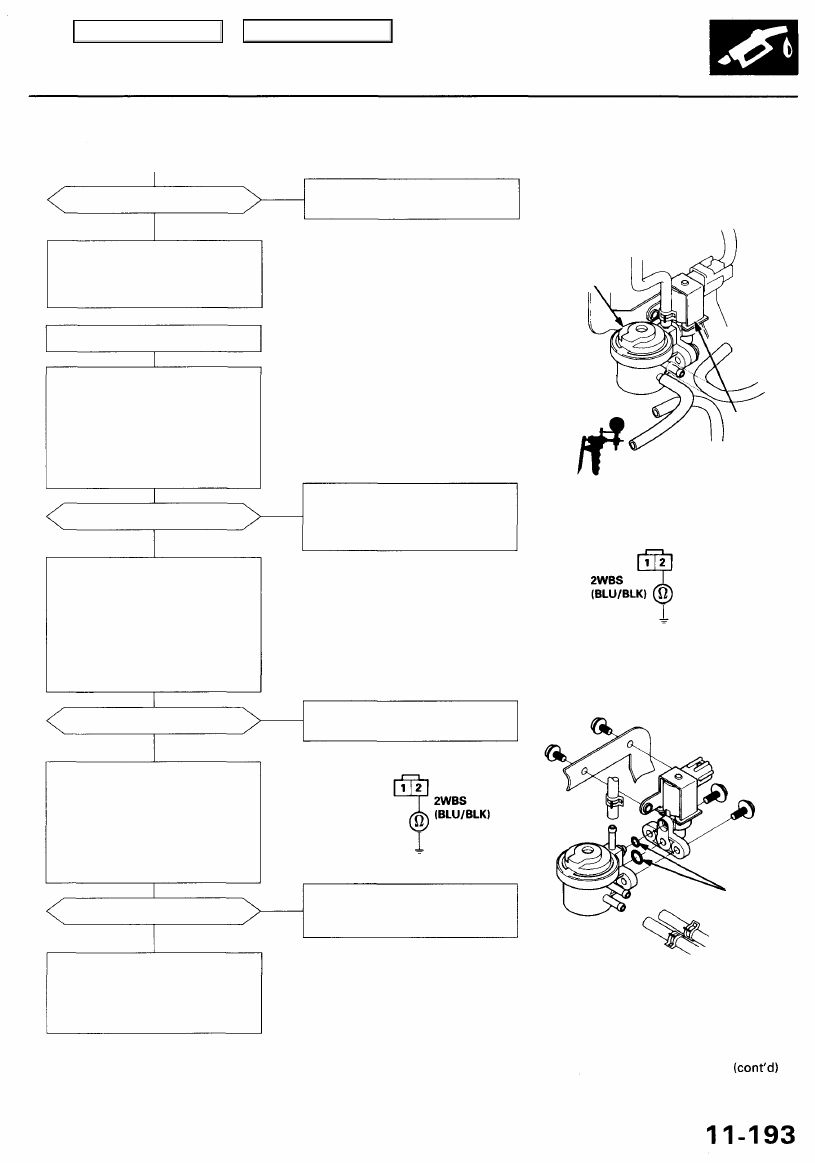
EVAP bypass solenoid valve test.
Check the EVAP bypass solenoid
valve:
1. Disconnect the vacuum hose
from the EVAP two way valve,
and connect a vacuum pump
to the hose.
2. Turn the ignition switch ON (II).
3. Apply vacuum to the hose.
Dose the valve hold vacuum?
NO
Check the EVAP bypass solenoid
valve:
1. Turn the ignition switch OFF.
2. Disconnect the EVAP bypass
solenoid valve 2P connector.
3. Check for continuity between
the EVAP bypass solenoid
valve 2P connector terminal
No. 2 and body ground.
Is there continuity?
YES
Check for a short in the wire
(2WBS line):
1. Disconnect the ECM/PCM
connector F (8P).
2. Check for continuity between
the EVAP bypass solenoid
valve 2P connector terminal
No. 2 and body ground.
Is there continuity?
NO
Substitute a known-good PCM
and recheck (see page
for
immobilizer information). If
symptom/indication goes away,
replace the original PCM.
Replace the EVAP purge control
solenoid valve.
EVAP TWO-WAY
VALVE
VACUUM
PUMP/
GAUGE,
0 - 30 in.Hg
EVAP
BYPASS
SOLENOID
VALVE
EVAP bypass solenoid valve/EVAP
two-way valve is OK. Do the EVAP
control canister vent shut valve
test (see page
).
EVAP BYPASS SOLENOID
VALVE 2P CONNECTOR (C320)
Replace the EVAP bypass solenoid
valve and O-rings.
Repair short in the wire between
PCM (F1) and EVAP bypass
solenoid valve.
O-RINGS
Replace.
YES
NO
YES
Wire side of
female
terminals
YES
Main Menu
Table of Contents
Emission Control System
Evaporative Emission (EVAP) Controls (cont'd)
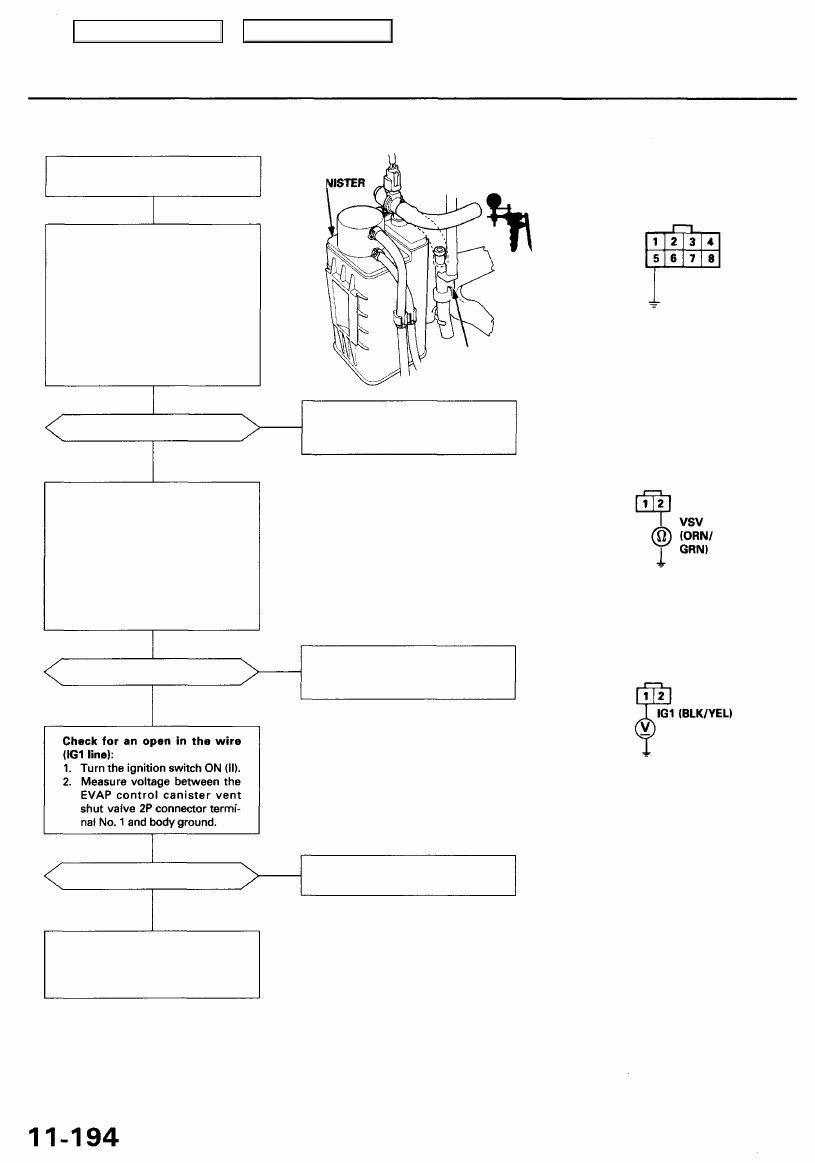
EVAP control canister vent shut
valve test.
Check the EVAP control canister
vent shut valve:
1. Disconnect the vacuum hose
from the EVAP three way
valve, and connect a vacuum
pump to the hose.
2. Connect the PCM connector
terminal F5 to the body ground
with a jumper wire.
3. Turn the ignition switch ON (II).
4. Apply vacuum to the hose.
Does the valve hold vacuum?
Is there battery voltage?
NO
Repair open in the wire between
the EVAP control canister vent
shut valve and No. 20 ECU (PCM)
(20 A) fuse.
EVAP
CONTROL
CA1
VACUUM
PUMP/GAUGE, 0 - 30 in.Hg
PCM CONNECTOR F (8P)
VSV (RED/WHT)
JUMPER WIRE
EVAP
THREE WAY
VALVE
Wire side of female
terminals
EVAP control canister vent shut
valve is OK. Do the canister sys-
tem leak test (see page
).
EVAP CONTROL
CANISTER VENT SHUT
VALVE 2P CONNECTOR (C316)
Wire side of female terminals
NO
Repair open in the wire between
the EVAP control canister vent
shut valve and PCM (F5).
Replace the EVAP control canis-
ter vent shut valve and O-ring.
YES
YES
Is there continuity?
NO
YES
Check for an open in the wire
(VSV line):
1. Turn the ignition switch OFF.
2. Disconnect the EVAP control
canister vent shut valve 2P
connector.
3. Check for continuity between
the EVAP control canister vent
shut valve 2P connector termi-
nal No. 2 and body ground.
Main Menu
Table of Contents
Does the voltage drop to 1.5 V
and holds at least 20 seconds?
YES
Inspect the EVAP control canister
vent shut valve line and connec-
tions.
EVAP TWO-WAY
VALVE
NO
VACUUM
PUMP/
GAUGE,
0 - 30 in.Hg
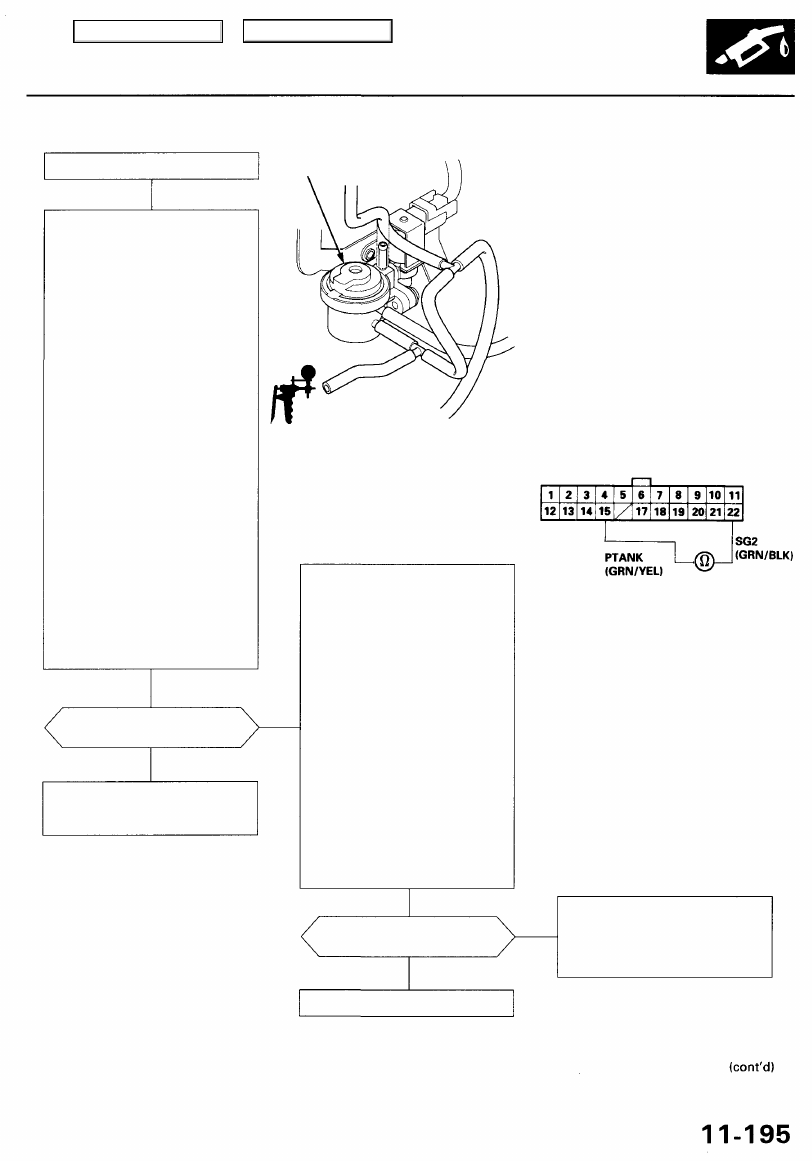
Check the EVAP purge control
solenoid valve line and connec-
tions:
1. Turn the ignition switch OFF.
2. Disconnect the purge line hose
from the EVAP control canister
and plug the port.
3. Turn the ignition switch ON (II).
4. While monitoring the FTP
Sensor voltage with the Honda
PGM Tester, or measuring volt-
age between PCM connector ter-
minals D15 and D22 slowly
pump the vacuum pump using a
stroke every 1-2 seconds.
5. Continue to pump vacuum
until the voltage drops to
approx. 1.5V.
NOTE: Make sure that the
engine coolant temperature
still above 95°F (35°C) and your
vacuum pump has no leak.
6. Monitor voltage for 20 seconds.
PCM CONNECTOR D (22P)
Wire side of female terminals
Does the voltage drop to 1.5 V
and holds at least 20 seconds?
Inspect the EVAP purge control
solenoid valve line and connec-
tions. If they are OK, do the
EVAP two-way valve test (see
page
).
YES
NO
Replace the EVAP control canister.
Canister system leak test.
Check the EVAP control canister
vent shut valve line and connec-
tions:
1. Turn the ignition switch OFF.
2. Connect a two three-way tee
fittings into the hose from the
EVAP control canister to the
EVAP two-way valve. Connect
the fuel tank pressure sensor
to one of the tee fittings and
the vacuum pump to the other.
3. Remove the vent hose from the
EVAP control canister vent shut
valve and cap the port to seal
the fresh air vent for the EVAP
control canister.
4. Turn the ignition switch ON (II).
5. While monitoring the FTP
Sensor voltage with the Honda
PGM Tester, or measuring volt-
age between PCM connector ter-
minals D15 and D22 slowly
pump the vacuum pump using a
stroke every 1-2 seconds.
6. Continue to pump vacuum
until that voltage drops to
approx. 1.5 V.
NOTE: Make sure that the
engine coolant temperature
still above 95°F (35°C) and your
vacuum pump has no leak.
7. Monitor that voltage for 20
seconds.
Main Menu
Table of Contents
Нет комментариевНе стесняйтесь поделиться с нами вашим ценным мнением.
Текст