Acura RL (1996-2004 year). Manual — part 607
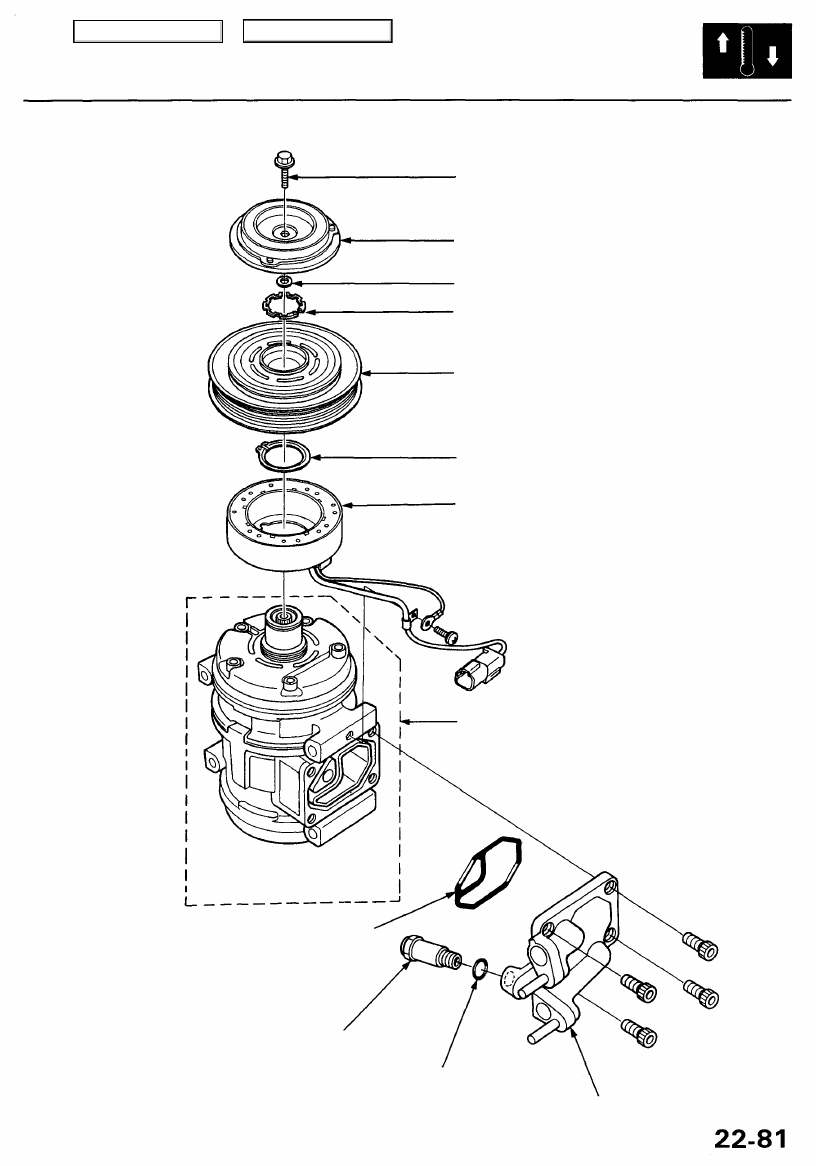
Illustrated Index
CENTER BOLT
PRESSURE PLATE
Inspection, page
SHIM(S)
SNAP RING B
Replace.
SNAP RING A
Replace.
O-RING
Replace.
SUCTION SERVICE VALVE
O-RING
Replace.
COMPRESSOR
(Do not disassemble)
Main Menu
Table of Contents

Compressor
Clutch Inspection
Check the plated parts of the pressure plate for color
changes, peeling or other damage. If there is dam-
age, replace the clutch set.
Check the pulley bearing play and drag by rotating
the pulley by hand. Replace the clutch set with a new
one if it is noisy or has excessive play/drag.
PULLEY
Measure the clearance between the pulley and the
pressure plate all the way around. If the clearance is
not within specified limits, the pressure plate must be
removed and shims added or removed as required,
following the procedure on page
Clearance: 0.5 ±0.15 mm (0.020 ± 0.006 in)
NOTE: The shims are available in three thicknesses:
0.1 mm, 0.3 mm and 0.5 mm.
PRESSURE PLATE
PULLEY
Check resistance of the field coil.
Field Coil Resistance: 3.4 to 3.8 at 68 F (20°C)
If resistance is not within specifications, replace the
field coil.
Main Menu
Table of Contents

Clutch Overhaul
1. Remove the center bolt while holding the pressure
plate.
CENTER BOLT
13.2 N-m
(1.35 kgf-m, 9.76 Ibf-ft)
A/C CLUTCH HOLDER
(Commercially available)
Robinair: P/N 10204
Kent-Moore: P/N J37872
2. Remove the pressure plate and shim(s), taking care
not to lose the shim(s).
PRESSURE PLATE
SHIM(S)
3. Remove the snap ring B with snap ring pliers, then
remove the pulley.
NOTE:
Be careful not to damage the pulley and com-
pressor during removal/installation.
Once the snap ring B is removed, replace it with
a new one.
SNAP RING B
Replace.
PULLEY
Main Menu
Table of Contents

Compressor
Clutch Overhaul (cont'd)
4. Remove the screw from the field coil ground termi-
nal. Remove the snap ring A with snap ring pliers,
then remove the field coil.
NOTE:
• Be careful not to damage the field coil and com-
pressor during removal/installation.
• Once the snap ring A is removed, replace it with
a new one.
SNAP RING A
Replace.
FIELD COIL
5. Install in the reverse order of removal. Make note of
the following items.
• Install the field coil with the wire side facing
down (see above).
• Clean the pulley and compressor sliding surfaces
with non-petroleum solvent.
• Make sure the snap rings are fully seated in the
groove.
• Make sure that the pulley turns smoothly after
it's reassembled.
Main Menu
Table of Contents
Нет комментариевНе стесняйтесь поделиться с нами вашим ценным мнением.
Текст