Acura RL (1996-2004 year). Manual — part 410

Emission Control System
Evaporative Emission (EVAP) Controls (cont'd)
7. Connect a second vacuum pump to the fuel tank
vapor signal tube.
FUEL TANK VAPOR
SIGNAL TUBE
VACUUM
PUMP/GAUGE,
in.Hg
8. Apply vacuum (1 pump) to the fuel tank vapor sig-
nal tube, then check the vacuum on the pump in
step 6.
• If the vacuum holds, replace the Fuel Tank Vapor
Control valve.
• If the vacuum is released, the Fuel Tank Vapor
Control valve is OK.
9. Disconnect the fuel tank vapor vent tube from the
EVAP canister, then plug the port on the canister.
Reapply vacuum (80 pumps).
• If the vacuum holds, replace the Fuel Tank Vapor
Control valve.
• If the vacuum does not hold, inspect the EVAP
canister vent shut valve O-ring. If the 0-ring is
OK, replace the EVAP canister and repeat step 4.
Main Menu
Table of Contents
Emission Control System
Evaporative Emission (EVAP) Controls (cont'd)
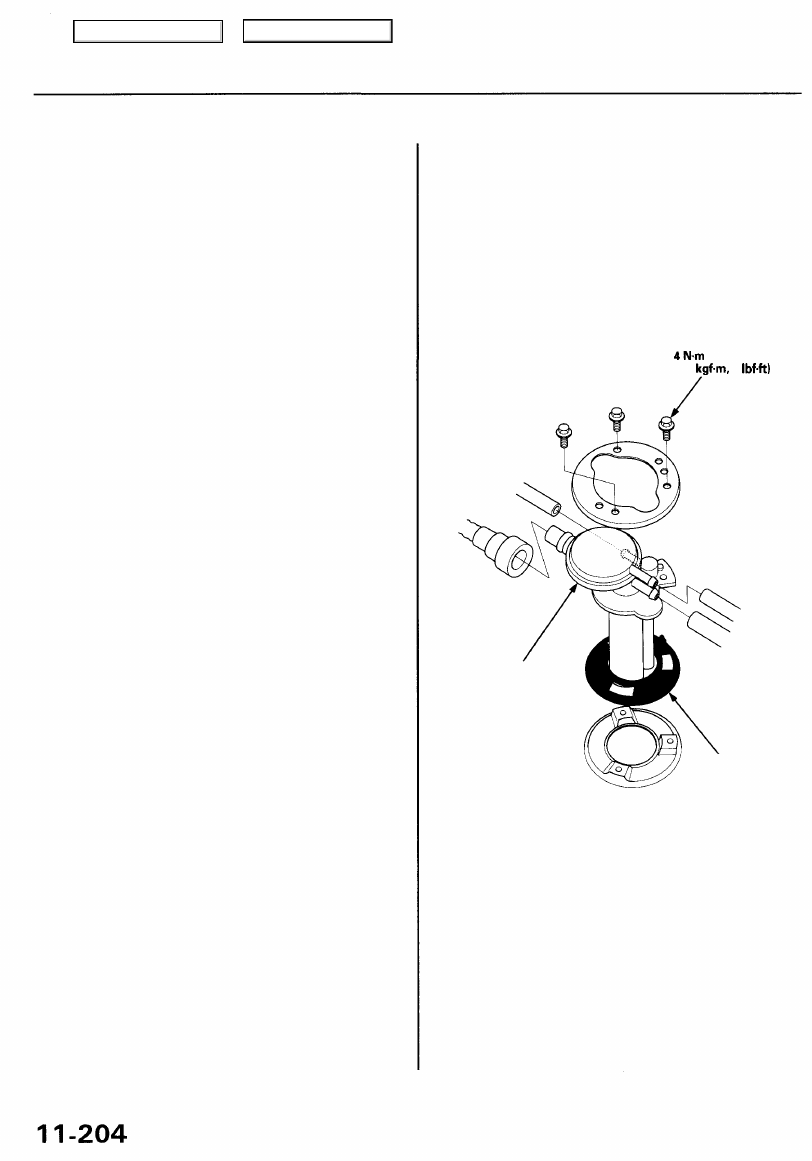
Fuel Tank Vapor Control Valve Replacement
1. Remove the fuel tank (see page
).
2. Remove the Fuel Tank Vapor Control valve from the
fuel tank.
3. Install parts in the reverse order of removal.
(0.4
3
FUEL TANK VAPOR
CONTROL VALVE
BASE GASKET
Replace.
Main Menu
Table of Contents

Evaporative Emission (EVAP) Two Way Valve Testing
1. Remove the fuel fill cap.
2. Remove the vapor line from the EVAP two way
valve (located above the EVAP canister), and con-
nect it to a T-fitting from a vacuum gauge and a
vacuum pump as shown.
'96 - 99 models:
VACUUM/PRESSURE
GAUGE
0 - 4 in.Hg
VACUUM PUMP/
GAUGE, 0 - 30 in.Hg
T-FITTING
'00 - 04 models:
VACUUM/PRESSURE
GAUGE
0 - 4 in.Hg
VACUUM PUMP/
GAUGE, 0 - 30 in.Hg
T-FITTING
3. Apply vacuum slowly and continuously while
watching the gauge. The vacuum should stabilize
momentarily at 0.8 - 2.1 kPa (6 - 16 mmHg, 0.2 - 0.6
in.Hg).
• If the vacuum stabilizes (valve opens) below
0.8 kPa (6 mmHg, 0.2 in.Hg) or above 2.1 kPa
(16 mmHg, 0.6 in.Hg), install a new valve and
retest.
4. Move the vacuum pump hose from the vacuum fit-
ting to the pressure fitting, and move the vacuum
gauge hose from the vacuum side to the pressure
side as shown.
'96 - 99 models:
PRESSURE
SIDE
'00 - 04 models:
PRESSURE
SIDE
5. Slowly pressurize the vapor line while watching the
gauge. The pressure should be stabilize momentarily
above 1.0 kPa (8 mmHg, 0.3 in.Hg).
• If the pressure momentarily stabilizes (valve
opens) above 1.0 kPa (8 mmHg, 0.3 in.Hg), the
valve is OK.
• If the pressure stabilizes below 1.0 kPa (8 mmHg,
0.3 in.Hg), install a new valve and retest.
Main Menu
Table of Contents

Special Tools
07GAD - SD40101
07GAE - PG40200 or
07GAE - PG4020A
07HAC - PK4010A
07LAC - PW50101
07LAD - SM40100
07LAE - PX40100
07MAC - PY40100
07MAD - PR90100
07MAF - PY40101
07MAJ - PY4011A
07MAJ - PY40120
07PAZ - 0010100
07SAZ - 001000A
07406 - 0020400
07406 - 0070300
07736 - A01000B or
07736 - A01000A
07746 - 0010400
07746 - 0010500
07746 - 0010600
07746 - 0030100
07749 - 0010000
07924 - PJ4010A
07947 - 6340500
Bearing Driver Attachment
Clutch Spring Compressor Bolt Assembly
Housing Puller
Extension Shaft Puller
Seal Driver Attachment
Clutch Spring Compressor Attachment
Housing Puller Extension Bolts
Attachment, 45 x 55 mm I.D.
Extension Shaft Installer
A/T Pressure Hose, 2210 mm
A/T Pressure Hose, Adapter
SCS Service Connector
Backprobe Set
A/T Oil Pressure Gauge Set w/panel
A/T Low Pressure Gauge w/panel
Adjustable Bearing Puller, 25 - 40 mm
Attachment, 52 x 55 mm
Attachment, 62 x 68 mm
Attachment, 72 x 75 mm
Driver I.D. 40 mm
Driver
Mainshaft Holder
Driver Attachment
14-133
14-118
14-176
14-164, 14-167
14-133
14-191
14-109
14-109
14-53
14-54, 14-104
14-109
14-109
14-177, 14-178
14-185
14-170, 172, 173
14-176, 177, 178
14-131, 14-186
14-177
*
1
07HAE - PL50100 may be used to substitute one of these tools.
*
2
Must be used with commercially available 3/8" - 16 slide hammer.
Main Menu
Table of Contents
Нет комментариевНе стесняйтесь поделиться с нами вашим ценным мнением.
Текст