Acura RLX Hybrid (2017 year). Manual — part 32
uu
Cleaning
u
Exterior Care
504
Main
tenan
ce
A good coat of automotive body wax helps protect your vehicle’s paint from the
elements. Wax will wear off over time and expose your vehicle’s paint to the
elements, so reapply as necessary.
If you get gasoline, oil, engine coolant, or battery fluid on resin coated parts, they
may be stained or the coating may peel. Promptly wipe it away using a soft cloth and
clean water.
Wipe using a glass cleaner.
Aluminum is susceptible to deterioration caused by salt and other road
contaminants. Use a sponge and mild detergent to wipe away promptly.
Be careful not to use harsh chemicals (including some commercial wheel cleaners) or
a stiff brush. They can damage the clear coat of the aluminum alloy wheels that
helps keep the aluminum from corroding and tarnishing.
■
Applying Wax
■
Maintaining the Bumpers and Other Resin Coated Parts
■
Cleaning the Window
■
Maintaining Aluminum Wheels
1
NOTICE
Chemical solvents and strong cleaners can damage
the paint, metal, and plastic on your vehicle. Wipe
away spills immediately.
1
Maintaining the Bumpers and Other Resin Coated Parts
Ask a dealer about the correct coating material when
you want to repair the painted surface of the parts
made of resin.
17 ACURA RLX E-AWD-31TY36300.book 504 ページ 2016年6月17日 金曜日 午前8時29分
-------------------------------------------------------------------------------------------------------------------------------------------------------------
505
uu
Cleaning
u
Exterior Care
Main
tenan
ce
The inside lenses of exterior lights (headlights, brake lights, etc.) may fog temporarily
if you have driven in the rain, or after the vehicle has been run through a car wash.
Dew condensation also may build up inside the lenses when there is a significant
enough difference between the ambient and inside lens temperatures (similar to
vehicle windows fogging up in rainy conditions). These conditions are natural
processes, not structural design problems in the exterior lights.
Lens design characteristics may result in moisture developing on the light lens frame
surfaces. This also is not a malfunction.
However, if you see large amounts of water accumulation, or large water drops
building up inside the lenses, have your vehicle inspected by a dealer.
■
Fogged Exterior Light Lenses
17 ACURA RLX E-AWD-31TY36300.book 505 ページ 2016年6月17日 金曜日 午前8時29分
-------------------------------------------------------------------------------------------------------------------------------------------------------------
506
Main
tenan
ce
Accessories and Modifications
Accessories
When installing accessories, check the following:
• Do not install accessories on the windshield. They can obstruct your view and
delay your reaction to driving conditions.
• Do not install any accessories over areas marked SRS AIRBAG, on the sides or
backs of the front seats, on front or side pillars, or near the side windows.
Accessories installed in these areas may interfere with proper operation of the
vehicle’s airbags or may be propelled into you or another occupant if the airbags
deploy.
• Be sure electronic accessories do not overload electrical circuits or interfere with
proper operation of your vehicle.
• Before installing any electronic accessory, have the installer contact a dealer for
assistance. If possible, have a dealer inspect the final installation.
1
Acura Genuine accessories are recommended to
ensure proper operation on your vehicle.
3
WARNING
Improper accessories or modifications can
affect your vehicle’s handling, stability, and
performance, and cause a crash in which
you can be seriously hurt or killed.
Follow all instructions in this owner’s
manual regarding accessories and
modifications.
17 ACURA RLX E-AWD-31TY36300.book 506 ページ 2016年6月17日 金曜日 午前8時29分
-------------------------------------------------------------------------------------------------------------------------------------------------------------
507
uu
Accessories and Modifications
u
Modifications
Main
tenan
ce
Modifications
Do not modify your vehicle in a manner that may affect its handling, stability, or
reliability, or install non-genuine Acura parts or accessories that may have a similar
effect.
Even minor modifications to vehicle systems can affect overall vehicle performance.
Always make sure all equipment is properly installed and maintained, and do not
make any modification to your vehicle or its systems that might cause your vehicle
to no longer meet federal, state, provincial, territorial, or local regulations.
Do not modify or attempt to repair your vehicle’s high-voltage hybrid power system
or otherwise modify vehicle electrical systems. Disassembling or modifying electrical
equipment can result in a crash or a fire.
If you ever need to replace your vehicle's high-voltage battery assembly outside of
warranty coverage, we highly recommend that you only use a genuine Acura high-
voltage battery assembly. Genuine Acura high-voltage battery assemblies are
designed to work with your vehicle's hybrid power system and have been designed,
engineered and manufactured to avoid overcharging situations. Non-genuine high-
voltage battery assemblies may not have been similarly designed, engineered and
manufactured, and installation of such assemblies could result in overcharging, fires,
loss of power, or other conditions that may increase the likelihood of a crash or
injury.
1
3
WARNING
Use of improperly designed, engineered or
manufactured high-voltage battery
assemblies could cause a fire in your
vehicle.
A vehicle fire could result in a crash or
injury.
Only use a genuine Acura high-voltage
battery assembly, or its equivalent, in your
vehicle.
17 ACURA RLX E-AWD-31TY36300.book 507 ページ 2016年6月17日 金曜日 午前8時29分
-------------------------------------------------------------------------------------------------------------------------------------------------------------
509
Handling the Unexpected
This chapter explains how to handle unexpected troubles.
Types of Tools . . . . . . . . .. 510
Temporarily Repairing a Flat Tire. ... 511
Changing a Flat Tire . . . . . . . 523
Checking the Procedure . . . . ... 529
If the Keyless Access Remote Battery is
Weak . . . . . . . . . . . . 530
Emergency Power System Off. . ... 531
Jump Starting. . . . . . . . . 532
Overheating
How to Handle Overheating. . . . 535
If the Low Oil Pressure Indicator Comes On . ..537
If the 12-Volt Battery Charging System
Indicator Comes On . . . . . ... 537
If the Malfunction Indicator Lamp Comes
On or Blinks . . . . . . . . ... 538
If the Brake System Indicator (Red) Comes On..538
If the Electric Power Steering (EPS) System
Indicator Comes On . . . . . . . .. 539
If the Electric Parking Brake System Indicator
Comes On. . . . . . . . . . . . 539
If the Low Tire Pressure/TPMS Indicator
Comes On or Blinks. . . . . . 540
If the Transmission Indicator Blinks along
with the Warning Message . . . 541
Fuse Locations . . . . . . . . . 542
Inspecting and Changing Fuses. . 547
Emergency Towing. . . . . . ... 548
When You Cannot Unlock the Fuel Fill
Door. . . . . . . . . . . . . 549
When You Cannot Open the Trunk . .550
Refueling
Refueling From a Portable Fuel Container ... 551
17 ACURA RLX E-AWD-31TY36300.book 509 ページ 2016年6月17日 金曜日 午前8時29分
-------------------------------------------------------------------------------------------------------------------------------------------------------------
510
Han
d
lin
g the U
n
expected
Tools
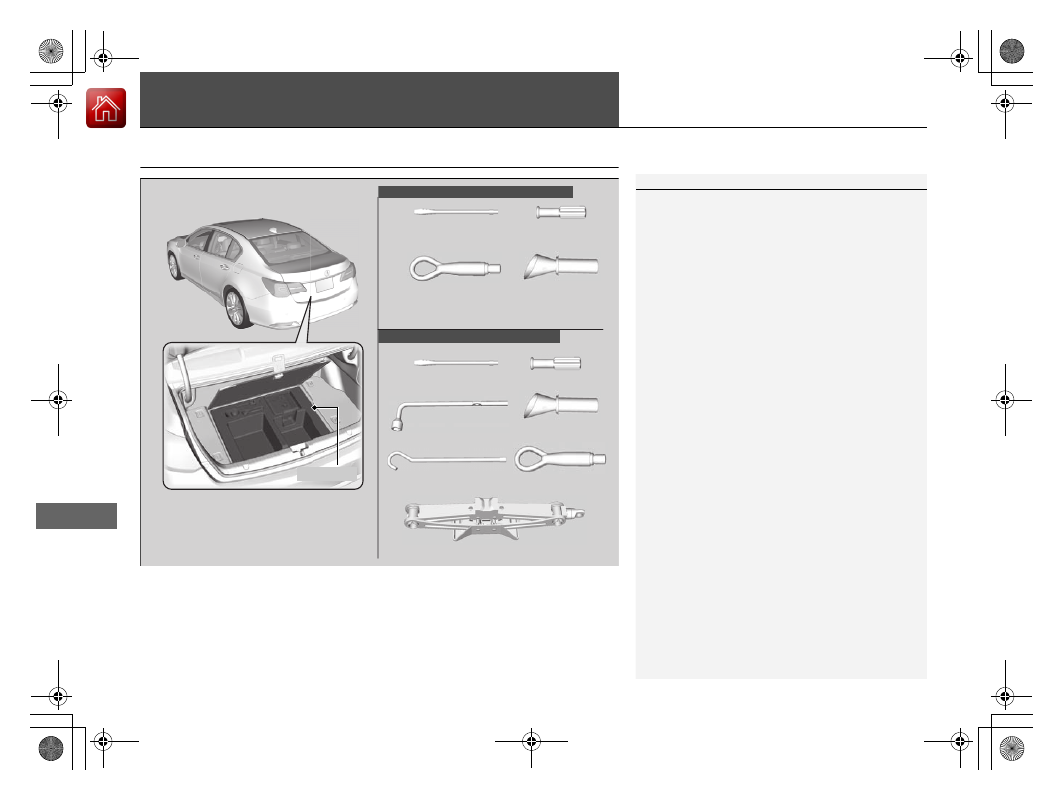
Types of Tools
1
The tools are stored in the trunk.
Vehicles with optional spare tire kit
Jack
Jack Handle Bar
Towing Hook
Wheel Nut Wrench/
Jack Handle
Funnel
Flat-tip Screwdriver
Grip
Towing Hook
Funnel
Flat-tip Screwdriver
Grip
Tool Case
Vehicle with temporary tire repair
kit is shown.
Vehicles with temporary tire repair kit
17 ACURA RLX E-AWD-31TY36300.book 510 ページ 2016年6月17日 金曜日 午前8時29分
-------------------------------------------------------------------------------------------------------------------------------------------------------------

511
Continued
Han
d
lin
g the U
n
expected
If a Tire Goes Flat
Temporarily Repairing a Flat Tire
If the tire has a large cut or is otherwise severely damaged, you will need to have the
vehicle towed. If the tire only has a small puncture, from a nail for instance, you can
use the temporary tire repair kit so that you can drive to the nearest service station
for a more permanent repair.
If a tire goes flat while driving, grasp the steering wheel firmly, and brake gradually
to reduce speed. Then stop in a safe place.
1. Park the vehicle on a firm, level, and non-slippery surface and apply the parking
brake.
2. Change the gear position to
(
P.
3. Turn on the hazard warning lights and set the power mode to VEHICLE OFF
(LOCK).
Vehicles with temporary tire repair kit
1
Temporarily Repairing a Flat Tire
The kit should not be used in the following situations.
Instead, contact a dealer or a roadside assistant to
have the vehicle towed.
•
The tire sealant has expired.
•
More than one tire is punctured.
•
The puncture or cut is larger than 3/16 inch (4 mm).
•
The tire side wall is damaged or the puncture is
outside the contact area.
•
Damage has been caused by driving with the tire
extremely under inflated.
•
The tire bead is no longer seated.
•
The rim is damaged.
Do not remove a nail or screw that punctured the
tire. If you remove it from the tire, you may not be
able to repair the puncture using the kit.
NOTICE
Do not use a puncture-repairing agent other than the
one provided in the kit that came with your vehicle. If
a different agent is used, you may permanently
damage the tire pressure sensor.
When the puncture is:
Kit Use
Smaller than 3/16 inch
(4 mm)
Yes
Larger than 3/16 inch
(4 mm)
No
Contact
Area
17 ACURA RLX E-AWD-31TY36300.book 511 ページ 2016年6月17日 金曜日 午前8時29分
-------------------------------------------------------------------------------------------------------------------------------------------------------------
uu
If a Tire Goes Flat
u
Temporarily Repairing a Flat Tire
512
Han
d
lin
g the U
n
expected
■
Getting Ready to Temporarily Repair the Flat Tire
1
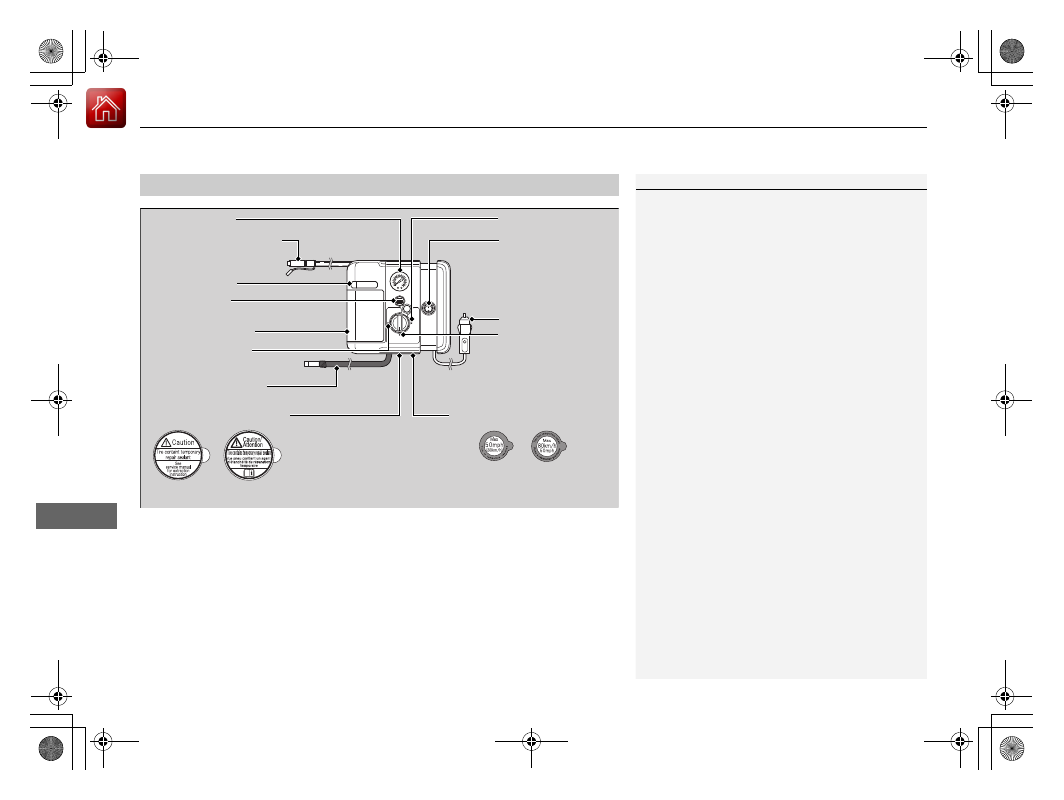
Getting Ready to Temporarily Repair the Flat Tire
Repair notification label and speed restriction label
are applied to the side of temporary tire repair kit.
When making a temporary repair, carefully read the
instruction manual provided with the kit.
Instruction Manual
Air Only Hose (Black)
Speed Restriction Label
Repair Notification Label
Pressure Relief
Button
Inflator Switch
Selector Switch
SEALANT/AIR side
Sealant/Air Hose (Clear)
AIR ONLY side
Power Plug
Pressure Gauge
Tire Sealant
Expiration Date
U.S.
Canada
U.S.
Canada
17 ACURA RLX E-AWD-31TY36300.book 512 ページ 2016年6月17日 金曜日 午前8時29分
-------------------------------------------------------------------------------------------------------------------------------------------------------------
513
uu
If a Tire Goes Flat
u
Temporarily Repairing a Flat Tire
Continued
Han
d
lin
g the U
n
expected
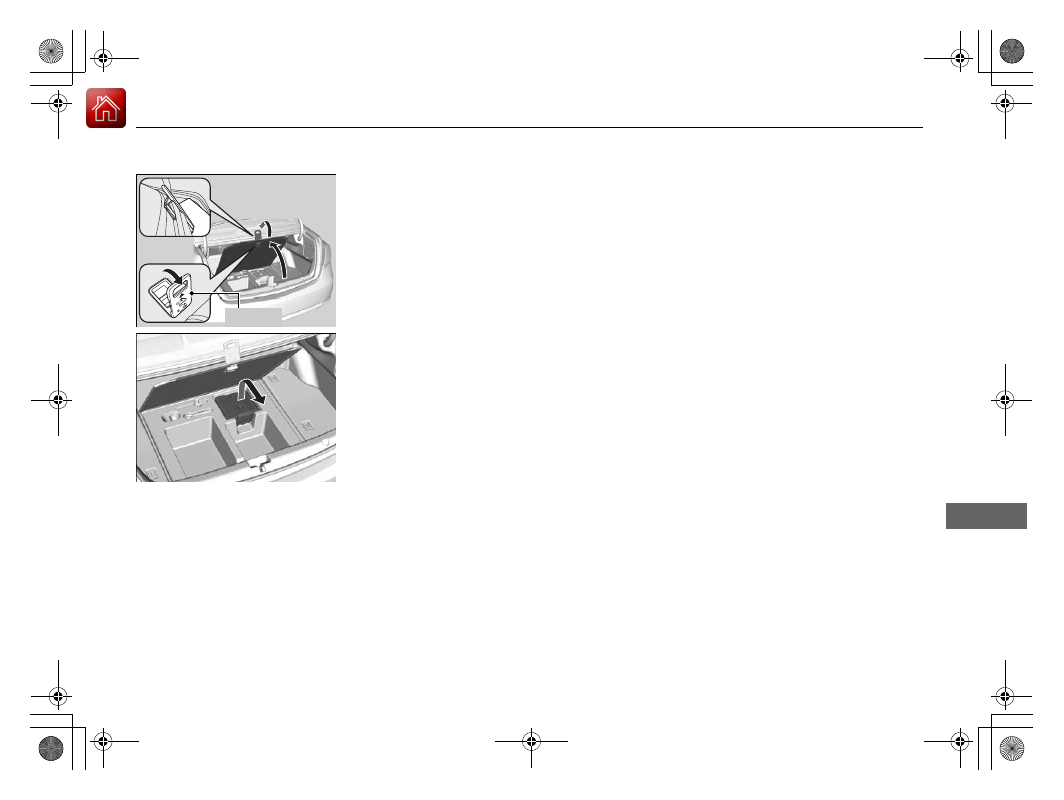
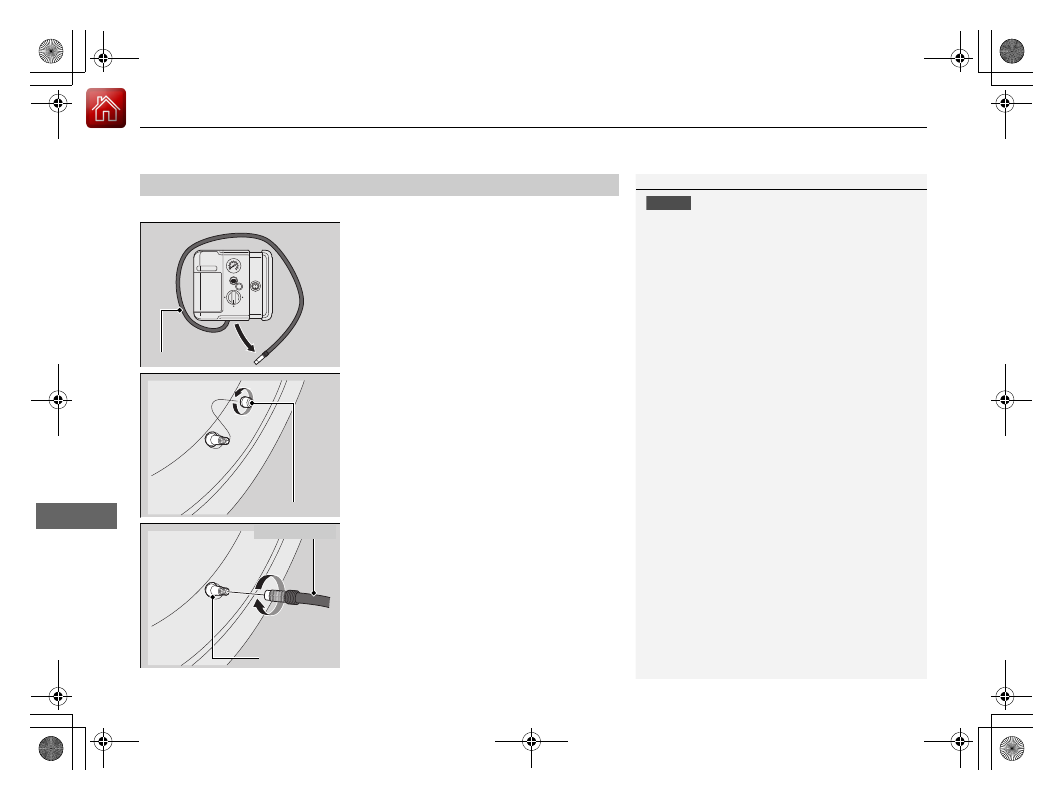
1. Pull the handle on the trunk floor lid and
open the lid.
2. Hook the handle to the edge of the trunk
opening.
3. Take the kit out of the case.
4. Place the kit face up, on flat ground near
the flat tire, and away from traffic. Do not
place the kit on its side.
Handle
17 ACURA RLX E-AWD-31TY36300.book 513 ページ 2016年6月17日 金曜日 午前8時29分
-------------------------------------------------------------------------------------------------------------------------------------------------------------
uu
If a Tire Goes Flat
u
Temporarily Repairing a Flat Tire
514
Han
d
lin
g the U
n
expected
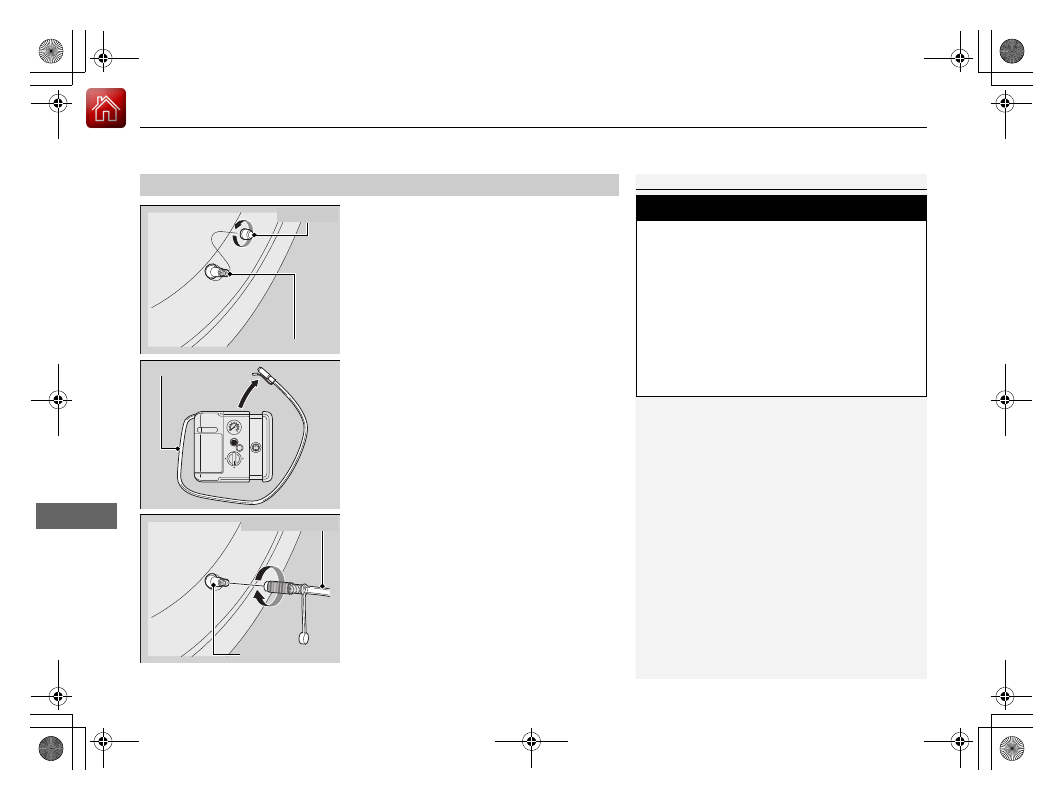
1. Remove the valve cap from the tire valve
stem.
2. Remove the sealant/air hose from the
packaging.
3. Attach the sealant/air hose onto the tire
valve stem. Screw it until it is tight.
■
Injecting Sealant and Air
1
In cold temperatures, the sealant may not flow easily.
In this situation, warm it up for five minutes before
using.
The sealant can permanently stain clothing and other
materials. Be careful during handling and wipe away
any spills immediately.
3
WARNING
Tire sealant contains substances that are
harmful and can be fatal if swallowed.
If accidentally swallowed, do not induce
vomiting. Drink plenty of water and get
medical attention immediately.
For skin or eye contact, flush with cool
water and get medical attention if
necessary.
Valve Stem
Valve Cap
Sealant/Air Hose
Valve Stem
Sealant/Air Hose
17 ACURA RLX E-AWD-31TY36300.book 514 ページ 2016年6月17日 金曜日 午前8時29分
-------------------------------------------------------------------------------------------------------------------------------------------------------------
Continued
515
uu
If a Tire Goes Flat
u
Temporarily Repairing a Flat Tire
Han
d
lin
g the U
n
expected
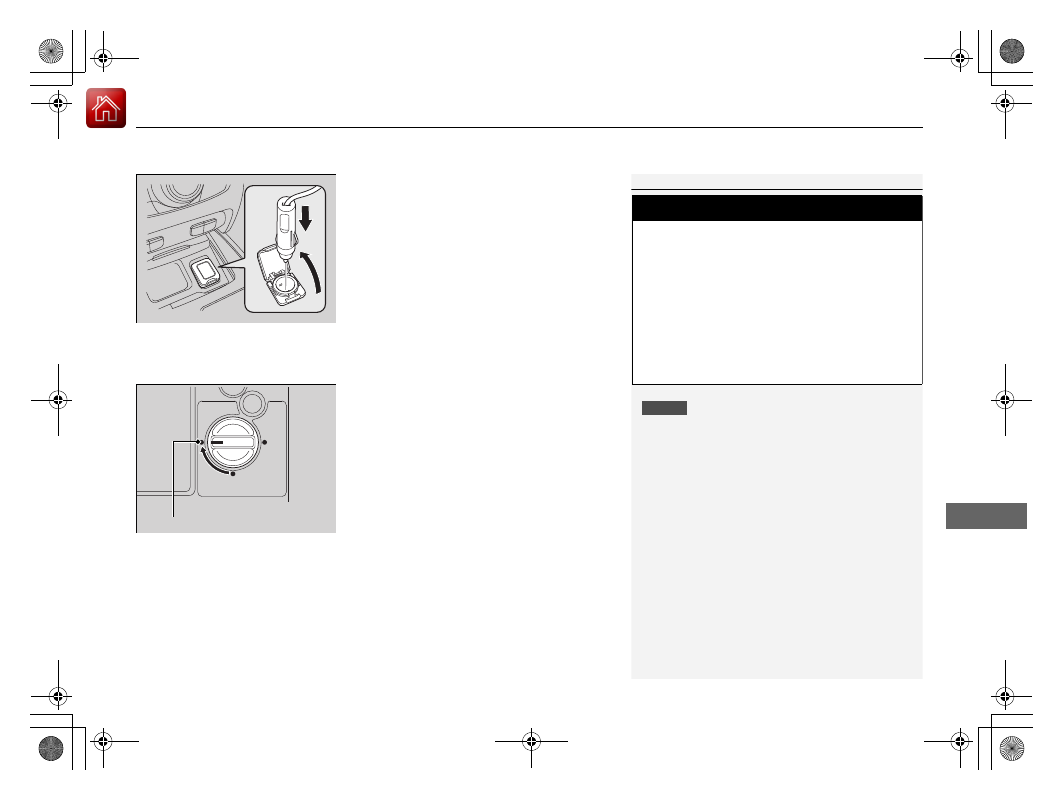
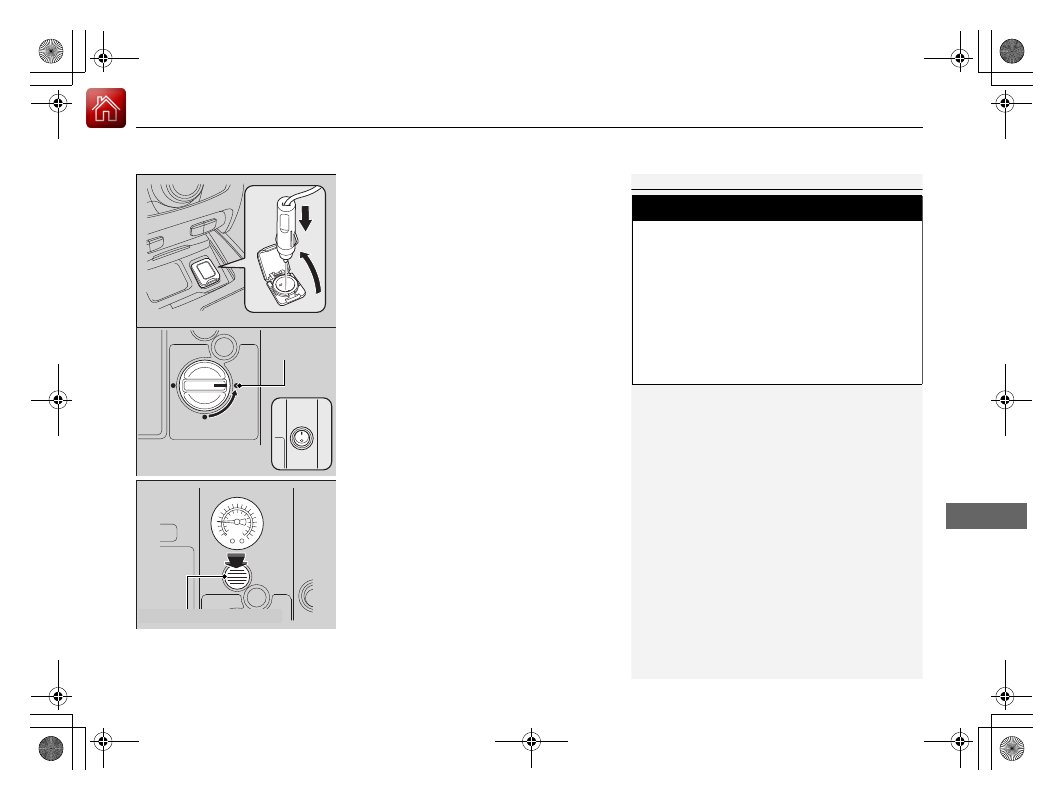
4. Plug in the compressor to the accessory
power socket.
u
Be careful not to pinch the cord in a
door or window.
u
Do not plug any other electronic
devices into other accessory power
sockets.
2 Accessory Power Sockets P. 190
5. Turn the power system on.
u
Keep the power system on while
injecting sealant and air.
6. Turn the selector switch to SEALANT/
AIR.
1
NOTICE
Do not operate the temporary tire repair kit
compressor for more than 15 minutes. The
compressor can overheat and become permanently
damaged.
Until the sealant injection is complete, the pressure
shown on the pressure gauge will appear higher than
actual. After the sealant injection is complete the
pressure will drop and then begin to rise again as the
tire is inflated with air. This is normal. To accurately
measure the air pressure using the gauge, turn the air
compressor off only after the sealant injection is
complete.
3
WARNING
Running the engine with the vehicle in an
enclosed or even partly enclosed area can
cause a rapid build-up of toxic carbon
monoxide.
Breathing this colorless, odorless gas can
cause unconsciousness and even death.
Only run the engine to power the air
compressor with the vehicle outdoors.
SEALANT/AIR side
17 ACURA RLX E-AWD-31TY36300.book 515 ページ 2016年6月17日 金曜日 午前8時29分
-------------------------------------------------------------------------------------------------------------------------------------------------------------
uu
If a Tire Goes Flat
u
Temporarily Repairing a Flat Tire
516
Han
d
lin
g the U
n
expected
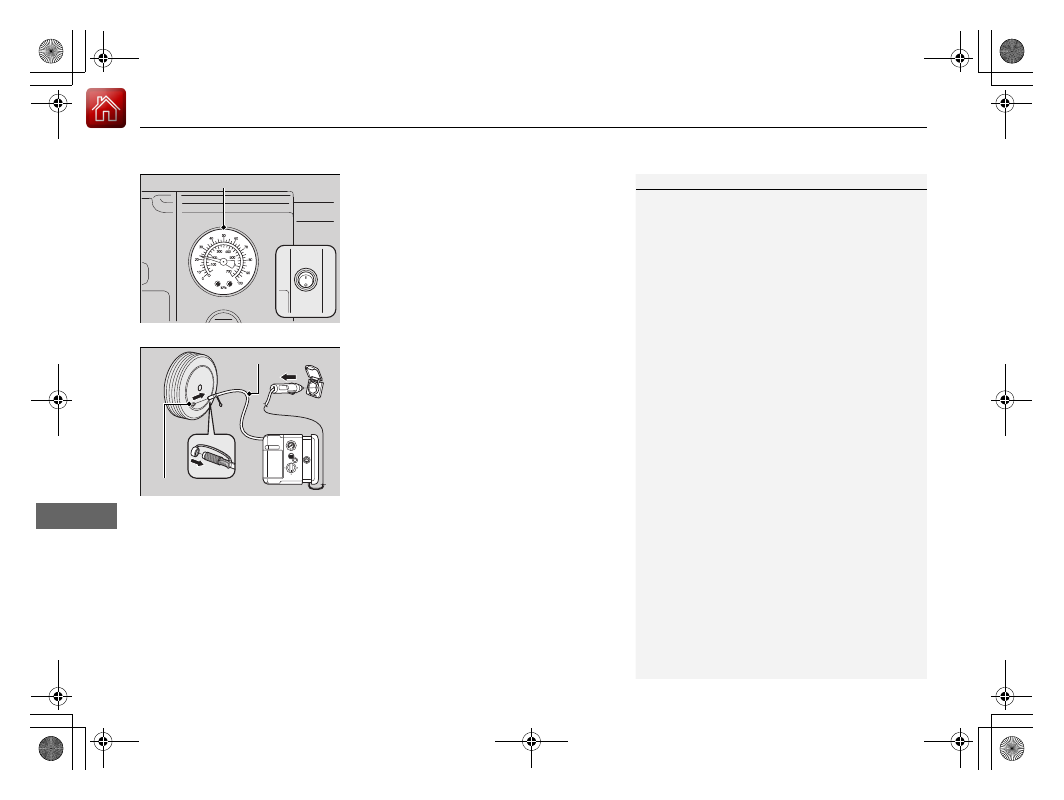
7. Press the inflator switch to turn on the
compressor.
u
The compressor starts injecting sealant
and air into the tire.
8. When the sealant injection is complete,
continue to add air.
9. After the air pressure reaches 36 psi (250
kPa), turn off the kit.
u
To check the pressure, occasionally turn
off the compressor and read the gauge.
10. Unplug the power plug from the accessory
power socket.
11. Unscrew the sealant/air hose from the tire
valve stem. Reinstall the valve cap.
12. Press the pressure relief button until the
gauge returns to 0 psi (0 kPa).
Pressure Gauge
ON
OFF
1
If the required air pressure is not reached within 15
minutes, the tire may be too severely damaged for
the kit to provide the necessary seal and your vehicle
will need to be towed.
See an Acura dealer for a replacement sealant bottle
and proper disposal of an empty bottle.
Sealant/Air Hose
Valve Stem
17 ACURA RLX E-AWD-31TY36300.book 516 ページ 2016年6月17日 金曜日 午前8時29分
-------------------------------------------------------------------------------------------------------------------------------------------------------------
517
uu
If a Tire Goes Flat
u
Temporarily Repairing a Flat Tire
Continued
Han
d
lin
g the U
n
expected
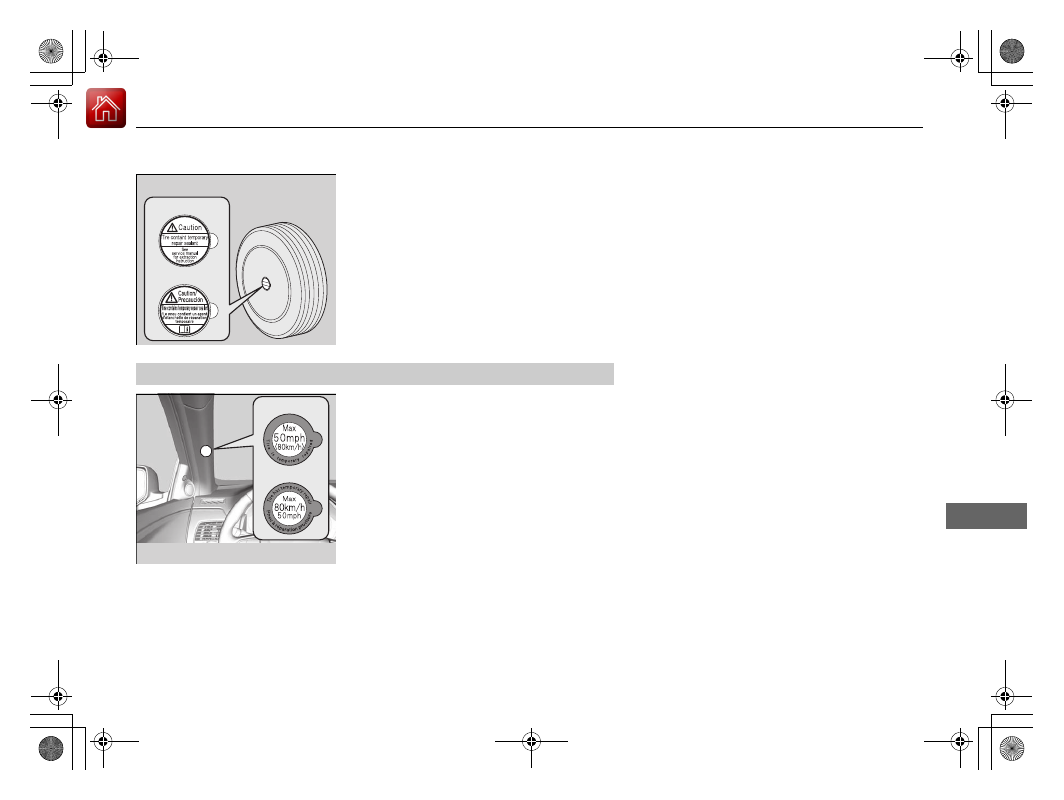
13. Apply the repair notification label to the
flat surface of the wheel.
u
The wheel surface must be clean to
ensure the label adheres properly.
1. Apply the speed restriction label to the
location as shown.
2. Drive the vehicle for about 10 minutes.
u
Do not exceed 50 mph (80 km/h).
3. Stop the vehicle in a safe place.
Repair Notification Label
U.S.
Canada
■
Distributing the Sealant in the Tire
Speed Restriction Label
U.S.
Canada
17 ACURA RLX E-AWD-31TY36300.book 517 ページ 2016年6月17日 金曜日 午前8時29分
-------------------------------------------------------------------------------------------------------------------------------------------------------------
518
uu
If a Tire Goes Flat
u
Temporarily Repairing a Flat Tire
Han
d
lin
g the U
n
expected
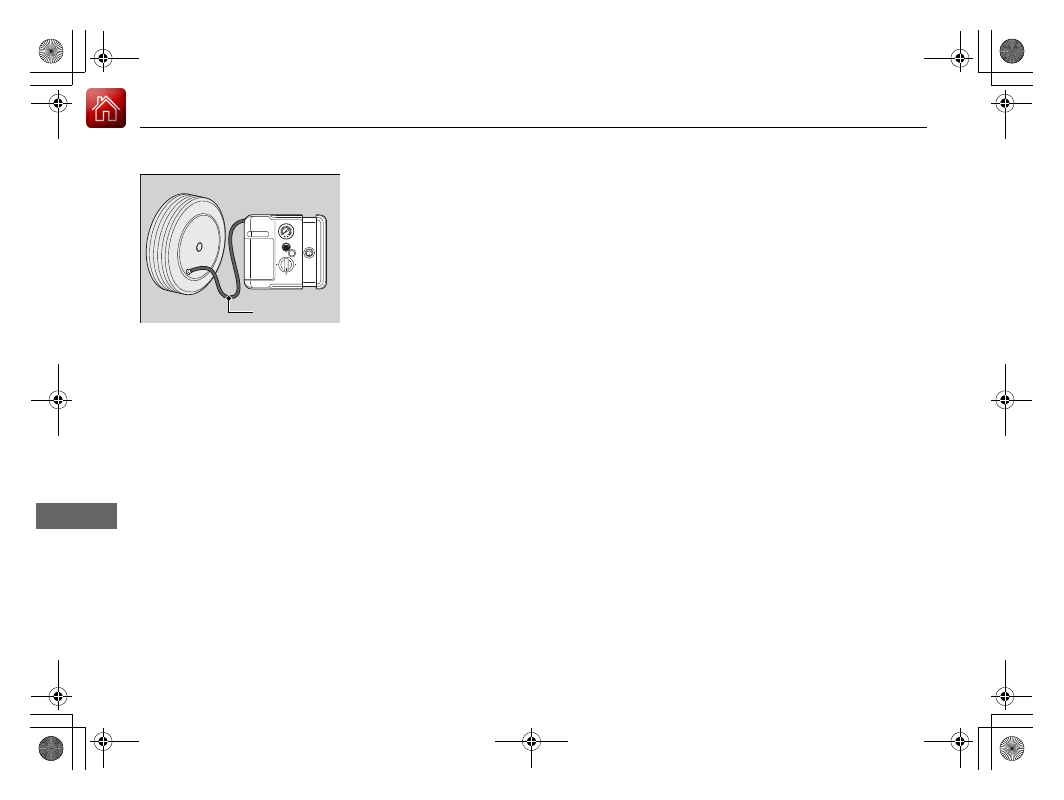
4. Recheck the air pressure using the air only
hose on the compressor.
5. Turn the selector switch to AIR ONLY.
u
Do not turn the air compressor on to
check the pressure.
2 Inflating an Under-inflated Tire P. 520
6. If the air pressure is
• Less than 19 psi (130 kPa):
Do not add air or continue driving. The leak
is too severe. Call for help and have your
vehicle towed.
• 36 psi (250 kPa) or more:
Continue driving for another 10 minutes or
until you reach the nearest service station.
Do not exceed 50 mph (80 km/h).
u
If the air pressure does not go down after
the 10 minute driving, you do not need
to check the pressure any more.
Air Only Hose
17 ACURA RLX E-AWD-31TY36300.book 518 ページ 2016年6月17日 金曜日 午前8時29分
-------------------------------------------------------------------------------------------------------------------------------------------------------------
Continued
519
uu
If a Tire Goes Flat
u
Temporarily Repairing a Flat Tire
Han
d
lin
g the U
n
expected
• Greater than 19 psi (130 kPa), but less
than 36 psi (250 kPa):
Turn the air compressor on to inflate the
tire until the tire pressure reaches 36 psi
(250 kPa).
2 Inflating an Under-inflated Tire P. 520
Then drive carefully for 10 more minutes or
until you reach the nearest service station.
Do not exceed 50 mph (80 km/h).
u
You should repeat this procedure as long
as the air pressure is within this range.
7. Press the pressure relief button until the
gauge returns to 0 psi (0 kPa).
8. Repackage and properly stow the kit.
AIR ONLY
side
ON
1
Distributing the Sealant in the Tire
3
WARNING
Running the engine with the vehicle in an
enclosed or even partly enclosed area can
cause a rapid build-up of toxic carbon
monoxide.
Breathing this colorless, odorless gas can
cause unconsciousness and even death.
Only run the engine to power the air
compressor with the vehicle outdoors.
Pressure Relief Button
17 ACURA RLX E-AWD-31TY36300.book 519 ページ 2016年6月17日 金曜日 午前8時29分
-------------------------------------------------------------------------------------------------------------------------------------------------------------
uu
If a Tire Goes Flat
u
Temporarily Repairing a Flat Tire
520
Han
d
lin
g the U
n
expected
You can use the kit to inflate a non-punctured under-inflated tire.
1. Open the trunk floor lid.
2 Getting Ready to Temporarily Repair
the Flat Tire P. 512
2. Remove the kit from the case.
3. Place the kit, face up, on flat ground near
the flat tire, away from traffic. Do not
place the kit on its side.
4. Remove the air only hose from the kit.
5. Remove the valve cap.
6. Attach the air only hose onto the tire valve
stem. Screw it until it is tight.
■
Inflating an Under-inflated Tire
1
Inflating an Under-inflated Tire
NOTICE
Do not operate the temporary tire repair kit
compressor for more than 15 minutes. The
compressor can overheat and become permanently
damaged.
Air Only Hose
Valve Cap
Valve Stem
Air Only Hose
17 ACURA RLX E-AWD-31TY36300.book 520 ページ 2016年6月17日 金曜日 午前8時29分
-------------------------------------------------------------------------------------------------------------------------------------------------------------
Нет комментариевНе стесняйтесь поделиться с нами вашим ценным мнением.
Текст