Mazda 3 Hatchback (2022 year). Manual in english — page 13

Lighting Control
▼
Headlights
Turn the headlight switch to turn the headlights and other exterior lights on or off.
When the taillights, parking lights, license plate lights, and the side-marker lights are
turned on, the lights-on indicator light in the instrument cluster turns on.
NOTE
x
If the light switch is left on, the lights will automatically switch off approximately
30 seconds after switching the ignition off.
The time setting can be changed.
Refer to the Settings section in the Mazda Connect Owner's Manual.
x
To prevent discharging the battery, do not leave the lights on while the engine is
off unless safety requires them.
Without auto-light control
Switch Position
OFF
Headlights
Off
Off
On
*1
Daytime running lights
On
*2
On
*2
Off
Taillights
Parking lights
License plate lights
Side-marker lights
Off
On
*3
On
*1
*
1
When the ignition is switched from ON to ACC or OFF, the headlights turn off if the auto headlight
off function has been canceled. If the auto headlight off function is enabled, the lights turn on for the
set period using the auto headlight off function, and then they turn off.
When Driving
Switches and Controls
4-56

*
2
When the light switch is switched to a different position from the OFF,
position while the
vehicle is stopped, the daytime running lights turn off. When starting to drive the vehicle, the daytime
running lights turn on again.
*
3
When the ignition is switched from ON to ACC or OFF, the headlights remain on if the auto headlight
off function has been canceled. If the auto headlight off function is enabled, the lights turn on for the
set period using the auto headlight off function, and then they turn off.
With auto-light control
Switch Position
OFF
*1
AUTO
Surround-
ings are
bright
*2
Surround-
ings are
dark
*3
Surround-
ings are
bright
*2
Surround-
ings are
dark
*3
Headlights
Off
Off
On
Off
On
*4*5
On
*6
Daytime running lights
Off
On
*7
Off
On
*8
Off
Off
Taillights
Parking lights
License plate lights
Side-marker lights
Off
Off
On
On
*9
On
*9
On
*6
*
1
When the light switch is switched to OFF while the vehicle is stopped, the lights turn off. The light
switch returns automatically to the AUTO position and the headlights change to AUTO operation
when you start driving the vehicle.
*
2
The level of brightness around the vehicle is of a sufficient level.
*
3
The level of brightness around the vehicle is of an insufficient level.
*
4
The daytime running lights can be disabled using the personalization features (page 4-61). If the
daytime running lights are disabled, the headlights turn off directly after starting the engine. The
headlights turn on when you begin driving the vehicle.
*
5
When the light switch is switched from the OFF, AUTO, or
position to the
position while
the vehicle is stopped, the headlights turn off. When starting to drive the vehicle, the headlights turn
on again.
*
6
When the ignition is switched from ON to ACC or OFF, the headlights turn off if the auto headlight
off function has been canceled. If the auto headlight off function is enabled, the lights turn on for the
set period using the auto headlight off function, and then they turn off.
When Driving
Switches and Controls
4-57

*
7
When the light switch is switched to a different position from the AUTO position while the vehicle is
stopped, the daytime running lights turn off. When starting to drive the vehicle, the daytime running
lights turn on again.
*
8
If one of the following operations is done from the
position while the vehicle is stopped, the
daytime running lights turn off.
x
Switch the light switch to the OFF position.
x
Switch the light switch to the AUTO position, and then to the
position again.
x
Switch the light switch to the
position.
When starting to drive the vehicle, the daytime running lights turn on again.
*
9
When the ignition is switched from ON to ACC or OFF, the headlights remain on if the auto headlight
off function has been canceled. If the auto headlight off function is enabled, the lights turn on for the
set period using the auto headlight off function, and then they turn off.
Auto-light control
When the headlight switch is in the AUTO position and the ignition is switched ON,
the light sensor senses the surrounding lightness or darkness and automatically turns
the headlights and other exterior lights on or off.
CAUTION
¾
Do not shade the light sensor by adhering a sticker or a label on the windshield.
Otherwise the light sensor will not operate correctly.
¾
The light sensor also works as a rain sensor for the auto-wiper control. Keep hands
and scrapers clear of the windshield when the wiper lever is in the AUTO position
and the ignition is switched ON as fingers could be pinched or the wipers and
wiper blades could be damaged when the wipers activate automatically. If you are
going to clean the windshield, be sure the wipers are turned off completely when
it is particularly tempting to leave the engine running. This is particularly important
when clearing ice and snow.
When Driving
Switches and Controls
4-58

NOTE
x
The headlights and other exterior lights may not turn off immediately even if the
surrounding area becomes well-lit because the light sensor determines that it is
night time if the surrounding area is continuously dark for several minutes such as
inside long tunnels, traffic jams inside tunnels, or in indoor parking lots.
x
If the headlight switch and the windshield wiper switch are in AUTO, and the
wipers are operated at low or high speed by the auto wiper control for several
seconds, bad weather conditions are determined and the headlights may be
turned on.
x
The sensitivity of the auto-light control may be changed.
Refer to the Settings section in the Mazda Connect Owner's Manual.
▼
Headlight High-Low Beam
The headlights switch between high
and low beams by moving the lever
forward or backward.
1. High beam
2. Low beam
When the headlight high-beams are
on, the headlight high-beam indicator
light is turned on.
▼
Flashing the Headlights
When the ignition is switched ON, and
regardless of the headlight position,
the headlights switch to high beams
while the lever is being pulled.
1. OFF
2. Headlight flashing
The headlight high-beam indicator
light in the instrument cluster
illuminates simultaneously. The lever
will return to the normal position when
released.
When Driving
Switches and Controls
4-59

▼
Coming Home Light
The coming home light turns on the
headlights (low beams) when the lever
is operated.
To turn on the lights
When the lever is pulled with the
ignition switched to ACC or OFF, the
low beam headlights turn on.
The headlights turn off after a certain
period of time has elapsed after all of
the doors are closed.
NOTE
x
The time until the headlights turn off
after all of the doors are closed can
be changed.
Refer to the Settings section in the
Mazda Connect Owner's Manual.
x
If no operations are done for 3
minutes after the lever is pulled, the
headlights turn off.
x
The headlights turn off if the lever is
pulled again while the headlights are
illuminated.
▼
Leaving Home Light
The leaving home light turns on the
lights when the transmitter unlock
button is pressed while away from the
vehicle.
The following lights turn on when the
leaving home light is operated.
Low beams, Parking lights, Taillights,
License plate lights.
To turn on the lights
When the ignition switch and the
headlight switch are in the following
conditions, the headlights will
illuminate when the transmitter unlock
button is pressed and the vehicle
receives the transmitter signal. The
headlights turn off after a certain
period of time has elapsed (30
seconds).
x
Ignition switch: off
x
Headlight switch: AUTO,
, or
1. Lock button
2. Unlock button
NOTE
x
Operation of the leaving home light
can be turned on or off.
Refer to the Settings section in the
Mazda Connect Owner's Manual.
x
When the transmitter lock button is
pressed and the vehicle receives the
transmitter signal, the headlights turn
off.
x
When the headlight switch is turned
to the OFF position, the headlights
turn off.
When Driving
Switches and Controls
4-60

▼
Headlight Leveling
The number of passengers and weight
of cargo in the luggage compartment
change the angle of the headlights.
Auto type
The angle of the headlights will be
automatically adjusted when turning
on the headlights.
A system malfunction or operation
conditions are indicated by a warning.
Refer to Exterior Light Warning
Indication/Warning Light on page
7-35.
Manual type
When adjusting the illumination angle
of the headlights, refer to the Settings
section in the Mazda Connect
Owner's Manual.
Select the proper headlight angle from
the following chart.
Front seat
Rear
seat
Load
Illumi-
nation
angle
(num-
ber)
Driver
Passenger
×
ʊ
ʊ
ʊ
0
×
×
ʊ
ʊ
0
×
×
×
ʊ
1
×
×
×
×
2
×
ʊ
ʊ
×
2.5
×: Yes
ʊ
: No
▼
Daytime Running Lights
Some countries require moving
vehicles to have their lights on
(daytime running lights) during the
daytime.
The daytime running lights turn on
automatically.
NOTE
(Except Canada)
The daytime running lights can be
deactivated.
Refer to the Settings section in the
Mazda Connect Owner's Manual.
When Driving
Switches and Controls
4-61

Turn and Lane-Change
Signals
▼
Turn and Lane-Change Signals
The ignition must be switched ON to
use the turn and lane-change signals.
▼
Turn Signals
Move the signal lever down (for a left
turn) or up (for a right turn) to the stop
position. The signal will self-cancel
after the turn is completed.
If the indicator light continues to flash
after a turn, manually return the lever
to its original position.
1. Right turn
2. Right lane change
3. OFF
4. Left lane change
5. Left turn
The turn signal indicators in the
instrument cluster flash according to
the operation of the turn signal lever to
show which signal is working.
NOTE
x
There may be a problem with the
turn signal lights if they do not flash
but remain turned on, or they flash
abnormally. Have your vehicle
inspected by an Authorized Mazda
Dealer.
x
A personalized function is available
to change the turn indicator sound
volume.
Refer to the Settings section in the
Mazda Connect Owner's Manual.
▼
Lane-Change Signals
Move the lever halfway toward the
direction of the lane change
ʊ
until the
indicator flashes
ʊ
and hold it there. It
will return to the off position when
released.
▼
Three-Flash Turn Signal
After releasing the turn signal lever
from the halfway point, the turn signal
indicator flashes 3 times. The
operation can be canceled by moving
the lever in the direction opposite to
which it was operated.
NOTE
The three-flash turn signal function can
be switched to on/off using the
personalization function.
Refer to the Settings section in the
Mazda Connect Owner's Manual.
When Driving
Switches and Controls
4-62

Windshield Wipers and
Washer
▼
Windshield Wipers and Washer
The ignition must be switched ON to
use the wipers.
WARNING
Use only windshield washer fluid or
plain water in the reservoir:
Using radiator antifreeze as washer
fluid is dangerous. If sprayed on the
windshield, it will dirty the windshield,
affect your visibility, and could result in
an accident.
Only use windshield washer fluid
mixed with anti-freeze protection in
freezing weather conditions:
Using windshield washer fluid without
anti-freeze protection in freezing
weather conditions is dangerous as it
could freeze on the windshield and
block your vision which could cause an
accident. In addition, make sure the
windshield is sufficiently warmed using
the defroster before spraying the
washer fluid.
CAUTION
¾
When the wipers are not used during
freezing temperatures or for a long
time, the wiper rubber may adhere
to the glass. If the wipers are
operated while adhered to the glass,
it could damage the wiper rubber
and motor.
¾
If the wipers are operated while the
glass is dry, the glass could be
scratched and the wiper rubber
damaged. When the glass is dry,
spray washer fluid before operating
the wipers.
¾
If the amount of washer fluid spray is
insufficient, do not use the washer
switch. If the washer switch
continues to be operated with no
washer fluid being sprayed, it could
lead to pump damage.
NOTE
If the windshield wipers are operated
under cold weather conditions or
during snowfall, they could stop due to
accumulated snow on the windshield.
If the windshield wipers stop due to
accumulated snow on the windshield,
park the vehicle in a safe place, turn
the wiper switch off, and then remove
the accumulated snow. If the wiper
switch is turned to another position
other than OFF, the wipers will
operate. If the wipers do not operate
even though the wiper switch is turned
to a position other than OFF, consult
an Authorized Mazda Dealer as soon
as possible.
▼
Windshield Wipers
Turn the wipers on by pressing the
lever up or down.
With intermittent wiper
When Driving
Switches and Controls
4-63
Switch Posi-
tion
Wiper operation
MIST
Operation while pulling up lev-
er
OFF
Stop
INT
Intermittent
LO
Low speed
HI
High speed
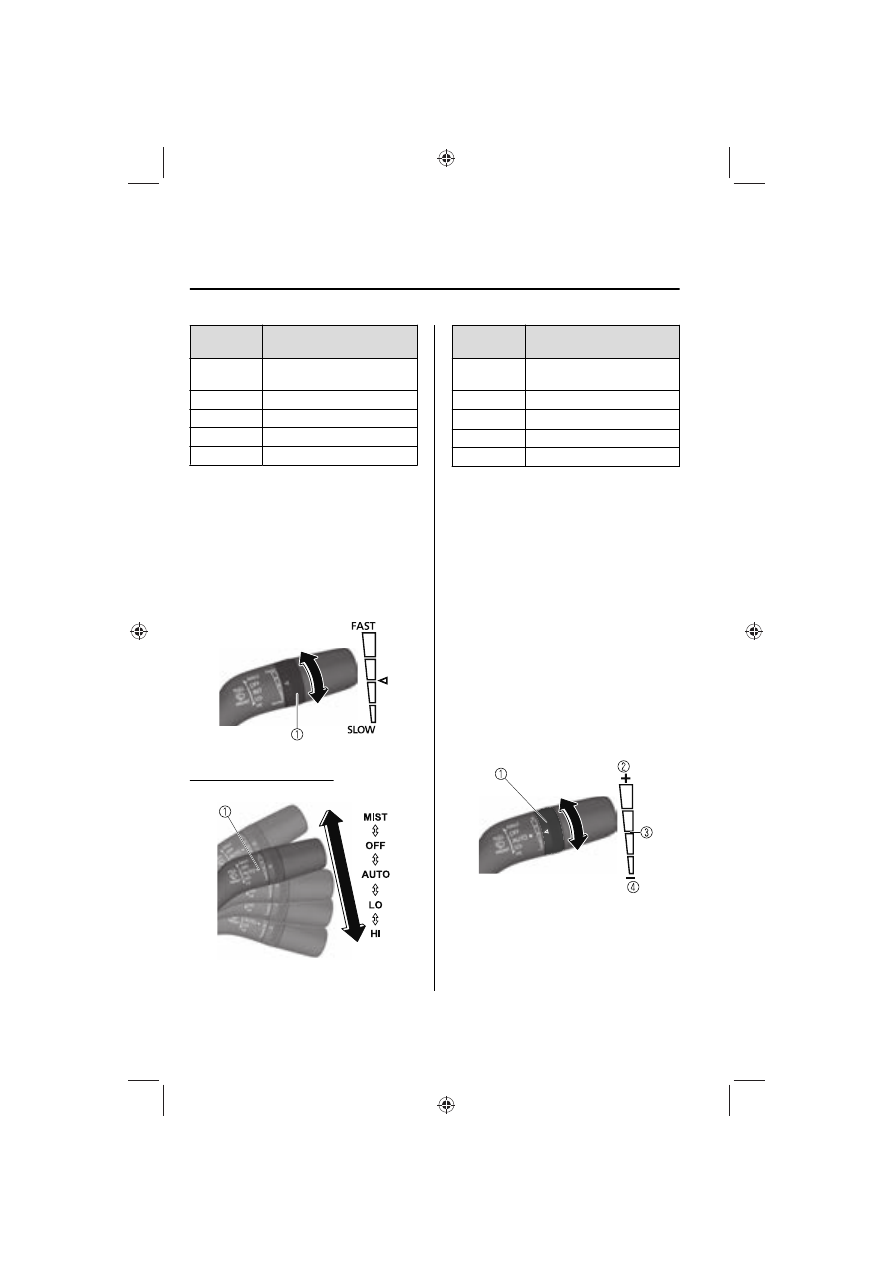
Variable-speed intermittent wipers
Set the lever to the intermittent
position and choose the interval timing
by rotating the switch.
Rotate the switch upward (FAST
direction) to shorten the interval time
of the wiper operation, and rotate the
switch downward (SLOW direction) to
lengthen it.
1. Switch
With auto-wiper control
1. Indicator light
Switch Posi-
tion
Wiper operation
MIST
Operation while pulling up lev-
er
OFF
Stop
AUTO
*1
Auto control
LO
Low speed
HI
High speed
*
1
When the wiper lever is switched to the
AUTO position, the indicator light turns on.
Auto-wiper control
*
When the wiper lever is in the AUTO
position, the rain sensor senses the
amount of rainfall on the windshield
and turns the wipers on or off
automatically (off
ʊ
intermittent
ʊ
low
speed
ʊ
high speed).
The sensitivity of the rain sensor can be
adjusted by turning the switch on the
wiper lever.
From the center position (normal),
rotate the switch upward (+ direction)
for higher sensitivity (faster response)
or rotate it downward (- direction) for
less sensitivity (slower response).
1. Switch
2. Higher sensitivity
3. Center position
4. Less sensitivity
When Driving
Switches and Controls
4-64
*Some models.

CAUTION
¾
Do not shade the rain sensor by
adhering a sticker or a label on the
windshield. Otherwise the rain
sensor will not operate correctly.
¾
When the ignition is switched ON
and the wiper lever is in the AUTO
position, the windshield wipers may
operate automatically in the
following cases:
¾
The area of the windshield above
the rain sensor is touched or wiped
with a cloth.
¾
The windshield or the rain sensor
area in the cabin is hit.
When the ignition is switched ON
and the wiper lever is in the AUTO
position, do not touch the
windshield or the windshield wipers
Otherwise, the windshield wipers
will operate automatically which
could catch your fingers or damage
the windshield wipers.
When removing ice or snow, or
cleaning the windshield, always
make sure the wiper lever is in the
OFF position.
NOTE
x
Switching the auto-wiper lever from
the OFF to the AUTO position while
driving activates the windshield
wipers once, after which they
operate according to the rainfall
amount.
x
The auto-wiper control may not
operate when the rain sensor
temperature is about
㸫
10 °C (14 °F)
or lower, or about 85 °C (185 °F) or
higher.
x
If the windshield is coated with
water repellent, the rain sensor may
not be able to sense the amount of
rainfall correctly and the auto-wiper
control may not operate properly.
x
If dirt or foreign matter (such as ice
or matter containing salt water)
adheres to the windshield above the
rain sensor, or if the windshield is
iced, it could cause the wipers to
move automatically. However, if the
wipers cannot remove this ice, dirt or
foreign matter, the auto-wiper
control will stop operation. In this
case, set the wiper lever to the low
speed position or high speed
position for manual operation, or
remove the ice, dirt or foreign matter
by hand to restore the auto-wiper
operation.
x
If the auto-wiper lever is left in the
AUTO position, the wipers could
operate automatically from the effect
of strong light sources,
electromagnetic waves, or infrared
light because the rain sensor uses an
optical sensor. It is recommended
that the auto-wiper lever be
switched to the OFF position other
than when driving the vehicle under
rainy conditions.
When Driving
Switches and Controls
4-65

x
If the headlight switch and the
windshield wiper switch are in
AUTO, and the wipers are operated
at low or high speed by the auto
wiper control for several seconds,
bad weather conditions are
determined and the headlights may
be turned on.
x
The auto-wiper control functions can
be turned off.
Refer to the Settings section in the
Mazda Connect Owner's Manual.
▼
Windshield Washer
Pull the wiper lever toward you to
spray washer fluid and operate the
windshield wipers several times. The
washer fluid is sprayed only while the
windshield wipers move out of their
stowed positions to the point where
they start reversing back.
1. OFF
2. Washer
NOTE
x
If the windshield washer is turned on
when the windshield wipers are not
operating, the windshield wipers
operate a few times.
x
If you pull the wiper lever while the
windshield wipers are reversing back
to their stowed positions, the next
time the washer fluid is sprayed is
during the next cycle.
If the washer does not work, inspect
the fluid level (page 6-21). If the fluid
level is normal, consult an Authorized
Mazda Dealer.
When Driving
Switches and Controls
4-66

Rear Window Wiper and
Washer
*
▼
Rear Window Wiper and Washer
The ignition must be switched ON to
use the wiper.
▼
Rear Window Wiper
Turn the wiper on by turning the rear
wiper/washer switch.
Switch Posi-
tion
Wiper operation
Spray washer fluid and operate
the rear wiper
ON
Normal
INT
Intermittent
OFF
Stop
Spray washer fluid and operate
the rear wiper
▼
Rear Window Washer
To spray washer fluid, turn the rear
wiper/washer switch to either of the
position. After the switch is
released, the washer will stop.
NOTE
While the windshield washers are
operating (from the time the wiper
lever is pulled until the washer fluid
stops spraying), the rear window
washer does not spray washer fluid
even if you operate the switch.
If the washer does not work, inspect
the fluid level (page 6-21). If the fluid
level is normal and the washer still
does not work, consult an Authorized
Mazda Dealer.
When Driving
Switches and Controls
*Some models.
4-67

Rear Window Defogger
▼
Rear Window Defogger
The rear window defogger clears fog
from the rear window.
The ignition must be switched ON to
use the defogger.
Press the switch to turn on the rear
window defogger. The rear window
defogger operates for about 15
minutes and then turns off
automatically.
The indicator light illuminates when
the defogger is operating.
To turn off the rear window defogger
before the 15 minutes has elapsed,
press the switch again.
1. Indicator light
CAUTION
¾
Do not use sharp instruments or
window cleaners with abrasives to
clean the inside of the rear window
surface. They may damage the
defogger grid inside the window.
NOTE
x
This defogger is not designed for
melting snow. If there is an
accumulation of snow on the rear
window, remove it before using the
defogger.
x
The rear window defogger operation
time can be changed from 15
minutes to continuous operation.
When the operation time has been
switched to continuous operation,
by pressing the switch, the rear
window defogger will continue to
operate until the ignition is switched
OFF.
Refer to the Settings section in the
Mazda Connect Owner's Manual.
▼
Windshield Wiper De-icer
*
The thermal filaments at the following
positions heat up and facilitate the
removal of snow accumulated on the
windshield.
The windshield wiper de-icer operates
in conjunction with the rear window
defogger.
When Driving
Switches and Controls
4-68
*Some models.

To turn on the windshield wiper
de-icer, switch the ignition ON and
press the rear window defogger switch
(page 4-68).
1. Indicator light
▼
Mirror Defogger
*
The mirror defoggers defrost the
outside mirrors.
The mirror defoggers operate in
conjunction with the rear window
defogger.
To turn on the mirror defoggers, switch
the ignition ON and press the rear
window defogger switch (page 4-68).
1. Indicator light
Horn
▼
Horn
To sound the horn, press the
mark on the steering wheel.
When Driving
Switches and Controls
*Some models.
4-69

Hazard Warning Flasher
▼
Hazard Warning Flasher
The hazard warning lights should
always be used when you stop on or
near a roadway in an emergency.
The hazard warning lights warn other
drivers that your vehicle is a traffic
hazard and that they must take
extreme caution when near it.
Depress the hazard warning flasher
and all the turn signals will flash. The
hazard warning indicator lights in the
instrument cluster flash simultaneously.
NOTE
x
The turn signals do not work when
the hazard warning lights are on.
x
Check local regulations about the
use of hazard warning lights while
the vehicle is being towed to verify
that it is not in violation of the law.
HomeLink Wireless
Control System
*
▼
HomeLink Wireless Control
System
NOTE
HomeLink and HomeLink house are
registered trademarks of Gentex
Corporation.
The HomeLink system replaces up to 3
hand-held transmitters with a single
built-in component in the
auto-dimming mirror. Pressing the
HomeLink button on the
auto-dimming mirror activates garage
doors, gates and other devices
surrounding your home.
1. Indicator light
2. HomeLink button
WARNING
Do not use the HomeLink system with
any garage door opener that lacks the
safety stop and reverse feature:
Using the HomeLink system with any
garage door opener that lacks the
safety stop and reverse feature as
required by federal safety standards is
dangerous. (This includes garage doors
manufactured before April 1, 1982.)
When Driving
Switches and Controls
4-70
*Some models.

Using these garage door openers can
increase the risk of serious injury or
death. For further information, contact
HomeLink at www.homelink.com
or
www.youtube.com/HomeLinkGentex
or an Authorized Mazda Dealer.
Always check the areas surrounding
garage doors and gates for people or
obstructions before programming or
during operation of the HomeLink
system:
Programming or operating the
HomeLink system without verifying the
safety of areas surrounding garage
doors and gates is dangerous and
could result in an unexpected accident
and serious injury if someone were to
be hit.
NOTE
The programming will not be erased
even if the battery is disconnected.
▼
Pre-programming the HomeLink
System
NOTE
It is recommended that a new battery
be placed in the hand-held transmitter
of the device being programmed to
HomeLink for quicker training and
accurate transmission of the
radio-frequency signal.
x
Verify that there is a remote control
transmitter available for the device
you would like to program.
▼
Programming the HomeLink
System
The HomeLink system provides 3
buttons which can be individually
selected and programmed using the
transmitters for current, on-market
devices as follows:
1. Press and release the HomeLink
button you would like to program.
The indicator light flashes slowly in
amber when the button is pressed.
1. Indicator light
2. HomeLink button
2. Hold the hand-held transmitter 2.5
to 7.5 cm (1 to 3 in) away from the
HomeLink button you would like to
program while keeping the
indicator light in view.
NOTE
Depending on the hand-held
transmitter, it may be easier to do
the programming by holding it 15
to 20 cm (6 to 7.8 in) away from
the HomeLink button.
3. Press the hand-held transmitter
button continuously until the
indicator light changes from amber
(flashing) to green (on/flashing).
When Driving
Switches and Controls
4-71
Нет комментариевНе стесняйтесь поделиться с нами вашим ценным мнением.
Текст