Mazda CX-50 (2023 year). Manual in english — page 5
Before Driving
Towing
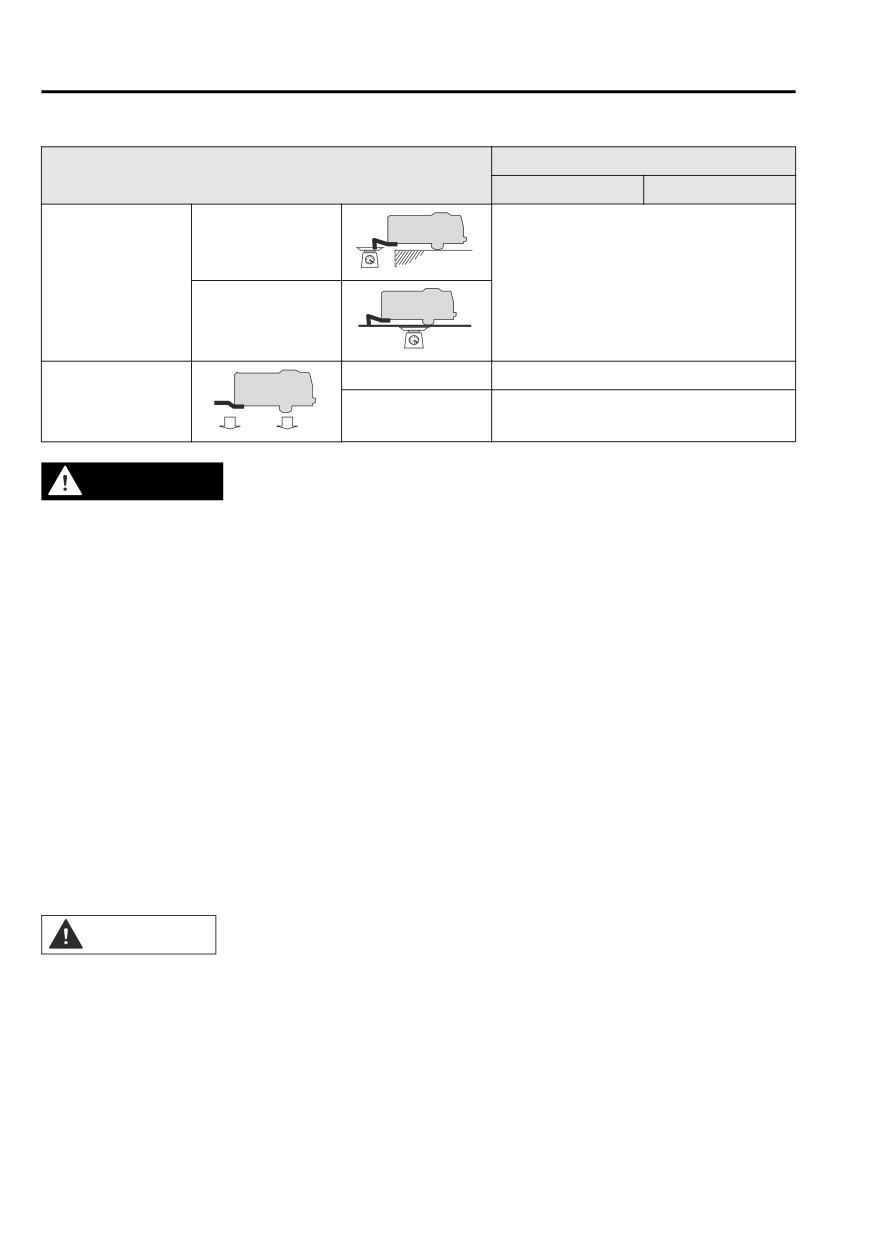
Model
Item
SKYACTIV-G 2.5
SKYACTIV-G 2.5T
Tongue load
TRAILER-TONGUE
Tongue load/Trailer load × 100 = 10 %
LOAD
to 15 %
Trailer load
Front
60 %
DISTRIBUTION OF
TRAILER LOAD
Rear
40 %
WARNING
Always keep tow loads within specified limits as indicated in the Trailer
Towing-Load Table:
Attempting to tow loads greater than those specified is dangerous as it may cause
serious handling and performance problems that could result in personal injury or
vehicle damage, or both.
Load your trailer with the weight about 60 % toward the front and 40 % toward
the rear:
Loading the trailer with more weight in the rear than in the front is dangerous. Doing
so could cause you to lose control. The trailer tongue load must be 10 %―15 % of
the total trailer load (sum of the weights of the trailer and cargo).
Always have the total trailer weight and tongue load determined prior to
departure:
Attempting to tow loads without determining the total trailer weight and tongue
load is dangerous. Trailer sway from crosswinds, rough roads or other causes could
result in loss of control and a serious accident.
CAUTION
The total trailer weight and tongue load can be determined by weighing the trailer
on platform scales at a highway weight station or a trucking company.
3-56
Before Driving
Towing
▼ Trailer Hitch
Use only a hitch ball recommended by the trailer manufacturer that conforms to the
gross trailer weight requirement.
When not towing a trailer, remove the trailer hitch (if detachable) to reduce the
possibility of damage as a result of the vehicle being rear-ended.
WARNING
Always make sure the trailer hitch is securely attached before departure:
An unsecured trailer hitch is dangerous as it causes greater trailer sway from
crosswinds, rough roads or other causes, resulting in loss of control and a serious
accident.
Examine all trailer-hitch mounting bolts regularly and tighten any that are loose. If
the hitch is removed, seal any open mounting holes to prevent exhaust, dust, water,
dirt and other foreign elements from filtering in, possibly endangering personal
safety and damaging your vehicle.
Do not install a hitch that stiffens the bumper as it will reduce the bumper's
performance.
Make sure there are no exhaust gas leaks into the passenger compartment if any
mounting bolts are connected to the body:
Modifying your vehicle exhaust system is dangerous. Exhaust gas entering the vehicle
could cause loss of consciousness or even death.
When mounting the trailer hitch, make no modifications to the vehicle exhaust
system.
CAUTION
¾ Make all hitch adjustments with actual loads. Do not load and unload vehicle
while adjusting hitch. This action will change the vehicle height.
¾ Do not use an axle-mounted hitch. This may damage the axle and related parts.
▼ Tires
When towing a trailer, make sure all tires are inflated to the recommended cold-tire
pressure, as indicated on the tire pressure chart on the driver's door frame. Trailer
tire size, load rating, and inflation pressures should conform to tire manufacturer
specifications.
WARNING
Never use the temporary spare tire when towing:
Using the temporary spare tire on your vehicle when towing a trailer is dangerous as
it could result in tire failure, loss of control, and injury to vehicle occupants.
3-57
Before Driving
Towing
▼ Safety Chains
Safety chains must be used as a precautionary measure should the trailer become
unintentionally unhitched. They should cross under the trailer tongue and attach to
the hitch. Leave enough slack to allow full turns. Consult literature published by your
trailer or hitch manufacturer for more details.
WARNING
Make sure the safety chain is securely attached to both the trailer and the vehicle
prior to departure:
Towing a trailer without using a safety chain securely attached to both the trailer and
the vehicle is dangerous. If damage occurs to the coupling unit or hitch ball, the
trailer could wander into another lane and cause a collision.
▼ Trailer Lights
Trailer lights must comply with all federal, state, and local regulations. Equip your
trailer as required before towing it day or night.
CAUTION
Do not connect a trailer lighting system directly to the lighting system of your Mazda.
This may damage your vehicle's electrical system and lighting systems. Have a
recreational vehicle dealer or trailer rental agency connect the system, and inspect
the brake lights and turn signals yourself before each trip.
▼ Trailer Brakes
If the total trailer weight exceeds 450 kg (1,000 lb), trailer brakes are required. If
your trailer has brakes, make sure they comply with all federal, state, and local
regulations.
WARNING
Do not connect a hydraulic trailer-brake system to your vehicle's brake system:
Connecting a hydraulic trailer-brake system directly to the vehicle brake system is
dangerous and will result in inadequate braking and possible injury.
3-58
Before Driving
Towing
▼ Trailer Towing Tips
Verify that your Mazda maintains a near-normal attitude when a loaded or
unloaded trailer is connected. Do not drive if it has an abnormal front-up or
front-down position. Inspect for incorrect tongue load, worn suspension parts,
and trailer overloading.
Make sure the trailer is properly loaded and the cargo is secure to prevent it from
shifting.
Make sure the mirrors conform to all government regulations. If they do not, install
required rear view mirrors appropriate for towing purposes.
The three main causes of vehicle-trailer accidents are driver error, excessive speed,
and improper trailer loading.
Before driving
Have your cooling and braking system checked by an Authorized Mazda Dealer.
Before starting out, inspect the operation of all vehicle and trailer lights and all
vehicle-to-trailer connections. Stop and re-inspect all lights and connections after
driving a short distance.
Driving
Your Mazda will handle differently with a trailer in tow, so practice turning,
backing, and stopping in a traffic-free area.
Take time to get accustomed to the extra weight and length.
Allow more room between your vehicle and the one in front because braking
distance increases with a trailer. For each 16 km/h (10 mph) of speed, allow at
least one vehicle and trailer length between your Mazda and the vehicle ahead.
Avoid jerky starts or sudden acceleration.
Avoid sudden braking. It may cause loss of control and result in jackknifing,
especially so on wet or slippery roads.
Shift the selector lever to the D position when towing a trailer in hilly terrain or
when heavily loaded.
The D position will allow operating the vehicle without frequent shifting.
Lane changes and turning
Avoid quick lane changes, sudden turns, and tight turns. Slow down before turning
to avoid the need of sudden braking.
A turning trailer will make a tighter arc than the tow vehicle. Compensate with turns
that are larger than normal.
Passing
Plan well ahead to pass other vehicles, and provide plenty of room before changing
lanes. Crosswinds from passing vehicles, especially larger ones, and the effects of
rough roads will affect handling.
If swaying occurs, firmly grip the steering wheel and reduce speed immediately, but
gradually.
3-59
Before Driving
Towing
Steer straight ahead. If no extreme correction of steering or braking is made, the
combination of less speed and firm steering will result in stability.
Backing up
Backing a vehicle with a trailer requires practice and patience. Back slowly, and have
a helper outside at the rear of the trailer to reduce the risk of an accident.
To turn the trailer, place your hand at the bottom of the steering wheel and turn it in
the direction you want the trailer to go. Make only slight movements to prevent
sharp or prolonged turning.
Ascending a hill
Shift into a lower gear to reduce the possibility of overloading or overheating the
engine, or both.
Descending a hill
Shift into a lower gear and use engine compression as a braking effect.
WARNING
Always use lower gears to reduce speed:
Holding the brake pedal down too long or too frequently is dangerous as it could
cause the brakes to overheat and lose power, resulting in loss of control and a
serious accident. Use lower gears to help reduce speed. Pull off the road and allow
brakes to cool down whenever braking performance feels reduced.
Overheated engine
The extra weight of the trailer may strain the engine on hot days and on long or
steep upgrades.
If the temperature gauge indicates overheating, turn off the air conditioner, drive
safely to the side of the road, park off the right-of-way and wait for engine to cool.
Refer to Overheating on page 7-15.
Parking
Always make sure the tires of the trailer and the tow vehicle are blocked while
parked.
Apply the parking brake firmly and put the transmission in P.
Avoid parking on an incline, but if you must, follow these instructions:
1. Depress and hold down the brake pedal.
2. Have a helper put wheel blocks against the downhill side of all vehicle and trailer
tires.
3. Then release the brake pedal slowly until the blocks bear the load.
If the grade is downhill, turn the steering wheel so that the front of the front
tires face the curb.
If it is uphill, face the rear of the front tires against the curb.
3-60
Before Driving
Towing
4. Firmly apply the parking brake.
5. Shift the transmission into P, and stop the engine.
To restart after parking on an incline:
1. With the transmission in P, start the engine. (Be sure to depress and hold the
brake pedal.)
2. Shift into gear.
3. Release the parking brake (also the foot brake) and pull away from the wheel
blocks. Stop; apply the parking brake and shift into P.
4. Have a helper retrieve the wheel blocks.
Fuel consumption
Trailer towing causes higher fuel consumption.
Maintenance
If you tow a trailer frequently, have your vehicle serviced as shown in Scheduled
Maintenance (page 6-4).
3-61
Before Driving
Towing
Recreational Towing
▼ Recreational Towing
An example of "recreational towing" is
towing your vehicle behind a
motorhome.
The transmission is not designed for
towing this vehicle on all 4 wheels.
When doing recreational towing refer
to "Towing Description" (page 7-17)
and "Tiedown Hooks" (page 7-18)
and carefully follow the instructions.
3-62
When Driving
4
Information concerning safer driving and stopping.
Start/Stop Engine
4-4
HomeLink Wireless Control
Ignition Switch
4-4
System*
4-61
Starting the Engine
4-5
Turning the Engine Off
4-9
Brake
4-66
Cylinder Deactivation*
4-10
Brake System
4-66
i-stop*
4-11
AUTOHOLD
4-72
Hill Launch Assist (HLA)
4-76
Instrument Cluster and
Display
4-17
ABS/TCS/DSC/TSC
4-77
Instrument Cluster and
Antilock Brake System
Display
4-17
(ABS)
4-77
Instrument Cluster
4-17
Traction Control System
Active Driving Display*
4-34
(TCS)
4-78
Dynamic Stability Control
Automatic Transmission
4-36
(DSC)
4-80
Automatic Transmission
Trailer Stability Control
Controls
4-36
(TSC)
4-81
Shift-Lock System
4-37
Transmission Ranges
4-38
Mazda intelligent Drive Select (Mi-
Manual Shift Mode
4-40
Drive)
4-82
Direct Mode*
4-46
Mazda intelligent Drive Select
Driving Tips
4-47
(Mi-Drive) (FWD)*
4-82
Mazda intelligent Drive Select
Switches and Controls
4-48
(Mi-Drive) (AWD)*
4-83
Lighting Control
4-48
Turn and Lane-Change
i-ACTIV AWD
4-86
Signals
4-53
i-ACTIV AWD Operation*
4-86
Windshield Wipers and
Washer
4-54
Power Steering
4-88
Rear Window Wiper and
Power Steering
4-88
Washer
4-57
Rear Window Defogger
4-58
Horn
4-60
i-ACTIVSENSE
4-89
Hazard Warning Flasher
4-60
i-ACTIVSENSE*
4-89
*Some models.
4-1
Adaptive Front Lighting System
360° View Monitor*
4-156
(AFS)*
4-93
Forward Sensing Camera
High Beam Control System
(FSC)*
4-189
(HBC)*
4-93
Front Radar Sensor*
4-193
Lane Departure Warning System
Rear Side Radar Sensor*
4-195
(LDWS)*
4-95
Rear/Rear Corner Ultrasonic
Blind Spot Monitoring (BSM)*
Sensor*
4-196
. . . . . . . . . . .. 4-99
Front Camera/Side Cameras/
Traffic Sign Recognition System
Rear Camera*
4-197
(TSR)*
4-104
Distance & Speed Alert (DSA)*
Cruise Control
4-198
. . . . . . . . . . 4-110
Cruise Control*
4-198
Driver Attention Alert (DAA)*
. . . . . . . . . . 4-111
Tire Pressure Monitoring System
Rear Cross Traffic Alert (RCTA)*
(TPMS)
4-202
. . . . . . . . . . 4-113
Tire Pressure Monitoring System
Mazda Radar Cruise Control with
(TPMS)
4-202
Stop & Go function (MRCC with
Stop & Go function)*
4-117
Rear View Monitor
4-206
Traffic Jam Assist (TJA)*
4-124
Rear View Monitor*
4-206
Lane-keep Assist System (LAS)*
. . . . . . . . . . 4-137
Emergency Lane Keeping
Parking Sensor System
4-215
(ELK)*
4-141
Parking Sensor System*
4-215
Smart Brake Support (SBS)*
. . . . . . . . . . 4-148
4-2
*Some models.
MEMO
4-3
When Driving
Start/Stop Engine
Ignition Switch
WARNING
▼ Push Button Start Positions
Before leaving the driver's seat,
always switch the ignition off, set the
The system operates only when the key
parking brake, and make sure the
is within operational range.
selector lever is in P position:
Each time the push button start is
Leaving the driver's seat without
pressed, the ignition switches in the
switching the ignition off, setting the
order of off, ACC, and ON. Pressing
parking brake, and shifting the selector
the push button start again from ON
lever to P position is dangerous.
switches the ignition off.
Unexpected vehicle movement could
occur which could result in an
accident.
In addition, if your intention is to leave
the vehicle for even a short period, it is
important to switch the ignition off, as
leaving it in another position will
disable some of the vehicle's security
systems and run the battery down.
ACC (Accessory)
1. Indicator light
Some electrical accessories will
2. Push button start
operate and the indicator light (amber)
illuminates.
NOTE
NOTE
The engine starts by pressing the
The keyless entry system does not
push button start while depressing
function while the push button start
the brake pedal. To switch the
has been pressed to ACC, and the
ignition position, press the push
doors will not lock/unlock even if they
button start without depressing the
have been locked manually.
pedal.
Do not leave the ignition switched
ON
ON while the engine is not running.
This is the normal running position
Doing so could result in the battery
after the engine is started. The
going dead. If the selector lever is in
indicator light (amber) turns off. (The
the P position, and the ignition is in
indicator light (amber) illuminates
ACC, the ignition switches off
when the ignition is switched ON and
automatically after about 25
the engine is not running.)
minutes.
Some indicator lights/warning lights
Off
should be inspected before the engine
is started.
The power supply to electrical devices
Refer to Warning/Indicator Lights on
turns off and the indicator light
page 4-28.
(amber) also turns off.
Refer to Indication/Indicator Lights on
page 4-30.
4-4
When Driving
Start/Stop Engine
NOTE
Starting the Engine
When the push button start is pressed
to ON, the sound of the fuel pump
▼ Starting the Engine
motor operating near the fuel tank can
be heard. This does not indicate an
abnormality.
WARNING
Radio waves from the key may affect
medical devices such as pacemakers:
Before using the key near people who
use medical devices, ask the medical
device manufacturer or your physician
if radio waves from the key will affect
the device.
NOTE
The key must be carried because the
key carries an immobilizer chip that
must communicate with the engine
controls at short range.
The engine can be started when the
push button start is pressed from off,
ACC, or ON.
The push button start system
functions (function which can start
the engine by only carrying the key)
can be deactivated to prevent any
possible adverse effect on a user
wearing a pacemaker or other
medical device. If the system is
deactivated, you will be unable to
start the engine by carrying the key.
Consult an Authorized Mazda Dealer
for details. If the push button start
system functions have been
deactivated, you can start the engine
by following the procedure indicated
when the key battery goes dead.
Refer to Engine Start Function When
Key Battery is Dead on page 4-7.
After starting a cold engine, the
engine speed increases and a
whining sound from the engine
compartment can be heard.
4-5
When Driving
Start/Stop Engine
This is for improved exhaust gas
NOTE
purification and does not indicate
If the push button start indicator
any parts defect.
light (green) flashes, make sure
Engine-starting is controlled by the
that the key is being carried.
spark ignition system.
If the push button start indicator
This system meets all Canadian
light (green) flashes with the key
Interference-Causing Equipment
being carried, touch the key to
Standard requirements regulating the
the push button start and start
impulse electrical field strength of
the engine.
radio noise.
Refer to Engine Start Function
1.
Make sure you are carrying the key.
When Key Battery is Dead on
2.
Occupants should fasten their seat
page 4-7.
belts.
3.
Make sure the parking brake is on.
CAUTION
4.
Continue to depress the brake
pedal firmly until the engine has
If the KEY warning indication (red)
completely started.
is displayed, or the push button
5.
Put the vehicle in park (P). If you
start indicator light (amber) flashes,
must restart the engine while the
this could indicate a problem with
vehicle is moving, shift into neutral
the engine starting system. This may
(N).
prevent the engine from starting or
from switching the ignition to ACC
NOTE
or ON.
The starter will not operate if the
Refer to KEY Warning Indication/
selector lever is not in P or N
Warning Light (Red) on page
position and the brake pedal is not
7-26.
depressed sufficiently.
Have your vehicle inspected at an
6.
Make sure that the KEY indicator
Authorized Mazda Dealer as soon
light (green) in the instrument
as possible.
cluster and push button start
indicator light (green) turns on.
NOTE
Under the following conditions,
the KEY warning indication (red)
is displayed after the push button
start is pressed. This informs the
driver that the push button start
will not switch to ACC, even if it
is pressed from off (page 7-26).
The key battery is dead.
The key is out of operational
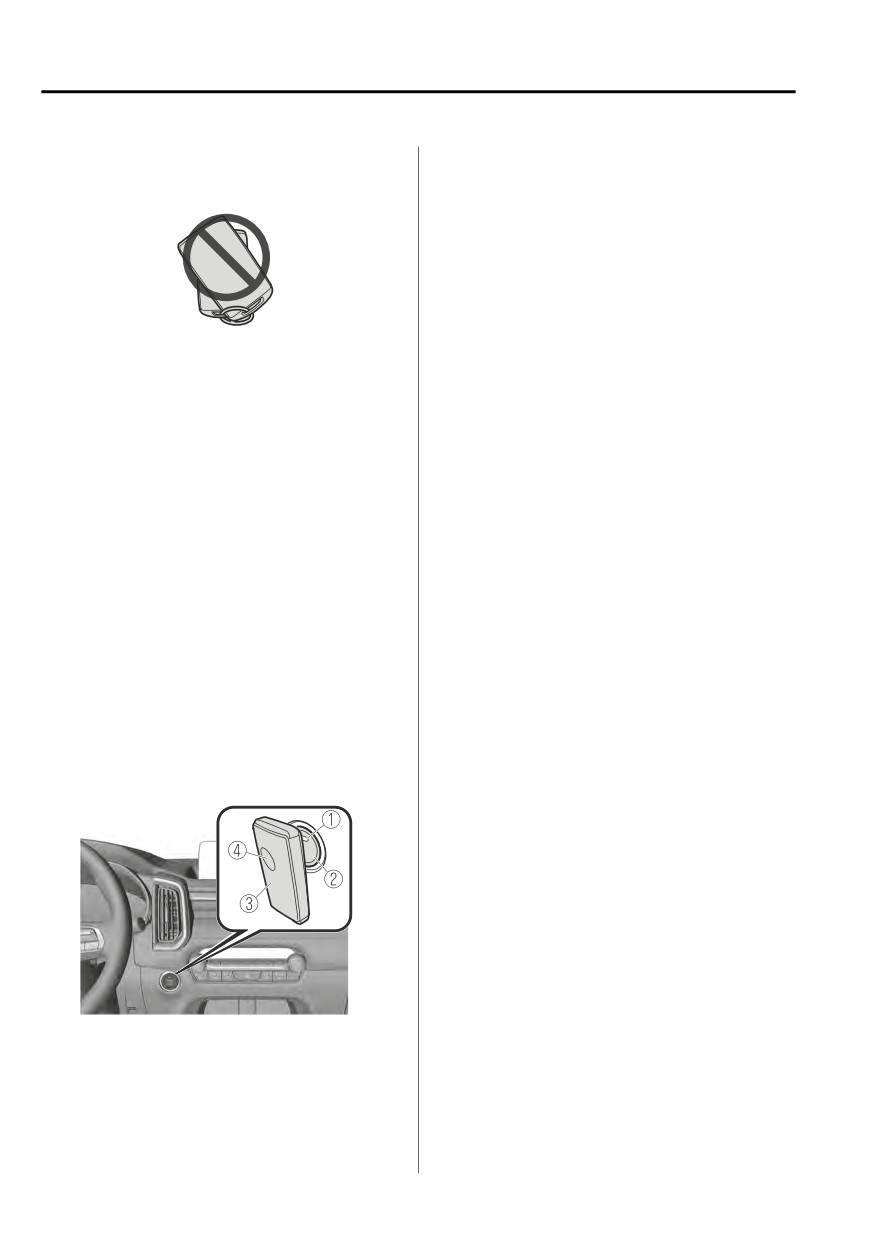
1. Indicator light
range.
2. Push button start
The key is placed in areas where
it is difficult for the system to
detect the signal (page 3-7).
4-6
When Driving
Start/Stop Engine
A key from another
8. After starting the engine, let it idle
manufacturer similar to the key
for about 10 seconds.
is in the operational range.
NOTE
(Forced engine starting method)
If the KEY warning indication
Do not use high engine speeds
(red) is displayed, or the push
until reaching the operating
button start indicator light
temperature.
(amber) flashes, this could
Whether the engine is cold or
indicate that the engine may not
warm, it should be started
start using the usual starting
without the use of the
method (page 7-26). Have your
accelerator.
vehicle inspected at an
If the engine does not start the
Authorized Mazda Dealer as
first time, refer to Starting a
soon as possible. If this occurs,
Flooded Engine under Emergency
the engine can be force-started.
Starting. If the engine still does
Press and hold the push button
not start, have your vehicle
start until the engine starts. Other
inspected by an Authorized
procedures necessary for starting
Mazda Dealer (page 7-14).
the engine, such as having the key
in the cabin, and depressing the
▼ Engine Start Function When Key
brake pedal are required.
Battery is Dead
When the engine is force-started,
the KEY warning indication (red)
CAUTION
remains displayed and the push
button start indicator light
When starting the engine by holding
(amber) remains flashing.
the transmitter over the push button
When the selector lever is in the
start due to a dead key battery or a
neutral (N) position, the push
malfunctioning key, be careful not to
button start indicator light (green)
allow the following, otherwise the
does not turn on.
signal from the key will not be received
7.
Press the push button start after the
correctly and the engine may not start.
push button start indicator light
(green) turns on.
¾ Metal parts of other keys or metal
objects touch the key.
NOTE
After starting the engine, the push
button start indicator light
(amber) turns off and the ignition
switches to the ON position.
After pressing the push button
start and before the engine starts,
the operation sound of the fuel
pump motor from near the fuel
tank can be heard, however, this
does not indicate a malfunction.
4-7
When Driving
Start/Stop Engine
¾ Spare keys or keys for other vehicles
5.
Make sure that the push button
equipped with an immobilizer
start indicator light (green) turns
system touch or come near the key.
on.
6.
Press the push button start to start
the engine.
NOTE
The engine cannot be started
unless the brake pedal is fully
¾ Devices for electronic purchases, or
depressed.
security passage touch or come near
If there is a malfunction with the
the key.
push button start function, the
If the engine cannot be started due to
push button start indicator light
a dead key battery, the engine can be
(amber) flashes. In this case, the
started using the following procedure:
engine may start, however, have
1.
Continue to depress the brake
the vehicle checked at an
pedal firmly until the engine has
Authorized Mazda Dealer as
completely started.
soon as possible.
2.
Put the vehicle in park (P). If you
If the push button start indicator
must restart the engine while the
light (green) does not illuminate,
vehicle is moving, shift into neutral
perform the operation from the
(N).
beginning again. If it does not
3.
Make sure that the push button
illuminate, have the vehicle
start indication light (green) flashes.
checked at an Authorized Mazda
4.
Align the center area of the
Dealer.
emblem on the transmitter with the
To switch the ignition position
center area of the push button start
without starting the engine,
while the push button start
perform the following operations
indicator light (green) flashes.
after the push button start
indicator light (green) turns on.
1. Release the brake pedal.
2. Press the push button start to
switch the ignition position.
The ignition switches in the
order of ACC, ON, and off
each time the push button
start is pressed. To switch the
ignition position again,
perform the operation from
the beginning.
1. Indicator light
2. Push button start
3. Transmitter
4. Emblem
4-8
When Driving
Start/Stop Engine
▼ Emergency Operation for Starting
Turning the Engine Off
the Engine
▼ Turning the Engine Off
If the KEY warning indication (red) is
displayed, or the push button start
indicator light (amber) flashes, this
WARNING
could indicate that the engine may not
start using the usual starting method.
Do not stop the engine while the
Have your vehicle inspected at an
vehicle is moving:
Authorized Mazda Dealer as soon as
Stopping the engine while the vehicle
possible. If this occurs, the engine can
is moving for any reason other than in
be force-started. Press and hold the
an emergency is dangerous. Stopping
push button start until the engine
the engine while the vehicle is moving
starts. Other procedures necessary for
will result in reduced braking ability
starting the engine such as having the
due to the loss of power braking,
key in the cabin, and depressing the
which could cause an accident and
brake pedal are required.
serious injury.
1. Stop the vehicle completely.
2. Shift the selector lever to the P
position and set the parking brake.
3. Press the push button start to turn
off the engine. The ignition position
is off.
CAUTION
¾ When leaving the vehicle, make sure
the push button start is off.
4-9
When Driving
Start/Stop Engine
NOTE
Cylinder Deactivation*
The cooling fan in the engine
compartment could turn on for a few
▼ Cylinder Deactivation
minutes after the ignition is switched
The cylinder deactivation is a function
from ON to OFF, whether or not the
designed to reduce fuel consumption
A/C is on or off, to cool the engine
and improve fuel economy by
compartment quickly.
deactivating 2 out of the 4 cylinders
If the system detects that the
while driving. The function constantly
remaining battery power of the key is
determines which is better for driving;
low when the ignition is switched
4 cylinders or 2 cylinders, regardless of
from ON to ACC or OFF, the
the driver's operations, and it performs
following is indicated.
the switching automatically.
Replace with a new battery before
the key becomes unusable.
When the cylinder deactivation
Refer to Key Battery Replacement on
function does not operate
page 6-29.
The cylinder deactivation function
A message is indicated in the display
does not operate under the following
of the instrument cluster.
conditions.
Refer to KEY Warning Indication/
Warning Light (Red) on page 7-26.
The selector lever is in the P, N, or R
If the engine is turned off while the
position.
selector lever is in a position other
The engine oil temperature or engine
than P, the ignition switches to ACC.
coolant temperature is low.
After disconnecting the battery
▼ Emergency Engine Stop
terminals for some reason, such as
Continuously pressing the push button
for battery replacement.
start or quickly pressing it any number
of times while the engine is running or
the vehicle is being driven will turn the
engine off immediately. The ignition
switches to ACC.
4-10
*Some models.
When Driving
Start/Stop Engine
(MRCC with Stop & Go function)/
i-stop*
Traffic Jam Assist (TJA))
1. Engine idling stops when the brake
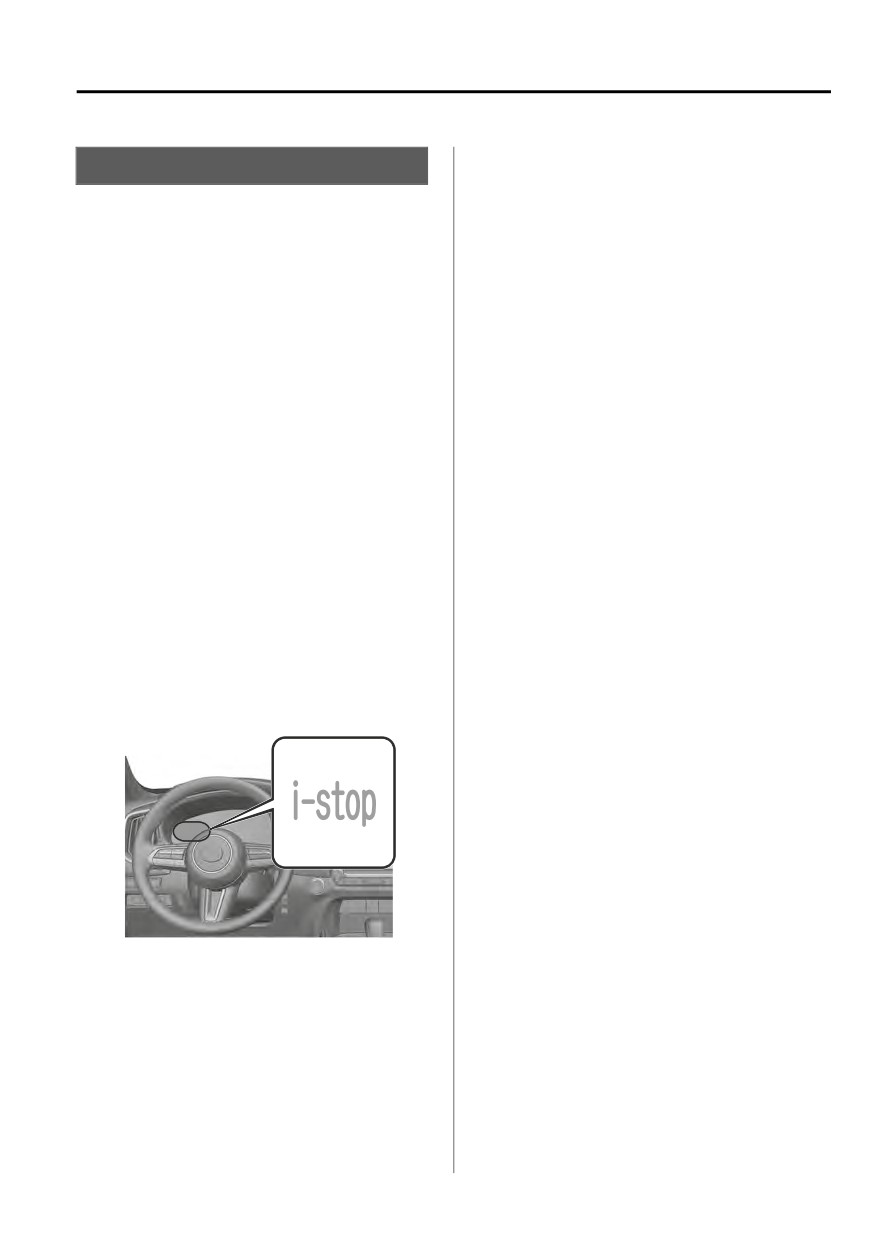
▼ i-stop
pedal is depressed while the vehicle
The i-stop function automatically stops
is driven (except for driving in the R
the engine when the vehicle is stopped
or M position second gear fixed
at a traffic light or stuck in traffic, and
mode) and the vehicle is stopped.
then restarts the engine automatically
2. The engine restarts automatically
to resume driving. The system provides
when the brake pedal is released
improved fuel economy, reduced
with the selector lever in the D or
exhaust gas emissions, and eliminates
M position (not in second gear
idling noise while the engine is
fixed mode).
stopped.
3. If the selector lever is in the N or P
position, the engine does not
Engine idle stopping and restarting
restart when the brake pedal is
released. The engine restarts when
NOTE
the brake pedal is depressed again
After parking the vehicle, make sure
or the selector lever is shifted to the
that the ignition is switched OFF.
D, M (not in second gear fixed
There is the possibility of the vehicle
mode) or the R position. (For the
moving if the vehicle is parked while
purposes of safety, always keep the
i-stop is operating.
brake pedal depressed when
The i-stop indicator light (green)
shifting the selector lever while
turns on under the following
engine idling is stopped.)
conditions:
(When the vehicle is stopped by the
MRCC with Stop & Go function/TJA
When engine idling is stopped.
stop hold control)
1. When the vehicle is stopped by the
MRCC with Stop & Go function/
TJA, engine idling stops and
continues to be stopped without
depressing the brake pedal.
2. When the accelerator pedal is
depressed or the RES switch is
operated, while the vehicle is
stopped by the MRCC with Stop &
Go function/TJA, the engine will
The i-stop indicator light (green)
automatically restart if the selector
turns off when the engine is
lever is in the D/M position (not in
restarted.
second gear fixed mode).
Engine idle stopping and restarting
(When the vehicle is stopped by the
while vehicle is stopped
AUTOHOLD function)
(AUTOHOLD operation turned off and
1. When the brake pedal is depressed
When not using Mazda Radar Cruise
while the vehicle is being driven
Control with Stop & Go function
and the vehicle comes to a stop,
the i-stop function will operate and
*Some models.
4-11
When Driving
Start/Stop Engine
continue to operate even if the
The temperature setting dial of the
brake is released (except when
air conditioner is in a position other
driving in the R or M position
than maximum heating or maximum
second gear fixed mode).
cooling (A/C ON) position.
2. The engine restarts automatically
(Automatic climate control system)
when the accelerator pedal is
The vehicle's interior temperature
depressed with the selector lever in
and the set temperature for the air
the D/M position (not in second
conditioner are nearly the same.
gear fixed mode).
The i-stop warning light (amber) is
3. If the selector lever is in the N or P
not turned on/flashing.
position, the engine does not
The keyless entry & push button start
restart when the brake pedal is
system functions are normal.
released. The engine restarts when
The brake vacuum is sufficiently high.
the brake pedal is depressed again
The battery is in good condition.
or the selector lever is shifted to the
While vehicle is stopped
D, M (not in second gear fixed
The selector lever is in the D or M
mode) or the R position. (For the
position (not in second gear fixed
purposes of safety, always keep the
mode).
brake pedal depressed when
The automatic transmission fluid
shifting the selector lever while
has warmed up sufficiently.
engine idling is stopped.)
The automatic transmission fluid
(When using MRCC with Stop & Go
temperature is not abnormally
function/TJA)
high.
1. Engine idling stops when the
The steering wheel is almost in the
vehicle has decelerated to about 20
straight-ahead position (idling may
km/h (12 mph) or slower while in
not stop even with the steering
headway control using the MRCC
wheel in the straight-ahead
with Stop & Go function/TJA.
position if force is applied to the
2. If it is necessary to accelerate while
steering wheel. Release the force
in headway control using the MRCC
applied to the steering wheel to
with Stop & Go function/TJA, the
stop engine idling).
engine restarts automatically.
The vehicle is stopped by
Operation conditions
depressing the brake pedal.
The vehicle is not on a steep slope.
Under the following conditions, engine
The vehicle is not stopped
idling stops and the i-stop indicator
suddenly.
light (green) turns on.
While driving
The engine has been started and the
The selector lever is in the D or M
vehicle is driven for a certain period.
position (not in second gear fixed
The engine is started with the hood
mode).
closed.
While driving
All doors, liftgate, and hood are
The vehicle is driven at a vehicle
closed.
speed of about 40 km/h (25 mph)
The air conditioner is not operating
or faster after engine idling stops
with the airflow mode in the
while driving.
position.
4-12
When Driving
Start/Stop Engine
The vehicle is not driven in sport
The i-stop OFF switch is pressed until
mode.
the beep sounds.
The automatic transmission fluid
The air conditioner is operated with
has warmed up sufficiently.
the airflow mode in the
The automatic transmission fluid
position.
temperature is not abnormally
The temperature setting dial of the
high.
air conditioner is in the maximum
The steering wheel is almost in the
heating or maximum cooling (A/C
straight-ahead position (idling may
ON) position.
not stop even with the steering
(Automatic climate control system)
wheel in the straight-ahead
The cabin temperature is largely
position if force is applied to the
different from the set temperature of
steering wheel. Release the force
the air conditioner.
applied to the steering wheel to
The brakes are released slightly on a
stop engine idling).
slope and the vehicle begins to
The vehicle is stopped by
move.
depressing the brake pedal.
Two minutes have elapsed since the
The vehicle is not driven on a
idling was stopped.
slope.
The battery power is depleted.
The vehicle is not stopped
The hood is opened.
suddenly.
The driver's seat belt is unfastened
and the driver's door is opened.
NOTE
Engine idling is stopped while the
Under the following conditions, a
vehicle is stopped
period of time is required to stop
engine idling
The accelerator pedal is depressed
with the selector lever in the D or
The battery power is depleted for
M (not in second gear fixed mode)
some reason such as the vehicle has
position.
not been driven for a long period.
The selector lever is shifted to the R
The ambient temperature is high or
position.
low.
The selector lever is shifted from N
After the battery terminals are
or P position to D or M (not in
disconnected for some reason such
second gear fixed mode) position.
as for battery replacement.
The steering wheel is operated
Engine-stop period is short or time
with the selector lever in the D or
until next engine idle stop is long
M (not in second gear fixed mode)
position.
The ambient temperature is high or
The selector lever is in the M
low.
position and the second gear fixed
The battery power is depleted.
mode is selected.
Power consumption by the vehicle's
With the selector lever in the P or
electrical parts is high.
N position, or the D/M range, the
Engine restarts automatically while
driver's seat belt is unfastened, the
engine idling is stopped
driver's door is opened, or the
Under the following conditions, the
hood is opened.
engine restarts automatically.
The steering wheel is operated.
4-13
When Driving
Start/Stop Engine
Engine idling is stopped while
▼ i-stop OFF Switch
driving
When pressing the switch, the i-stop
The selector lever is in a position
function stops and the i-stop OFF
other than the D position.
switch indicator light turns on. If the
The accelerator pedal is depressed.
switch is pressed again, the i-stop
Sport mode is selected.
function becomes operational and the
The steering wheel is operated.
i-stop OFF switch indicator light turns
The shift lever is shifted to the R
off.
position.
Selector lever is operated while
engine idling is stopped
If the selector lever is shifted from D or
M (not in second gear fixed mode)
position to N or P position while
engine idling is stopped, the engine
does not restart even when the brake
pedal is released. The engine will
restart if the brake pedal is depressed
again or the selector lever is shifted to
the D, M (not in second gear fixed
1. Indicator light
mode), or R position. (For the
purposes of safety, always keep the
NOTE
brake pedal depressed when shifting
If the engine is stopped with the i-stop
the selector lever.)
function stopped, the i-stop function
If the selector lever is shifted from the
becomes operational again when the
D or M (not in second gear fixed
engine is started the next time.
mode) to the N or P position, and the
▼ Vehicle Roll Prevention Function
driver's seat belt is unfastened or the
driver's door is opened, the engine
Vehicles with the i-stop function are
restarts.
equipped with a vehicle roll prevention
Battery terminals have been
function. This function prevents the
disconnected
vehicle from rolling, such as when
Engine idling may not stop right after
releasing the brake pedal while on a
the battery terminals have been
slope under the following conditions:
disconnected. In addition, if the
While engine idling is stopped
battery is replaced, the i-stop functions
(prevents the vehicle from rolling
must be verified. Consult an
back)
Authorized Mazda Dealer.
When the engine restarts after
releasing the brake pedal (prevents
the vehicle's sudden movement due
to vehicle creep), sudden movement
of the vehicle is prevented by
controlling the brakes.
4-14
When Driving
Start/Stop Engine
1.
Release foot from brake pedal
¾ The vehicle roll prevention function
is a supplementary function which
operates for a maximum of 2
seconds after releasing the brake
pedal and accelerating the vehicle
from an engine idling stop condition.
Over reliance on the system may
result in an unexpected accident if
2.
Vehicle brake force maintained
the vehicle were to suddenly
accelerate. Before starting to drive
the vehicle, always confirm the safety
of the surroundings and operate the
selector lever, brake pedal, and
accelerator pedal appropriately.
Note that the vehicle may move
suddenly depending on the vehicle's
load or if it is towing something.
3.
Engine restarted
¾ Note that the vehicle may move
suddenly after the vehicle roll
prevention function is released while
the vehicle is under the following
conditions:
¾ The selector lever is in the N
position.
¾ If the selector lever is shifted to the
4.
Acceleration
N position and the brake pedal is
released while the i-stop function
is operating, the brake force is
gradually released. To accelerate
the vehicle, release the brake pedal
after the engine restarts and shift
the selector lever to a position
other than the N position.
WARNING
NOTE
When the vehicle is stopped on a
Do not rely completely on the vehicle
steep grade, the vehicle roll
roll prevention function.
prevention function does not
operate because engine idling is not
stopped.
4-15
When Driving
Start/Stop Engine
The brake pedal response may
NOTE
change, sound may occur from the
A problem in the system may be
brakes, or the brake pedal could
indicated under the following
vibrate from the operation of the
conditions. Have your vehicle
vehicle roll prevention function.
inspected by an Authorized Mazda
However, this does not indicate a
Dealer.
malfunction.
The light does not turn on when the
▼ i-stop Warning Light (Amber)/
ignition is switched ON.
i-stop Indicator Light (Green)
The light continues to remain on
while the engine is running.
The i-stop system constantly monitors
the driver's operations, the vehicle's
When the light is flashing
interior and exterior environment, and
The light continues to flash if the
the operational status of the vehicle,
system has a malfunction. Have your
and uses the i-stop warning light
vehicle inspected by an Authorized
(amber) and i-stop indicator light
Mazda Dealer.
(green) to inform the driver of various
cautions and warnings.
i-stop indicator light (green)
NOTE
On vehicles equipped with the center
display, the i-stop operation status is
displayed in the fuel efficiency monitor
display.
Refer to the Fuel Efficiency Monitor
When the light is turned on
section in the Mazda Connect
The light turns on while engine idling is
Owner's Manual.
stopped and turns off when the engine
i-stop warning light (amber)
is restarted.
When the light is turned on
The light turns on when the ignition
is switched ON and turns off when
the engine is started.
If the i-stop warning light (amber)
remains on while the engine is
running, the battery performance
may have decreased. Have your
vehicle inspected by an Authorized
Mazda Dealer.
4-16
When Driving
Instrument Cluster and Display
Instrument Cluster and
Instrument Cluster
Display
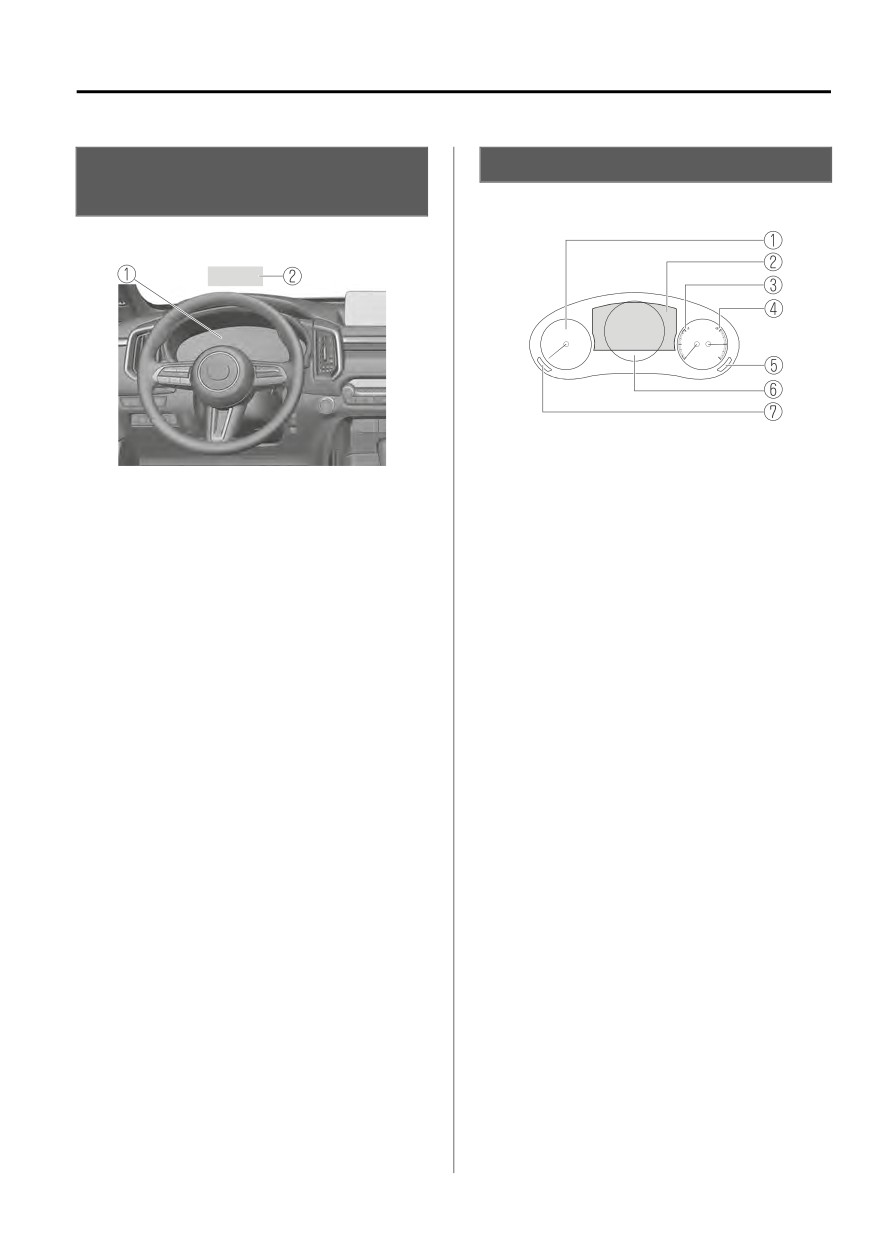
▼ Instrument Cluster
▼ Instrument Cluster and Display
ᶃ Tachometer
page 4-18
ᶄ Multi-information Display
ᶃ Instrument Cluster
page 4-17
. . . . . . . . . . page 4-19
ᶄ Active Driving Display
page 4-34
ᶅ Engine Coolant Temperature
Gauge
page 4-21
ᶆ Fuel Gauge
page 4-22
ᶇ Dashboard Illumination
Switch
page 4-23
ᶈ Speedometer
page 4-17
ᶉ TRIP Switch
page 4-21
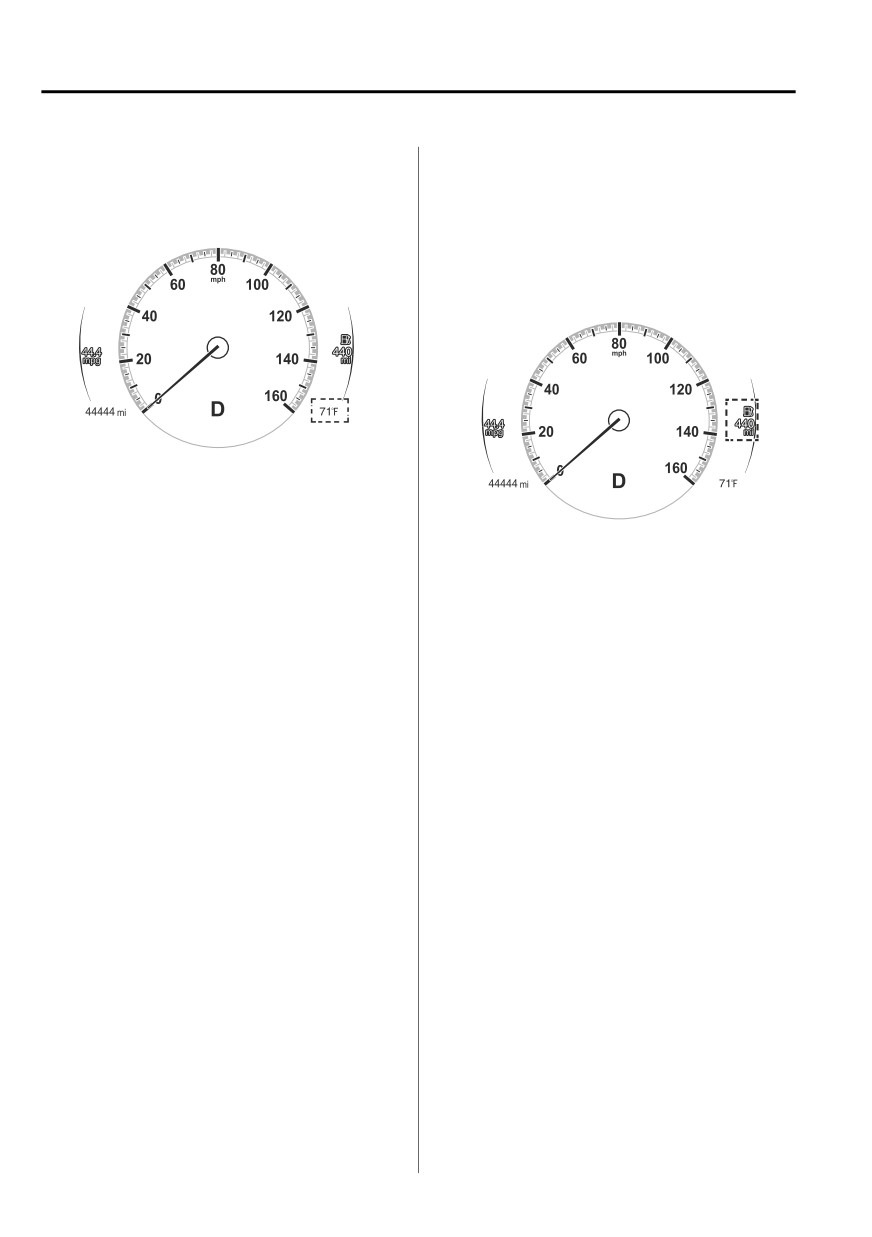
▼ Speedometer
The speedometer indicates the speed
of the vehicle.
4-17
When Driving
Instrument Cluster and Display
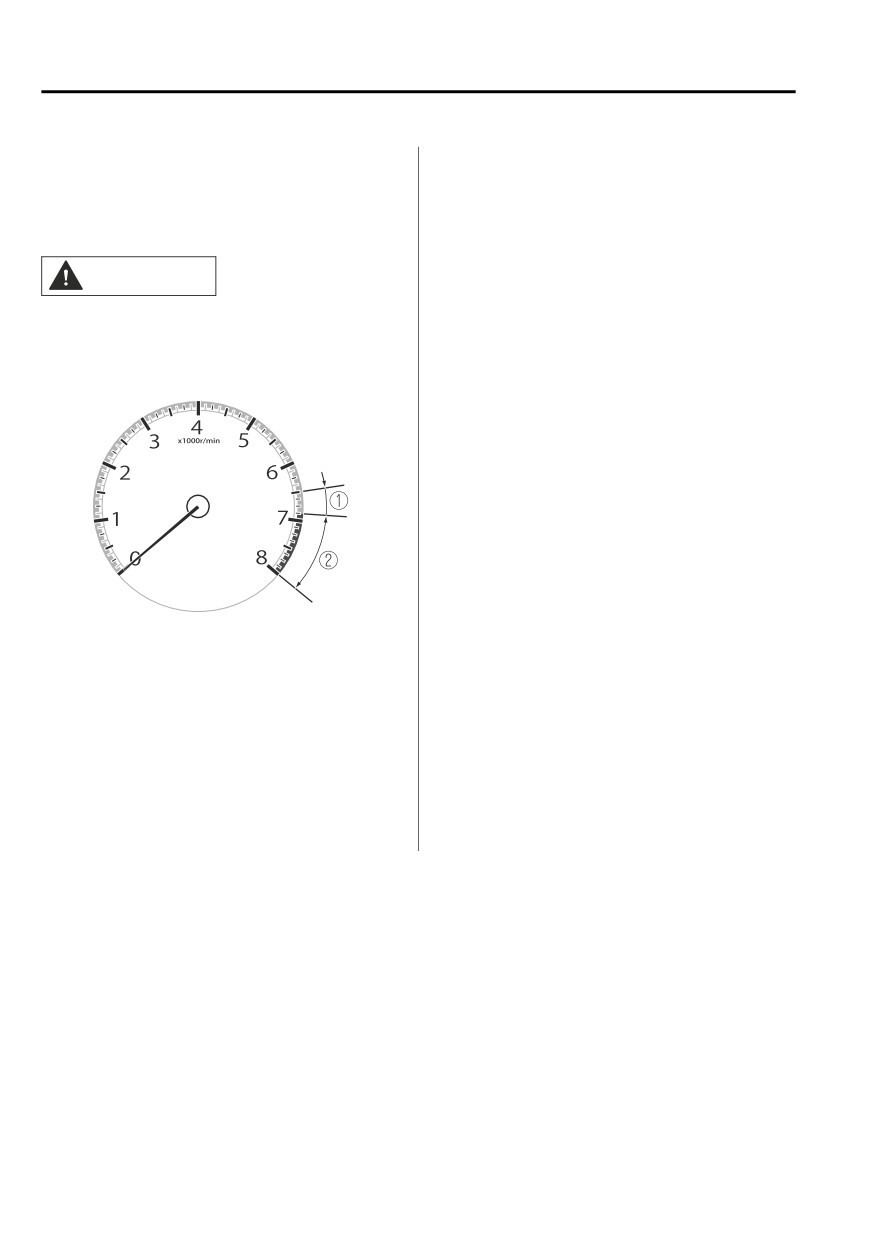
▼ Tachometer
The tachometer shows engine speed in
thousands of revolutions per minute
(rpm).
CAUTION
Do not run the engine with the
tachometer needle in the RED ZONE.
This may cause severe engine damage.
1. STRIPED ZONE*1
2. RED ZONE*1
*1
The range varies depending on the type of
gauge.
NOTE
When the tachometer needle enters
the STRIPED ZONE, this indicates to
the driver that the gears should be
shifted before entering the RED ZONE.
4-18
When Driving
Instrument Cluster and Display
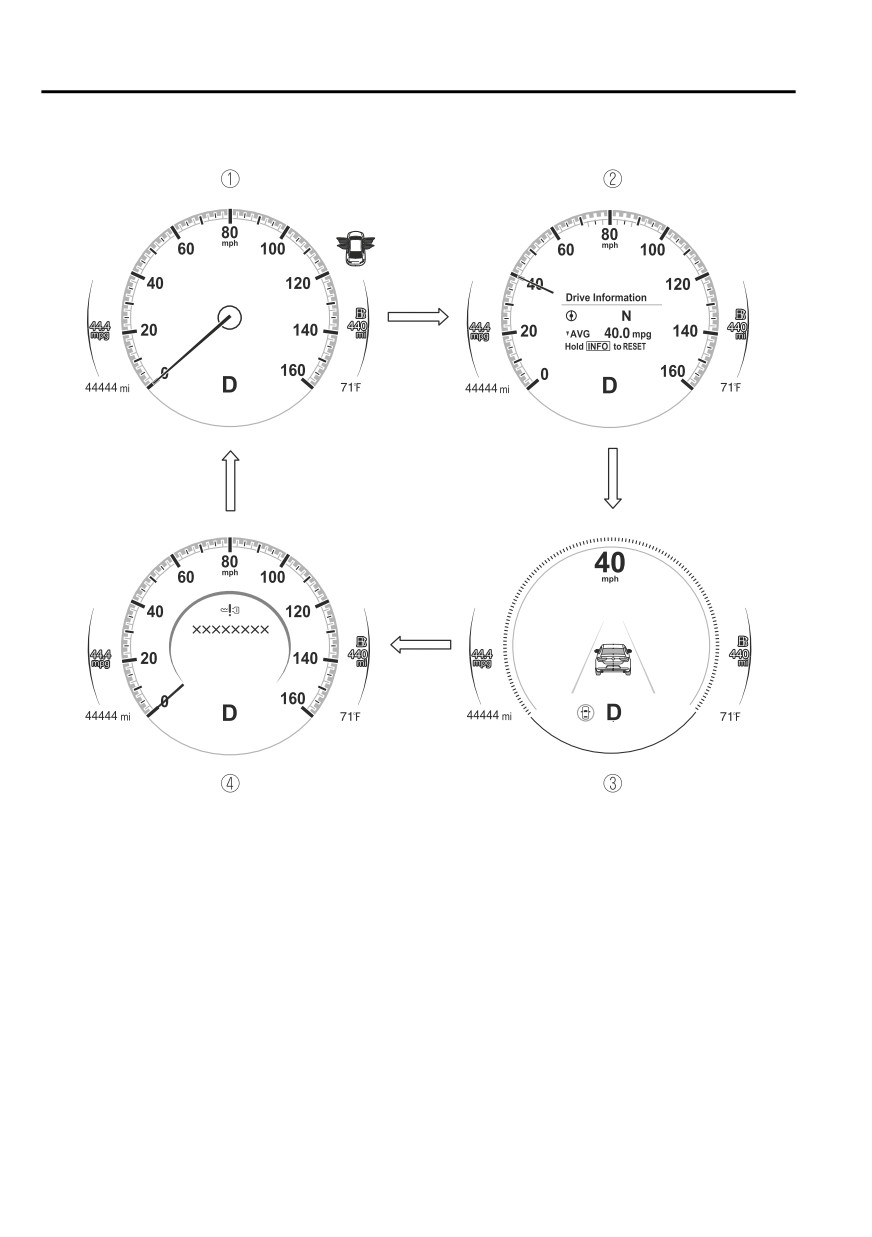
▼ Multi-information Display
1. Multi-information Display
2. INFO switch
The multi-information display indicates the following information.
Speedometer
Odometer
Trip meter
Outside temperature
Distance-to-empty
Average fuel economy
Current fuel economy
Mazda intelligent Drive Select (Mi-Drive) Display
i-ACTIVSENSE Display
Compass Display
Door-Ajar/Liftgate-Ajar/Hood-Ajar Warning Indication*1
Message Display
*1
Displayed when opening door/liftgate/hood.
4-19
When Driving
Instrument Cluster and Display
The screen content changes each time the INFO switch is pressed.
1. Basic display
2. Drive information display
3. i-ACTIVSENSE display
4. Message display*1
*1
Displayed only when a warning occurs.
The type of display for the fuel economy and the maximum driving distance can be
changed.
Refer to the Settings section in the Mazda Connect Owner's Manual.
4-20
When Driving
Instrument Cluster and Display
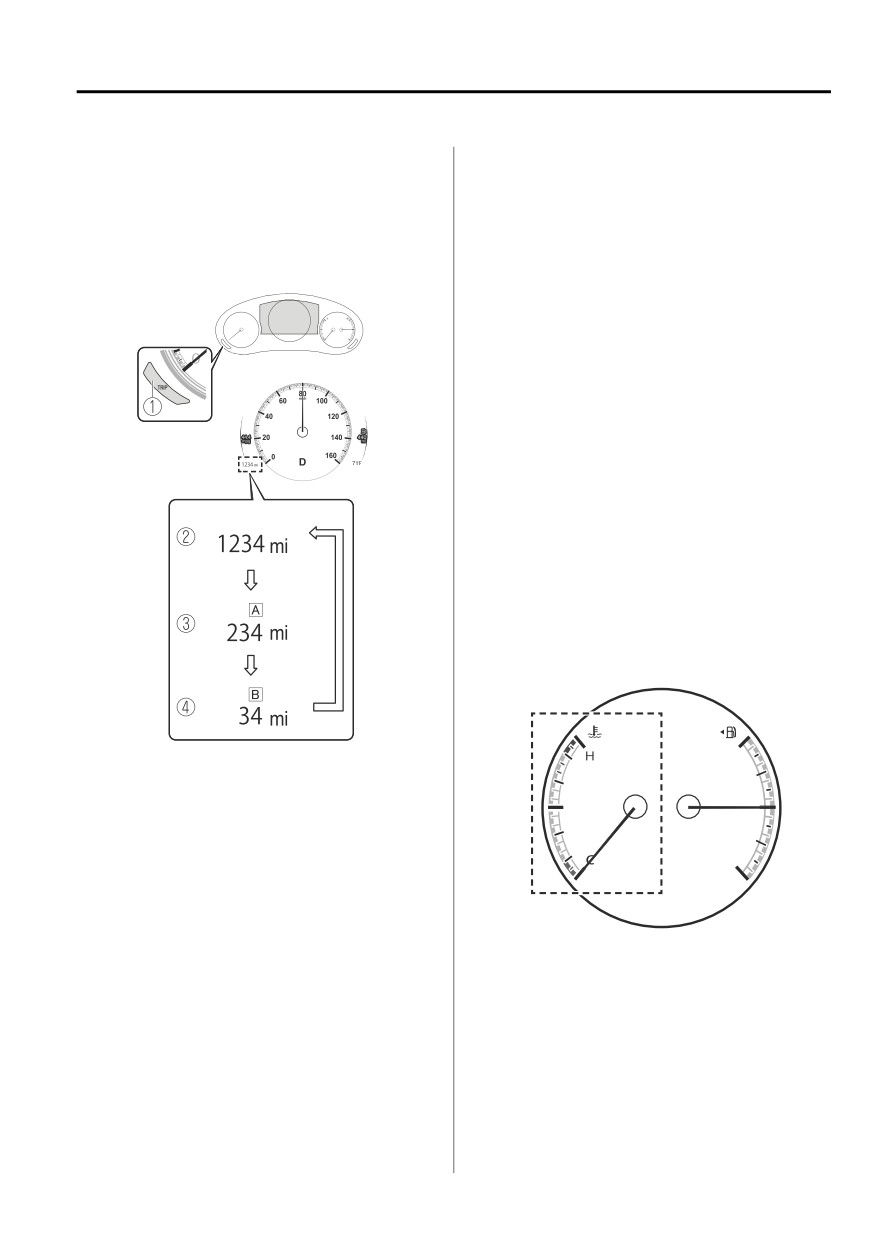
▼ Odometer, Trip Meter and Trip
distance from where the fuel tank is
Meter Selector
filled.
You can switch between the odometer
When trip meter A is selected, TRIP A
and trip meter display using the TRIP
will be displayed. When trip meter B is
switch.
selected, TRIP B will be displayed.
The trip meter can be reset by pressing
the TRIP switch for 1.5 seconds or
more while the trip meter is displayed.
NOTE
Only the trip meters record tenths of
kilometers (miles).
▼ Engine Coolant Temperature
Gauge
Displays the engine coolant
temperature. The blue range of the
gauge indicates that the engine coolant
temperature is low, and the red range
of the gauge indicates that the engine
coolant temperature is high and
overheating.
1. TRIP switch
2. Odometer display
3. Trip meter A display
4. Trip meter B display
Odometer
The odometer records the total
distance the vehicle has been driven.
Trip meter
The driving distance for a specified
interval is indicated. Two types (TRIP A,
TRIP B) of interval distance can be
measured.
For instance, trip meter A can record
the distance from the point of origin,
and trip meter B can record the
4-21
When Driving
Instrument Cluster and Display
recommend keeping the tank over 1/4
CAUTION
full.
When the engine coolant temperature
gauge needle is in the red range, the
engine coolant temperature is
extremely high. Drive slowly to reduce
engine load. If the engine coolant
temperature gauge needle is in the red
range, there is the possibility of
overheating. Park the vehicle in a safe
place immediately and take
appropriate measures.
Refer to Overheating on page 7-15.
NOTE
If the engine or engine coolant
temperature is high or low, the
engine output may be restricted to
protect the engine.
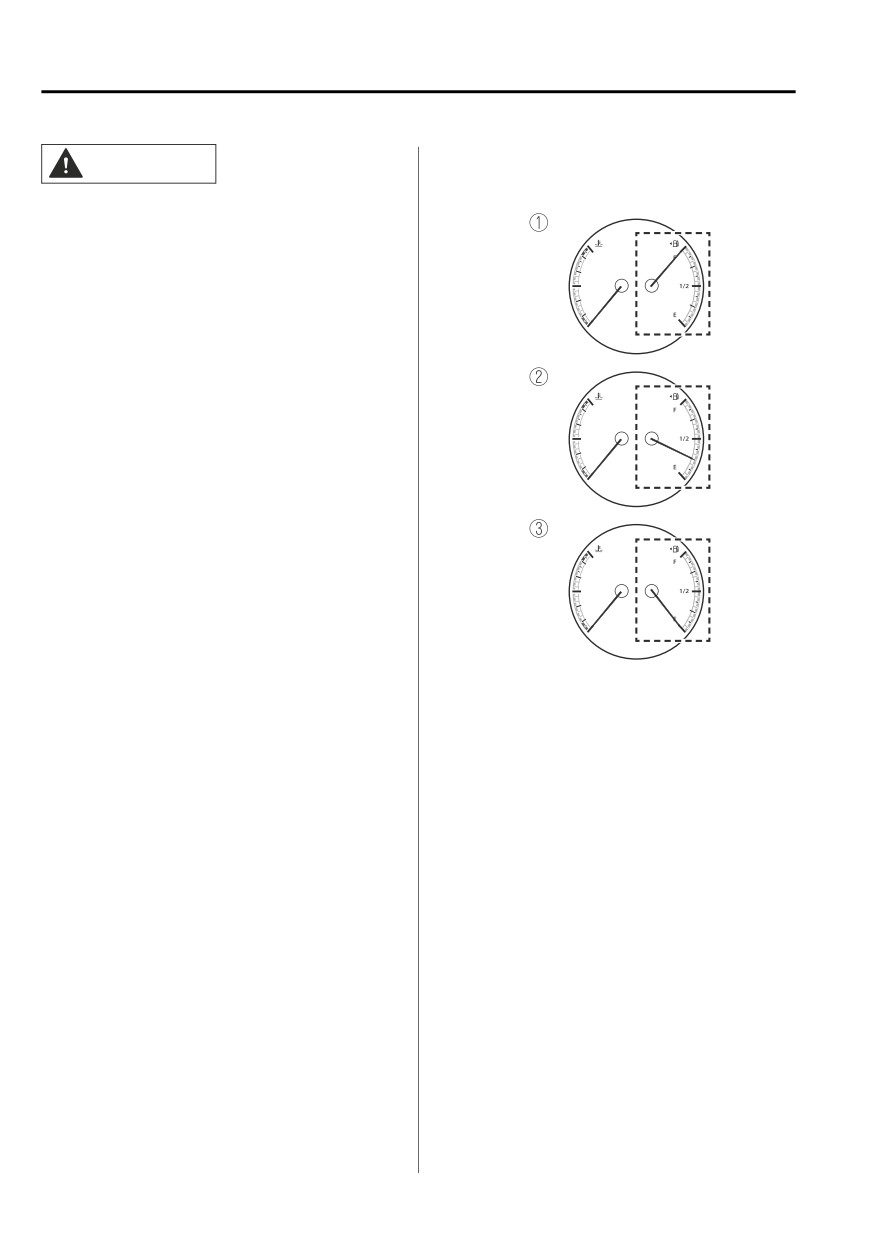
▼ Fuel Gauge
The fuel gauge shows approximately
how much fuel is remaining in the tank
when the ignition is switched ON. We
1.
Full
2.
1/4 Full
3.
Empty
If the low fuel warning light illuminates
or the fuel level is very low, refuel as
soon as possible.
If inconsistency in engine performance
or stalling occurs due to low fuel level
conditions, refuel the vehicle as soon
as possible and add at least 10 L (2.7
US gal, 2.2 Imp gal) of fuel.
Refer to Low Fuel Warning Indication/
Warning Light on page 7-28.
NOTE
After refueling, it may require some
time for the indicator to stabilize. In
addition, the indicator may deviate
while driving on a slope or curve
since the fuel moves in the tank.
4-22
When Driving
Instrument Cluster and Display
current dimmer setting is at
The direction of the arrow (
)
maximum dimness.
indicates that the fuel-filler lid is on
the left side of the vehicle.
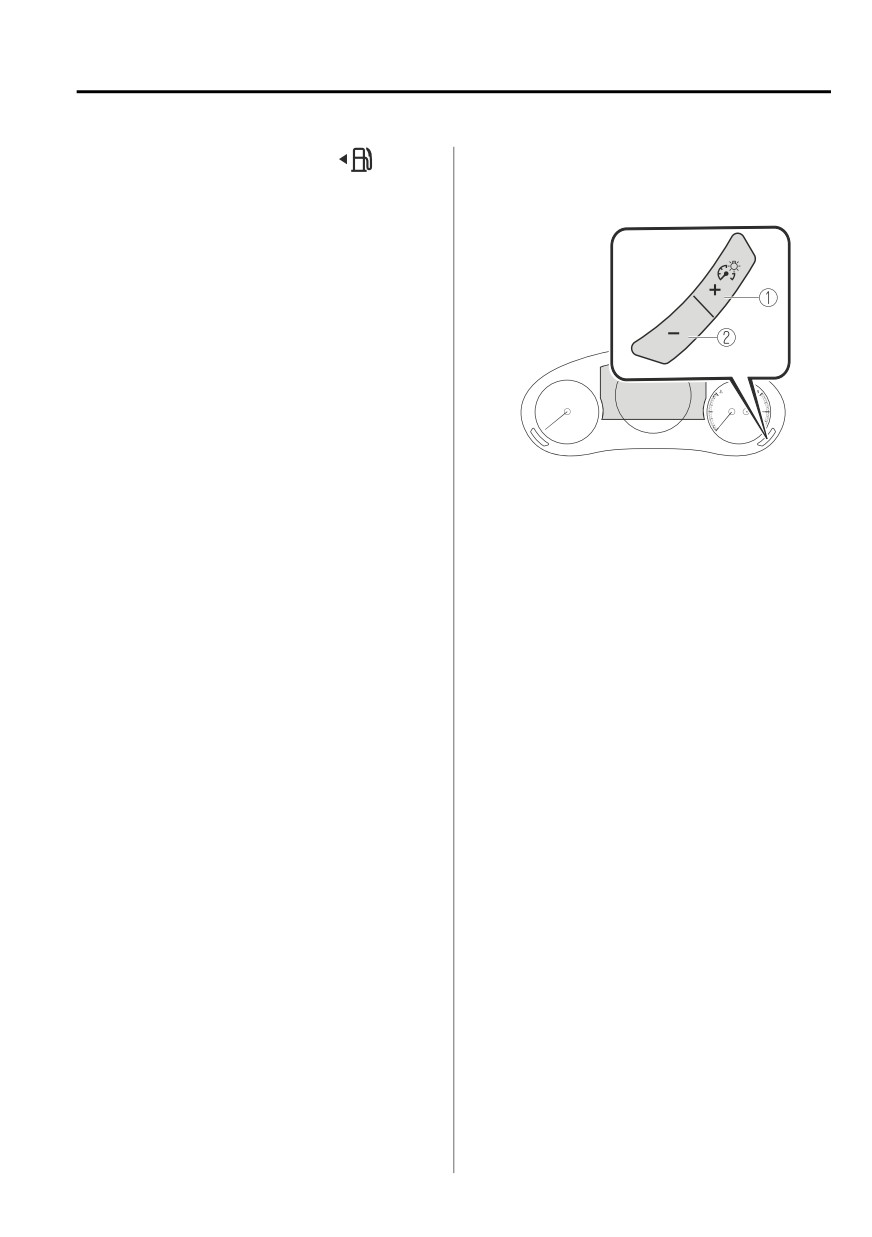
▼ Dashboard Illumination
(Without auto-light control)
When the lights are turned on with the
ignition switched ON, the brightness of
the dashboard illumination is dimmed.
(With auto-light control)
When the lights are turned on with the
ignition switched ON, the brightness of
the dashboard illumination is dimmed.
However, when the light sensor
detects that the surrounding area is
1. Bright
bright such as when the lights are
2. Dim
turned on in the daytime, the
Function for canceling illumination
dashboard illumination does not dim.
dimmer
NOTE
The illumination dimmer can be
(With auto-light control)
canceled by pressing the + switch
When the ignition is switched ON in
while the instrument cluster is at
the early evening or at dusk, the
maximum dimness and while the
dashboard illumination is dimmed
ignition is switched ON. If you press
for several seconds until the light
the + switch again while the
sensor detects the brightness of the
illumination dimmer is canceled, a
surrounding area, however, the
sound is activated to notify you that it
dimming may cancel after the
is canceled. If the instrument cluster's
brightness is detected.
visibility is reduced due to glare from
When the lights are turned on, the
surrounding brightness, cancel the
lights-on indicator light in the
illumination dimmer.
instrument cluster turns on.
NOTE
Refer to Headlights on page 4-48.
When the illumination dimmer is
The brightness of the instrument panel
canceled, the instrument cluster
and dashboard illuminations can be
cannot be dimmed even if the lights
adjusted by pressing the dashboard
are turned on.
illumination switch while the
When the illumination dimmer is
dashboard illumination is dimmed.
canceled, the screen in the center
The brightness increases by pressing
display switches to constant display
the + switch.
of the daytime screen.
The brightness decreases by pressing
the - switch. If you press the - switch
while the instrument cluster is at
maximum dimness, a sound is
activated to notify you that the
4-23
When Driving
Instrument Cluster and Display
▼ Outside Temperature Display
or farther, the remaining
distance-to-empty indication
When the ignition is switched ON, the
decreases in 10 km (10 mile)
outside temperature is displayed.
increments, and when the remaining
distance-to-empty is 50 km (30 miles)
or shorter, it decreases in 1 km (1 mile)
increments.
NOTE
Under the following conditions, the
outside temperature display may
differ from the actual outside
NOTE
temperature depending on the
Even though the distance-to-empty
surroundings and vehicle conditions:
display may indicate a sufficient
Significantly cold or hot
amount of remaining driving distance
before refueling is required, refuel as
temperatures.
Sudden changes in outside
soon as possible if the fuel level is
very low or the low fuel warning light
temperature.
The vehicle is parked.
illuminates.
The display will not change unless
The vehicle is driven at low speeds.
you add more than approximately 9
Changing the Temperature Unit of the
L (2.3 US gal, 1.9 Imp gal) of fuel.
Outside Temperature Display
The distance-to-empty is the
approximate remaining distance the
The outside temperature unit can be
vehicle can be driven until all the
switched between Celsius and
graduation marks in the fuel gauge
Fahrenheit.
indicating the remaining fuel supply
Settings can be changed by operating
disappear.
the center display screen.
If there is no past fuel economy
Refer to the Settings section in the
information such as after first
Mazda Connect Owner's Manual.
purchasing your vehicle or the
▼ Distance-to-empty
information is deleted when the
battery cables are disconnected, the
This displays the approximate distance
actual distance-to empty/range may
you can travel on the remaining fuel
differ from the amount indicated.
based on the fuel economy.
The distance-to-empty will be
calculated and displayed every second.
When the remaining
distance-to-empty is 50 km (30 miles)
4-24
When Driving
Instrument Cluster and Display
▼ Average Fuel Economy
NOTE
This mode displays the average fuel
Indicates the 0 position when the
economy by calculating the total
vehicle speed is about 5 km/h (3
traveled distance and the total fuel
mph) or slower.
consumption since the vehicle was
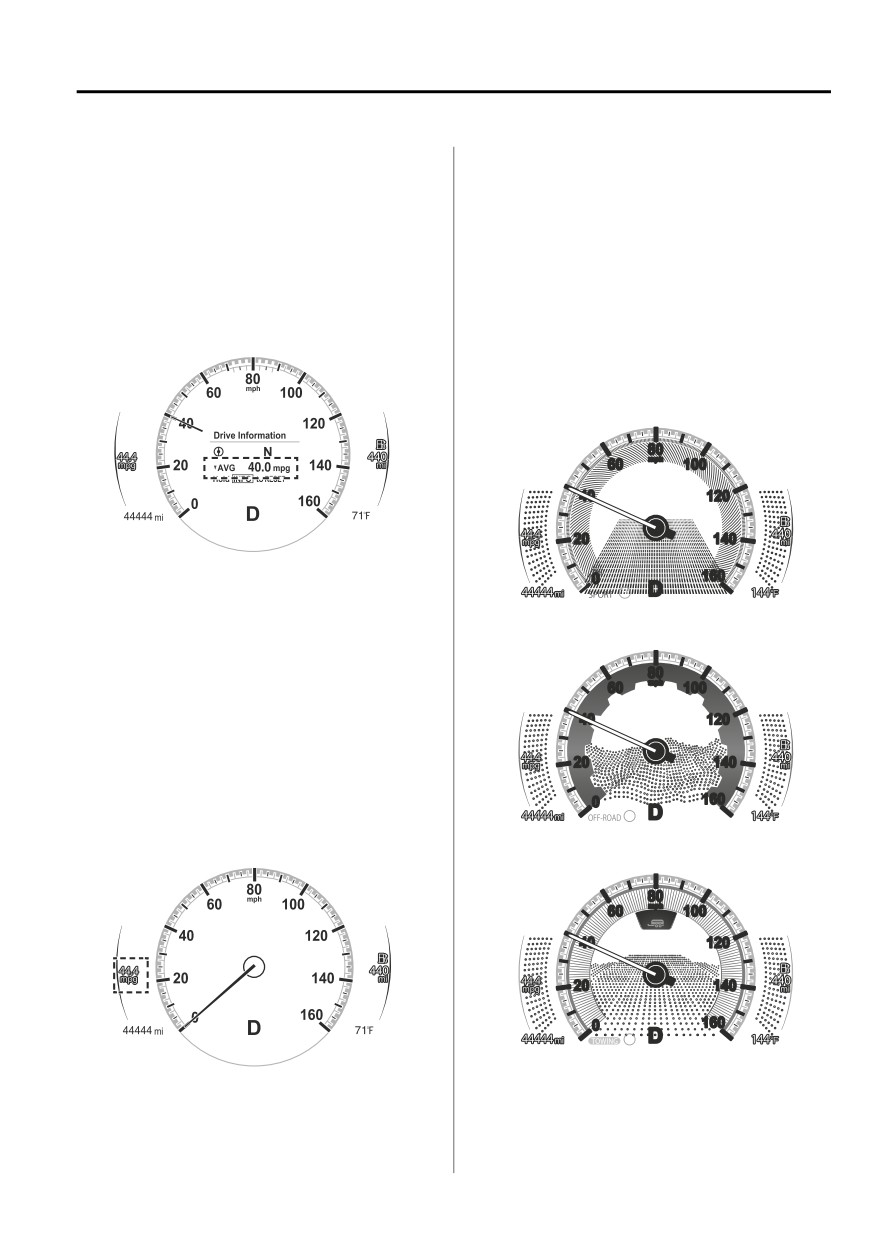
▼ Mazda intelligent Drive Select
purchased or the past data was reset.
(Mi-Drive) Display*
The average fuel economy is calculated
and displayed every 30 seconds.
The display changes depending on the
driving mode.
Sport mode
The average fuel economy can be reset
by pressing the INFO switch for 1.5
seconds or more. After the data is
Off-road mode
cleared, the fuel consumption is
recalculated and the - - - L/100 km
(- - - mpg) for the 30 seconds prior to
it being displayed is indicated.
▼ Current Fuel Economy
This displays the current fuel economy
by calculating the amount of fuel
consumption and the distance
traveled.
Towing mode
*Some models.
4-25
Большое спасибо!
Ваше мнение очень важно для нас.
Нет комментариевНе стесняйтесь поделиться с нами вашим ценным мнением.
Текст