Mazda CX-50 (2023 year). Manual in english — page 15
Maintenance and Care
Owner Maintenance
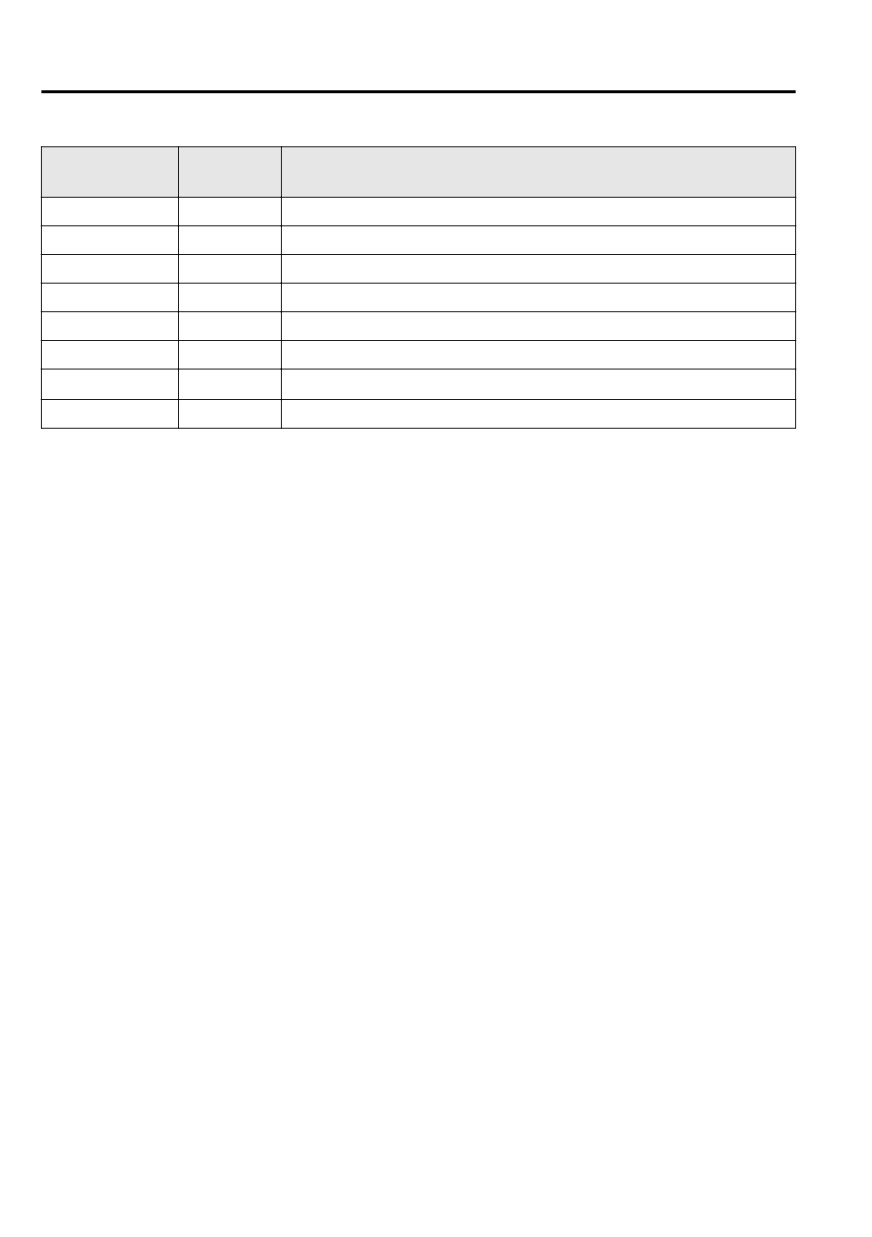
FUSE RAT-
No.
PROTECTED COMPONENT
ING
F16
15 A
Illumination
F17
10 A
Brake lights
F18
10 A
Reverse lights
F19
10 A
Rear turn signal lights
F20
10 A
Taillights
F21
10 A
Taillights
F22
7.5 A
Air bag*
F23
―
―
6-42
*Some models.
Maintenance and Care
Appearance Care
clear and color base coat of the
Exterior Care
vehicle's paintwork.
▼ Exterior Care
When insects stick to the paint surface
The paintwork on your Mazda
and decompose, corrosive compounds
represents the latest technical
form. These can erode the clear and
developments in composition and
color base coat of the vehicle's
methods of application.
paintwork if they are not removed.
Environmental hazards, however, can
Tree sap will harden and adhere
harm the paint's protective properties,
permanently to the paint finish. If you
if proper care is not taken.
scratch the sap off while it is hard,
some vehicle paint could come off
Here are some examples of possible
with it.
damage, with tips on how to prevent
Prevention
them.
It is necessary to have your Mazda
Etching Caused by Acid Rain or
washed and waxed to preserve its
Industrial Fallout
finish according to the instructions in
Occurrence
this section. This should be done as
soon as possible.
Industrial pollutants and vehicle
emissions drift into the air and mix
Bird droppings can be removed with a
with rain or dew to form acids. These
soft sponge and water. If you are
acids can settle on a vehicle's finish. As
traveling and these are not available, a
the water evaporates, the acid
moistened tissue may also take care of
becomes concentrated and can
the problem. The cleaned area should
damage the finish.
be waxed according to the instructions
And the longer the acid remains on the
in this section.
surface, the greater the chance is for
Insects and tree sap are best removed
damage.
with a soft sponge and water or a
Prevention
commercially available chemical
cleaner.
It is necessary to wash and wax your
vehicle to preserve its finish according
Another method is to cover the
to the instructions in this section.
affected area with dampened
These steps should be taken
newspaper for 1 to 2 hours. After
immediately after you suspect that acid
removing the newspaper, rinse off the
rain has settled on your vehicle's finish.
loosened debris with water.
Damage Caused by Bird Dropping,
Water Marks
Insects, or Tree Sap
Occurrence
Occurrence
Rain, fog, dew, and even tap water can
Bird droppings contain acids. If these
contain harmful minerals such as salt
are not removed they can eat away the
and lime. If moisture containing these
minerals settles on the vehicle and
6-43
Maintenance and Care
Appearance Care
evaporates, the minerals will
cleaner or polish. Read all warnings
concentrate and harden to form white
and cautions.
rings. The rings can damage your
▼ Maintaining the Finish
vehicle's finish.
Washing
Prevention
It is necessary to wash and wax your
CAUTION
vehicle to preserve its finish according
to the instructions in this section.
¾ Before lifting the windshield wiper
These steps should be taken
blades off the windshield, always
immediately after you find water marks
follow the procedure for moving the
on your vehicle's finish.
windshield wiper blades. Otherwise,
Paint Chipping
a wiper blade, wiper arm, or the
hood could be damaged.
Occurrence
Refer to the Replacing Windshield
Wiper Blades (page 6-23) section for
Paint chipping occurs when gravel
thrown in the air by another vehicle's
the procedure on how to move the
windshield wiper blades to the
tires hits your vehicle.
service position.
How to avoid paint chipping
¾ When the ignition is switched ON
and the wiper lever is in the AUTO
Keeping a safe distance between you
and the vehicle ahead reduces the
position, the windshield wipers may
operate automatically in the
chances of having your paint chipped
by flying gravel.
following cases:
¾ The area of the windshield above
NOTE
the rain sensor is touched or wiped
The paint chipping zone varies with
with a cloth.
the speed of the vehicle. For
¾ The windshield or the rain sensor
example, when traveling at 90 km/h
area in the cabin is hit.
(56 mph), the paint chipping zone is
When the ignition is switched ON
50 m (164 ft).
In low temperatures a vehicle's finish
and the wiper lever is in the AUTO
position, do not touch the
hardens. This increases the chance of
paint chipping.
windshield or the windshield wipers
Otherwise, the windshield wipers
Chipped paint can lead to rust
forming on your Mazda. Before this
will operate automatically which
could catch your fingers or damage
happens, repair the damage by using
Mazda touch-up paint according to
the windshield wipers.
When removing ice or snow, or
the instructions in this section.
Failure to repair the affected area
cleaning the windshield, always
make sure the wiper lever is in the
could lead to serious rusting and
expensive repairs.
OFF position.
¾ Do not spray water in the engine
compartment. Otherwise, it could
Follow all label and container
result in engine-starting problems or
directions when using a chemical
damage to electrical parts.
6-44
Maintenance and Care
Appearance Care
¾ When washing and waxing the
Rinse off any dirt or other foreign
vehicle, be careful not to apply
matter using lukewarm or cold water
excessive force to any single area of
before washing.
the vehicle roof or the antenna.
Use plenty of lukewarm or cold
Otherwise, you could dent the
water and a soft cloth when washing
vehicle or damage the antenna.
the vehicle. Do not use a nylon cloth.
¾ Make sure that the fuel-filler lid is
Rub gently when washing or drying
closed and lock the doors.
the vehicle.
Otherwise, the fuel-filler lid may be
Take your vehicle only to a car wash
forcefully opened by water pressure
that keeps its brushes well
causing damage to the vehicle or
maintained.
fuel-filler lid.
Do not use abrasive cleansers or wax
that contain abrasives.
To help protect the finish from rust and
deterioration, wash your Mazda
thoroughly and frequently, at least
CAUTION
once a month, with lukewarm or cold
¾ Do not use steel wool, abrasive
water.
cleaners, or strong detergents
containing highly alkaline or caustic
If the vehicle is washed improperly, the
agents on chrome-plated or
paint surface could be scratched. Here
anodized aluminum parts. This may
are some examples of how scratching
damage the protective coating; also,
could occur.
cleaners and detergents may discolor
or deteriorate the paint.
Scratches occur on the paint surface
when:
Pay special attention to removing salt,
dirt, mud, and other foreign material
The vehicle is washed without first
from the underside of the fenders, and
rinsing off dirt and other foreign
make sure the drain holes in the lower
matter.
edges of the doors and rocker panels
The vehicle is washed with a rough,
are clean.
dry, or dirty cloth.
The vehicle is washed at a car wash
Insects, tar, tree sap, bird droppings,
that uses brushes that are dirty or too
industrial fallout, and similar deposits
stiff.
can damage the finish if not removed
Cleansers or wax containing
immediately. When prompt washing
abrasives are used.
with plain water is ineffective, use a
mild soap made for use on vehicles.
NOTE
Mazda is not responsible for
Thoroughly rinse off all soap with
scratches caused by automatic car
lukewarm or cold water. Do not allow
washes or improper washing.
soap to dry on the finish.
Scratches are more noticeable on
vehicles with darker paint finishes.
After washing the vehicle, dry it with a
clean chamois to prevent water spots
To minimize scratches on the vehicle's
from forming.
paint finish:
6-45
Maintenance and Care
Appearance Care
body, wax the metal trim to maintain
WARNING
its luster.
Dry off brakes that have become wet
1. Use wax which contains no
by driving slowly, releasing the
abrasives.
accelerator pedal and lightly applying
Wax containing abrasives will
the brakes several times until the
remove paints and could damage
brake performance returns to normal:
bright metal parts.
Driving with wet brakes is dangerous.
2. Use a good grade of natural wax for
Increased stopping distance or the
metallic, mica, and solid colors.
vehicle pulling to one side when
3. When waxing, coat evenly with the
braking could result in a serious
sponge supplied or a soft cloth.
accident. Light braking will indicate
4. Wipe off the wax with a soft cloth.
whether the brakes have been
affected.
NOTE
A spot remover to remove oil, tar, and
When using an automatic car wash
similar materials will usually also take
Retract the door mirrors.
off the wax. Rewax these areas even if
The automatic car wash brushes
the rest of the vehicle does not need it.
could reduce the paint luster or
▼ Repairing Damage to the Finish
hasten paint deterioration.
Deep scratches or chips on the finish
When using a high water pressure car
should be repaired promptly. Exposed
wash
metal quickly rusts and can lead to
High water temperature and high
major repairs.
water pressure car washers are
available depending on the type of car
CAUTION
wash machine. If the car washer nozzle
If your Mazda is damaged and needs
is put too close to the vehicle, the
metal parts repaired or replaced, make
force of the spray could damage or
sure the body shop applies
deform the molding, affect the
anti-corrosion materials to all parts,
sealability of parts, and allow water to
both repaired and new. This will
penetrate the interior. Keep a sufficient
prevent them from rusting.
space (30 cm (12 in) or more)
between the nozzle and the vehicle. In
addition, do not spend too much time
spraying the same area of the vehicle,
and be very careful when spraying
between gaps in doors and around
windows.
Waxing
Your vehicle needs to be waxed when
water no longer beads on the finish.
Always wash and dry the vehicle before
waxing it. In addition to the vehicle
6-46
Maintenance and Care
Appearance Care
▼ Bright-Metal Maintenance
▼ Underbody Maintenance
Use tar remover to remove road tar
Road chemicals and salt used for ice
and insects. Never do this with a
and snow removal and solvents used
knife or similar tool.
for dust control may collect on the
To prevent corrosion on bright-metal
underbody. If not removed, they will
surfaces, apply wax or chrome
speed up rusting and deterioration of
preservative and rub it to a high
such underbody parts as fuel lines,
luster.
frame, floor pan, and exhaust system,
During cold weather or in coastal
even though these parts may be coated
areas, cover bright-metal parts with a
with anti-corrosive material.
coating of wax or preservative
heavier than usual. It would also help
Thoroughly flush the underbody and
to coat them with noncorrosive
wheel housings with lukewarm or cold
petroleum jelly or some other
water at the end of each winter. Try
protective compound.
also to do this every month.
Pay special attention to these areas
CAUTION
because they easily hide mud and dirt.
Do not use steel wool, abrasive
It will do more harm than good to wet
cleaners, or strong detergents
down the road grime without
containing highly alkaline or caustic
removing it.
agents on chrome-plated or anodized
aluminum parts. This may result in
The lower edges of doors, rocker
damage to the protective coating and
panels, and frame members have drain
cause discoloration or paint
holes that should not be clogged.
deterioration.
Water trapped there will cause rusting.
WARNING
Dry off brakes that have become wet
by driving slowly, releasing the
accelerator pedal and lightly applying
the brakes several times until the
brake performance returns to normal:
Driving with wet brakes is dangerous.
Increased stopping distance or the
vehicle pulling to one side when
braking could result in a serious
accident. Light braking will indicate
whether the brakes have been
affected.
6-47
Maintenance and Care
Appearance Care
▼ Aluminum Wheel Maintenance
▼ Plastic Part Maintenance
A protective coating is provided over
When cleaning the plastic lenses of
the aluminum wheels. Special care is
the lights, do not use gasoline,
needed to protect this coating.
kerosene, rectified spirit, paint,
thinner, highly acidic detergents, or
CAUTION
strongly alkaline detergents.
Otherwise, these chemical agents
Do not use any detergent other than
can discolor or damage the surfaces
mild detergent. Before using any
resulting in a significant loss in
detergent, verify the ingredients.
functionality. If plastic parts become
Otherwise, the product could discolor
inadvertently exposed to any of these
or stain the aluminum wheels.
chemical agents, flush with water
immediately.
NOTE
If plastic parts such as the bumpers
Do not use a wire brush or any
become inadvertently exposed to
abrasive cleaner, polishing
chemical agents or fluids such as
compound, or solvent on aluminum
gasoline, oil, engine coolant, or
wheels. They may damage the
battery fluid, it could cause
coating.
discoloration, staining, or paint
Always use a sponge or soft cloth to
peeling. Wipe off any such chemical
clean the wheels.
agents or fluids using a soft cloth
Rinse the wheels thoroughly with
immediately.
lukewarm or cold water. Also, be
High water temperature and high
sure to clean the wheels after driving
water pressure car washers are
on dusty or salted roads to help
available depending on the type of
prevent corrosion.
high pressure car washer device. If
Avoid washing your vehicle in an
the car washer nozzle is put too
automatic car wash that uses
close to the vehicle or aimed at one
high-speed or hard brushes.
area for an extended period of time,
(20-inch wheel vehicle)
it could deform plastic parts or
If your aluminum wheels lose luster,
damage the paint.
apply wax which contains no
Do not use wax containing
polishing powder.
compounds (polish). Otherwise, it
could result in paint damage.
In addition, do not use an electrical
or air tool to apply wax. Otherwise,
the frictional heat generated could
result in deformation of plastic parts
or paint damage.
6-48
Maintenance and Care
Appearance Care
▼ Seat Belt Maintenance
Interior Care
1. Clean the soiled area by lightly
▼ Interior Care
dabbing it with a soft cloth soaked
in a mild detergent (approx. 5%)
WARNING
diluted with water.
2. Wipe off the remaining detergent
using a cloth soaked in clean water
Do not spray water into the vehicle
and wrung out well.
cabin:
3. Before retracting seat belts which
Spraying water into the vehicle cabin is
have been pulled out for cleaning,
dangerous as electrical devices such as
dry them off thoroughly and make
the audio and switches could get wet
sure there is no remaining moisture
resulting in a malfunction or vehicle
on them.
fire.
WARNING
NOTE
Do not wipe the interior using
If a seat belt appears frayed or has
alcohol, chlorine bleach, or organic
abrasions, have it replaced by an
solvents such as thinner, benzene,
Authorized Mazda Dealer:
and gasoline. Otherwise, it may
If a seat belt is used under such a
cause discoloration or stains.
condition, it cannot function at its full
Rubbing hard with a stiff brush or
capacity which could result in serious
cloth may cause damage.
injury or death.
If the vehicle interior becomes soiled
Use a mild detergent to remove
by any of the following, wipe it off
soiling from a seat belt:
immediately using a soft cloth.
If organic solvents are used for cleaning
Leaving it uncleaned could cause
the seat belts or they become stained
discoloration, stains, cracks, or peeling
or bleached, there is the possibility of
of the coating, and it will make it hard
them becoming weakened and as a
to wipe off later.
result, they may not function at their
Beverage or fragrance
full capacity which could cause serious
Grease or oil
injury or death.
Soiling
NOTE
Clean seat belts diligently if they get
dirty. Leaving them uncleaned will
make it difficult to clean them later,
and it may affect the smooth retracting
of the seat belt.
6-49
Maintenance and Care
Appearance Care
▼ Vinyl Upholstery Maintenance
If the leather upholstery comes into
contact with any of the following,
Remove dust and dirt from the vinyl
clean it immediately.
upholstery using a brush or vacuum.
Leaving it uncleaned could cause
Remove soiling from vinyl upholstery
premature wear, mold, or stains.
using a leather and vinyl upholstery
cleaner.
Sand or dirt
Grease or oil, such as hand cream
▼ Upholstery Maintenance
Alcohol, such as in cosmetic or
hair dressing items
1.
Clean the soiled area by lightly
If the leather upholstery gets wet,
dabbing it with a soft cloth soaked
promptly remove moisture with a dry
in a mild detergent (approx. 5%)
cloth. Remaining moisture on the
diluted with water.
surface may cause deterioration such
2.
Wipe off the remaining detergent
as hardening and shrinkage.
using a cloth soaked in clean water
Exposure to direct sunlight for long
and wrung out well.
periods may cause deterioration and
▼ Leather Upholstery Maintenance*
shrinkage. When parking the car
under direct sunlight for long
1.
Remove dust and sand using a
periods, shade the interior using
vacuum cleaner.
sunshades.
2.
Wipe off the soiled area with a soft
Do not leave vinyl products on the
cloth and a suitable, special cleaner
leather upholstery for long periods.
or a soft cloth soaked in a mild
They may affect the leather quality
detergent (about 5%) diluted with
and coloring. If the cabin
water.
temperature becomes hot, the vinyl
3.
Wipe off the remaining detergent
may deteriorate and adhere to the
using a cloth soaked in clean water
genuine leather.
and wrung out well.
4.
Remove moisture with a dry, soft
▼ Plastic Part Maintenance
cloth and allow the leather to
further dry in a well-ventilated,
CAUTION
shaded area. If the leather gets wet
such as from rain, remove the
Do not use polishing agents.
moisture and dry it as soon as
Depending on the product ingredients,
possible.
they could cause discoloration, stains,
cracks or peeling of the coating.
NOTE
Because genuine leather is a natural
material, its surface is not uniform
and it may have natural scars,
scratches, and wrinkles.
To maintain the quality for as long as
possible, periodical maintenance,
about twice a year, is recommended.
6-50
*Some models.
Maintenance and Care
Appearance Care
▼ Instrument Panel Top (Soft pad)
▼ Active Driving Display
Maintenance
Maintenance*
Extremely soft material is used for the
The dust-proof sheet has a coating.
soft pad surface. If the soft pad surface
When cleaning, do not use a hard or
is rubbed harshly with a dry cloth, it
rough-surface cloth, or cleaning
could result in the surface being
detergent. In addition, if a chemical
damaged and leaving white scratch
solvent gets on the active driving
marks.
display, wipe it off immediately. The
1.
Wipe the soiled area with a soft
dust-proof sheet could be damaged
cloth soaked in a mild detergent
and the surface coating could be
(approx. 5%) diluted with water.
scratched. Use a fine, soft cloth such as
2.
Wipe off the remaining detergent
those used for cleaning eyeglasses.
using a cloth soaked in clean water
NOTE
and wrung out well.
Use of compressed air when cleaning
the dust-proof sheet is recommended.
▼ Panel Maintenance
If a panel becomes soiled, wipe it off
with a soft cloth soaked in clean water
and thoroughly wrung out.
If some areas require further cleaning,
use the following procedure:
1. Wipe the soiled area with a soft
cloth soaked in a mild detergent
(approx. 5 %) diluted with water.
2. Wipe off the remaining detergent
using a cloth soaked in clean water
and wrung out well.
NOTE
Be particularly careful when cleaning
shiny surface panels and metallic parts
such as plating as they can be
scratched easily.
*Some models.
6-51
Maintenance and Care
Appearance Care
▼ Cleaning the Window Interiors
▼ Cleaning the Floor Mats
If the windows become covered with
Rubber floor mats should be cleaned
an oily, greasy, or waxy film, clean
with mild soap and water only.
them with glass cleaner. Follow the
directions on the container.
WARNING
CAUTION
Do not use rubber cleaners, such as
tire cleaner or tire shine, when
¾ Do not scrape or scratch the inside
cleaning rubber floor mats:
of the window glass. It could
Cleaning the rubber floor mats with
damage the thermal filaments and
rubber cleaning products makes the
the antenna lines.
floor mats slippery.
¾ When washing the inside of the
This may cause an accident when
window glass, use a soft cloth
depressing the accelerator or brake
dampened in lukewarm water, gently
pedal or when getting in or out of the
wiping the thermal filaments and the
vehicle.
antenna lines.
Use of glass cleaning products could
After removing the floor mats for
damage the thermal filaments and
cleaning, always reinstall them securely
the antenna lines.
(page 3-49).
6-52
If Trouble Arises
7
Helpful information on what to do if a problem arises with the
vehicle.
Parking in an Emergency
7-2
Warning/Indicator Lights and
Parking in an Emergency
7-2
Warning Sounds
7-20
If a Warning Light Turns On or
Flashes
7-20
Flat Tire
7-3
Message Indicated on Multi-
Spare Tire and Tool Storage
information Display
7-32
. . . . . . . . . . . 7-3
Warning Sound is
Changing a Flat Tire
7-5
Activated
7-36
Battery Runs Out
7-11
When Liftgate Cannot be
Jump-Starting
7-11
Opened
7-41
When Liftgate Cannot be
Emergency Starting
7-14
Opened
7-41
Starting a Flooded Engine
7-14
Push-Starting
7-14
Active Driving Display Does Not
Operate
7-42
Overheating
7-15
If the Active Driving Display Does
Overheating
7-15
Not Operate*
7-42
Emergency Towing
7-17
Windshield Wipers Operate at High
Towing Description
7-17
Speed
7-43
Tiedown Hooks*
7-18
Windshield Wipers Operate at
High Speed
7-43
*Some models.
7-1
If Trouble Arises
Parking in an Emergency
Parking in an Emergency
▼ Parking in an Emergency
The hazard warning lights should
always be used when you stop on or
near a roadway in an emergency.
The hazard warning lights warn other
drivers that your vehicle is a traffic
hazard and that they must take
extreme caution when near it.
Depress the hazard warning flasher
and all the turn signals will flash. The
hazard warning indicator lights in the
instrument cluster flash simultaneously.
NOTE
The turn signals do not work when
the hazard warning lights are on.
Check local regulations about the
use of hazard warning lights while
the vehicle is being towed to verify
that it is not in violation of the law.
7-2
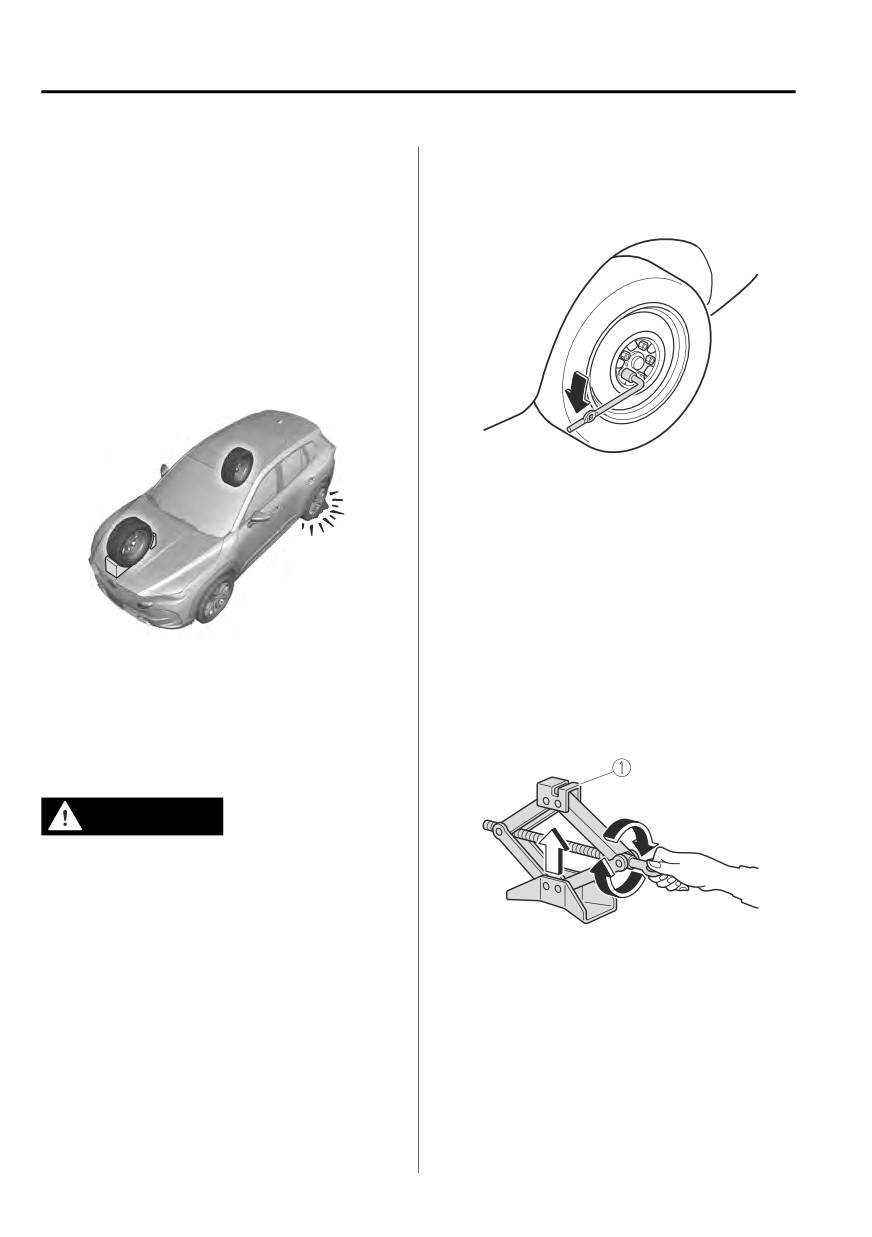
If Trouble Arises
Flat Tire
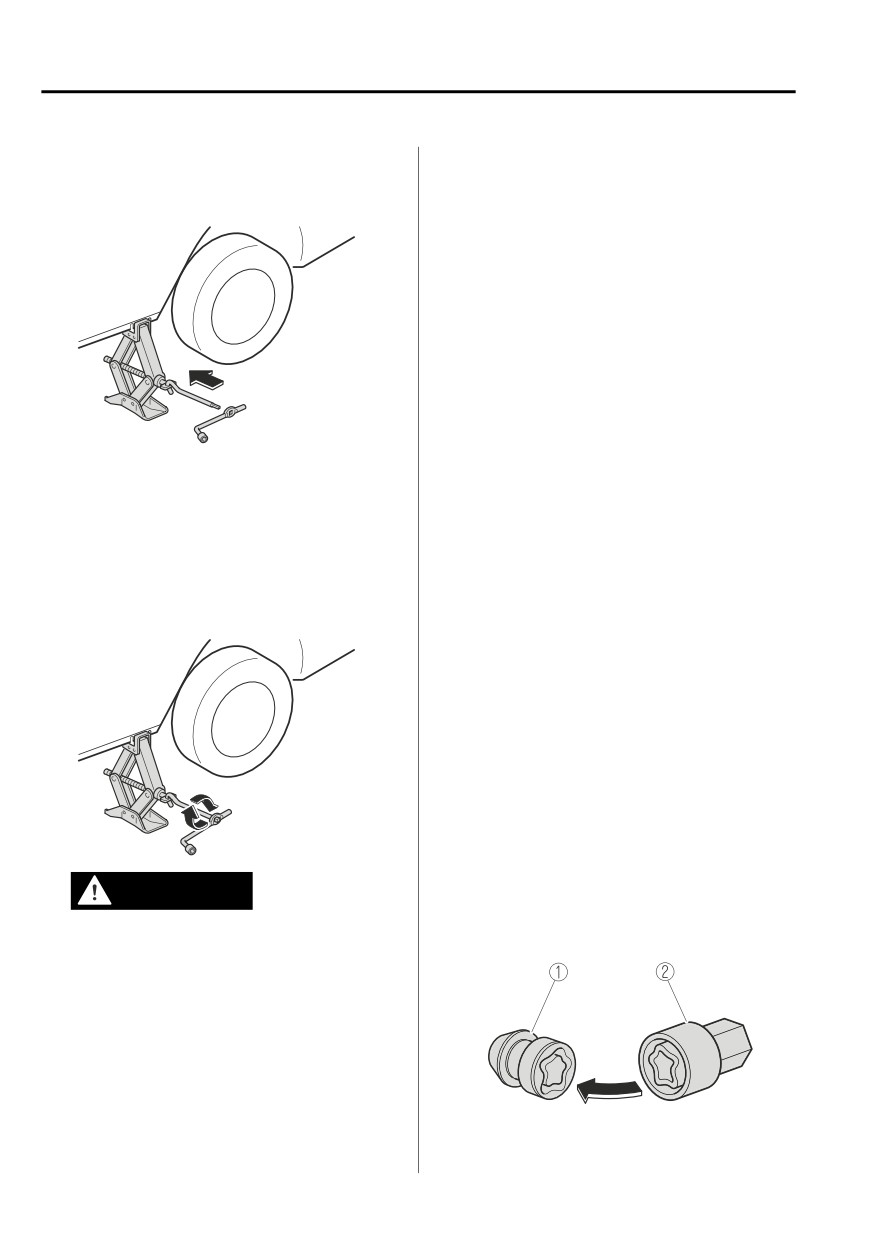
2. Remove the jack.
Spare Tire and Tool
Storage
▼ Spare Tire and Tool Storage
Spare tire and tools are stored in the
locations illustrated in the diagram.
To secure the jack
Perform the removal procedure in
reverse.
Maintenance
Always keep the jack clean.
1. Tiedown eyelet*
Make sure the moving parts are kept
2. Spare tire hold-down bolt
free from dirt or rust.
3. Jack lever
Make sure the screw thread is
4. Lug wrench
adequately lubricated.
5. Jack
6. Spare tire
▼ Spare Tire
▼ Jack
Your Mazda has a temporary spare tire.
The temporary spare tire is lighter and
To remove the jack
smaller than a conventional tire, and is
1. Remove the luggage mat.
designed only for emergency use and
should be used only for VERY short
periods. Temporary spare tires should
NEVER be used for long drives or
extended periods.
WARNING
Do not install the temporary spare tire
on the front wheels (driving wheels):
Driving with the temporary spare tire
on one of the front driving wheels is
dangerous. Handling will be affected.
You could lose control of the vehicle,
especially on ice or snow bound roads,
and have an accident. Move a regular
tire to the front wheel and install the
temporary spare tire to the rear.
*Some models.
7-3
If Trouble Arises
Flat Tire
Uncouple the sub-woofer
CAUTION
connector.
¾ When using the temporary spare tire,
driving stability may decrease
compared to when using only the
conventional tire. Drive carefully.
¾ To avoid damage to the temporary
spare tire or to the vehicle, observe
the following precautions:
¾ Do not exceed 80 km/h (50 mph).
¾ Avoid driving over obstacles. Also,
do not drive through an automatic
car wash. This tire's diameter is
smaller than a conventional tire, so
the ground clearance is reduced.
NOTE
¾ Do not use a tire chain on this tire
Extra strength may be required to
because it will not fit properly.
uncouple the connector. Be sure to
¾ Do not use your temporary spare
squeeze the tab firmly.
tire on any other vehicle, it has
3.
(Vehicles with sub-woofer)
been designed only for your
Turn the spare tire hold-down bolt
Mazda.
counterclockwise and remove the
¾ Use only one temporary spare tire
sub-woofer and the spare tire.
on your vehicle at the same time.
To remove the spare tire
1. Remove the luggage mat.
(Vehicles without sub-woofer)
2.
(Vehicles with sub-woofer)
7-4
If Trouble Arises
Flat Tire
Turn the spare tire hold-down bolt
Changing a Flat Tire
counterclockwise and remove the
spare tire.
▼ Changing a Flat Tire
NOTE
If the following occurs while driving, it
could indicate a flat tire.
Steering becomes difficult.
The vehicle begins to vibrate
excessively.
The vehicle pulls in one direction.
If you have a flat tire, drive slowly to a
level spot that is well off the road and
1. Spare tire hold-down bolt
out of the way of traffic to change the
tire.
NOTE
Stopping in traffic or on the shoulder
If the spare tire hold-down bolt
of a busy road is dangerous.
cannot be loosened, hold the edge
of the tire and turn it
WARNING
counterclockwise until the spare
tire hold-down bolt rotates.
Be sure to follow the directions for
changing a tire:
To secure the spare tire
Changing a tire is dangerous if not
Store the spare tire in the reverse order
done properly. The vehicle can slip off
of removal. After storing, verify that the
the jack and seriously injure someone.
spare tire is stored securely.
No person should place any portion of
their body under a vehicle that is
supported by a jack.
Never allow anyone inside a vehicle
supported by a jack:
Allowing someone to remain in a
vehicle supported by a jack is
dangerous. The occupant could cause
the vehicle to fall resulting in serious
injury.
NOTE
Make sure the jack is well lubricated
before using it.
1. Park on a hard, level surface off the
right-of-way and firmly set the
parking brake.
7-5
If Trouble Arises
Flat Tire
2. Shift into Park (P) and turn off the
but do not remove any lug nuts
engine.
until the tire has been raised off the
3. Turn on the hazard warning flasher.
ground.
4. Have passengers get out of the
vehicle and away from the vehicle
and traffic.
5. Remove any luggage, the jack,
tools, and spare tire (page 7-3).
6. Block the wheel diagonally
opposite the flat tire. When
blocking a wheel, place a tire block
both in front and behind the tire.
NOTE
If your Mazda is equipped with the
optional antitheft wheel lug nuts, a
special key must be used to unlock
the locking lug nut for each wheel.
For details, refer to the Locking Lug
Nuts on page 7-8.
2.
Place the jack on the ground.
3.
Turn the jack screw in the direction
NOTE
shown in the figure and adjust the
When blocking a tire, use rocks or
jack head so that it is close to the
wood blocks of sufficient size if
jack-up position.
possible to hold the tire in place.
▼ Removing a Flat Tire
WARNING
When jacking-up a vehicle, always
shift the selector lever to P position,
apply the parking brake, and place
wheel blocks in the position
1. Jack head
diagonally opposed to the jack:
Changing a flat tire without using
4.
Place the jack under the jack-up
wheel blocks is dangerous because the
position closest to the tire being
vehicle may move and fall off the jack
even with the selector lever is in P
position, which could result in an
accident.
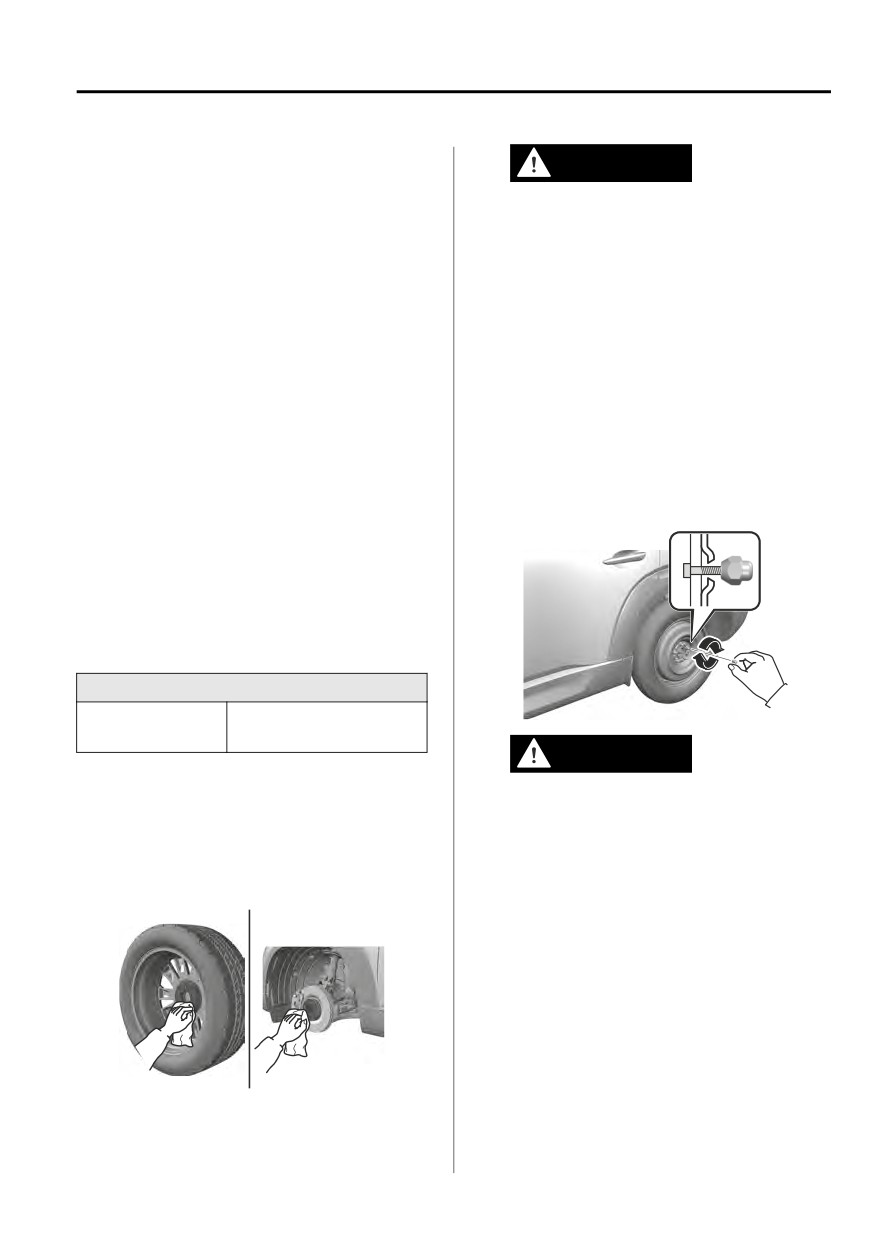
1. Loosen the lug nuts by turning them
counterclockwise one turn each,
7-6
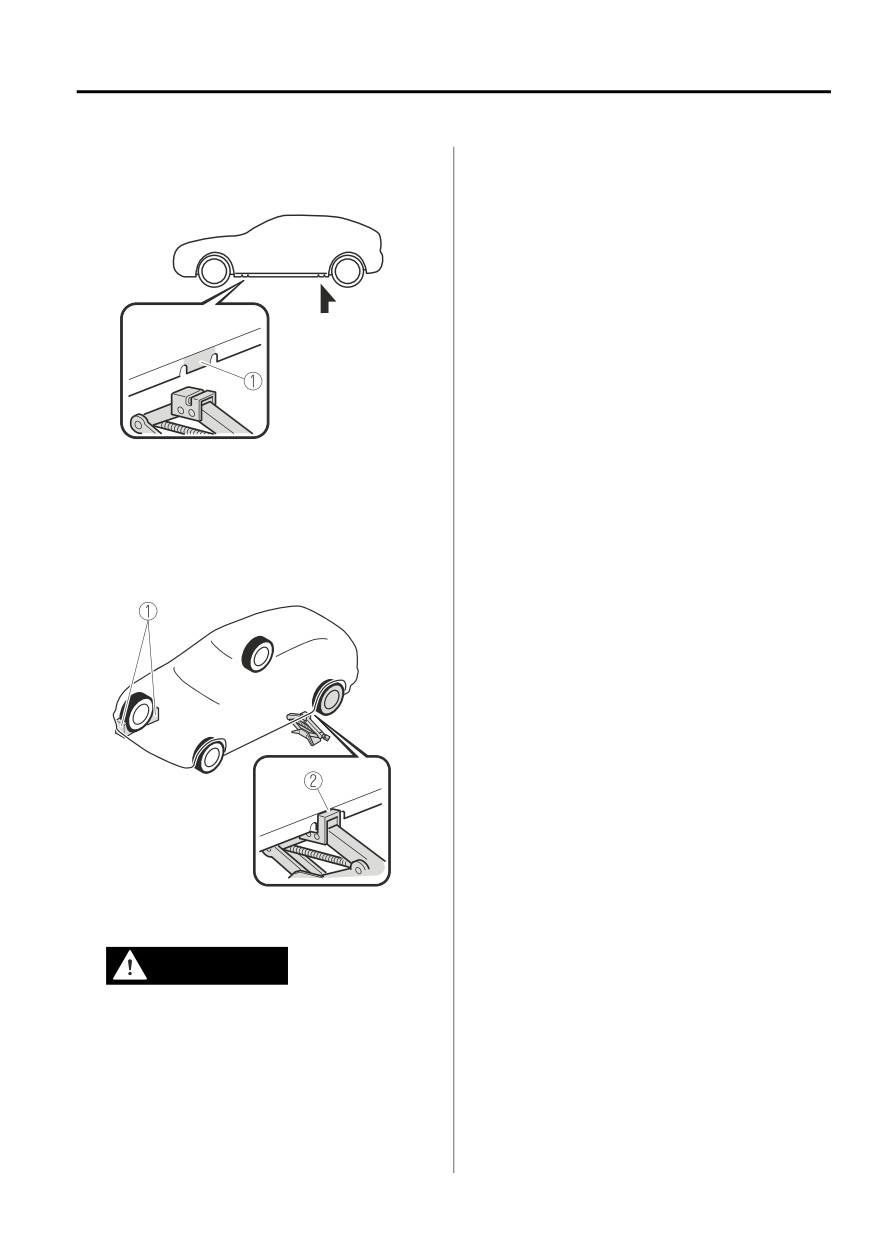
If Trouble Arises
Flat Tire
changed with the jack head
Attempting to jack the vehicle in
squarely under the jack-up point.
positions other than those
recommended in this manual is
dangerous. The vehicle could slip
off the jack and seriously injure or
even kill someone. Use only the
front and rear jacking positions
recommended in this manual.
Do not jack up the vehicle in a
position other than the designated
jack-up position or place any
objects on or under the jack:
Jacking up the vehicle in a position
1. Jacking position
other than the designated jack-up
position or placing objects on or
5.
Continue raising the jack head
under the jack is dangerous as it
gradually by rotating the screw with
could deform the vehicle body or
your hand until the jack head is
the vehicle could fall off the jack
inserted into the jack-up position.
resulting in an accident.
Use only the jack provided with
your Mazda:
Using a jack that is not designed for
your Mazda is dangerous. The
vehicle could slip off the jack and
seriously injure someone.
Never place objects under the
jack:
Jacking the vehicle with an object
under the jack is dangerous. The
jack could slip and someone could
be seriously injured by the jack or
1. Tire blocks
the falling vehicle.
2. Jacking position
NOTE
WARNING
When raising the jack head into the
jacking position and aligning the
Use only the front and rear jacking
groove in the jack head with the rail
positions recommended in this
under the vehicle body, the top of
manual:
the jack head contacts the vehicle's
underbody without the rail
contacting the bottom of the
groove.
7-7
If Trouble Arises
Flat Tire
6.
Insert the jack lever and attach the
Starting the engine or shaking the
lug wrench to tire jack.
vehicle while it is jacked up is
dangerous as it could cause the
vehicle to fall off the jack resulting
in an accident.
Never go under the vehicle while it
is jacked up:
Going under the vehicle while it is
jacked up is dangerous as it could
result in death or serious injury if
the vehicle were to fall off the jack.
8. Remove the lug nuts by turning
them counterclockwise; then
7.
Turn the jack handle clockwise and
remove the wheel and center cap.
raise the vehicle high enough so
that the spare tire can be installed.
▼ Locking Lug Nuts
Before removing the lug nuts, make
If your Mazda is equipped with the
sure your Mazda is firmly in
optional antitheft wheel lug nuts, a
position and that it cannot slip or
special key must be used to unlock the
move.
locking lug nut for each wheel. The key
is stored in the glove compartment,
center console storage, storage box, or
trunk. Register the key and lug nuts
with the lock manufacturer by filling
out the registration card and mailing it
in using the accompanying envelope. If
the key is lost, consult an Authorized
Mazda Dealer or use the lock
manufacturer’s order form to order a
new key.
Antitheft wheel lug nuts cannot be
installed on a steel wheel spare tire.
When installing a temporary spare tire,
WARNING
use one of the original lug nuts in place
of the locking lug nut. The original lug
Do not jack up the vehicle higher
nuts are stored inside your Mazda.
than is necessary:
Jacking up the vehicle higher than is
necessary is dangerous as it could
destabilize the vehicle resulting in
an accident.
Do not start the engine or shake
the vehicle while it is jacked up:
1. Antitheft lug nut
2. Special key
7-8
If Trouble Arises
Flat Tire
To remove an antitheft lug nut
WARNING
1. Obtain the special key for the
antitheft lug nut.
Make sure the mounting surfaces
2. Place the special key on top of the
of the wheel, hub and lug nuts are
antitheft lug nut, and be sure to
clean before changing or replacing
hold the key square to it. If you
tires:
hold the key at an angle, you may
When changing or replacing a tire,
damage both key and nut. Do not
not removing dirt and grime from
use a power impact wrench.
the mounting surfaces of the wheel,
3. Place the lug wrench on top of the
hub and hub bolts is dangerous.
key and apply pressure. Turn the
The lug nuts could loosen while
wrench counterclockwise.
driving and cause the tire to come
off, resulting in an accident.
To install the antitheft lug nut
2.
Mount the spare tire.
1. Place the special key on top of the
3.
Install the lug nuts with the beveled
nut, and be sure to hold the key
edge inward; tighten them by hand.
square to it. If you hold the key at
an angle, you may damage both key
and nut. Do not use a power
impact wrench.
2. Place the lug wrench on top of the
special key, apply pressure, and
turn it clockwise.
Nut tightening torque
108―147 (12―14,
N·m (kgf·m, ft·lbf)
80―108)
WARNING
▼ Mounting the Spare Tire
Do not apply oil or grease to lug
1. Remove dirt and grime from the
nuts and bolts and do not tighten
mounting surfaces of the wheel and
the lug nuts beyond the
hub, including the hub bolts, with a
recommended tightening torque:
cloth.
Applying oil or grease to lug nuts
and bolts is dangerous. The lug nuts
could loosen while driving and
cause the tire to come off, resulting
in an accident. In addition, lug nuts
and bolts could be damaged if
tightened more than necessary.
4.
Turn the jack handle
counterclockwise using the lug
wrench and lower the vehicle.
7-9
If Trouble Arises
Flat Tire
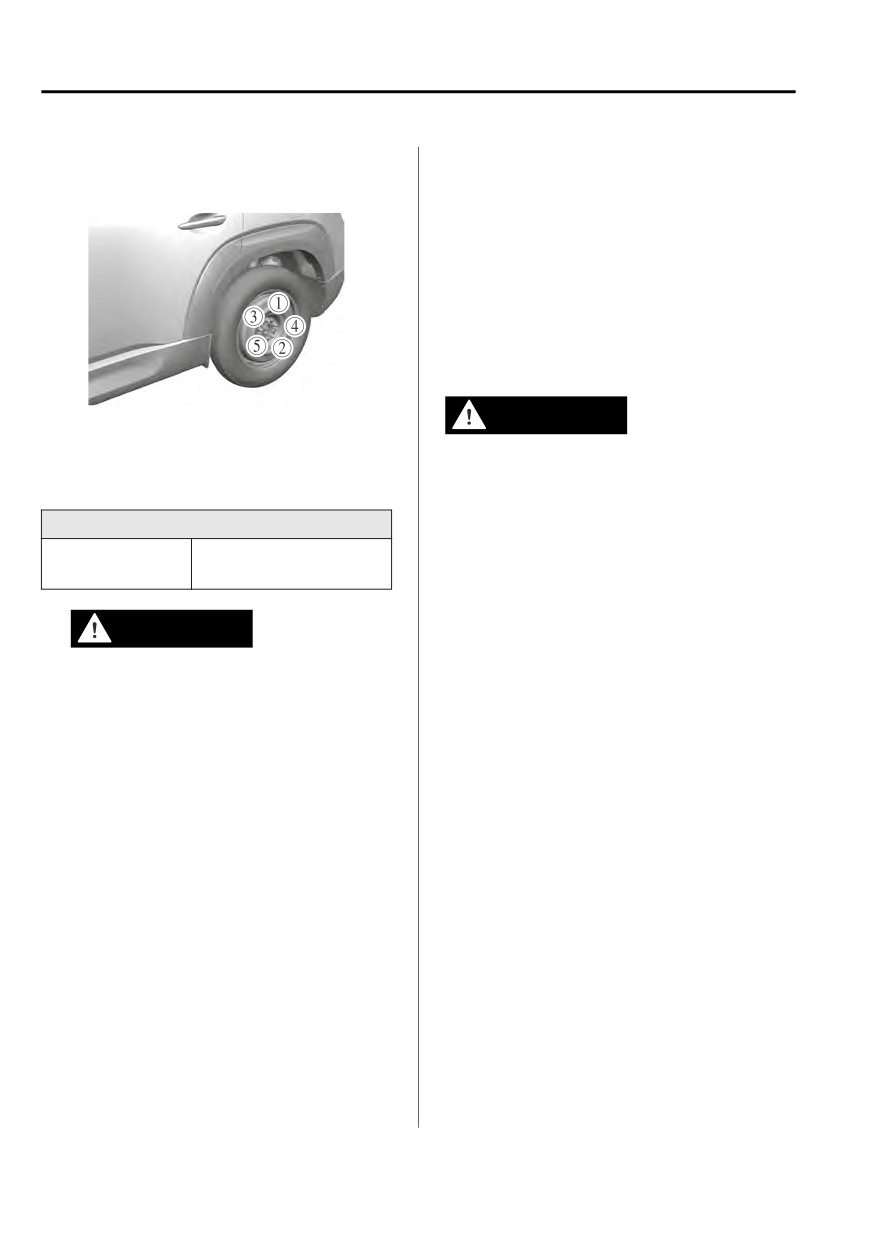
5. Use the lug wrench to tighten the
6. Remove the center cap by tapping
nuts in the order shown.
it from the backside of the wheel
using the lug wrench.
7. Store the damaged and/or flat tire
in the rear cargo area.
8. Remove the tire blocks and store
the tools and jack.
9. Check the inflation pressure. Refer
to Tires on page 9-7.
10.Have the flat tire repaired or
replaced as soon as possible.
If you are unsure of how tight the
WARNING
nuts should be, have them
inspected at an Authorized Mazda
Do not drive with any tires that have
Dealer.
incorrect air pressure:
Driving on tires with incorrect air
Nut tightening torque
pressure is dangerous. Tires with
108―147 (12―14,
incorrect pressure could affect
N·m (kgf·m, ft·lbf)
80―108)
handling and result in an accident.
When you check the regular tires' air
pressure, check the spare tire, too.
WARNING
NOTE
Always securely and correctly
To prevent the jack and tool from
tighten the lug nuts:
rattling, store them properly.
Improperly or loosely tightened lug
nuts are dangerous. The wheel
could wobble or come off. This
could result in loss of vehicle
control and cause a serious
accident.
Be sure to reinstall the same nuts
you removed or replace them with
metric nuts of the same
configuration:
Because the wheel studs and lug
nuts on your Mazda have metric
threads, using a non-metric nut is
dangerous. On a metric stud, it
would not secure the wheel and
would damage the stud, which
could cause the wheel to slip off
and cause an accident.
7-10
If Trouble Arises
Battery Runs Out
Jump-Starting
▼ Jump-Starting
Jump-starting is dangerous if done incorrectly. So follow the procedure carefully. If
you feel unsure about jump-starting, we strongly recommend that you have a
competent service technician do the work.
WARNING
Follow These Precautions Carefully:
To ensure safe and correct handling of the battery, read the following precautions
carefully before using the battery or inspecting it.
Keep flames and sparks away from open battery cells and do not allow
metal tools to contact the positive (+) or negative (-) terminal of the battery when
working near a battery. Do not allow the positive (+) terminal to contact the
vehicle body:
Flames and sparks near open battery cells are dangerous. Hydrogen gas, produced
during normal battery operation, could ignite and cause the battery to explode. An
exploding battery can cause serious burns and injuries. Keep all flames including
cigarettes and sparks away from open battery cells.
Keep all flames and sparks away from open battery cells because hydrogen
gas is produced from open battery cells while charging the battery or adding
battery fluid:
Flames and sparks near open battery cells are dangerous. Hydrogen gas, produced
during normal battery operation, could ignite and cause the battery to explode. An
exploding battery can cause serious burns and injuries. Keep all flames including
cigarettes and sparks away from open battery cells.
Do not jump-start a frozen battery or one with a low fluid level:
Jump-starting a frozen battery or one with a low fluid level is dangerous. It may
rupture or explode, causing serious injury.
Connect the negative cable to a good ground point away from the battery:
Connecting the end of the second jumper cable to the negative (-) terminal of the
discharged battery is dangerous.
A spark could cause the gas around the battery to explode and injure someone.
7-11
If Trouble Arises
Battery Runs Out
Route the jumper cables away from parts that will be moving:
Connecting a jumper cable near or to moving parts (cooling fans, belts) is
dangerous. The cable could get caught when the engine starts and cause serious
injury.
CAUTION
Use only a 12 V booster system. You can damage a 12 V starter, ignition system, and
other electrical parts beyond repair with a 24 V power supply (two 12 V batteries in
series or a 24 V motor generator set).
1. Move the booster vehicle so that its battery is as close as possible to your
vehicle's battery.
2. Make sure that the power such as for the headlights and air conditioner is turned
off.
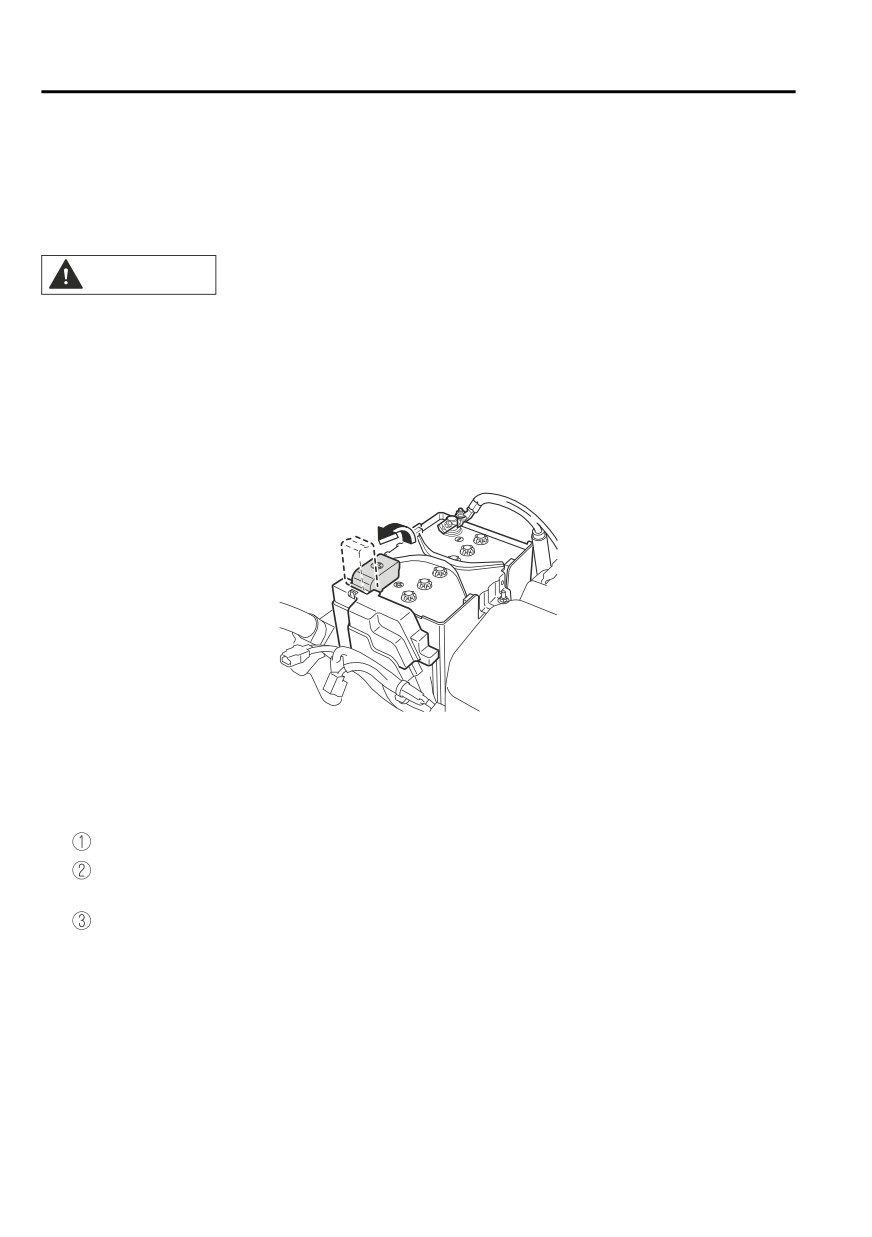
3. Remove the battery cover.
4. Turn off the booster vehicle's engine and connect the jumper cables in the
following order.
Make sure that the jumper cables are securely connected so that they do not
disconnect due to engine vibrations.
1st lead
Positive (+) terminal on the discharged battery
Positive (+) terminal on booster vehicle's battery
2nd lead
Negative (-) terminal on booster vehicle's battery
7-12
If Trouble Arises
Battery Runs Out
Location shown in the figure (do not connect to the negative (-) terminal of
the battery)
5. Start the booster vehicle's engine and rev the engine.
6. Start the engine of your vehicle. Run the engines for about 3 minutes to
temporarily charge the battery of your vehicle.
7. Disconnect the jumper cables in the reverse order of their connection.
8. Install the battery cover.
9. Have your vehicle inspected by an Authorized Mazda Dealer as soon as possible.
7-13
If Trouble Arises
Emergency Starting
Starting a Flooded Engine
Push-Starting
▼ Starting a Flooded Engine
▼ Push-Starting
If the engine fails to start, it may be
Do not push-start your Mazda.
flooded (excessive fuel in the engine).
WARNING
Follow this procedure:
Never tow a vehicle to start it:
1. If the engine does not start within 5
Towing a vehicle to start it is
seconds on the first try, wait 10
dangerous. The vehicle being towed
seconds and try again.
could surge forward when its engine
2. Make sure the parking brake is on.
starts, causing the 2 vehicles to collide.
3. Depress the accelerator all the way
The occupants could be injured.
and hold it there.
4. Depress the brake pedal, then press
NOTE
the push button start. If the engine
You cannot start a vehicle with an
starts, release the accelerator
automatic transmission by pushing it.
immediately because the engine
will suddenly rev up.
5. If the engine fails to start, crank it
without depressing the accelerator.
If the engine still does not start using
the previous procedure, have your
vehicle inspected by an Authorized
Mazda Dealer.
7-14
If Trouble Arises
Overheating
high engine coolant temperature
Overheating
warning indication is displayed:
▼ Overheating
1.
Drive safely to the side of the road
If the engine coolant temperature
and park off the right-of-way.
gauge indicates overheating and the
2.
Shift into park (P).
high engine coolant temperature
3.
Apply the parking brake.
warning indication is displayed, the
4.
Turn off the air conditioner.
vehicle loses power or you hear a loud
5.
Check whether coolant or steam is
knocking or pinging noise, the engine
escaping from the engine
is probably too hot.
compartment.
WARNING
If steam is coming from the engine
compartment:
Do not go near the front of the
vehicle. Stop the engine.
Pull over to a safe location, then
Wait until the steam dissipates,
switch the ignition off and make sure
then open the hood and start the
the fan is not running before
engine.
attempting to work near the cooling
fan:
If neither coolant nor steam is
Working near the cooling fan when it is
escaping:
running is dangerous. The fan could
Open the hood and idle the engine
continue running indefinitely even if
until it cools.
the engine has stopped and the engine
compartment temperature is high. You
CAUTION
could be hit by the fan and seriously
If the cooling fan does not operate
injured.
while the engine is running, the
engine temperature will increase.
Stop the engine and call an
Authorized Mazda Dealer.
Do not remove either
6.
Make sure the cooling fan is
cooling system cap when the engine
operating, then turn off the engine
and radiator are hot:
after the temperature has
When the engine and radiator are hot,
decreased.
scalding coolant and steam may shoot
7.
When cool, check the coolant level.
out under pressure and cause serious
If it is low, look for coolant leaks
injury.
from the radiator and hoses.
Open the hood ONLY after steam is
If you find a leak or other damage, or
no longer escaping from the engine:
if coolant is still leaking:
Steam from an overheated engine is
Stop the engine and call an Authorized
dangerous. The escaping steam could
Mazda Dealer.
seriously burn you.
If the engine coolant temperature
gauge indicates overheating and the
7-15
If Trouble Arises
Overheating
SKYACTIV-G 2.5
CAUTION
If the engine continues to overheat or
frequently overheats, have the cooling
system inspected. The engine could be
seriously damaged unless repairs are
made. Consult an Authorized Mazda
Dealer.
1. Cooling system cap
2. Cooling fan
3. Coolant reservoir
SKYACTIV-G 2.5T
1. Cooling system cap
2. Cooling fan
3. Coolant reservoir
If you find no problems, the engine is
cool, and no leaks are obvious:
Carefully add coolant as required
(page 6-19).
7-16
If Trouble Arises
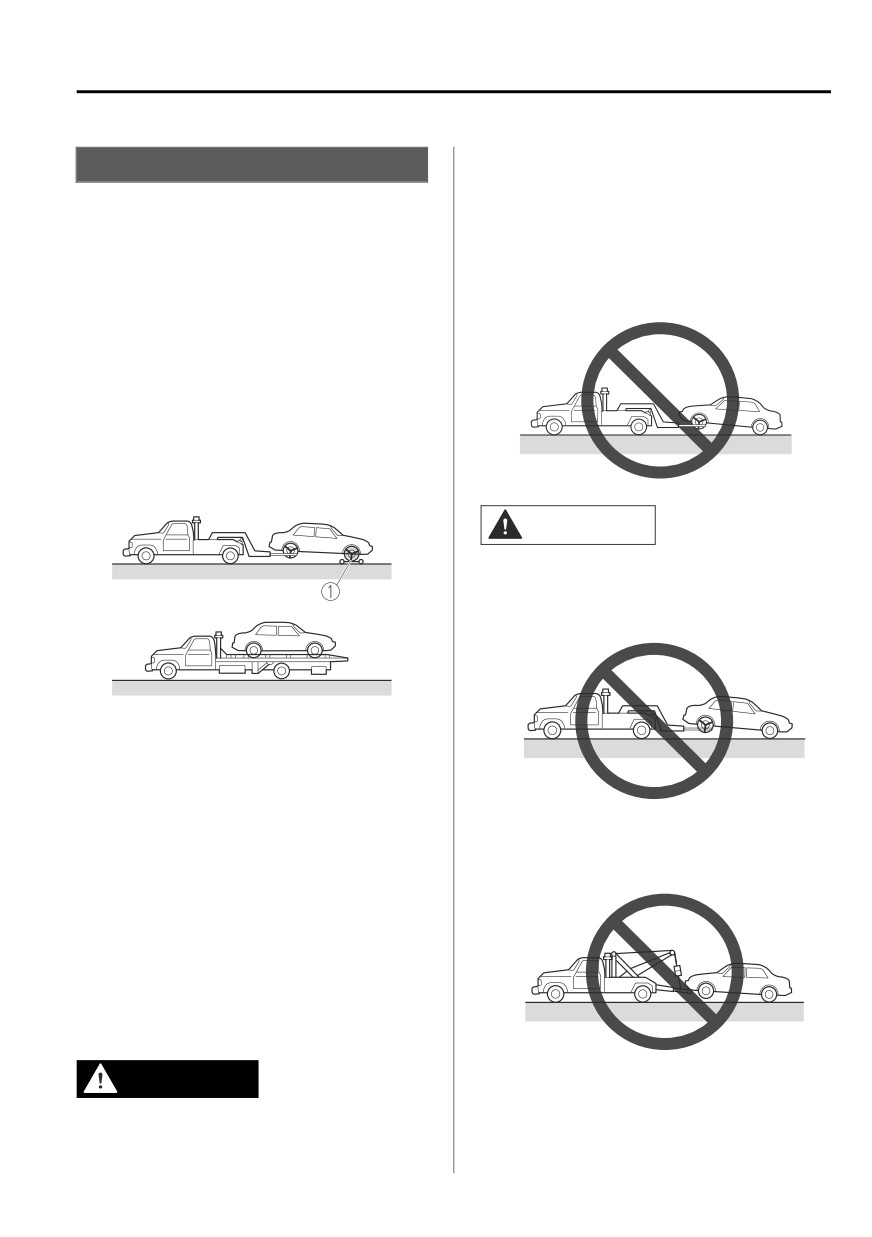
Emergency Towing
Towing an AWD vehicle with either the
Towing Description
front or rear wheels on the ground is
dangerous as the drive train could be
▼ Towing Description
damaged, or the vehicle could trail
We recommend that towing be done
away from the tow truck and cause an
only by an Authorized Mazda Dealer
accident. If the drive train has been
or a commercial tow-truck service.
damaged, transport the vehicle on a
flatbed truck.
Proper lifting and towing are necessary
to prevent damage to the vehicle.
Particularly when towing an AWD
vehicle, where all the wheels are
connected to the drive train, proper
transporting of the vehicle is absolutely
essential to avoid damaging the drive
system. Government and local laws
must be followed.
CAUTION
¾ Do not tow the vehicle pointed
backward with driving wheels on the
ground. This may cause internal
damage to the transmission.
1. Wheel dollies
A towed FWD vehicle should have its
drive wheels (front wheels) off the
ground. If excessive damage or other
¾ Do not tow with sling-type
conditions prevent this, use wheel
dollies.
equipment. This could damage your
vehicle. Use wheel-lift or flatbed
When towing a FWD vehicle with the
equipment.
rear wheels on the ground, release the
parking brake.
Refer to Electric Parking Brake (EPB) on
page 4-66.
A towed AWD vehicle must have all its
wheels off the ground.
WARNING
Always tow an AWD vehicle with all
four wheels off the ground:
7-17
If Trouble Arises
Emergency Towing
¾ If the parking brake cannot be
Tiedown Hooks
released when towing the vehicle,
transport the vehicle with all front
▼ Tiedown Hooks
and rear wheels raised off the ground
as shown in the figure. If the vehicle
is towed without raising the wheels
CAUTION
off the ground, the brake system
Do not use the front and rear tiedown
could be damaged.
eyelets for towing the vehicle.
They have been designed only for
securing the vehicle to a transport
vessel during shipping.
Using the eyelets for any other purpose
could result in the vehicle being
damaged.
1. Remove the tiedown eyelet and the
lug wrench from the luggage
1. Wheel dollies
compartment (page 7-3).
2. Wrap a flathead screwdriver or
similar tool with a soft cloth to
prevent damage to a painted
bumper, and open the cap located
on the front or rear bumper.
Front
7-18
*Some models.
If Trouble Arises
Emergency Towing
Rear
2. Tiedown eyelet
Rear
CAUTION
1. Lug wrench
Do not use excessive force as it may
2. Tiedown eyelet
damage the cap or scratch the
4. Hook the tying rope to the tiedown
painted bumper surface.
eyelet.
NOTE
CAUTION
Remove the cap completely and
If the tiedown eyelet is not securely
store it so as not to lose it.
tightened, it may loosen or
3. Securely install the tiedown eyelet
disengage from the bumper when
using the lug wrench.
tying the vehicle. Make sure that
Front
the tiedown eyelet is securely
tightened to the bumper.
1. Lug wrench
7-19
If Trouble Arises
Warning/Indicator Lights and Warning Sounds
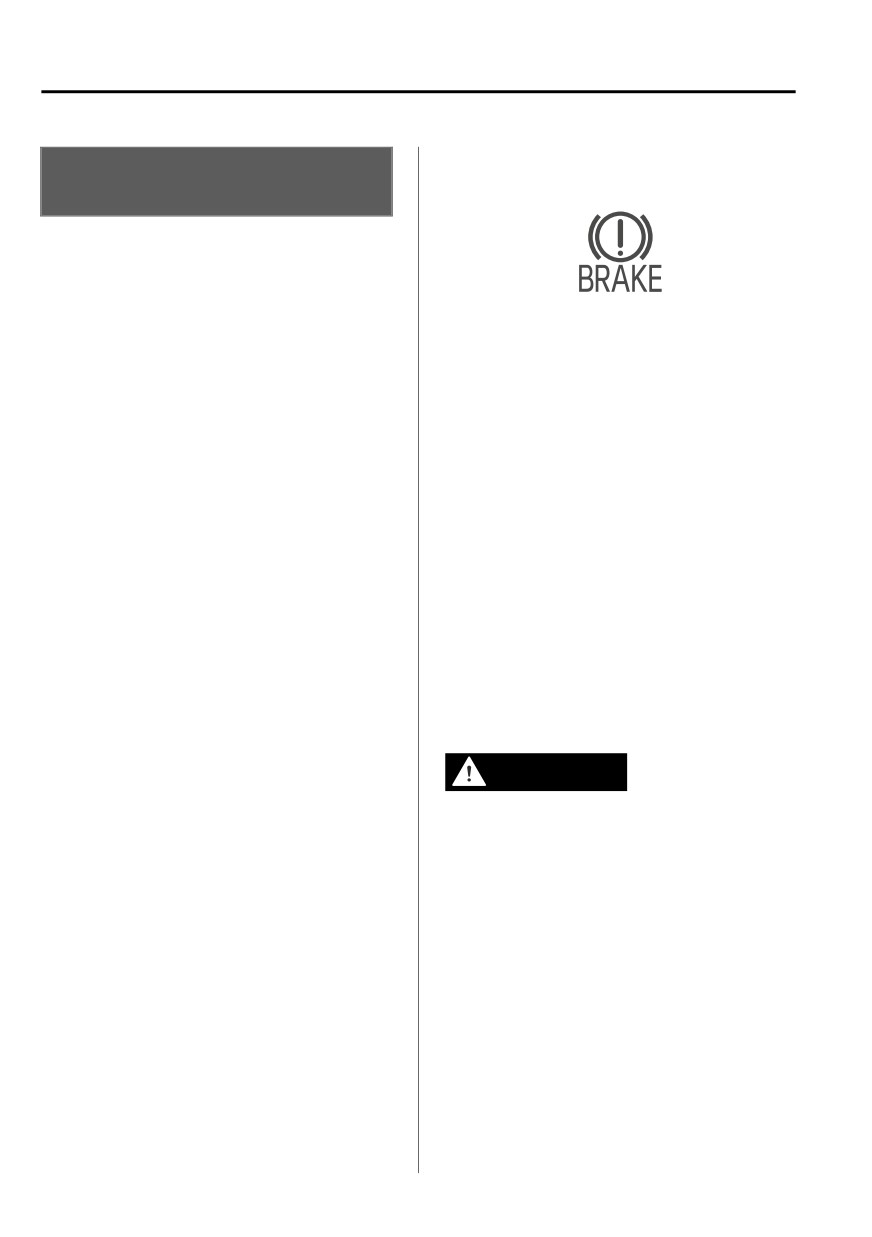
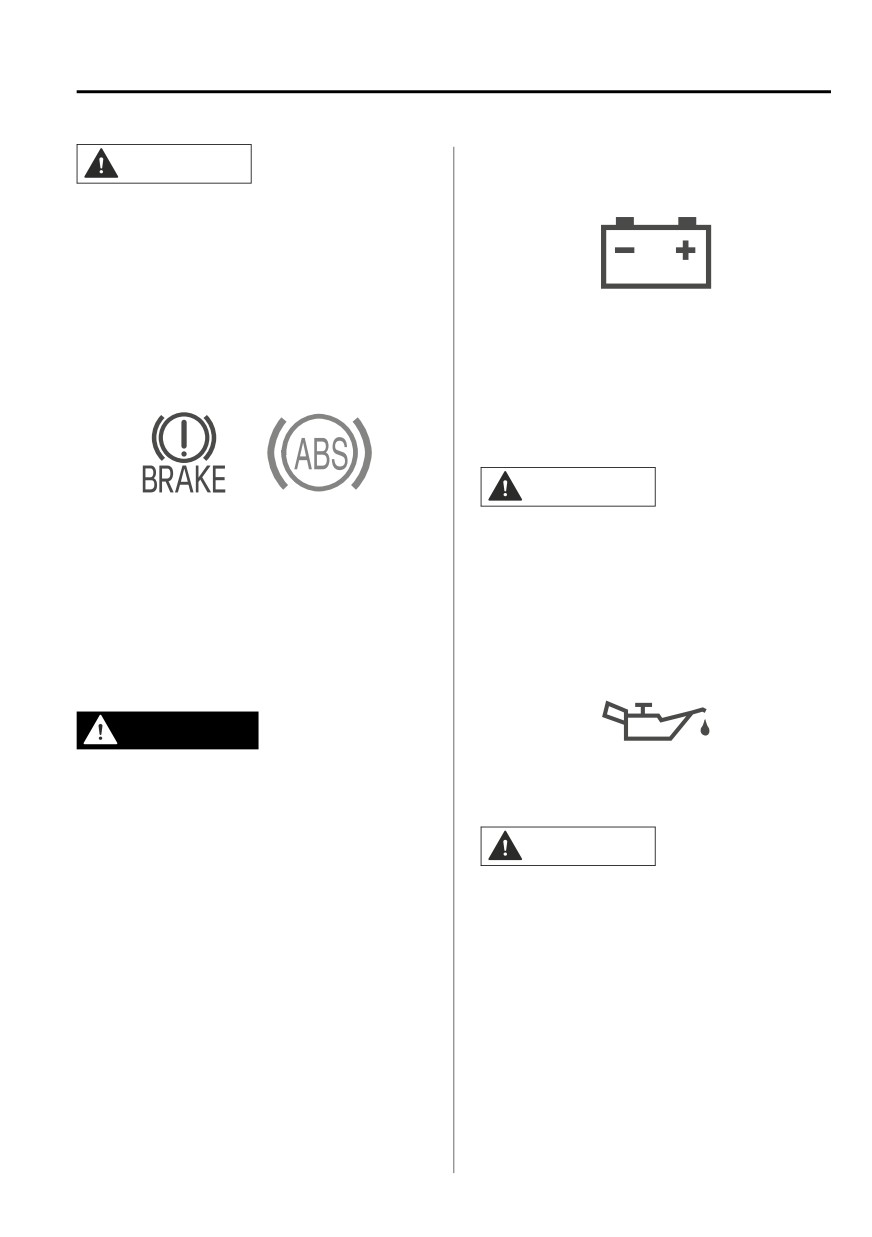
Brake System Warning Indication/
▼
If a Warning Light Turns
Warning Light
On or Flashes
▼ If a Warning Light Turns On or
Flashes
If any warning light turns on/flashes,
take appropriate action for each light.
This warning has the following
There is no problem if the light turns
functions:
off, however if the light does not turn
Warning light inspection
off or turns on/flashes again, consult
an Authorized Mazda Dealer.
For an operation check, make sure that
The details for some warnings can be
the light turns on when the ignition is
viewed on the center display or
switched on, and turns off a few
multi-information display in the
seconds later or when the engine is
instrument cluster.
started.
Center display
When the light turns on
1. Select “Information” on the home
If the brake system warning light
screen.
remains illuminated the brake fluid
2. Select “Vehicle Status Monitor”.
may be low or there could be a
3. Select the applicable warning to
problem with the brake system. Park
view the warning details.
the vehicle in a safe place immediately
and contact an Authorized Mazda
NOTE
Dealer.
You can also display the currently
Refer to Inspecting Brake Fluid Level on
occurring warning by sliding the
page 6-20.
commander knob to the left while on
the home screen of the center display.
WARNING
Multi-information display
Do not drive with the brake system
1. Press the INFO switch on the
warning light illuminated. Contact an
steering switch to display the
Authorized Mazda Dealer to have the
warning indication screen.
brakes inspected as soon as possible:
Refer to Multi-information Display
Driving with the brake system warning
on page 4-19.
light illuminated is dangerous. It
indicates that your brakes may not
work at all or that they could
completely fail at any time. If this light
remains illuminated, after checking
that the parking brake is fully released,
have the brakes inspected
immediately.
7-20
If Trouble Arises
Warning/Indicator Lights and Warning Sounds
▼ Charging System Warning
CAUTION
Indication/Warning Light
¾ In addition, the effectiveness of the
braking may diminish so you may
need to depress the brake pedal
more strongly than normal to stop
the vehicle.
If the warning light illuminates while
driving, it indicates a malfunction of
▼ Electronic Brake Force Distribution
the alternator or of the charging
System Warning
system.
Drive to the side of the road and park
off the right-of-way. Consult an
Authorized Mazda Dealer.
CAUTION
If the electronic brake force
Do not continue driving when the
distribution control unit determines
charging system warning light is
that some components are operating
illuminated because the engine could
incorrectly, the control unit may
stop unexpectedly.
illuminate the brake system warning
light and the ABS warning light
▼ Engine Oil Warning Indication/
simultaneously. The problem is likely to
Warning Light
be the electronic brake force
distribution system.
WARNING
Do not drive with both the brake
This warning light indicates low engine
system warning light and ABS warning
oil pressure.
light illuminated. Have the vehicle
towed to an Authorized Mazda
CAUTION
Dealer to have the brakes inspected as
soon as possible:
Do not run the engine if the oil
Driving when the brake system warning
pressure is low. Otherwise, it could
light and ABS warning light are
result in extensive engine damage.
illuminated simultaneously is
If the light illuminates or the warning
dangerous.
indication is displayed while driving:
When both lights are illuminated, the
1. Drive to the side of the road and
rear wheels could lock more quickly in
park off the right-of-way on level
an emergency stop than under normal
ground.
circumstances.
2. Turn off the engine and wait 5
minutes for the oil to drain back
into the oil pan.
3. Inspect the engine oil level (page
6-18). If it's low, add the
7-21
Большое спасибо!
Ваше мнение очень важно для нас.
Нет комментариевНе стесняйтесь поделиться с нами вашим ценным мнением.
Текст