Mazda CX 7. Manual — part 292

BASIC SYSTEM
07-11–13
07-11
REAR HEAT DUCT REMOVAL/INSTALLATION
id071100800900
1. Disconnect the negative battery cable.
2. Remove the following parts:
(1) Front seat (See 09-13-2 FRONT SEAT REMOVAL/INSTALLATION.)
(2) Car-navigation unit (With car-navigation system) (See 09-20-5 CAR-NAVIGATION UNIT REMOVAL/
INSTALLATION.)
(3) Front scuff plate inner (See 09-17-19 FRONT SCUFF PLATE REMOVAL/INSTALLATION.)
(4) Front side trim (See 09-17-18 FRONT SIDE TRIM REMOVAL/INSTALLATION.)
(5) Console panel (See 09-17-13 CONSOLE REMOVAL/INSTALLATION.)
(6) Console (See 09-17-13 CONSOLE REMOVAL/INSTALLATION.)
3. Turn over the floor covering. (See 09-17-28 FLOOR COVERING REMOVAL/INSTALLATION.)
4. Remove in the order indicated in the table.
.
5. Install in the reverse order of removal.
End Of Sie
WM: A/C COMPRESSOR
A/C COMPRESSOR REMOVAL/INSTALLATION
id071100801000
1. Disconnect the negative battery cable.
2. Discharge the refrigerant from the system. (See 07-10-6 REFRIGERANT RECOVERY.) (See 07-10-2
REFRIGERANT CHARGING.)
3. Remove the splash shield.
4. Loosen the drive belt and remove it.
Caution
• If moisture or foreign material enters the refrigeration cycle, cooling ability will be lowered and
abnormal noise will occur. Always immediately plug open fittings after removing any refrigeration
cycle parts to keep moisture or foreign material out of the cycle.
5. Remove in the order indicated in the table. Do not
allow compressor oil to spill.
.
6. Install in the reverse order of removal.
7. Install the drive belt. (See 01-10-3 DRIVE BELT
REMOVAL/INSTALLATION[L3 WITH TC].)
8. Perform the refrigerant system performance test.
(See 07-10-6 REFRIGERANT SYSTEM
PERFORMANCE TEST.)
1
Rear heat duct (RH)
2
Rear heat duct (LH)
1
2
acxuuw00000706
1
Cooler hose (HI)
(See 07-11-15 REFRIGERANT LINES REMOVAL/
INSTALLATION.)
2
Cooler hose (LO)
(See 07-11-15 REFRIGERANT LINES REMOVAL/
INSTALLATION.)
3
Magnetic clutch connector
4
A/C compressor
(See 07-11-14 A/C Compressor Installation Note.)
N·m {kgf·cm, in·lbf}
R
4
3
1
2
6.86—9.80
{70.0—99.9
60.8—86.7}
6.86—9.80
{70.0—99.9
60.8—86.7}
R
acxuuw00000707
1871-1U-06B(07-11).fm 13 ページ 2006年3月15日 水曜日 午前11時30分

BASIC SYSTEM
07-11–14
A/C Compressor Installation Note
Caution
• Due to the high moisture-absorption characteristics of the compressor oil, it may absorb moisture
if left over a long period of time thereby negatively affecting A/C operation. Drain the compressor
oil and refill within 10 min. of each other.
1. Rotate new A/C compressor shaft six to eight revolutions while collecting refrigerant oil in a clean measuring
device. Use this refrigerant oil to refill new A/C compressor. Do not allow refrigerant oil to become
contaminated.
2. Rotate old A/C compressor shaft six to eight revolutions while collecting refrigerant oil in a separate, clean
measuring device.
3. Compare those oil amounts. The amount of the oil drained from the new A/C compressor should be greater
than the old one.
4. Pour the same amount oil of drained from the old A/C compressor back into the new A/C compressor.
A/C compressor oil type
• ATMOS GU10
A/C compressor oil sealed volume (approx. quantity)
• 120 ml {120 cc, 4.06 fl oz}
End Of Sie
WM: REFRIGERANT LINES
NEW A/C
COMPRESSOR
NEW A/C
COMPRESSOR
OLD A/C
COMPRESSOR
SAME AMOUNT
acxuuw00000708
1871-1U-06B(07-11).fm 14 ページ 2006年3月15日 水曜日 午前11時30分

BASIC SYSTEM
07-11–15
07-11
REFRIGERANT LINES REMOVAL/INSTALLATION
id071100801100
1. Disconnect the negative battery cable.
2. Discharge the refrigerant from the system. (See 07-10-6 REFRIGERANT RECOVERY.) (See 07-10-2
REFRIGERANT CHARGING.)
3. Disconnect the body earth cable installed to No.3 engine mount rubber.
4. Disconnect the insulator. (See 07-11-2 A/C UNIT REMOVAL/INSTALLATION.)
5. Remove in the order indicated in the table. Do not allow compressor oil to spill.
Caution
• If moisture or foreign material enters the refrigeration cycle, cooling ability will be lowered and
abnormal noise will occur. Always immediately plug all open fittings after removing any
refrigeration cycle parts to keep moisture or foreign material out of the cycle.
6. Install in the reverse order of removal.
7. Perform the refrigerant system performance test. (See 07-10-6 REFRIGERANT SYSTEM PERFORMANCE
TEST.)
.
A
B
B
A
R
R
R
R
R
a: 6.86—9.80 N·m {70.0—99.9 kgf·cm, 60.8—86.7 in·lbf}
a
a
R
3
1
2
a
acxuuw00002321
1
Cooler hose (HI)
(See07-11-16 Refrigerant Line Removal Note.)
(See07-11-16 Refrigerant Line Installation Note.)
2
Cooler hose (LO)
(See07-11-16 Refrigerant Line Removal Note.)
(See07-11-16 Refrigerant Line Installation Note.)
3
Cooler pipe
(See07-11-16 Refrigerant Line Removal Note.)
(See07-11-16 Refrigerant Line Installation Note.)
1871-1U-06B(07-11).fm 15 ページ 2006年3月15日 水曜日 午前11時30分
BASIC SYSTEM
07-11–16
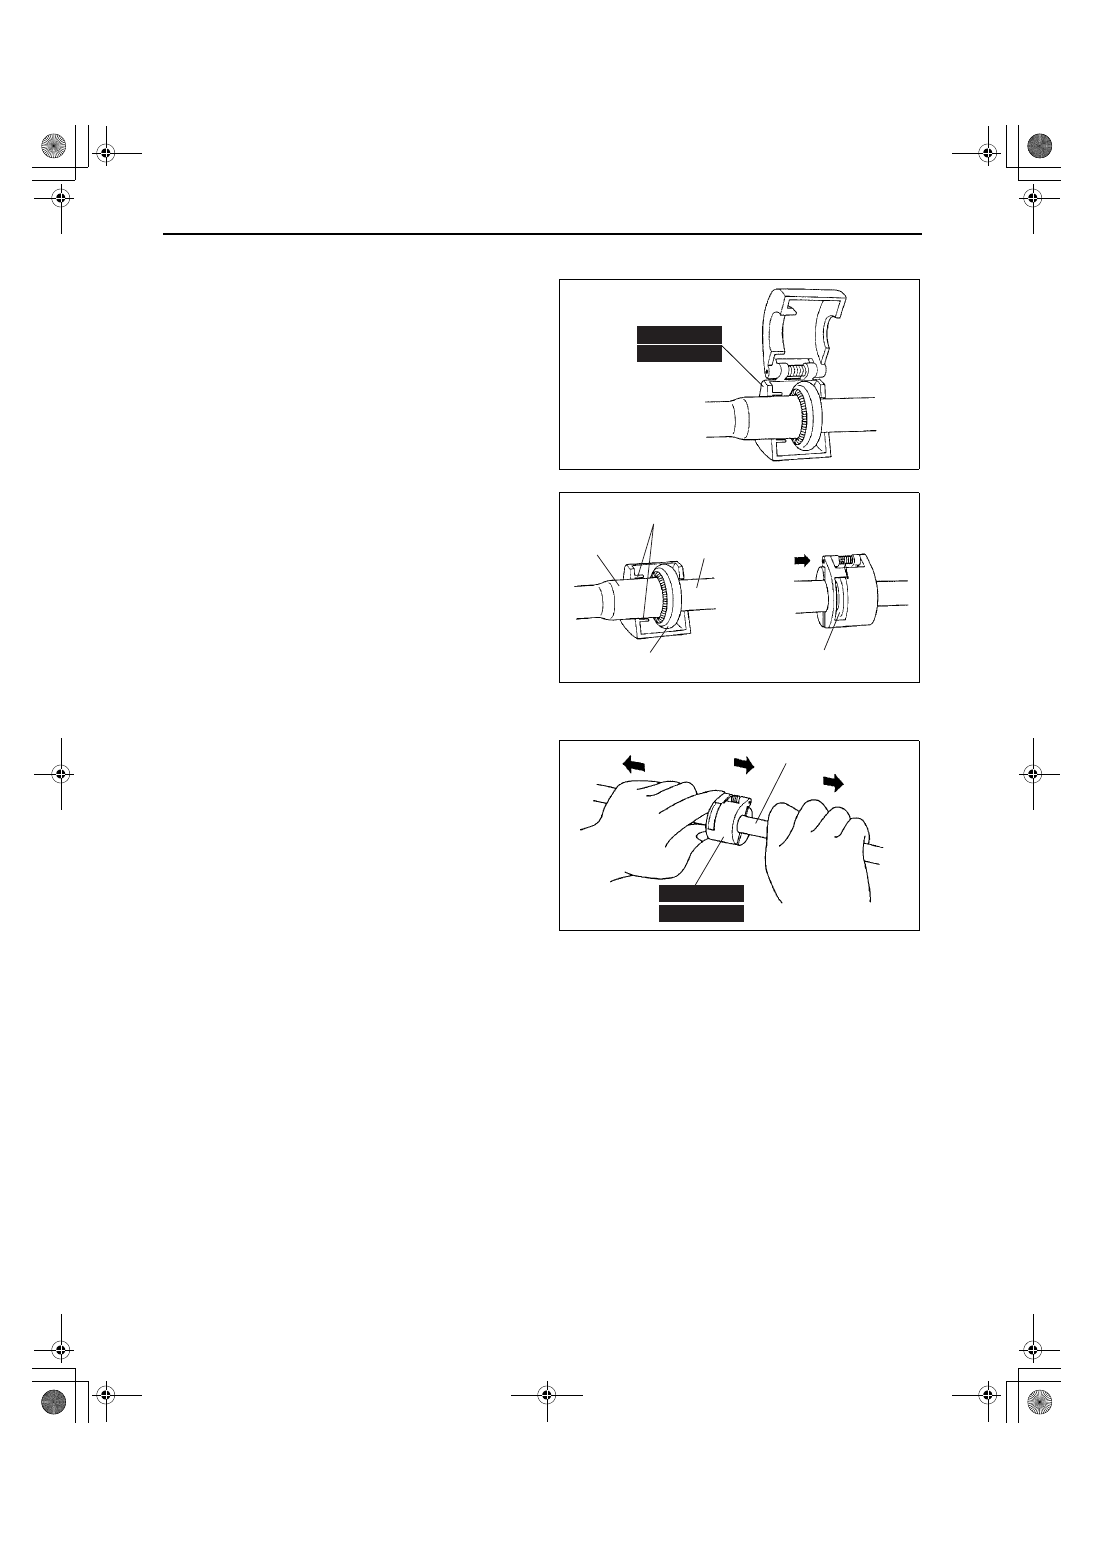
Refrigerant Line Removal Note
Spring-lock coupling type
1. Set the SST.
2. While looking through the inspection hole of the
SST, insert the protruding part of the SST until it
makes contact with the cage section.
3. Use the SST to disconnect the male pipe or hose
from the female by pulling the male pipe or hose.
Note
• The male pipe or hose can be disconnected
easily from the female pipe by pulling from
the male pipe or hose while maintaining the
pressure of the protruding part of the SST.
Refrigerant Line Installation Note
1. When installing a new cooler pipe or cooler hose, add a supplemental amount of ATMOS GU10 compressor oil
into the refrigeration cycle.
Supplemental amount (approx. quantity)
5 ml {5 cc, 0.2 fl oz}: Cooler pipe
10 ml {10 cc, 0.3 fl oz}: Cooler hose
2. Apply compressor oil to the O-rings and connect the joints.
3. Tighten the joints.
49 B061 014
49 G061 001
LOW:
HIGH:
acxuuw00000784
FEMALE
PIPE
PROTRUDING
MALE PIPE
OR HOSE
PRESS
CAGE SECTION
INSPECTION HOLE
acxuuw00000785
MALE PIPE OR HOSE
49 B061 014
49 G061 001
LOW:
HIGH:
acxuuw00000786
1871-1U-06B(07-11).fm 16 ページ 2006年3月15日 水曜日 午前11時30分
Нет комментариевНе стесняйтесь поделиться с нами вашим ценным мнением.
Текст