Mazda CX-9 (2022 year). Manual in english — page 5
Before Driving
Mirrors
2. If the power window lock switch is in
▼ Rearview Mirror
the unlock position, switch it to the
lock position.
WARNING
3. Press and hold the front passenger's
power window switch and rear left/
right power window switches on the
Do not stack cargo or objects higher than
driver's door at the same time for 3
the seatbacks:
seconds or longer.
Cargo stacked higher than the seatbacks is
dangerous. It can block your view in the
NOTE
rearview mirror, which might cause you to
The automatic folding function cannot
hit another car when changing lanes.
be canceled if the procedure is not
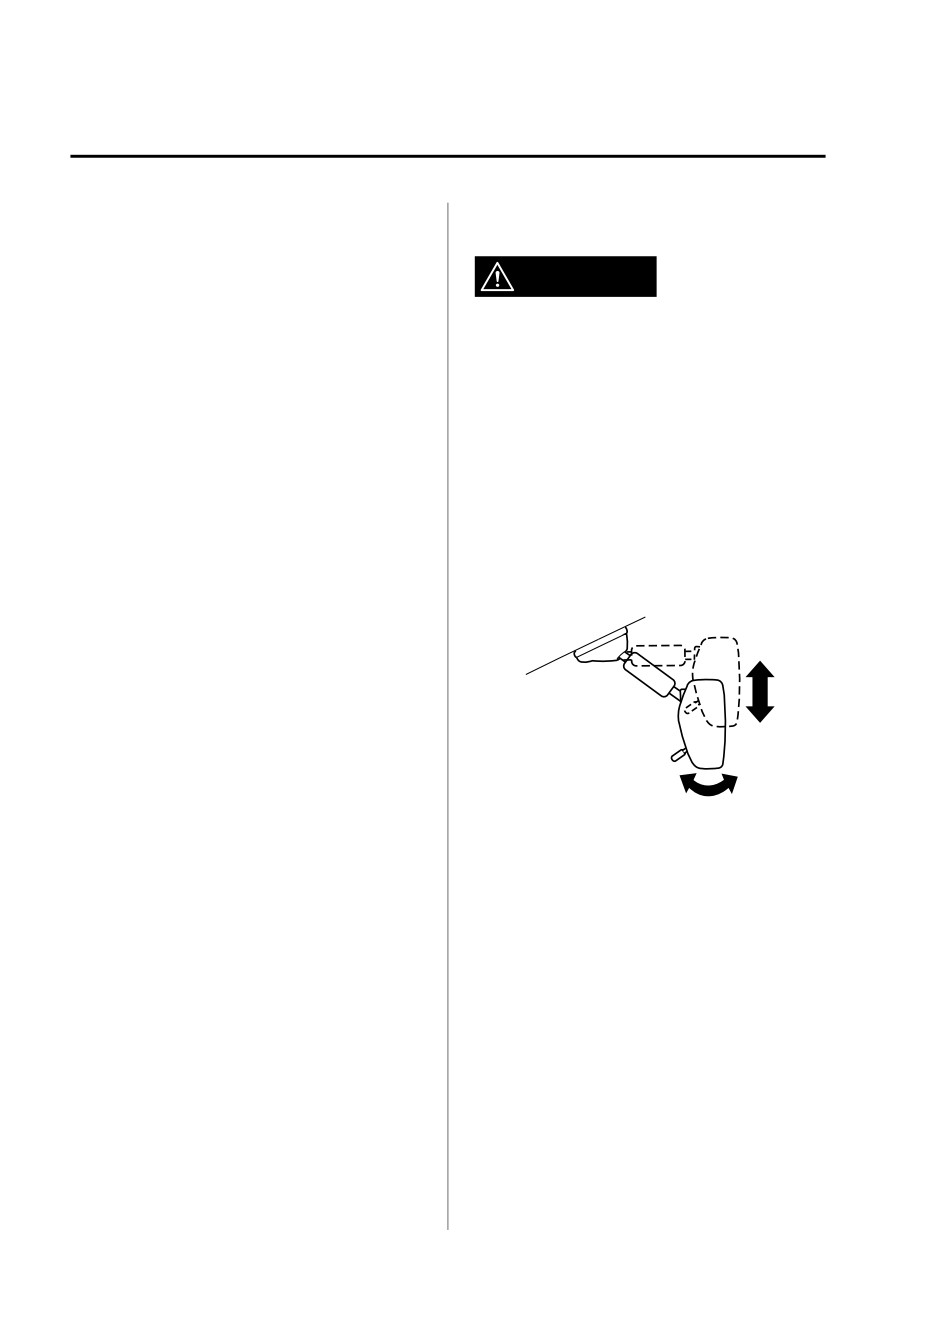
Rearview mirror adjustment
completed within the specified times, or
the procedure is changed along the way.
Before driving, adjust the rearview mirror
To redo the procedure, first switch the
to center on the scene through the rear
ignition off and proceed from the
window.
beginning.
If you are unable to cancel the function
despite doing the cancellation
procedure, consult an Authorized Mazda
Dealer.
Restoring the automatic folding
function
With the automatic folding function in the
NOTE
canceled state, repeat the previous
For the manual day/night mirror, perform
procedure for canceling the function and it
the adjustment with the day/night lever in
will be restored.
the day position.
NOTE
If you are unable to restore the function
despite carrying out the restore procedure,
consult an Authorized Mazda Dealer.
Engine-off outside mirror operation*
The outside mirrors can be operated for
about 40 seconds after the ignition is
switched from ON to off.
3-34
*Some models.
Before Driving
Mirrors
Reducing glare from headlights
(Type B)
Press the ON/OFF button (
) to cancel the
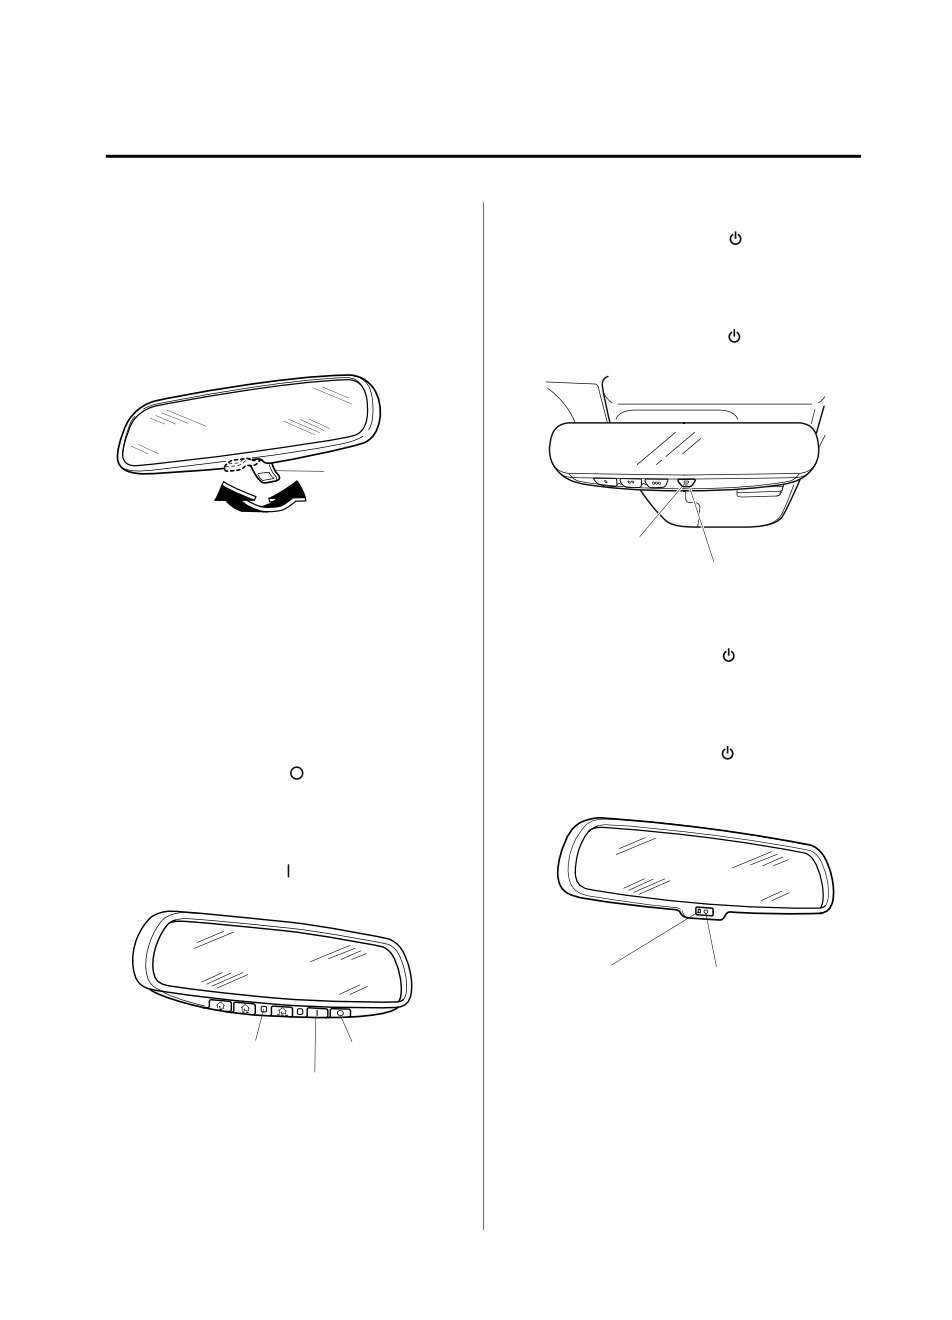
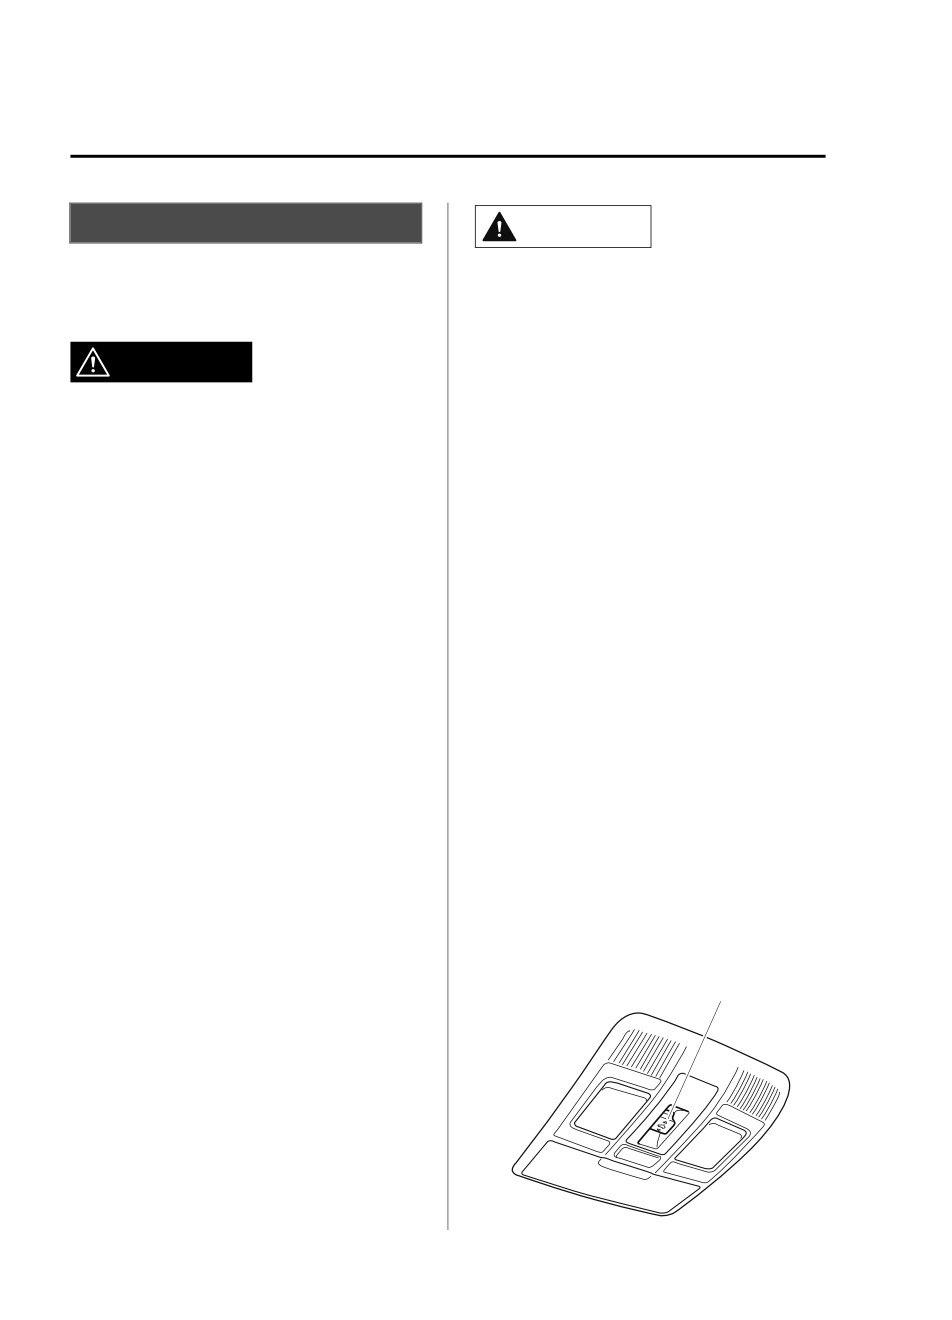
Manual day/night mirror
auto-dimming function. The indicator light
Push the day/night lever forward for day
will turn off.
driving. Pull it back to reduce glare of
To reactivate the auto-dimming function,
headlights from vehicles at the rear.
press the ON/OFF button (
). The
indicator light will illuminate.
Day/Night lever
Night
Day
Auto-dimming mirror
Indicator light
The auto-dimming mirror automatically
ON/OFF button
reduces the glare of headlights from
(Without Homelink wireless control
vehicles at the rear when the ignition is
system)
switched ON.
Press the ON/OFF button to cancel the
auto-dimming function. The indicator light
(With Homelink wireless control
will turn off.
system)
To reactivate the auto-dimming function,
(Type A)
press the ON/OFF button . The indicator
Press the OFF button (
) to cancel the
light will illuminate.
auto-dimming function. The indicator light
will turn off.
To reactivate the auto-dimming function,
press the ON button (
). The indicator
light will illuminate.
Indicator light
ON/OFF button
NOTE
Indicator light
OFF button
Do not use glass cleaner or suspend
objects on or around the light sensor.
ON button
Otherwise, light sensor sensitivity will
be affected and may not operate
normally.
3-35
Before Driving
Mirrors
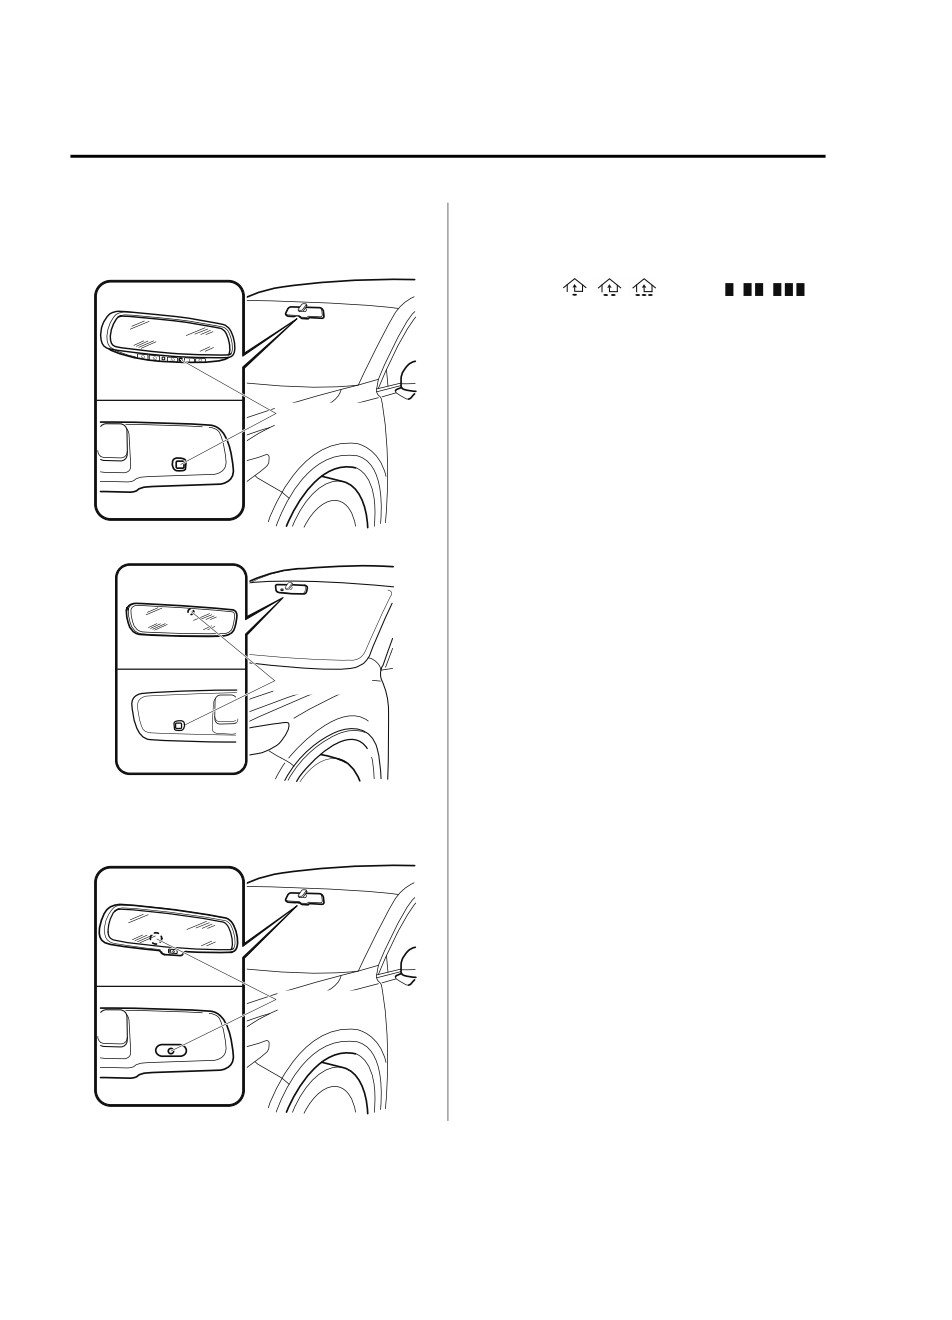
(With Homelink wireless control
(With Homelink wireless control
system)
system)
(Type A)
For information regarding the 3 buttons
(Type A
,
,
/Type B
,
,
)
on the auto-dimming mirror.
Refer to HomeLink Wireless Control
System on page 4-72.
The auto-dimming function is canceled
Light sensor
when the ignition is switched ON and
the shift lever is in reverse (R).
(Type B)
Light sensor
(Without Homelink wireless control
system)
Light sensor
3-36
Before Driving
Windows
Power Windows
The windows can be opened/closed by operating the power window switches.
WARNING
Make sure the opening is clear before closing a window:
Closing a power window is dangerous. A person's hands, head, or even neck could be caught
by the window and result in serious injury or even death. This warning applies especially to
children.
Never allow children to play with power window switches:
Power window switches that are not locked with the power window lock switch would allow
children to operate power windows unintentionally, which could result in serious injury if a
child's hands, head or neck becomes caught by the window.
Make sure nothing blocks the window just before it reaches the fully closed position or while
fully holding up the power window switch:
Blocking the power window just before it reaches the fully closed position or while fully
holding up the power window switch is dangerous.
In this case, the jam-safe function cannot prevent the window from closing all the way. If
fingers are caught, serious injuries could occur.
NOTE
When driving with only 1 of the rear windows open, your ears might experience a
resonating sound. However, this does not indicate a problem. The sound can be reduced by
slightly opening a front window or by changing the size of the rear window opening.
▼ Opening/Closing Windows
The window opens while the switch is pressed and it closes while the switch is pulled up
with the ignition switched ON. Do not open or close 3 or more windows at the same time.
3-37
Before Driving
Windows
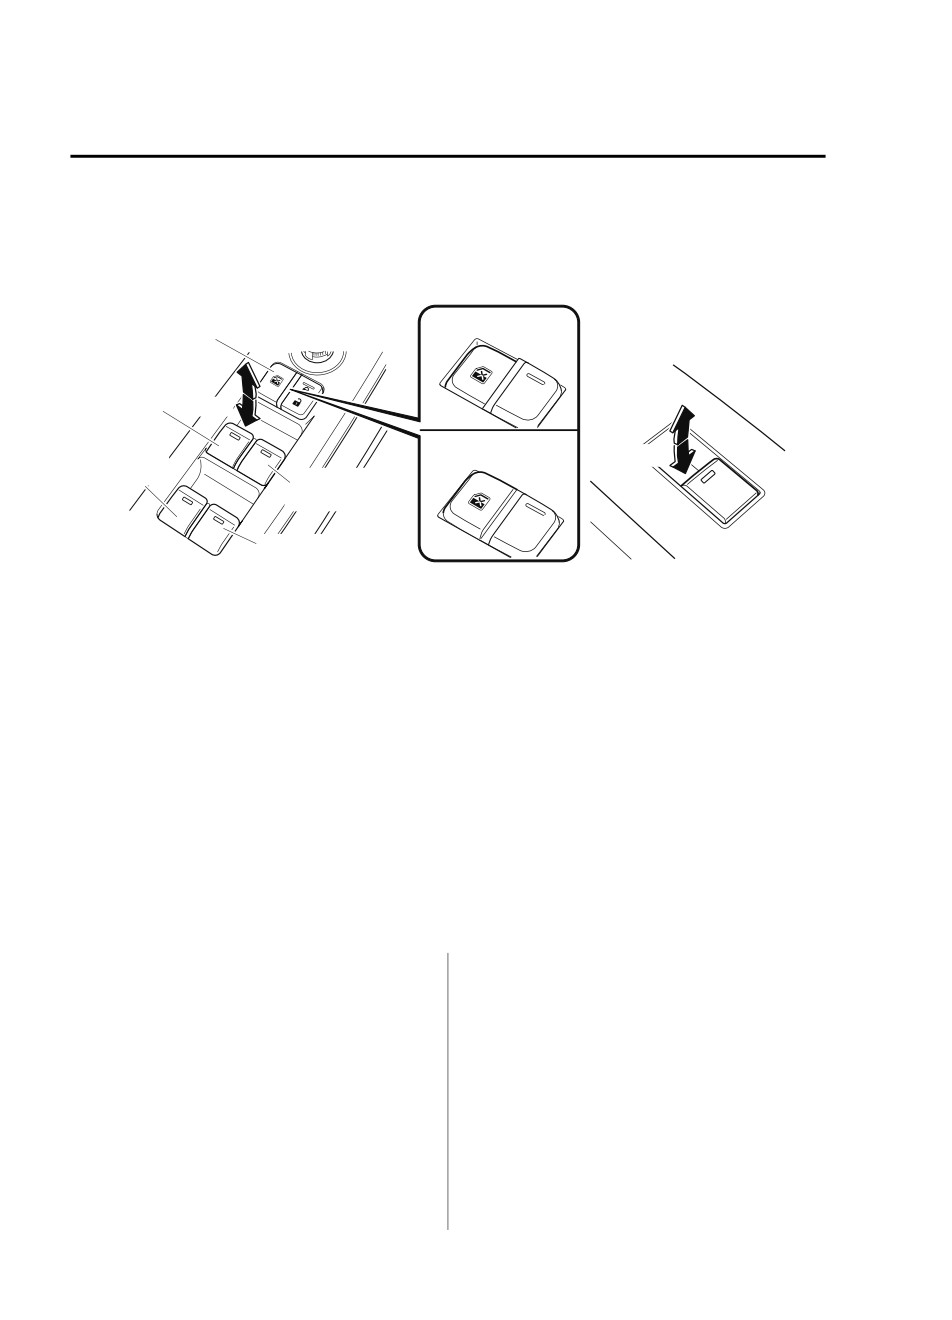
The front passenger's side and rear windows can be opened/closed when the power window
lock switch on the driver's door is in the unlock position. Keep this switch in the locked
position while children are in the vehicle.
Master control switches
Front passenger's
Locked position
Power window
window switch
lock switch
Rear window switches
Close
Driver's
Open
Close
window
Unlocked position
Left rear
Open
window
Front passenger's
window
Right rear window
NOTE
A power window may no longer open/close if you continue to press the switch after fully
opening/closing the power window. If the power window does not open/close, wait a
moment and then operate the switch again.
The passenger windows may be opened or closed using the master control switches on the
driver's door.
The power window can be operated for about 40 seconds after the ignition is switched
from ON to ACC or off with all doors closed. If any door is opened, the power window
will stop operating.
For engine-off operation of the power window, the switch must be held up firmly
throughout window closure because the auto-closing function will be inoperable.
When the power window lock switch is in the locked position, the light on each power
window switch, except for the driver's power window switch, turns off. The light may be
difficult to see depending on the surrounding brightness.
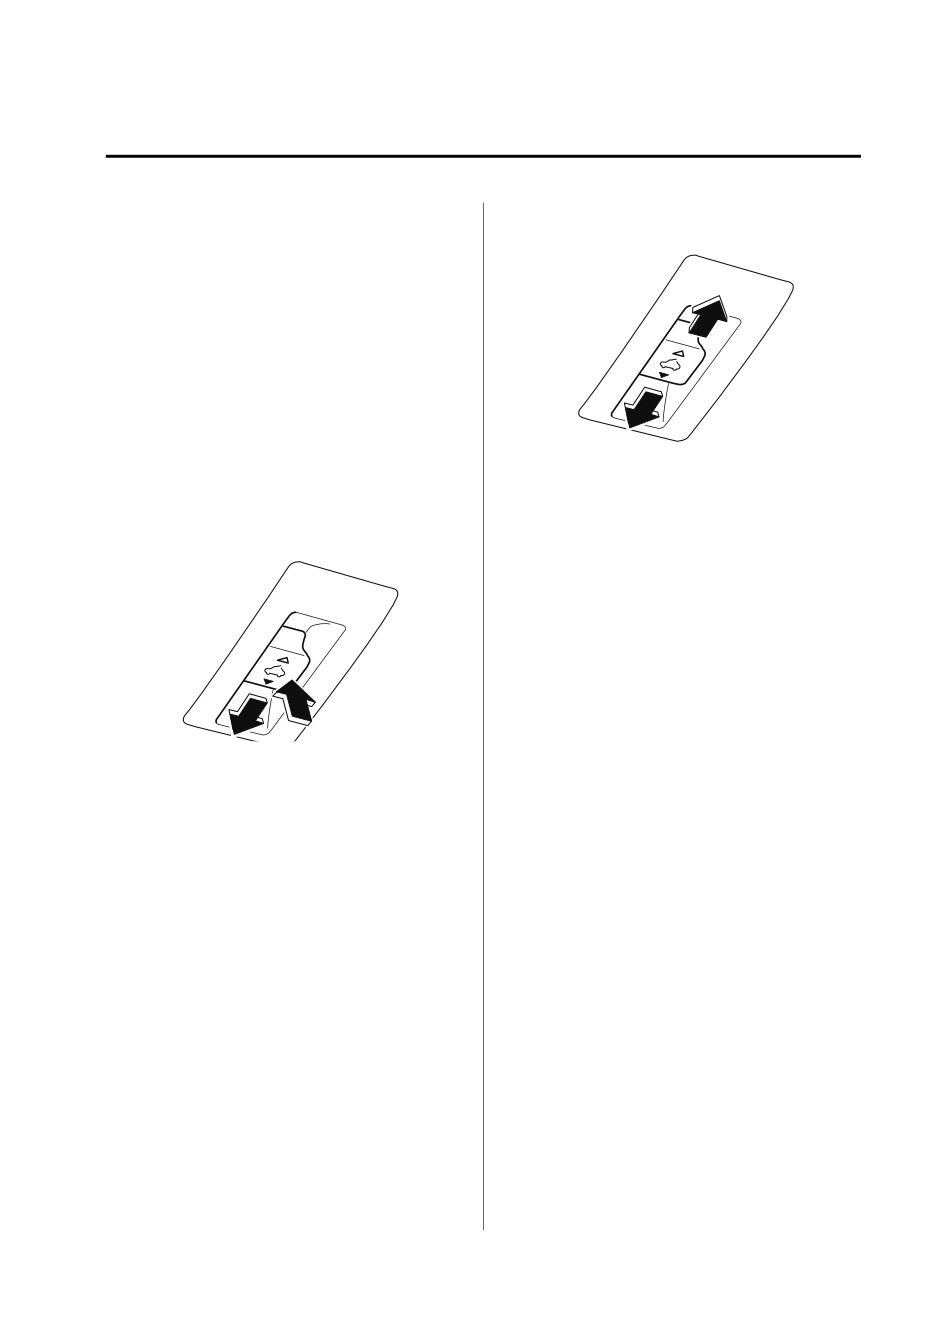
▼ Auto-opening/Closing
release. The window will fully close
automatically.
To fully open the window automatically,
press the switch completely down, then
To stop the window partway, pull or press
release. The window will fully open
the switch in the opposite direction and
automatically.
then release it.
To fully close the window automatically,
pull the switch completely up, then
NOTE
Power window system initialization
procedure
3-38
Before Driving
Windows
If the battery was disconnected during
In the event the jam-safe function
vehicle maintenance, or for other reasons
activates and the power window cannot
(such as a switch continues to be operated
be closed automatically, pull and hold
after the window is fully open/closed), the
the switch and the window will close.
window will not fully open and close
The jam-safe window function does not
automatically.
operate until the system has been reset.
The power window auto function will only
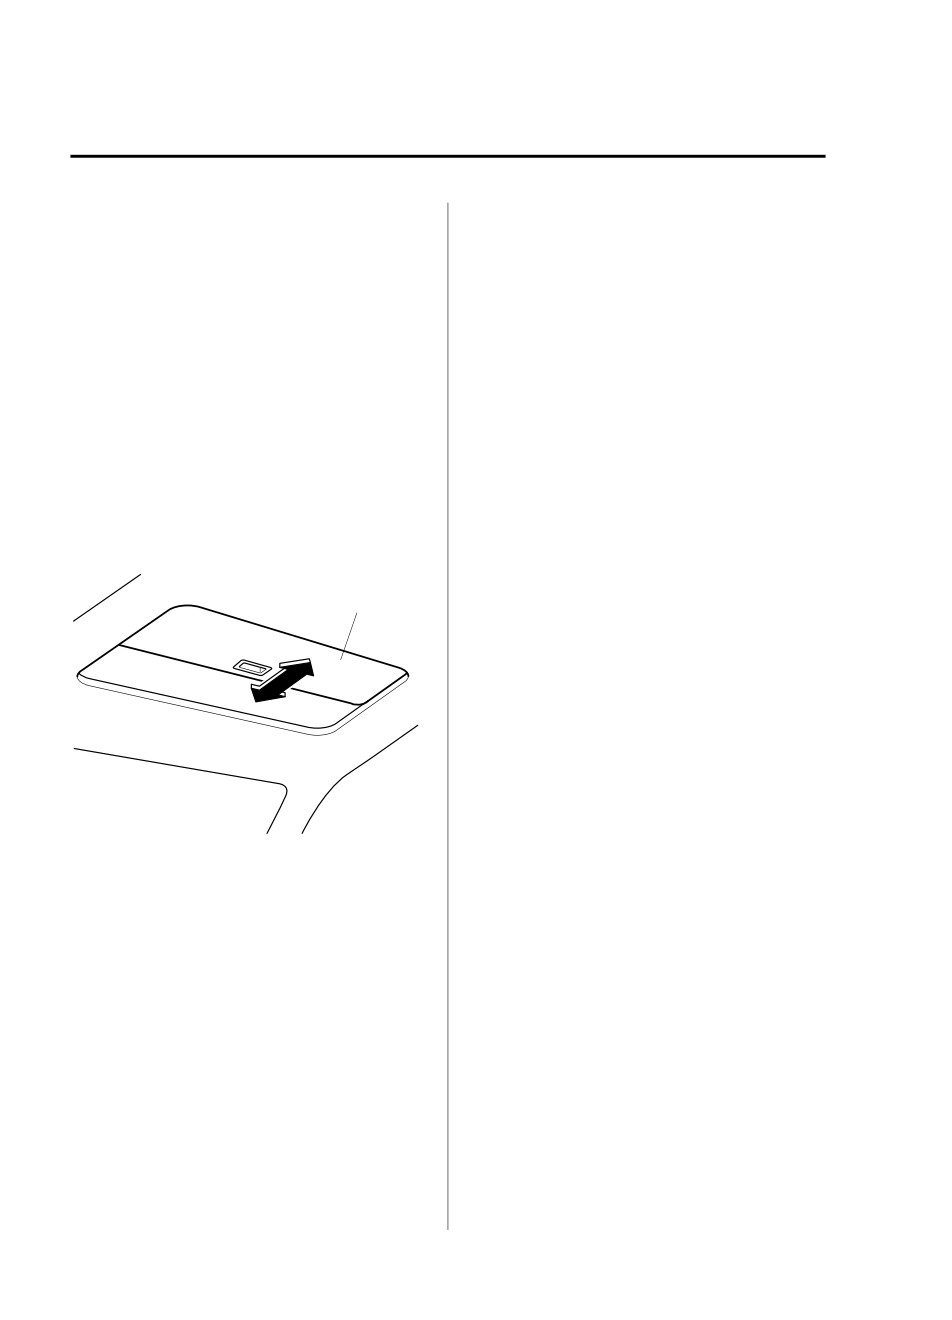
▼ Remote Power Window Operation
resume on a power window that has been
reset.
All power windows can be opened from
1. Switch the ignition ON.
outside the vehicle after the doors are
2. Make sure that the power window lock
closed.
switch located on the driver's door is
The power windows can be operated
not depressed.
remotely when the power window lock
3. Press the switch and fully open the
switch on the driver's door is in the lock or
window.
unlocked position.
4. Pull up the switch to fully close the
Remote power window operation is
window and continue holding the
activated under the following conditions.
switch for about 2 seconds after the
All the doors and liftgate are closed.
window fully closed.
The ignition is switched OFF.
5. Make sure that the power windows
operate correctly using the door
NOTE
switches.
The power windows cannot be opened
▼ Jam-safe Window
from the outside of the vehicle if the power
window initialization has not been
If foreign matter is detected between the
completed.
window and the window frame while the
window is closing automatically (refer to
Opening
Auto-opening/Closing on page 3-38), the
The windows can be opened for
window stops closing and automatically
ventilating the cabin before getting in the
opens partway.
vehicle.
NOTE
Press the unlock button on the key quickly
and briefly 3 times and then immediately
The jam-safe function may operate
afterwards, press and hold the unlock
under the following conditions:
button to open the windows.
A strong impact is detected while the
window is closing automatically.
Window is closing automatically in
very low temperatures.
To stop the windows from opening,
release the button. If the operation is
performed from the beginning again, the
windows open.
3-39
Before Driving
Windows
Moonroof*
CAUTION
The moonroof can be opened or closed
¾ Do not sit on or put heavy items on the
when operating the overhead tilt/slide
area where the moonroof opens and
switch at the front seats.
closes. Otherwise, the moonroof could be
damaged.
WARNING
¾ Do not open or close the moonroof
forcefully during freezing temperatures
Do not let passengers stand up or extend
or snowfall. Otherwise, the moonroof
part of the body through the open
could be damaged.
moonroof while the vehicle is moving:
¾ The sunshade does not tilt. To avoid
Extending the head, arms, or other parts of
damaging the sunshade, do not push it
the body through the moonroof is
up.
dangerous. The head or arms could hit
¾ Do not close the sunshade while the
something while the vehicle is moving. This
moonroof is opening. Trying to force the
could cause serious injury or death.
sunshade closed could damage it.
Never allow children to play with the tilt/
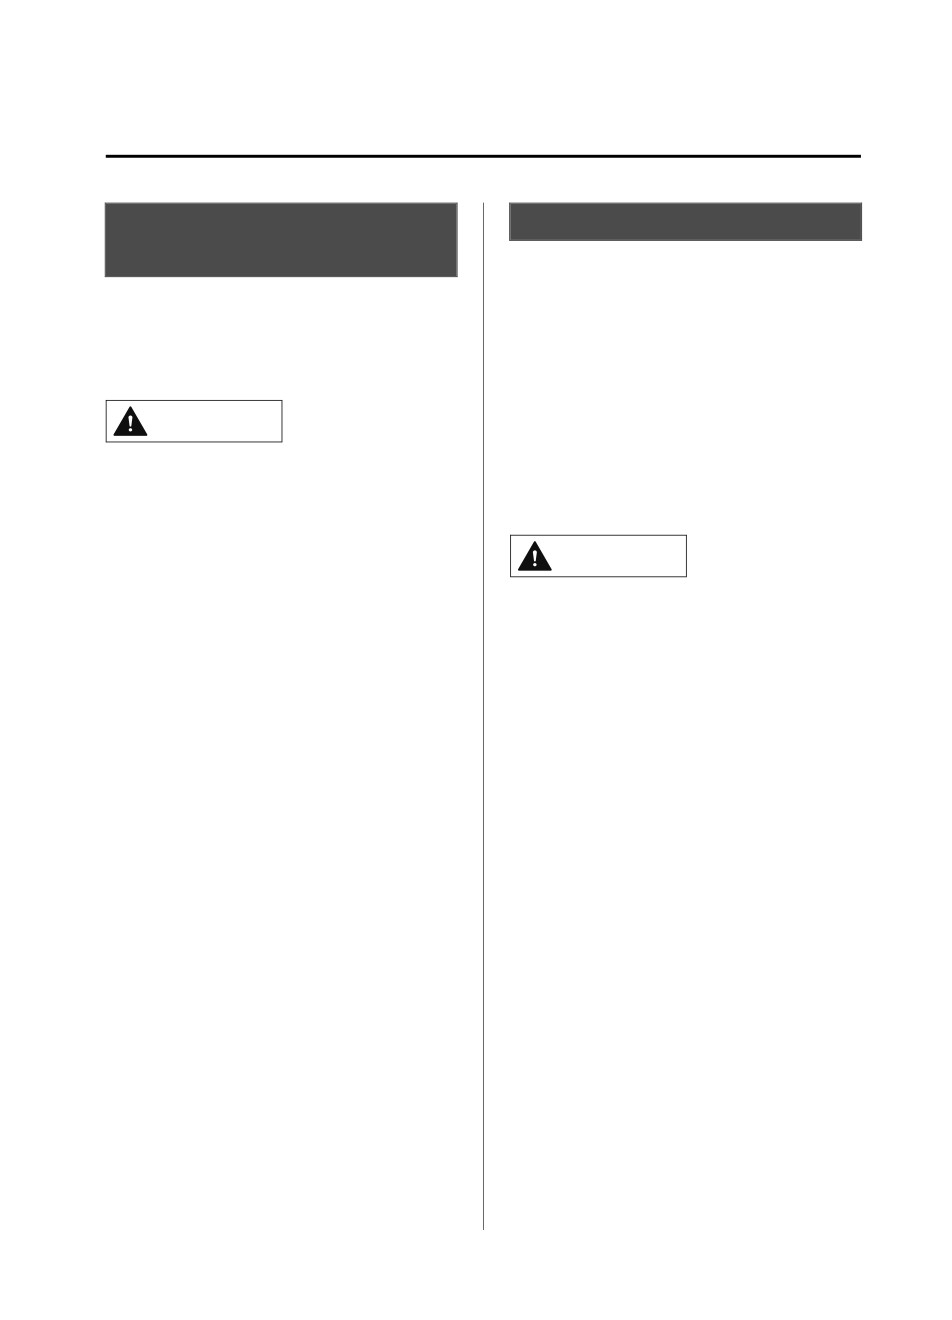
▼ Tilt/Slide Operation
slide switch:
The moonroof can be opened or closed
The tilt/slide switch would allow children to
electrically only when the ignition is
operate the moonroof unintentionally,
switched ON.
which could result in serious injury if a
child's hands, head or neck becomes
Before leaving the vehicle or washing
caught by the moonroof.
your Mazda, make sure the moonroof is
completely closed so that water does not
Make sure the opening is clear before
get inside the cabin area.
closing the moonroof:
After washing your Mazda or after it
A closing moonroof is dangerous. The
rains, wipe the water off the moonroof
hands, head, or even neck of a person,
before operating it to avoid water
especially a child, could be caught in it as it
penetration which could cause rust and
closes, causing serious injury or even death.
water damage to your headliner.
Tilt/Slide switch
Make sure nothing blocks the moonroof
just before it reaches the fully closed
position:
Blocking the moonroof just before it
reaches the closed position is dangerous.
In this case, the jam-safe function cannot
prevent the moonroof from closing. If
fingers are caught, serious injuries could
occur.
3-40
*Some models.
Before Driving
Windows
Tilt Operation
the moonroof and then do a slide
operation.
The rear of the moonroof can be tilted
open to provide more ventilation.
Open
To fully tilt automatically, momentarily
press the tilt/slide switch.
To fully close automatically, momentarily
press the tilt/slide switch in the forward
direction.
To stop tilting partway, press the tilt/slide
Close
switch.
When the moonroof is already slid open
NOTE
If the moonroof does not operate normally,
and you want to tilt it open, first close the
do the following procedure:
moonroof and then do a tilt operation.
1. Switch the ignition ON.
2. Press the tilt switch, to partially tilt
open the rear of the moonroof.
3. Repeat Step 2. The rear of the
moonroof tilts open to the fully open
position, then closes a little.
If the reset procedure is performed while
Tilt up
the moonroof is in the slide position
Close (Tilt down)
(partially open) it will close before the
rear tilt opens.
Slide Operation
▼ Jam-safe Moonroof
To fully open automatically, momentarily
press the tilt/slide switch in the backward
If a person's hands, head or an object
direction.
blocks the moonroof while it is closing,
To fully close automatically, momentarily
the moonroof will stop and move in the
press the tilt/slide switch in the forward
open direction.
direction.
NOTE
To stop sliding partway, press the tilt/slide
switch.
The jam-safe function may operate
When the moonroof is already tilted open
under the following conditions:
and you want to slide it open, first close
A strong impact is detected while the
moonroof is closing automatically.
The moonroof is closing automatically
during very low temperatures.
3-41
Before Driving
Windows
In the event the jam-safe function
activates and the moonroof cannot be
closed automatically, press the tilt/slide
switch and the moonroof will close.
The jam-safe moonroof function does
not operate until the system has been
reset.
▼ Sunshade
The sunshade can be opened and closed by
hand.
The sunshade opens at the same time as
the moonroof slides open, but it must be
closed by hand.
Sunshade
3-42
Before Driving
Security System
Modification and Add-On
Immobilizer System
Equipment
The immobilizer system allows the engine
to start only with a key the system
Mazda cannot guarantee the immobilizer
recognizes.
and the theft-deterrent systems' operation
if the system has been modified or if any
If someone attempts to start the engine
add-on equipment has been installed.
with an unrecognized key, the engine will
not start, thereby helping to prevent
CAUTION
vehicle theft.
If you have a problem with the
To avoid damage to the vehicle, do not
immobilizer system or the key, consult an
modify the system or install any add-on
Authorized Mazda Dealer.
equipment to the immobilizer and the
theft-deterrent systems or the vehicle.
CAUTION
¾ Radio equipment like this is governed by
laws in the United States.
Changes or modifications not expressly
approved by the party responsible for
compliance could void the user's
authority to operate the equipment.
¾ To avoid damage to the key, do not:
¾ Drop the key.
¾ Get the key wet.
¾ Expose the key to any kind of magnetic
field.
¾ Expose the key to high temperatures
on places such as the dashboard or
hood, under direct sunlight.
¾ If the engine does not start with the
correct key, and the security indicator
light keeps illuminating or flashing, the
system may have a malfunction. Consult
an Authorized Mazda Dealer.
3-43
Before Driving
Security System
NOTE
The security indicator light in the
instrument cluster flashes every 2 seconds
The keys carry a unique electronic code.
until the system is disarmed.
For this reason, and to assure your
safety, obtaining a replacement key
requires some waiting time. They are
only available through an Authorized
Mazda Dealer.
Always keep a spare key in case one is
Disarming
lost. If a key is lost, consult an
The system is disarmed when the ignition
Authorized Mazda Dealer as soon as
is switched ON with the correct
possible.
programmed key. The security indicator
If you lose a key, an Authorized Mazda
light illuminates for about 3 seconds and
Dealer, will reset the electronic codes of
then turns off. If the engine does not start
your remaining keys and immobilizer
with the correct key, and the security
system. Bring all the remaining keys to
indicator light remains illuminated or
the Authorized Mazda Dealer to reset.
flashing, try the following:
Starting the vehicle with a key that has
Make sure the key is within the
not been reset is not possible.
operational range for signal transmission.
▼ Operation
Switch the ignition off, and then restart the
engine. If the engine does not start after 3
NOTE
or more tries, contact an Authorized
Mazda Dealer.
The engine may not start and security
indicator light may illuminate or flash if
NOTE
the key is placed in an area where it is
If the security indicator light flashes
difficult for the system to detect the
continuously while you are driving, do
signal, such as on the dashboard or in
not shut off the engine. Go to an
the glove compartment. Move the key to
Authorized Mazda Dealer, and have it
a location within the signal range,
checked. If the engine is shut off while
switch the ignition off, and then restart
the indicator light is flashing, you will
the engine.
not be able to restart it.
Signals from a TV or radio station, or
Because the electronic codes are reset
from a transceiver or mobile telephone
when the immobilizer system is repaired,
could interfere with your immobilizer
the keys are needed. Make sure to bring
system. If you are using the proper key
all the keys to an Authorized Mazda
and the engine fails to start, check the
Dealer, so that they can be programmed.
security indicator light.
Arming
The system is armed when the ignition is
switched from ON to off.
3-44
Before Driving
Security System
NOTE
Theft-Deterrent System*
The liftgate does not open while the
If the theft-deterrent system detects an
theft-deterrent system is operating.
inappropriate entry into the vehicle, which
For vehicles equipped with the power
could result in the vehicle or its contents
liftgate, the liftgate can be opened even
being stolen, the alarm alerts the
while the theft-deterrent system is
surrounding area of an abnormality by
operating by pressing the power liftgate
sounding the horn and flashing the hazard
button on the transmitter or the electric
warning lights.
liftgate opener switch while carrying the
key.
The system will not function unless it's
If the battery goes dead while the
properly armed. So when you leave the
theft-deterrent system is armed, the horn
vehicle, follow the arming procedure
will activate and the hazard warning
correctly.
lights will flash when the battery is
charged or replaced.
▼ Operation
System triggering conditions
▼ How to Arm the System
The horn sounds intermittently and the
1.
Close the windows and the moonroof*
hazard warning lights flash for about 30
securely.
seconds when the system is triggered by
2.
Switch the ignition OFF.
any one of the following:
3.
Make sure the hood, the doors, and the
liftgate are closed.
Unlocking a door with the auxiliary key,
4.
Press the lock button on the transmitter
door lock switch, or an inside door-lock
or lock the driver's door from the
knob.
outside with the auxiliary key.
Forcing open a door, the hood or the
The hazard warning lights will flash
liftgate.
once.
Opening the hood by operating the hood
The following method will also arm
release handle.
the theft-deterrent system:
Switching the ignition ON without using
Press the door-lock switch “
” while
the push button start.
any door is open and then close all of
If the system is triggered again, the lights
the doors.
and horn will activate until the driver's
(With the advanced keyless function)
door or the liftgate is unlocked with the
Press a request switch.
transmitter.
(With the advanced keyless function)
The security indicator light in the
The lights and horn can also be
instrument cluster flashes twice per
deactivated by pressing the request switch
second for 20 seconds.
on a door.
*Some models.
3-45
Before Driving
Security System
5. After 20 seconds, the system is fully
NOTE
armed.
When the doors are unlocked by pressing
the unlock button on the transmitter while
NOTE
the theft-deterrent system is turned off, the
The theft-deterrent system can also be
hazard warning lights will flash twice to
armed by activating the auto relock
indicate that the system is turned off.
function with all the doors, the liftgate
▼ To Stop the Alarm
and the hood closed.
Refer to Transmitter on page 3-5.
A triggered alarm can be turned off using
The system will disarm if one of the
any one of the following methods:
following operations takes place within
Pressing the unlock button on the
20 seconds after pressing the lock
transmitter.
button:
Starting the engine with the push button
Unlocking any door.
start.
Opening any door.
(With the advanced keyless function)
Opening the hood.
Pressing a request switch on the
Switching the ignition ON.
doors.
To rearm the system, do the arming
Pressing the electric liftgate opener
procedure again.
while the key is being carried.
When the doors are locked by pressing
Pressing the power liftgate button on
the lock button on the transmitter or
the transmitter.
using the auxiliary key while the
The hazard warning lights will flash twice.
theft-deterrent system is armed, the
hazard warning lights will flash once to
indicate that the system is armed.
▼ To Turn Off an Armed System
An armed system can be turned off using
any one of the following methods:
Pressing the unlock button on the
transmitter.
Starting the engine with the push button
start.
(With the advanced keyless function)
Pressing a request switch on the
doors.
The hazard warning lights will flash twice.
3-46
Before Driving
Driving Tips
Break-In Period
Saving Fuel and Protection
No special break-in is necessary, but a few
of the Environment
precautions in the first 1,000 km (600
How you operate your Mazda determines
miles) may add to the performance,
how far it will travel on a tank of fuel. Use
economy, and life of the vehicle.
these suggestions to help save fuel and
Do not race the engine.
reduce CO2.
Do not maintain one constant speed,
Avoid long warm-ups. Once the engine
either slow or fast, for a long period of
runs smoothly, begin driving.
time.
Avoid fast starts.
Do not drive constantly at full-throttle or
Drive at lower speeds.
high engine rpm for extended periods of
Anticipate when to apply the brakes
time.
(avoid sudden braking).
Avoid unnecessary hard stops.
Follow the maintenance schedule (page
Avoid full-throttle starts.
6-4) and have an Authorized Mazda
Do not tow a trailer.
Dealer perform inspections and
servicing.
Use the air conditioner only when
necessary.
Slow down on rough roads.
Keep the tires properly inflated.
Do not carry unnecessary weight.
Do not rest your foot on the brake pedal
while driving.
Keep the wheels in correct alignment.
Keep windows closed at high speeds.
Slow down when driving in crosswinds
and headwinds.
WARNING
Never stop the engine when going down a
hill:
Stopping the engine when going down a
hill is dangerous. This causes the loss of
power steering and power brake control,
and may cause damage to the drivetrain.
Any loss of steering or braking control
could cause an accident.
3-47

Before Driving
Driving Tips
Avoid sudden braking and sudden
Hazardous Driving
maneuvering.
Do not pump the brakes. Continue to
WARNING
press down on the brake pedal.
Refer to Antilock Brake System (ABS)
on page 4-90.
Be extremely careful if it is necessary to
If you get stuck, select a lower gear and
downshift on slippery surfaces:
accelerate slowly. Do not spin the front
Downshifting into lower gear while driving
wheels.
on slippery surfaces is dangerous. The
For more traction in starting on slippery
sudden change in tire speed could cause
surfaces such as ice or packed snow, use
the tires to skid. This could lead to loss of
sand, rock salt, chains, carpeting, or
vehicle control and an accident.
other nonslip material under the front
wheels.
Avoid sharp turns, excessive speed and
abrupt maneuvers when driving this
NOTE
vehicle:
Use snow chains only on the front wheels.
Sharp turns, excessive speed and abrupt
maneuvering of this vehicle are dangerous
as it could result in the increased risk of loss
of vehicle control, vehicle roll-over,
personal injury or death.
This vehicle has a higher center of gravity.
Vehicles with a higher center of gravity
such as utility vehicles handle differently
than vehicles with a lower center of gravity.
Utility vehicles are not designed for
cornering at high speeds any more than
low profile sports cars are designed to
perform satisfactorily under off-road
conditions.
In addition, utility vehicles have a
significantly higher rollover rate than other
types of vehicles.
In a rollover crash, an unbelted person is
significantly more likely to die than a
person wearing a seat belt.
When driving on ice or in water, snow,
mud, sand, or similar hazards:
Be cautious and allow extra distance for
braking.
3-48
Before Driving
Driving Tips
Floor Mat
Rocking the Vehicle
We recommend the use of Genuine
Mazda floor mats.
WARNING
WARNING
Do not spin the wheels at more than 56
km/h (35 mph), and do not allow anyone
Make sure the floor mats are hooked on the
to stand behind a wheel when pushing the
retention pins to prevent them from
vehicle:
bunching up under the foot pedals:
When the vehicle is stuck, spinning the
Using a floor mat that is not secured is
wheels at high speed is dangerous. The
dangerous as it will interfere with the
spinning tire could overheat and explode.
accelerator and brake pedal operation,
This could cause serious injuries.
which could result in an accident.
CAUTION
Do not install two floor mats, one on top of
the other, on the driver's side:
Too much rocking may cause engine
Installing two floor mats, one on top of the
overheating, transaxle failure, and tire
other, on the driver's side is dangerous as
damage.
the retention pins can only keep one floor
mat from sliding forward.
If you must rock the vehicle to free it from
Loose floor mat(s) will interfere with the
snow, sand or mud, depress the accelerator
foot pedals and could result in an accident.
slightly and slowly move the selector lever
If using an all-weather mat for winter use
from D to R position.
always remove the original floor mat.
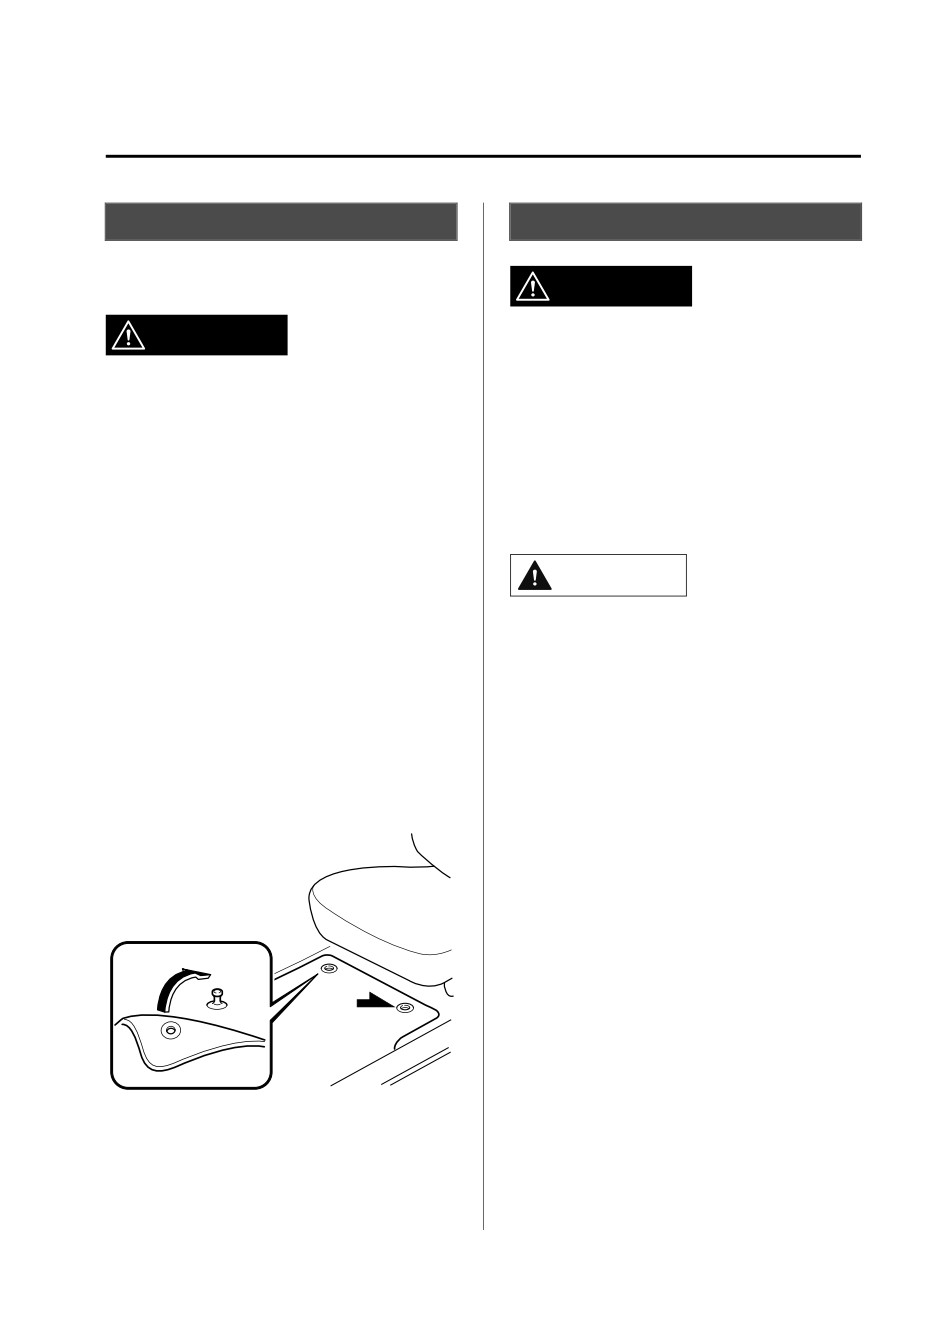
When setting a floor mat, position the
floor mat so that its grommets are inserted
over the pointed end of the retention posts.
3-49
Before Driving
Driving Tips
Drive slowly. Braking performance can
Winter Driving
be adversely affected if snow or ice
Carry emergency gear, including tire
adheres to the brake components. If this
chains, window scraper, flares, a small
situation occurs, drive the vehicle
shovel, jumper cables, and a small bag of
slowly, releasing the accelerator pedal
sand or salt.
and lightly applying the brakes several
Ask an Authorized Mazda Dealer to check
times until the brake performance
the following:
returns to normal.
Have the proper ratio of antifreeze in the
▼ Snow Tires
radiator.
Use snow tires on all 4 wheels
Refer to Engine Coolant on page 6-22.
Inspect the battery and its cables. Cold
Do not go faster than 120 km/h (75 mph)
reduces battery capacity.
while driving with snow tires. Inflate snow
Use an engine oil appropriate for the
tires 30 kPa (0.3 kgf/cm2, 4.3 psi) more
lowest ambient temperatures that the
than recommended on the tire pressure
vehicle will be driven in (page 6-20).
label (driver's door frame), but never more
Inspect the ignition system for damage
than the maximum cold-tire pressure
and loose connections.
shown on the tires.
Use washer fluid made with
antifreeze―but do not use engine
The vehicle is originally equipped with all
coolant antifreeze for washer fluid (page
season radials designed to be used all year
6-24).
around. In some extreme climates you
may find it necessary to replace them with
NOTE
snow tires during the winter months to
Remove snow before driving. Snow left
further improve traction on snow and ice
on the windshield is dangerous as it
covered roads.
could obstruct vision.
Do not apply excessive force to a
WARNING
window scraper when removing ice or
frozen snow on the mirror glass and
Use only the same size and type tires (snow,
windshield.
radial, or non-radial) on all 4 wheels:
Never use warm or hot water for
Using tires different in size or type is
removing snow or ice from windows and
dangerous. Your vehicle's handling could
mirrors as it could result in the glass
be greatly affected and result in an
cracking.
accident.
CAUTION
Check local regulations before using
studded tires.
3-50
Before Driving
Driving Tips
NOTE
Do not use chains on the rear tires.
The tire pressure monitoring system may
Please consult an Authorized Mazda
not function correctly when using tires
Dealer.
with steel wire reinforcement in the
Installing the chains
sidewalls (page 4-241).
1.
Secure the chains on the front tires as
▼ Tire Chains
tightly as possible.
Check local regulations before using tire
Always follow the chain
chains.
manufacturer's instructions.
2.
Retighten the chains after driving
CAUTION
1/2―1 km (1/4―1/2 mile).
¾ Chains may affect handling.
¾ Do not go faster than 50 km/h (30 mph)
or the chain manufacturer's
recommended limit, whichever is lower.
¾ Drive carefully and avoid bumps, holes,
and sharp turns.
¾ Avoid locked-wheel braking.
¾ Do not use chains on a temporary spare
tire; it may result in damage to the
vehicle and to the tire.
¾ Do not use chains on roads that are free
of snow or ice. The tires and chains could
be damaged.
¾ Chains may scratch or chip aluminum
wheels.
NOTE
The tire pressure monitoring system may
not function correctly when using tire
chains.
Use of tire chains on a vehicle equipped
with P255/50R20 specification tires
could cause interference with the vehicle
body and scratching. If tire chains are to
be used, replace both front and rear tires
with P255/60R18 tires. Please consult
an Authorized Mazda Dealer.
Install the chains on the front tires only.
3-51
Before Driving
Driving Tips
Driving In Flooded Area
Overloading
WARNING
WARNING
Dry off brakes that have become wet by
Be careful not to overload your vehicle:
driving slowly, releasing the accelerator
The gross axle weight rating (GAWR) and
pedal and lightly applying the brakes
the gross vehicle weight rating (GVWR) of
several times until the brake performance
the vehicle are on the Motor Vehicle Safety
returns to normal:
Standard Label on the driver's door frame.
Driving with wet brakes is dangerous.
Exceeding these ratings can cause an
Increased stopping distance or the vehicle
accident or vehicle damage. You can
pulling to one side when braking could
estimate the weight of the load by
result in a serious accident. Light braking
weighing the items (or people) before
will indicate whether the brakes have been
putting them in the vehicle.
affected.
CAUTION
Do not drive the vehicle on flooded roads
as it could cause short circuiting of
electrical/electronic parts, or engine
damage or stalling from water absorption.
If the vehicle has been immersed in water,
consult an Authorized Mazda Dealer.
3-52
Before Driving
Driving Tips
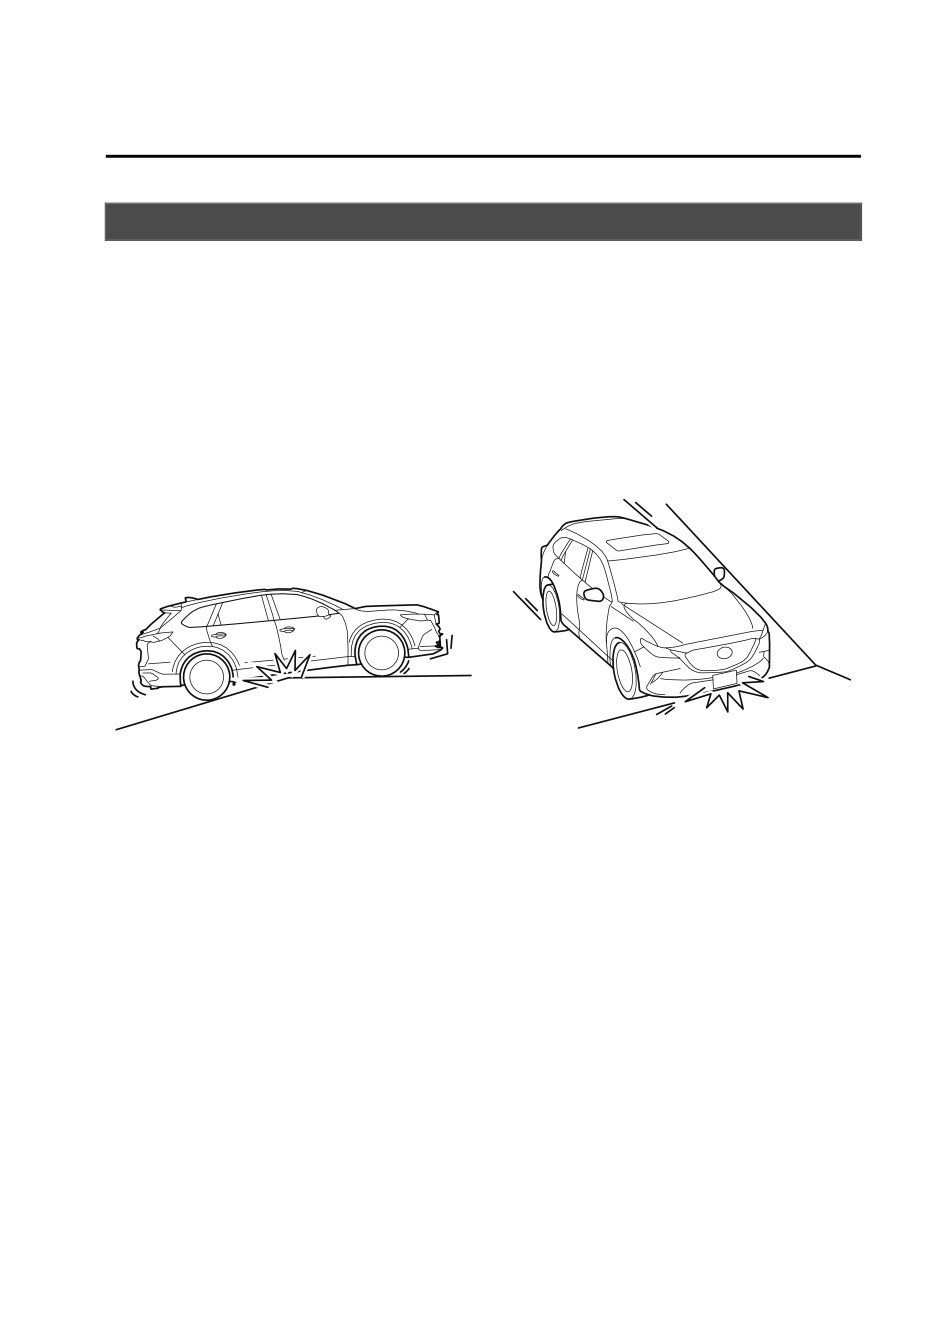
Driving on Uneven Road
Your vehicle's suspension and underbody can be damaged if driven on rough/uneven roads
or over speed bumps at excessive speeds. Use care and reduce speed when traveling on
rough/uneven roads or over speed bumps.
Use care not to damage the vehicle's underbody, bumpers or muffler(s) when driving under
the following conditions:
Ascending or descending a slope with a sharp transition angle
Ascending or descending a driveway or trailer ramp with a sharp transition angle
This vehicle is equipped with low profile tires allowing class-leading performance and
handling. As a result, the sidewall of the tires are very thin and the tires and wheels can be
damaged if driven through potholes or on rough/uneven roads at excessive speeds. Use care
and reduce speed when traveling on rough/uneven roads or through potholes.
3-53
Before Driving
Driving Tips
Turbocharger Information
CAUTION
¾ After driving at freeway speeds or up a long hill, trailer towing for a long time, idle the
engine at least 30 seconds before stopping it. Otherwise, the turbocharger could be
damaged.
¾ Racing or over-revving the engine, particularly after it's just been started, can damage the
turbocharger.
¾ To protect the engine from damage, the engine is designed so that it cannot be raced just
after starting it in extremely cold weather.
The turbocharger greatly enhances engine power. Its advanced design provides improved
operation and requires minimum maintenance.
To get the most from it, observe the following.
1. Change engine oil and filter according to Scheduled Maintenance (page 6-4).
2. Use only recommended engine oil (page 6-20). Extra additives are NOT recommended.
3-54
Before Driving
Towing
Trailer Towing (U.S.A. and Canada)
Your Mazda was designed and built primarily to carry passengers and cargo.
If you tow a trailer, follow these instructions because driver and passenger safety depends
on proper equipment and safe driving habits. Towing a trailer will affect handling, braking,
durability, performance, and fuel economy.
Never overload your vehicle or trailer. Consult an Authorized Mazda Dealer if you need
further details.
CAUTION
Do not tow a trailer during the first 1,000 km (600 miles) of your new Mazda. If you do, you
may damage the engine, transaxle, differential, wheel bearings, and other power-train
components.
NOTE
When towing, use of gasoline with a octane rating of 91 or higher is recommended.
Your vehicle is equipped with a Trailer Stability Control (TSC) mechanism, which
enhances vehicle stability when towing a trailer.
Refer to Trailer Stability Control (TSC) on page 4-94.
▼ Weight Limits
TTW and GCWR
The total trailer weight (TTW), gross combination weight rating (GCWR), gross axle
weight rating (GAWR), trailer load, and trailer tongue load must be within the
prescribed limits.
The total trailer weight (TTW) is the sum of the weights of the trailer load (trailer
weight plus cargo), trailer hitch, 2 passengers, and vehicle load (baggage, food, camp
gear, etc.). Never allow the total trailer weight (TTW) to exceed specifications in the
Trailer Towing-Load Table.
The maximum GCWR is the combination weight of the trailer and load plus the
towing vehicle (including trailer hitch, vehicle passengers, and load). It must not
exceed specifications in the load table.
GAWR and GVWR
Do not exceed front and rear GAWR (gross axle weight rating) and GVWR (gross vehicle
weight rating). If you do, vehicle handling, braking, and performance will be affected. These
values are also on the Motor Vehicle Safety Certification Label posted on the driver's door
frame.
3-55
Before Driving
Towing
High-altitude operation
CAUTION
Be aware of the towing load weight differences when towing at high altitudes. For altitudes
exceeding 1,000 meter (3,280 ft 10 in), always reduce the towing load by 10 % for every 1,000
meter (3,280 ft 10 in) increase in altitude from the load indicated under the maximum GCWR
heading in the trailer towing-load table. If the determined maximum total towing load
weight is exceeded, the engine and other power-train parts may be damaged.
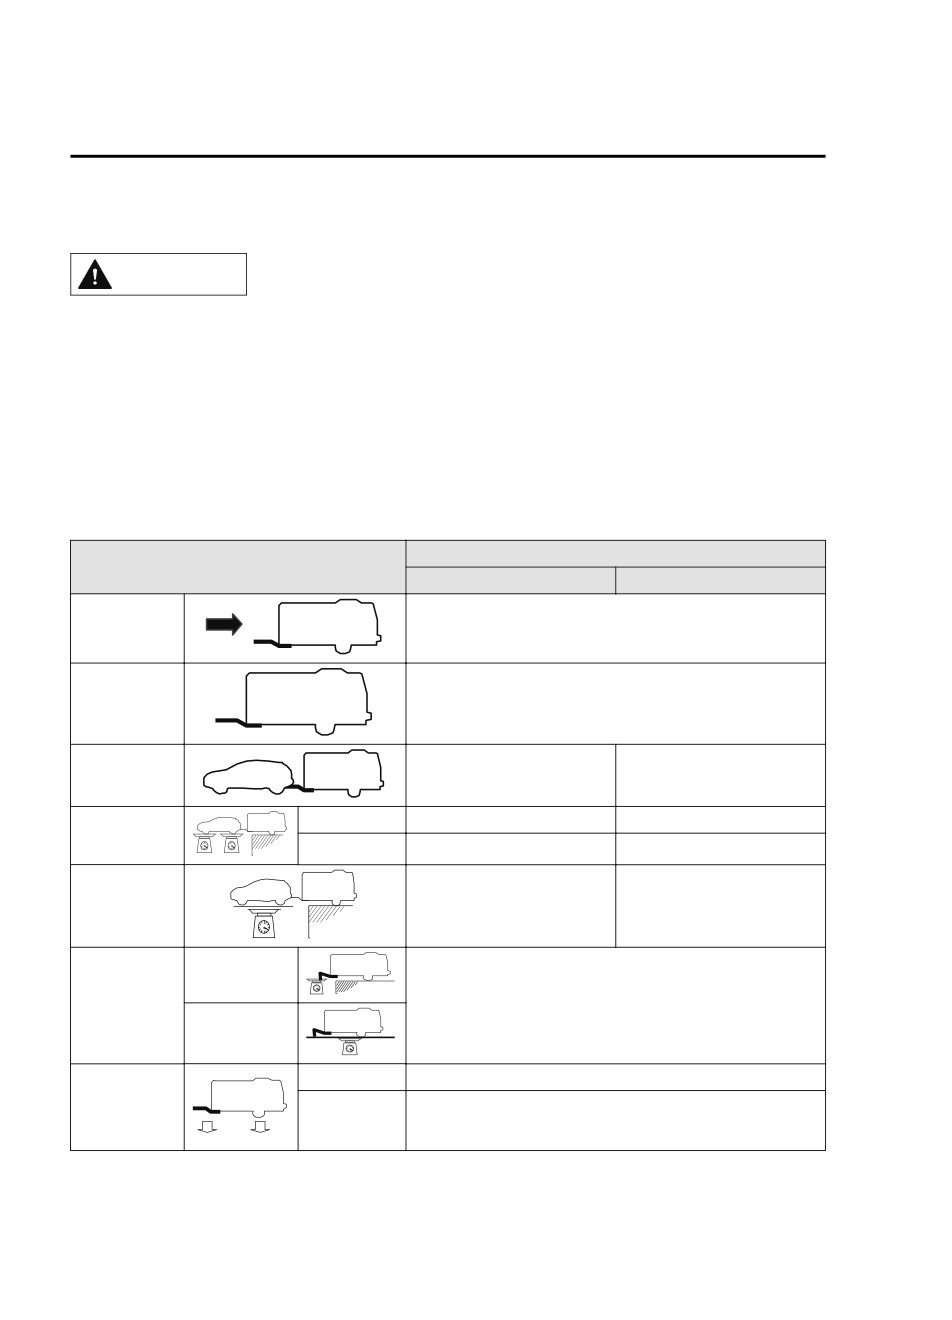
TRAILER TOWING-LOAD TABLE
Because vehicle weights vary, adjustments must be made to meet the requirements in this
table.
Model
Item
FWD
AWD
MAX. FRON-
2.97 m2 (32 ft2)
TAL AREA
MAX. TTW
1,587.5 kg (3,500 lb)
MAX. GCWR
3,629 kg (8,000.4 lb)
3,782 kg (8,337.7 lb)
Front
1,225 kg (2,701 lb)
1,250 kg (2,756 lb)
MAX. GAWR
Rear
1,383 kg (3,049 lb)
1,427 kg (3,146 lb)
MAX. GVWR
2,572 kg (5,670 lb)
2,641 kg (5,822 lb)
Tongue load
TRAIL-
ER-TONGUE
Tongue load/Trailer load × 100 = 10 % to 15 %
LOAD
Trailer load
DISTRIBU-
Front
60 %
TION OF
TRAILER
Rear
40 %
LOAD
3-56
Before Driving
Towing
WARNING
Always keep tow loads within specified limits as indicated in the Trailer Towing-Load Table:
Attempting to tow loads greater than those specified is dangerous as it may cause serious
handling and performance problems that could result in personal injury or vehicle damage,
or both.
Load your trailer with the weight about 60 % toward the front and 40 % toward the rear:
Loading the trailer with more weight in the rear than in the front is dangerous. Doing so could
cause you to lose control. The trailer tongue load must be 10 %―15 % of the total trailer load
(sum of the weights of the trailer and cargo).
Always have the total trailer weight and tongue load determined prior to departure:
Attempting to tow loads without determining the total trailer weight and tongue load is
dangerous. Trailer sway from crosswinds, rough roads or other causes could result in loss of
control and a serious accident.
CAUTION
The total trailer weight and tongue load can be determined by weighing the trailer on
platform scales at a highway weight station or a trucking company.
▼ Trailer Hitch
Use only a hitch ball recommended by the trailer manufacturer that conforms to the gross
trailer weight requirement.
When not towing a trailer, remove the trailer hitch (if detachable) to reduce the possibility of
damage as a result of the vehicle being rear-ended.
WARNING
Always make sure the trailer hitch is securely attached before departure:
An unsecured trailer hitch is dangerous as it causes greater trailer sway from crosswinds,
rough roads or other causes, resulting in loss of control and a serious accident.
Examine all trailer-hitch mounting bolts regularly and tighten any that are loose. If the hitch
is removed, seal any open mounting holes to prevent exhaust, dust, water, dirt and other
foreign elements from filtering in, possibly endangering personal safety and damaging your
vehicle.
Do not install a hitch that stiffens the bumper as it will reduce the bumper's performance.
3-57
Before Driving
Towing
Make sure there are no exhaust gas leaks into the passenger compartment if any mounting
bolts are connected to the body:
Modifying your vehicle exhaust system is dangerous. Exhaust gas entering the vehicle could
cause loss of consciousness or even death.
When mounting the trailer hitch, make no modifications to the vehicle exhaust system.
CAUTION
¾ Make all hitch adjustments with actual loads. Do not load and unload vehicle while
adjusting hitch. This action will change the vehicle height.
¾ Do not use an axle-mounted hitch. This may damage the axle and related parts.
▼ Tires
When towing a trailer, make sure all tires are inflated to the recommended cold-tire
pressure, as indicated on the tire pressure chart on the driver's door frame. Trailer tire size,
load rating, and inflation pressures should conform to tire manufacturer specifications.
WARNING
Never use the temporary spare tire when towing:
Using the temporary spare tire on your vehicle when towing a trailer is dangerous as it could
result in tire failure, loss of control, and injury to vehicle occupants.
▼ Safety Chains
Safety chains must be used as a precautionary measure should the trailer become
unintentionally unhitched. They should cross under the trailer tongue and attach to the hitch.
Leave enough slack to allow full turns. Consult literature published by your trailer or hitch
manufacturer for more details.
WARNING
Make sure the safety chain is securely attached to both the trailer and the vehicle prior to
departure:
Towing a trailer without using a safety chain securely attached to both the trailer and the
vehicle is dangerous. If damage occurs to the coupling unit or hitch ball, the trailer could
wander into another lane and cause a collision.
▼ Trailer Lights
Trailer lights must comply with all federal, state, and local regulations. Equip your trailer as
required before towing it day or night.
3-58
Before Driving
Towing
CAUTION
Do not connect a trailer lighting system directly to the lighting system of your Mazda. This
may damage your vehicle's electrical system and lighting systems. Have a recreational vehicle
dealer or trailer rental agency connect the system, and inspect the brake lights and turn
signals yourself before each trip.
▼ Trailer Brakes
If the total trailer weight exceeds 450 kg (1,000 lb), trailer brakes are required. If your trailer
has brakes, make sure they comply with all federal, state, and local regulations.
WARNING
Do not connect a hydraulic trailer-brake system to your vehicle's brake system:
Connecting a hydraulic trailer-brake system directly to the vehicle brake system is dangerous
and will result in inadequate braking and possible injury.
▼ Trailer Towing Tips
Verify that your Mazda maintains a near-normal attitude when a loaded or unloaded trailer
is connected. Do not drive if it has an abnormal front-up or front-down position. Inspect
for incorrect tongue load, worn suspension parts, and trailer overloading.
Make sure the trailer is properly loaded and the cargo is secure to prevent it from shifting.
Make sure the mirrors conform to all government regulations. If they do not, install
required rear view mirrors appropriate for towing purposes.
The three main causes of vehicle-trailer accidents are driver error, excessive speed, and
improper trailer loading.
Before driving
Have your cooling and braking system checked by an Authorized Mazda Dealer.
Before starting out, inspect the operation of all vehicle and trailer lights and all
vehicle-to-trailer connections. Stop and re-inspect all lights and connections after driving
a short distance.
Driving
Your Mazda will handle differently with a trailer in tow, so practice turning, backing, and
stopping in a traffic-free area.
Take time to get accustomed to the extra weight and length.
Allow more room between your vehicle and the one in front because braking distance
increases with a trailer. For each 16 km/h (10 mph) of speed, allow at least one vehicle
and trailer length between your Mazda and the vehicle ahead.
3-59
Before Driving
Towing
Avoid jerky starts or sudden acceleration.
Avoid sudden braking. It may cause loss of control and result in jackknifing, especially so
on wet or slippery roads.
Shift the selector lever to the D position when towing a trailer in hilly terrain or when
heavily loaded.
The D position will allow operating the vehicle without frequent shifting.
Lane changes and turning
Avoid quick lane changes, sudden turns, and tight turns. Slow down before turning to avoid
the need of sudden braking.
A turning trailer will make a tighter arc than the tow vehicle. Compensate with turns that are
larger than normal.
Passing
Plan well ahead to pass other vehicles, and provide plenty of room before changing lanes.
Crosswinds from passing vehicles, especially larger ones, and the effects of rough roads will
affect handling.
If swaying occurs, firmly grip the steering wheel and reduce speed immediately, but
gradually.
Steer straight ahead. If no extreme correction of steering or braking is made, the
combination of less speed and firm steering will result in stability.
Backing up
Backing a vehicle with a trailer requires practice and patience. Back slowly, and have a
helper outside at the rear of the trailer to reduce the risk of an accident.
To turn the trailer, place your hand at the bottom of the steering wheel and turn it in the
direction you want the trailer to go. Make only slight movements to prevent sharp or
prolonged turning.
Ascending a hill
Shift into a lower gear to reduce the possibility of overloading or overheating the engine, or
both.
Descending a hill
Shift into a lower gear and use engine compression as a braking effect.
3-60
Before Driving
Towing
WARNING
Always use lower gears to reduce speed:
Holding the brake pedal down too long or too frequently is dangerous as it could cause the
brakes to overheat and lose power, resulting in loss of control and a serious accident. Use
lower gears to help reduce speed. Pull off the road and allow brakes to cool down whenever
braking performance feels reduced.
Overheated engine
The extra weight of the trailer may strain the engine on hot days and on long or steep
upgrades.
If the temperature gauge indicates overheating, turn off the air conditioner, drive safely to
the side of the road, park off the right-of-way and wait for engine to cool. Refer to
Overheating on page 7-23.
Parking
Always make sure the tires of the trailer and the tow vehicle are blocked while parked.
Apply the parking brake firmly and put the transaxle in P.
Avoid parking on an incline, but if you must, follow these instructions:
1. Depress and hold down the brake pedal.
2. Have a helper put wheel blocks against the downhill side of all vehicle and trailer tires.
3. Then release the brake pedal slowly until the blocks bear the load.
If the grade is downhill, turn the steering wheel so that the front of the front tires face
the curb.
If it is uphill, face the rear of the front tires against the curb.
4. Firmly apply the parking brake.
5. Shift the transaxle into P, and stop the engine.
To restart after parking on an incline:
1. With the transaxle in P, start the engine. (Be sure to depress and hold the brake pedal.)
2. Shift into gear.
3. Release the parking brake (also the foot brake) and pull away from the wheel blocks.
Stop; apply the parking brake and shift into P.
4. Have a helper retrieve the wheel blocks.
Fuel consumption
Trailer towing causes higher fuel consumption.
3-61
Before Driving
Towing
Maintenance
If you tow a trailer frequently, have your vehicle serviced as shown in Scheduled
Maintenance (page 6-4).
3-62
Before Driving
Towing
Recreational Towing
An example of "recreational towing" is
towing your vehicle behind a motorhome.
The transaxle is not designed for towing
this vehicle on all 4 wheels.
When doing recreational towing refer to
"Towing Description" (page 7-25) and
carefully follow the instructions.
3-63
When Driving
4
Information concerning safer driving and stopping.
Start/Stop Engine
4-4
HomeLink Wireless Control System
Ignition Switch
4-4
(Type A)*
4-72
Starting the Engine
4-5
HomeLink Wireless Control System
Turning the Engine Off
4-10
(Type B)*
4-76
Instrument Cluster and Display
Brake
4-80
. . . . . . . . . . . . . . ... 4-11
Brake System
4-80
Instrument Cluster and
AUTOHOLD
4-84
Display
4-11
Hill Launch Assist (HLA)
4-88
Instrument Cluster (Type A)
4-12
Instrument Cluster (Type B)
4-29
ABS/TCS/DSC/Trailer Stability
Active Driving Display*
4-45
Control (TSC)/Off-Road Traction
Assist
4-90
Automatic Transaxle
4-47
Antilock Brake System
Automatic Transaxle
(ABS)
4-90
Controls
4-47
Traction Control System
Shift-Lock System
4-48
(TCS)
4-91
Transaxle Ranges
4-48
Dynamic Stability Control
Manual Shift Mode
4-50
(DSC)
4-93
Direct Mode*
4-56
Trailer Stability Control
Driving Tips
4-57
(TSC)
4-94
Off-Road Traction Assist*
4-95
Switches and Controls
4-58
Lighting Control
4-58
Drive Selection
4-97
Fog Lights*
4-64
Drive Selection
4-97
Turn and Lane-Change
Signals
4-65
i-ACTIV AWD
4-99
Windshield Wipers and
i-ACTIV AWD Operation*
4-99
Washer
4-66
Rear Window Wiper and
Power Steering
4-101
Washer
4-69
Power Steering
4-101
Rear Window Defogger
4-70
Horn
4-71
Hazard Warning Flasher
4-72
*Some models.
4-1
i-ACTIVSENSE
4-102
Radar Sensor (Front)*
4-228
i-ACTIVSENSE*
4-102
Radar Sensors (Rear)*
4-231
Adaptive Front Lighting System
Ultrasonic Sensor (Rear)*
4-233
(AFS)*
4-105
Front Camera/Side Cameras/Rear
High Beam Control System
Camera*
4-234
(HBC)*
4-106
Blind Spot Monitoring (BSM)*
Cruise Control
4-235
. . . . . . . . . . . . .. 4-109
Cruise Control*
4-235
Traffic Sign Recognition System
(TSR)*
4-115
Tire Pressure Monitoring
Distance Recognition Support
System
4-240
System (DRSS)*
4-121
Tire Pressure Monitoring
Driver Attention Alert (DAA)*
System
4-240
. . . . . . . . . . . . .. 4-125
Rear Cross Traffic Alert (RCTA)*
Rear View Monitor (Mazda Connect
. . . . . . . . . . . . .. 4-127
(Type A))
4-244
Mazda Radar Cruise Control with
Rear View Monitor (Mazda Connect
Stop & Go function (MRCC with
(Type A))*
4-244
Stop & Go function)*
4-131
Lane-keep Assist System (LAS) &
Lane Departure Warning System
Rear View Monitor (Mazda Connect
(LDWS)*
4-146
(Type B))
4-252
Advanced Smart City Brake Support
Rear View Monitor (Mazda Connect
(Advanced SCBS)*
4-157
(Type B))*
4-252
Smart City Brake Support [Forward]
(SCBS F)*
4-160
Parking Sensor System (Mazda
Smart City Brake Support [Reverse]
Connect (Type A))
4-260
(SCBS R)*
4-163
Parking Sensor System (Mazda
Smart Brake Support (SBS)*
4-167
Connect (Type A))*
4-260
360° View Monitor (Mazda Connect
(Type A))*
4-169
Parking Sensor System (Mazda
360° View Monitor (Mazda Connect
Connect (Type B))
4-270
(Type B))*
4-195
Parking Sensor System (Mazda
Forward Sensing Camera (FSC)*
Connect (Type B))*
4-270
. . . . . . . . . . . . .. 4-223
4-2
*Some models.
Большое спасибо!
Ваше мнение очень важно для нас.
Нет комментариевНе стесняйтесь поделиться с нами вашим ценным мнением.
Текст