Mazda CX-5 (2023 year). Manual in english — page 15

When Driving
Parking Sensor System (Mazda Connect (Type B))
As the vehicle approaches closer to an obstruction, the zone in the gauge closer to the
vehicle illuminates.
Front ultrasonic sensor gauge
Left front corner
Right front corner
ultrasonic sensor gauge
ultrasonic sensor gauge
Left rear corner
Right rear corner
ultrasonic sensor gauge
ultrasonic sensor gauge
Rear sensor ultrasonic gauge
NOTE
The detection indicator can be switched between display and non-display and the buzzer
volume can be changed.
Refer to the Settings section in the Mazda Connect Owner's Manual.
When the detection indicator is set to “Display”, even with the 360° view monitor not
displayed, if a front ultrasonic sensor or a front corner ultrasonic sensor detects an
obstruction, the 360° view monitor switches automatically to display. When an obstruction
is no longer detected, the display switches to the display before the obstruction was
detected. However, while the 360° view monitor is displayed, it continues to display no
matter if an obstruction is detected or not.
System problem notification
The indication displays if the system has a malfunction.
Check the reason for the indication displaying on the center display or multi-information
display.
Refer to If a Warning Light Turns On or Flashes on page 7-22.
4-310

When Driving
Parking Sensor System (Mazda Connect (Type B))
▼ Parking Sensor Warning Beep
The beeper sounds as follows while the system is operating.
Front ultrasonic sensor, Rear ultrasonic sensor
Distance Detecဨ
Distance between vehicle and obstruction
Beeper sound*1
tion area
Front ultrasonic sensor
Rear ultrasonic sensor
Approx. 100―60 cm (39.3―23.6
Approx. 150―60 cm (59.0―23.6
in)
in)
Slow intermittent
Farthest distance
sound
Approx. 60―45 cm (23.6―17.7
Approx. 60―45 cm (23.6―17.7
in)
in)
Medium intermit-
Far distance
tent sound
Approx. 45―35 cm (17.7―13.7
Approx. 45―35 cm (17.7―13.7
in)
in)
Fast intermittent
Middle distance
sound
Within approx. 35 cm (13.7 in)
Within approx. 35 cm (13.7 in)
Close distance
Continuous sound
*1
The rate at which the intermittent sound beeps increases as the vehicle approaches the obstruction.
4-311

When Driving
Parking Sensor System (Mazda Connect (Type B))
Front corner ultrasonic sensor, Rear corner ultrasonic sensor
Distance between vehicle and obstruction
Distance Detection area
Front corner ultrasonic sensor/Rear corner ultraဨ
Beeper sound*1
sonic sensor
Approx. 55―38 cm (21.6―14.9 in)
Far distance
Medium intermittent sound
Approx. 38―25 cm (14.9―9.8 in)
Middle distance
Fast intermittent sound
Within approx. 25 cm (9.8 in)
Close distance
Continuous sound
*1
The rate at which the intermittent sound beeps increases as the vehicle approaches the obstruction.
NOTE
If an obstruction is detected in a zone for 6 seconds or more, the beep sound is stopped
(except for the close-distance zone). If the same obstruction is detected in another zone,
the corresponding beep sound is heard.
▼ When Warning Indicator/Beep is Activated
The system notifies the driver of an abnormality by activating the beep sound and the
indicator light.
Indicator/Beep
How to check
The indicator light flashes when
the parking sensor switch is
The system may have a malfunction. Have the vehicle inspected at an Author-
pressed at a vehicle speed of 10
ized Mazda Dealer as soon as possible.
km/h (6 mph) or less.
The system may have a malfunction. Have the vehicle inspected at an Author-
The beep sound is not heard.
ized Mazda Dealer as soon as possible.
4-312

When Driving
Parking Sensor System (Mazda Connect (Type B))
Indicator/Beep
How to check
The intermittent sound of the
Remove any foreign material from the sensor area. If the system does not re-
buzzer is heard 5 times.
cover, have the vehicle inspected at an Authorized Mazda Dealer.
A certain obstruction detection
indicator is continuously dis-
Refer to Obstruction Detection Indication on page 4-300.
played.
4-313
Interior Features
5
Use of various features for ride comfort, including air-conditioning
system and audio system.
Climate Control System
5-2
Mazda Connect Basic
Operating Tips
5-2
Operations
5-37
Vent Operation
5-3
Connected Service (If
Manual Type
5-5
applicable)
5-53
Fully Automatic Type
5-9
Interior Equipment
5-55
Mazda Connect (Mazda Connect
Sunvisors
5-55
(Type A))
5-14
Interior Lights
5-56
What is Mazda Connect ?
5-14
Accessory Sockets
5-60
Mazda Connect Basic
USB Power Outlet*
5-62
Operations
5-17
Wireless Charger (Qi)*
5-63
Cup Holder
5-66
Mazda Connect (Mazda Connect
Bottle Holder
5-67
(Type B))
5-33
Storage Compartments
5-68
What is Mazda Connect ?
5-33
*Some models.
5-1

Interior Features
Climate Control System
because a special device is required for
Operating Tips
the air conditioner maintenance.
Operate the climate control system with
For details, consult an Authorized
the engine running.
Mazda Dealer.
To prevent the battery from being
discharged, do not leave the fan control
dial/switch on for a long period of time
with the ignition switched ON when the
engine is not running.
Clear all obstructions such as leaves,
snow and ice from the hood and the air
Label
inlet in the cowl grille to improve the
system efficiency.
Use the climate control system to defog
the windows and dehumidify the air.
The recirculate mode should be used
when driving through tunnels or while
in a traffic jam, or when you would like
to shut off outside air for quick cooling
of the interior.
Use the outside air position for
ventilation or windshield defrosting.
If the vehicle has been parked in direct
sunlight during hot weather, open the
windows to let warm air escape, then
run the climate control system.
Run the air conditioner about 10
minutes at least once a month to keep
internal parts lubricated.
Have the air conditioner checked before
the weather gets hot. Lack of refrigerant
may make the air conditioner less
efficient.
The refrigerant specifications are
indicated on a label attached to the
inside of the engine compartment. If the
wrong type of refrigerant is used, it
could result in a serious malfunction of
the air conditioner. Consult a
professional, government certified
repairer for the inspection or repair
5-2

Interior Features
Climate Control System
Center Vents
Vent Operation
Knob
Open
▼ Adjusting the Vents
Directing airflow
To adjust the direction of airflow, move
Close
the adjustment knob.
Dial
NOTE
Rear Vents*
When using the air conditioner under
Knob
Dial
humid ambient temperature conditions,
Open
the system may blow fog from the vents.
This is not a sign of trouble but a result
of humid air being suddenly cooled.
Close
The air vents can be fully opened and
closed by operating the dial.
Side Vents
Knob
Open
Close
Dial
*Some models.
5-3

Interior Features
Climate Control System
▼ Selecting the Airflow Mode
Dashboard Vents
Defroster and Floor Vents
Dashboard and Floor Vents
Defroster Vents
Floor Vents
* With rear vents
NOTE
The location airflow exits the air vents and the airflow amount may change depending on
the open or close status of the air vents.
5-4

Interior Features
Climate Control System
Manual Type
Temperature control dial
Fan control dial
Mode selector dial
A/C switch
Air intake selector switch
Rear window defogger switch
▼ Control Switches
NOTE
The mode selector dial can be set at the
Temperature control dial
intermediate positions (
) between each
This dial controls temperature. Turn it
mode. Set the dial to an intermediate
clockwise for hot and counterclockwise
position if you want to split the airflow
for cold.
between the two modes.
NOTE
For example, when the mode selector
When the mode is set to
,
or a
dial is at the position between the
position in between them with the fan
and positions, airflow from the floor
control dial in a position other than 0 and
vent is less than that of the
position.
the temperature control dial in the
A/C switch
maximum cold position, the air intake
selector switches to the recirculated air
Press the A/C switch to turn the air
position and the A/C turns on
conditioner on. The indicator light on the
automatically.
switch will illuminate when the fan control
If A/C is not desired, press the A/C switch
dial is in any position except OFF.
to turn it off.
Press the switch once again to turn the air
Fan control dial
conditioner off.
This dial allows variable fan speeds.
NOTE
The fan has seven speeds.
The air conditioner may not function when
Mode selector dial
the outside temperature approaches 0 °C
(32 °F).
Turn the mode selector dial to select
airflow mode (page 5-4).
5-5
Interior Features
Climate Control System
Air intake selector
To exit the default recirculated air
position, press the air intake selector
This switch controls the source of air
switch to select the outside air position.
entering the vehicle.
When the air intake selector switch is set
to the outside air position and the
Outside or recirculated air positions can be
outside temperature exceeds about 73°F
selected. Press the switch to select outside/
(23౯), the climate control system may
recirculated air positions.
automatically select the recirculated air
Recirculated air position (indicator light
position to improve the efficiency of the
illuminated)
climate control system.
Outside air is shut off. Air within the
Rear window defogger switch
vehicle is recirculated. Use this position
Press the rear window defogger switch to
when going through tunnels, driving in
defrost the rear window.
congested traffic (high engine exhaust
Refer to Rear Window Defogger on page
areas), or when quick cooling is desired.
4-84.
Outside air position (indicator light
▼ Heating
turned off)
1. Set the mode selector dial to the
Outside air is allowed to enter the cabin.
position.
Use this position for ventilation or
2. Set the air intake selector to the outside
windshield defrosting.
air position (indicator light turns off).
3. Set the temperature control dial to the
WARNING
hot position.
4. Set the fan control dial to the desired
Do not use the
position in cold or rainy
speed.
weather:
5. If dehumidified heating is desired, turn
Using the
position in cold or rainy
on the air conditioner.
weather is dangerous as it will cause the
NOTE
windows to fog up. Your vision will be
hampered, which could lead to a serious
If the windshield fogs up easily, set the
accident.
mode selector dial to the position.
If cooler air is desired at face level, set
NOTE
the mode selector dial at the position
The recirculated air position is the
and adjust the temperature control dial
default position whenever the ignition is
to maintain maximum comfort.
switched ON, the climate control system
The air to the floor is warmer than air
is on, and the outside temperature
to the face (except when the temperature
exceeds about 73°F (23౯).
control dial is set at the extreme hot or
cold position).
5-6

Interior Features
Climate Control System
▼ Cooling
The air to the floor is warmer than air
to the face (except when the temperature
1. Set the mode selector dial to the
control dial is set at the extreme hot or
position.
cold position).
2. Set the temperature control dial to the
cold position.
▼ Ventilation
3. Set the fan control dial to the desired
1. Set the mode selector dial to the
speed.
position.
4. Turn on the air conditioner by pressing
2. Set the air intake selector to the outside
the A/C switch.
air position (indicator light turns off).
5. After cooling begins, adjust the fan
3. Set the temperature control dial to the
control dial and temperature control
desired position.
dial as needed to maintain maximum
4. Set the fan control dial to the desired
comfort.
speed.
CAUTION
▼ Windshield Defrosting and
Defogging
If the air conditioner is used while driving
1. Set the mode selector dial to the
up long hills or in heavy traffic, monitor the
position.
high engine coolant temperature warning
2. Set the temperature control dial to the
indication/warning light to see if it is
desired position.
illuminated or flashing (page 7-22).
3. Set the fan control dial to the desired
The air conditioner may cause engine
speed.
overheating. If the warning light is
4. If dehumidified heating is desired, turn
illuminated or flashing, turn the air
on the air conditioner.
conditioner off (page 7-17).
WARNING
NOTE
When maximum cooling is desired, set
Do not defog the windshield using the
the temperature control dial to the
position with the temperature control set
extreme cold position and set the air
to the cold position:
intake selector to the recirculated air
Using the position with the temperature
position, then turn the fan control dial
control set to the cold position is
fully clockwise.
dangerous as it will cause the outside of the
If warmer air is desired at floor level,
windshield to fog up. Your vision will be
set the mode selector dial at the
hampered, which could lead to a serious
position and adjust the temperature
accident. Set the temperature control to
control dial to maintain maximum
the hot or warm position when using the
comfort.
position.
5-7
Interior Features
Climate Control System
NOTE
For maximum defrosting, turn on the air
conditioner, set the temperature control
dial to the extreme hot position, and turn
the fan control dial fully clockwise.
If warm air is desired at the floor, set the
mode selector dial to the position.
In the
or
position, the air
conditioner is automatically turned on
and the outside air position is
automatically selected to defrost the
windshield. In the or
position, the
outside air position cannot be changed
to the recirculated air position.
▼ Dehumidifying
Operate the air conditioner in cool or cold
weather to help defog the windshield and
side windows.
1. Set the mode selector dial to the
desired position.
2. Set the air intake selector to the outside
air position (indicator light turns off).
3. Set the temperature control dial to the
desired position.
4. Set the fan control dial to the desired
speed.
5. Turn on the air conditioner by pressing
the A/C switch.
NOTE
One of the functions of the air conditioner
is dehumidifying the air and, to use this
function, the temperature does not have to
be set to cold. Therefore, set the
temperature control dial to the desired
position (hot or cold) and turn on the air
conditioner when you want to dehumidify
the cabin air.
5-8

Interior Features
Climate Control System
Fully Automatic Type
Climate control system information is displayed on the display.
Airflow display
Air intake selector
Windshield defroster switch
(recirculated air position)
Rear window defogger switch
Air intake selector
(outside air position)
SYNC (synchronized
AUTO switch
Power switch
temperature) switch
Driver temperature
Passenger temperature
control dial
Fan control
control dial
Temperature setting display
switch
Temperature setting display
(driver’s side)
(Passenger’s side)
A/C switch
Mode selector switch
Mode selector
A/C mode display
display
▼ Control Switches
If any of the following switches are
operated while in auto control, the
AUTO switch
AUTO switch indicator turns off.
By pressing the AUTO switch the
Mode selector switch
following functions will be automatically
Fan control switch
controlled in accordance with the selected
Windshield defroster switch
set temperature:
The functions for switches other than
Airflow temperature
those operated continue to operate in
Amount of airflow
auto control.
Selection of airflow mode
Power switch (Fan On/Off)
Outside/Recirculated air selection
Air conditioner operation
The climate control system turns on or off
by pressing the power switch.
NOTE
Temperature control dial
AUTO switch indicator light
This dial controls temperature. Turn it
When on, it indicates auto operation,
clockwise for hot and counterclockwise
and the system will function
for cold.
automatically.
5-9

Interior Features
Climate Control System
Turn the temperature control dial to adjust
Fan control switch
the temperature between 15 °C (60 °F) and
The fan has 7 speeds. The selected speed
29 °C (84 °F).
will be displayed.
When the SYNC switch is on:
Mode selector switch
Turn the driver temperature control dial
to control the temperature throughout
The desired airflow mode can be selected
the entire cabin.
(page 5-4).
When the SYNC switch is off:
NOTE
Turn the driver or front passenger
temperature control dial to
With the airflow mode set to the
independently control the temperature
position and the temperature control
on each side of the cabin.
dial set at a medium temperature,
heated air is directed to the feet and air
NOTE
at a comparably lower temperature will
flow through the central, left and right
The climate control system changes to
vents.
the individual operation mode (SYNC
To set the air vent to
, press the
switch indicator light turns off) by
windshield defroster switch.
turning the front passenger temperature
In the
or
position, the air
control dial even when the SYNC switch
conditioner is automatically turned on
is on, which allows individual control of
and the outside air position is
the set temperature for the driver and
automatically selected to defrost the
front passenger.
windshield. In the or
position, the
When you set the temperature to the
outside air position cannot be changed
lower or upper limit, “Lo” or “Hi” is
to the recirculated air position.
displayed.
The temperature units for the
A/C switch
temperature setting display can be
Pressing the A/C switch while the AUTO
changed in conjunction with the
switch is turned on will turn off the air
temperature units for the outside
conditioner (cooling/dehumidifying
temperature display.
functions).
(Instrument cluster Type A)
The on/off of the air conditioner switches
Refer to Outside Temperature Display
each time the A/C switch is pressed.
on page 4-19.
(Instrument cluster Type B)
NOTE
Refer to Outside Temperature Display
The air conditioner operates when the
on page 4-37.
A/C switch is pressed while the air
(Instrument cluster Type C)
conditioner is turned off.
Refer to Outside Temperature Display
The air conditioner may not function
on page 4-51.
when the outside temperature
approaches 0 °C (32 °F).
5-10

Interior Features
Climate Control System
Air intake selector
When the air intake selector switch is set
to the outside air position and the
Outside or recirculated air positions can be
outside temperature exceeds about 73°F
selected. Press the switch to select outside/
(23౯), the climate control system may
recirculated air positions.
automatically select the recirculated air
Recirculated air position (
)
position to improve the efficiency of the
climate control system.
Outside air is shut off. Air within the
vehicle is recirculated. Use this position
SYNC (Synchronized Temperature)
when going through tunnels, driving in
switch
congested traffic (high engine exhaust
Use the SYNC switch to change the mode
areas), or when quick cooling is desired.
between the individual operation (driver
Outside air position (
)
and passenger) and interconnection
(simultaneous) modes.
Outside air is allowed to enter the cabin.
Use this position for ventilation or
Interconnection mode (indicator light
windshield defrosting.
turns on)
The set temperature for the driver and
WARNING
front passenger is controlled
simultaneously.
Do not use the
position in cold or rainy
Individual operation mode (indicator
weather:
light turns off)
Using the
position in cold or rainy
weather is dangerous as it will cause the
The set temperature can be controlled
windows to fog up. Your vision will be
individually for the driver and front
hampered, which could lead to a serious
passenger.
accident.
Windshield defroster switch
NOTE
Press the switch to defrost the windshield
and front door windows.
The recirculated air position is the
Refer to Windshield Defrosting and
default position whenever the ignition is
Defogging on page 5-12.
switched ON, the climate control system
is on, and the outside temperature
Rear window defogger switch
exceeds about 73°F (23౯).
Press the rear window defogger switch to
To exit the default recirculated air
defrost the rear window.
position, press the air intake selector
Refer to Rear Window Defogger on page
switch to select the outside air position.
4-84.
5-11

Interior Features
Climate Control System
▼ Operation of Automatic Air
WARNING
Conditioner
1. Press the AUTO switch. Selection of
Set the temperature control to the hot or
the airflow mode, air intake selector
warm position when defogging (
and amount of airflow will be
position):
automatically controlled.
Using the position with the temperature
2. Use the temperature control dial to
control set to the cold position is
select a desired temperature.
dangerous as it will cause the outside of the
If you want to set the temperature on
windshield to fog up. Your vision will be
the front passenger's side separately
hampered, which could lead to a serious
from the driver's side, turn the front
accident.
passenger temperature control dial to
switch the mode automatically to the
NOTE
individual operation mode and set the
Use the temperature control dial to
temperature for the front passenger's
increase the air flow temperature and
side.
defog the windshield more quickly.
To turn off the system, press the power
switch.
▼ Sunlight/Interior Temperature
Sensor
NOTE
Sunlight sensor
Set the control dial to the recommended
temperature of 22 °C (72 °F), and then
Do not place objects on the sunlight
adjust it as desired.
sensor. Otherwise, the interior temperature
Setting the temperature to maximum hot
may not adjust correctly.
or cold will not provide the desired
Sunlight sensor
temperature at a faster rate.
When selecting heat, the system will
restrict airflow until the engine has
warmed to prevent cold air from
blowing out of the vents.
▼ Windshield Defrosting and
Defogging
Press the windshield defroster switch.
In this position, the outside air position is
automatically selected, and the air
conditioner automatically turns on. The air
conditioner will directly dehumidify the
air to the front windshield and side
windows on page 5-4.
Airflow amount will be increased.
5-12

Interior Features
Climate Control System
Interior temperature sensor
Do not cover the interior temperature
sensor. Otherwise, the interior temperature
may not adjust correctly.
Interior temperature sensor
5-13

Interior Features
Mazda Connect (Mazda Connect (Type A))
What is Mazda Connect ?
▼ What is Mazda Connect ?
For vehicles with the following display type, refer to the following page because your
vehicle is equipped with Mazda Connect (Type B).
Refer to What is Mazda Connect ? 5-33.
This manual only indicates a part of the information for Mazda Connect. For details, check
the Web owner's manual at the Mazda site for each country and region.
1. Radio
2. Bluetooth® Audio/Hands-Free Call/SMS (Short Message Service)/E-mail
3. USB Audio
4. AUX
5. USB port*1/Auxiliary jack*1/SD card slot*2
5-14

Interior Features
Mazda Connect (Mazda Connect (Type A))
6. SD card (Navigation system)*
*1
The location of the USB slot/auxiliary jack differs depending on the specifications.
*2
The SD card slot is for the navigation system only. For vehicles with the navigation
system, the SD card (Mazda genuine) with stored map data is inserted into the SD card
slot and used.
Icon
Function
Applications
Information such as average fuel economy, maintenance, and warnings can be verified. In
addition, SiriusXM®, Apple CarPlay™*, and Android™* can be selected.
Depending on the grade and specification, the screen display may differ.
Entertainment
Operates audio such as the radio. The audio source most recently used is displayed. An
audio source which cannot be used at that time is skipped and the previous audio source is
displayed.
To change the audio source, select the
icon displayed at the bottom of the screen.
Communication
Bluetooth® related functions are available.
Navigation
Navigation screen is displayed (vehicles with navigation system).
If the SD card for the navigation system is not inserted, the compass indicating the direc-
tion in which the vehicle is moving is displayed.
The compass may not indicate the correct bearing when the vehicle is stopped or traveling
at a slow speed.
Settings
Overall setting menu (Such as display, sound, Bluetooth® and Language).
Depending on the grade and specification, the screen display may differ.
*Some models.
5-15
Interior Features
Mazda Connect (Mazda Connect (Type A))
WARNING
Always adjust Mazda Connect while the vehicle is stopped:
Do not adjust Mazda Connect with the Commander switch while driving the vehicle.
Adjusting Mazda Connect with the Commander switch while driving the vehicle is dangerous
as it could distract your attention from the vehicle operation which could lead to a serious
accident.
Even if the audio remote control switches are equipped on the steering wheel, learn to use the
switches without looking down at them so that you can keep your maximum attention on the
road while driving the vehicle.
Do not allow the connection plug cord to get tangled with the selector lever:
Allowing the plug cord to become tangled with the selector lever is dangerous as it could
interfere with driving, resulting in an accident.
Do not adjust a mobile device or a similar product while driving the vehicle:
Adjusting a mobile device or a similar product while driving the vehicle is dangerous as it
could distract your attention from the vehicle operation which could lead to a serious
accident. Always adjust a mobile device or a similar product while the vehicle is stopped.
CAUTION
For the purposes of safe driving, adjust the audio volume to a level that allows you to hear
sounds outside of the vehicle including car horns and particularly emergency vehicle sirens.
NOTE
Do not use Mazda Connect for a long time with the engine stopped. Otherwise, the battery
power could be depleted.
If a mobile phone or CB radio is used in or near the vehicle, it could cause noise to occur
from the audio system. However, this does not indicate a problem.
5-16
Interior Features
Mazda Connect (Mazda Connect (Type A))
Mazda Connect Basic Operations
▼ Mazda Connect Basic Operations
NOTE
The explanation of functions described in this manual may differ from the actual operation,
and the shapes of screens and buttons and the letters and characters displayed may also
differ from the actual appearance.
Additionally, depending on future software updates, the content may successively change
without notice.
▼ Touch Panel Operation
CAUTION
Do not press the screen strongly or press it with a sharp-pointed object. Otherwise, the screen
could be damaged.
NOTE
For safety reasons, operation of the center display is disabled while the vehicle is being
driven. However, items not displayed in gray can be operated using the commander switch
while the vehicle is being driven.
Touch & Tap
1. Touch or tap on the item indicated on the screen.
5-17

Interior Features
Mazda Connect (Mazda Connect (Type A))
2. The operation is launched and the next item is displayed.
Slide
1. Touch the setting item displaying a slider bar.
2. Touch the slider with your finger and move to the desired level.
Swipe
1. Touch the screen with your finger and move up or down.
2. Items which were not displayed can be displayed.
Return to previous screen
1. Touch the
5-18

Interior Features
Mazda Connect (Mazda Connect (Type A))
Displaying the home screen
1. Touch the
▼ Commander Switch Operation
NOTE
For safety reasons, some operations are disabled while the vehicle is being driven.
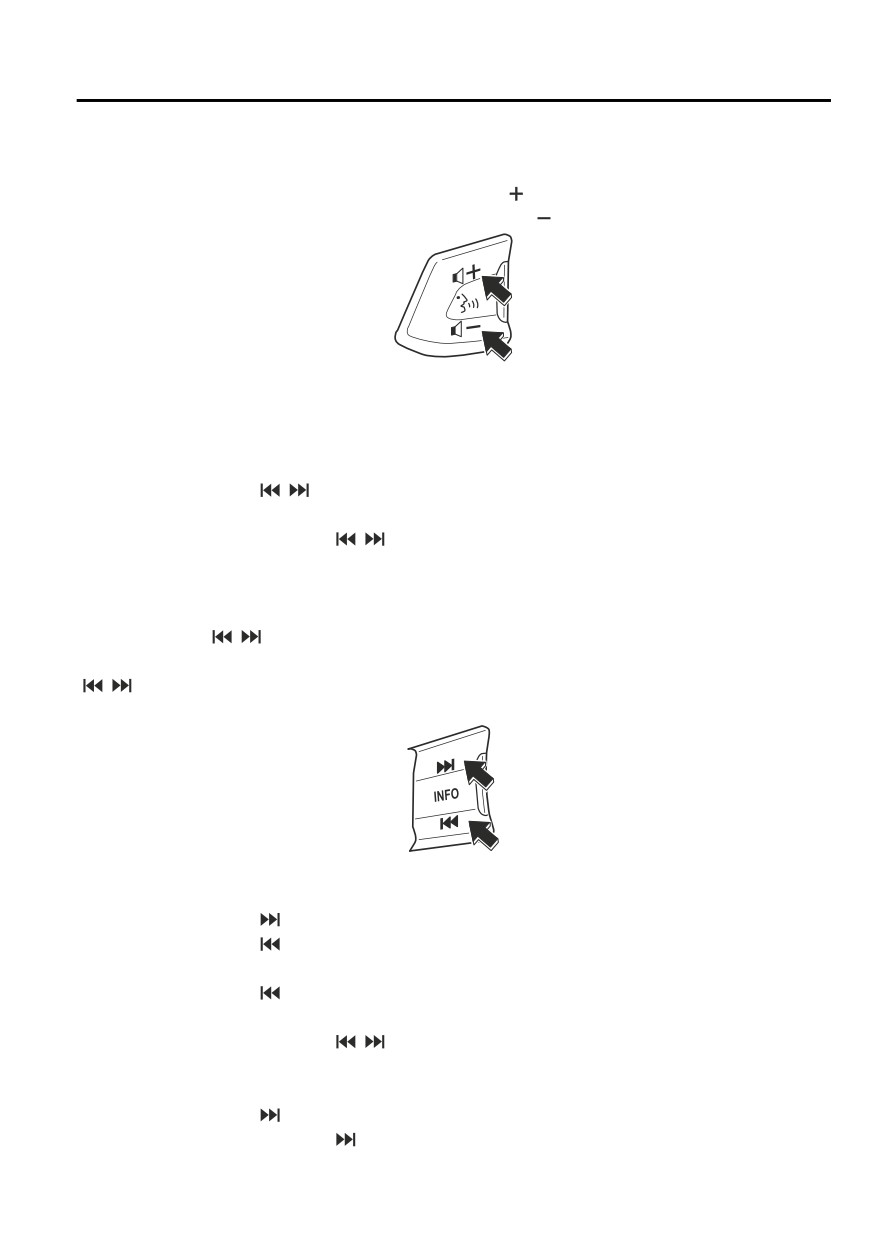
Volume dial operation
Volume dial
Press the volume dial to mute and pause. However, while an audio source which cannot be
paused such as FM radio is playing, only mute is available. Press the volume dial again to
resume the audio.
Turn the volume dial to adjust the volume. The volume increases by turning the dial
clockwise, and decreases by turning it counterclockwise.
Switches around commander knob
The following operations can be done by pressing the switches around the commander
knob.
: Displays the home screen.
: Displays the Entertainment screen.
: Displays the Navigation screen (Only navigation-equipped vehicles). For operation
of the Navigation screen, refer to the navigation system manual. If the SD card for the
navigation system is not inserted, the compass indicating the direction in which the vehicle
is moving is displayed.
5-19

Interior Features
Mazda Connect (Mazda Connect (Type A))
: Displays the Favorites screen. Long-press to store particular items in Favorites. (Radio,
phonebook and destination of the navigation system can be programmed.)
: Returns to previous screen.
Commander knob operation
(Selection of icons on screen)
1. Tilt or turn the commander knob and move the cursor to the desired icon.
2. Press the commander knob and select the icon.
NOTE
Long-press operation of the commander knob is also possible for some functions.
▼ Audio Remote Control Switch Operation
5-20
Interior Features
Mazda Connect (Mazda Connect (Type A))
Adjusting the Volume
To increase the volume, press up the volume switch (
).
To decrease the volume, press down the volume switch (
).
Seek Switch
AM/FM/SiriusXM® radio
Press the seek switch (
,
). The radio switches to the next/previous stored station in the
order that it was stored.
Press and hold the seek switch (
,
) to seek all usable stations at a higher or lower
frequency whether programmed or not.
Radio stations which have been previously stored in favorites can be called up by pressing
the seek switch (
,
) while any radio station stored in the favorite radio is being received.
Radio stations can be called up in the order they were stored with each press of the switch
(
,
).
USB Audio/Bluetooth® Audio
Press the seek switch (
) to skip forward to the beginning of the next track.
Press the seek switch (
) within a few seconds after playback begins to track down to the
beginning of the previous track.
Press the seek switch (
) after a few seconds have elapsed to start playback from the
beginning of the current track.
Press and hold the seek switch (
,
) to continuously switch the tracks up or down.
Pandora®/Aha™/Stitcher™ Radio
Press the seek switch (
) to skip forward to the beginning of the next track.
Press and hold the seek switch (
) to evaluate the playback of the current song as “Like”.
5-21

Interior Features
Mazda Connect (Mazda Connect (Type A))
Press and hold the seek switch (
) to evaluate the playback of the current song as
“Dislike”.
Pick up/hang up the Phone, or Activate Voice Control Using the Switch
Talk button
Activates the voice recognition. In addition, it skips the voice guidance.
Pick-up button
Answers incoming calls. In addition, after selecting a contact or dialing a number, it places
the call when the button is pressed.
Hang-up button
Ends the call or refuses an incoming call. In addition, it ends the voice recognition
operation.
▼ Operation Using Voice Recognition Function
Talk button
Hang-up button
Talk button
Activates the voice recognition. In addition, it skips the voice guidance.
Hang-up button
Ends the voice recognition operation.
Basic Operation Method
Activating Voice Recognition
Press the talk button.
5-22
Interior Features
Mazda Connect (Mazda Connect (Type A))
Ending Voice Recognition
Use one of the following methods:
Press the hang-up button.
Say, “Cancel”.
Operate the commander switch or the center display (only when vehicle is stopped).
Skipping Voice Guidance (for faster operation)
Press and release the talk button.
Troubleshooting for Voice Recognition
If you do not understand an operation method while in the voice recognition mode, say
“Tutorial” or “Help”.
Commands useable anytime during voice recognition
“Go Back” and “Cancel” are commands which can be used at anytime during voice
recognition.
Returning to previous operation
To return to the previous operation, say, “Go Back” while in voice recognition mode.
Cancel
To put the Bluetooth® Hands-Free system in standby mode, say, “Cancel” while in voice
recognition mode.
To prevent a deterioration in the voice recognition rate and voice quality, the following
points should be observed:
The voice recognition cannot be performed while voice guidance or the beep sound is
operating. Wait until the voice guidance or the beep sound is finished before saying a
command.
Phone related commands are available only when a phone is connected via Bluetooth®.
Make sure a phone is connected via Bluetooth® before you operate phone related voice
commands.
Music play commands, such as Play Artist and Play Album can be used only in USB
audio mode.
Do not speak too slowly or loudly (no loud voice).
Speak clearly, without pausing between words or numbers.
Dialects or different wording other than hands-free prompts cannot be recognized by
voice recognition. Speak in the wording specified by the voice commands.
It is not necessary to face the microphone or be close to it. Speak the voice commands
while maintaining a safe driving position.
Close the windows and/or the moonroof to reduce loud noises from outside the vehicle, or
turn down the airflow of the climate control system while Bluetooth® Hands-Free is being
used.
5-23

Interior Features
Mazda Connect (Mazda Connect (Type A))
Make sure the vents are not directing air up towards the microphone.
Voice Command List
Voice command
When the talk button is pressed and the following command is spoken, the audio or
navigation can be operated. The commands in the () can be omitted. The specified name and
number are put into the {}.
Standard command
Voice command
Function
Help
Usable commands can be verified.
Tutorial
Basic voice commands and methods of use can be verified.
(Navigate/Take me/Drive) Home
Set the destination to Home.
Communication (phone) related command
Voice command
Function
Call {name in phonebook} (mobile/
home/work/other)
Calls to the contact in the downloaded phonebook.
Example: “Call John Mobile”
Redial
Calls to the last contact you called.
Callback
Calls to the last contact who called you.
Entertainment (audio) related command
Corresponding audio
Voice command
Function
source
Switches the audio source to Bluetooth® audio.
(Go to/Play) Bluetooth (Audio)
Can also switch to each audio source by similarly us-
All
ing commands such as FM, AM, or USB.
Play Artist {Artist name}
Plays the selected artist.
USB
Navigation related command*
For the navigation screen voice commands, refer to the separate navigation system manual.
NOTE
Some commands cannot be used depending on the vehicle specifications.
Some commands cannot be used depending on the device connection conditions and the
use conditions.
The commands indicated in this manual are some examples of usable voice commands.
Some commands cannot be used depending on the vehicle specifications.
5-24
*Some models.
Interior Features
Mazda Connect (Mazda Connect (Type A))
▼ Appendix
Gracenote® Database
When a USB device or Bluetooth® device is connected to this unit and the audio is played,
the album name, artist name, genre and title information are automatically displayed if there
is a match in the vehicle's database compilation to the music being played. The information
stored in this device uses database information in the Gracenote® music recognition service.
This application or device contains software from Gracenote, Inc. of Emeryville, California
(“Gracenote”). The software from Gracenote (the “Gracenote Software”) enables this
application to perform disc and/or file identification and obtain music-related information,
including name, artist, track, and title information (“Gracenote Data”) from online servers or
embedded databases (collectively, “Gracenote Servers”) and to perform other functions. You
may use Gracenote Data only by means of the intended End-User functions of this
application or device.
You agree that you will use Gracenote Data, the Gracenote Software, and Gracenote Servers
for your own personal non-commercial use only. You agree not to assign, copy, transfer or
transmit the Gracenote Software or any Gracenote Data to any third party. YOU AGREE
NOT TO USE OR EXPLOIT GRACENOTE DATA, THE GRACENOTE SOFTWARE,
OR GRACENOTE SERVERS, EXCEPT AS EXPRESSLY PERMITTED HEREIN.
You agree that your non-exclusive license to use the Gracenote Data, the Gracenote
Software, and Gracenote Servers will terminate if you violate these restrictions. If your
license terminates, you agree to cease any and all use of the Gracenote Data, the Gracenote
Software, and Gracenote Servers. Gracenote reserves all rights in Gracenote Data, the
Gracenote Software, and the Gracenote Servers, including all ownership rights. Under no
circumstances will Gracenote become liable for any payment to you for any information that
you provide. You agree that Gracenote, Inc. may enforce its rights under this Agreement
against you directly in its own name.
The Gracenote service uses a unique identifier to track queries for statistical purposes. The
purpose of a randomly assigned numeric identifier is to allow the Gracenote service to count
queries without knowing anything about who you are. For more information, see the web
page for the Gracenote Privacy Policy for the Gracenote service.
The Gracenote Software and each item of Gracenote Data are licensed to you “AS IS.”
Gracenote makes no representations or warranties, express or implied, regarding the
accuracy of any Gracenote Data from in the Gracenote Servers. Gracenote reserves the right
to delete data from the Gracenote Servers or to change data categories for any cause that
Gracenote deems sufficient. No warranty is made that the Gracenote Software or Gracenote
Servers are error-free or that functioning of Gracenote Software or Gracenote Servers will
be uninterrupted. Gracenote is not obligated to provide you with new enhanced or additional
data types or categories that Gracenote may provide in the future and is free to discontinue
its services at any time.
5-25

Interior Features
Mazda Connect (Mazda Connect (Type A))
GRACENOTE DISCLAIMS ALL WARRANTIES EXPRESS OR IMPLIED,
INCLUDING, BUT NOT LIMITED TO, IMPLIED WARRANTIES OF
MERCHANTABILITY, FITNESS FOR A PARTICULAR PURPOSE, TITLE, AND
NON-INFRINGEMENT. GRACENOTE DOES NOT WARRANT THE RESULTS THAT
WILL BE OBTAINED BY YOUR USE OF THE GRACENOTE SOFTWARE OR ANY
GRACENOTE SERVER. IN NO CASE WILL GRACENOTE BE LIABLE FOR ANY
CONSEQUENTIAL OR INCIDENTAL DAMAGES OR FOR ANY LOST PROFITS OR
LOST REVENUES.
Updating the database
The Gracenote® media database can be updated using USB device.
1. Connect a USB device containing the software for updating Gracenote®.
2. Select the
icon on the home screen to display the Settings screen.
3. Select the
tab and select
4. Select
. The list of the update package stored in the USB device and the version
are displayed.
5. Select the package to use the update.
6. Select
NOTE
Gracenote® can be downloaded from the Mazda Hands-free Website.
SiriusXM® Satellite Radio*
SiriusXM® All Access Subscription
Hopefully, you're already loving SiriusXM in your new Mazda. But don't stop there — you
can also listen on the app and online. All Access is the very best subscription package -
with the most channels and the most flexibility. With All Access, you get every channel
available on satellite radio, plus you can listen on the app and online — so you can enjoy
SiriusXM wherever you are. Here's what's included:
-Over 150 satellite channels to enjoy in your car, coast-to-coast, 24/7.
-All kinds of commercial-free music, plus every major sport, world-class news and the
biggest names in talk & entertainment.
-All of our premium programming, including Howard Stern, every NFL, MLB®, and NBA
game, NHL® games, every NASCAR® race, 24/7 talk channels dedicated to the biggest
leagues, and much more.
5-26
*Some models.
Interior Features
Mazda Connect (Mazda Connect (Type A))
All SiriusXM services require a subscription, sold separately or as a package by SiriusXM
Radio Inc. (or, in Canada, SiriusXM Canada Inc.), after any trial subscription which may be
included with your vehicle purchase or lease. To subscribe after your trial subscription, call
1-877-447-0011 (U.S.A.) or 1-877-438-9677 (Canada).
CAUTION
It is prohibited to copy, decompile, disassemble, reverse engineer, hack, manipulate, or
otherwise make available any technology or software incorporated in receivers compatible
with the SiriusXM satellite radio service or that support the SiriusXM website, the online
service or any of its content. Furthermore, the AMBE® voice compression software included in
this product is protected by intellectual property rights including patent rights, copyrights,
and trade secrets of Digital Voice Systems, Inc. The SiriusXM Service may include traffic,
weather and other content and emergency alert information and data. Such information and
data is not for “safety for life”, but is merely supplemental and advisory in nature and,
therefore, cannot be relied upon as safety critical. Neither SiriusXM nor Mazda is responsible
for any errors inaccuracies in the SiriusXM data services or its use in applications. The SiriusXM
content is subject to change without notice.
HD Radio™
What is HD Radio™ Technology and how does it work?
HD Radio™ Technology is the digital evolution of analog AM/FM radio. Your radio
product has a special receiver which allows it to receive digital broadcasts (where available)
in addition to the analog broadcasts it already receives. Digital broadcasts have better sound
quality than analog broadcasts as digital broadcasts provide free, crystal clear audio. For
more information, and a guide to available radio stations and programming, please visit
Benefits of HD Radio™ Technology
(Information)
The song title, artist name, album name and genre will appear on the screen when available
by the radio station.
(Multicast)
On the FM radio frequency most digital stations have “multiple” or supplemental programs
on each FM station.
HD Radio Technology manufactured under license from iBiquity Digital Corporation. U.S.
and Foreign Patents.
For patents see http://dts.com/patents.
5-27
Interior Features
Mazda Connect (Mazda Connect (Type A))
Apple CarPlay™
Apple CarPlay™ allows you to make calls, send or receive messages, and listen to music
using your iPhone® with the vehicle's audio system, or search for destinations using the
maps. In addition, voice recognition operation is possible using Siri®.
CAUTION
¾ YOU EXPRESSLY ACKNOWLEDGE AND AGREE THAT USE OF APPLE CARPLAY™ (“THE
APPLICATION”) IS AT YOUR SOLE RISK AND THAT THE ENTIRE RISK AS TO SATISFACTORY
QUALITY, PERFORMANCE, ACCURACY AND EFFORT IS WITH YOU TO THE MAXIMUM EXTENT
PERMITTED BY APPLICABLE LAW, AND THAT THE APPLICATION AND INFORMATION ON THE
APPLICATION IS PROVIDED “AS IS” AND “AS AVAILABLE”, WITH ALL FAULTS AND WITHOUT
WARRANTY OF ANY KIND, AND MAZDA HEREBY DISCLAIMS ALL WARRANTIES AND
CONDITIONS WITH RESPECT TO THE APPLICATION AND INFORMATION ON THE
APPLICATION, EITHER EXPRESS, IMPLIED OR STATUTORY, INCLUDING, BUT NOT LIMITED TO,
THE IMPLIED WARRANTIES AND/OR CONDITIONS OF MERCHANTABILITY, SATISFACTORY
QUALITY, FITNESS FOR A PARTICULAR PURPOSE, ACCURACY, QUIET ENJOYMENT, AND
NONINFRINGEMENT OF THIRD PARTY RIGHTS. AS EXAMPLES, AND WITHOUT LIMITATION,
MAZDA DISCLAIMS ANY WARRANTY REGARDING THE ACCURACY OF DATA PROVIDED BY
THE APPLICATION, SUCH AS THE ACCURACY OF DIRECTIONS, ESTIMATED TRAVEL TIME,
SPEED LIMITS, ROAD CONDITIONS, NEWS, WEATHER, TRAFFIC, OR OTHER CONTENT
PROVIDED BY APPLE, ITS AFFILIATES, OR THIRD PARTY PROVIDERS; MAZDA DOES NOT
GUARANTEE AGAINST LOSS OF APPLICATION DATA, WHICH MAY BE LOST AT ANY TIME;
MAZDA DOES NOT GUARANTEE THAT THE APPLICATION OR ANY SERVICES PROVIDED
THROUGH THEM WILL BE PROVIDED AT ALL TIMES OR THAT ANY OR ALL SERVICES WILL BE
AVAILABLE AT ANY PARTICULAR TIME OR LOCATION. FOR EXAMPLE, SERVICES MAY BE
SUSPENDED OR INTERRUPTED WITHOUT NOTICE FOR REPAIR, MAINTENANCE, SECURITY
FIXES, UPDATES, ETC., SERVICES MAY BE UNAVAILABLE IN YOUR AREA OR LOCATION, ETC.
IN ADDITION, YOU UNDERSTAND THAT CHANGES IN THIRD PARTY TECHNOLOGY OR
GOVERNMENT REGULATION MAY RENDER THE SERVICES AND/OR APPLICATIONS
OBSOLETE AND/OR UNUSABLE.
TO THE EXTENT NOT PROHIBITED BY LAW, IN NO EVENT SHALL MAZDA OR ITS AFFILIATES
BE LIABLE FOR PERSONAL INJURY, OR ANY INCIDENTAL, SPECIAL, INDIRECT OR
CONSEQUENTIAL DAMAGES WHATSOEVER, INCLUDING, WITHOUT LIMITATION, DAMAGES
FOR LOSS OF PROFITS, CORRUPTION OR LOSS OF DATA, FAILURE TO TRANSMIT OR RECEIVE
ANY DATA, BUSINESS INTERRUPTION OR ANY OTHER COMMERCIAL DAMAGES OR LOSSES,
ARISING OUT OF OR RELATED TO THE APPLICATION OR YOUR USE OF OR INABILITY TO USE
THE APPLICATION OR INFORMATION ON THE APPLICATION.
¾ When using Apple CarPlay™, please avoid distraction and use Apple CarPlay™ responsibly.
Stay fully aware of driving conditions and always obey applicable laws.
5-28
Большое спасибо!
Ваше мнение очень важно для нас.
Нет комментариевНе стесняйтесь поделиться с нами вашим ценным мнением.
Текст