Mazda CX-5 (2023 year). Manual in english — page 3
Essential Safety Equipment
SRS Air Bags
How the SRS Air Bags Work
Your Mazda is equipped with the following types of SRS air bags. SRS air bags are
designed to work together with the seat belts to help to reduce injuries during an accident.
The SRS air bags are designed to provide further protection for passengers in addition to the
seat belt functions. Be sure to wear seat belts properly.
▼ Seat Belt Pretensioners
The pretensioners operate differently depending on what types of air bags are equipped. For
more details about seat belt pretensioner operation, refer to the SRS Air Bag Deployment
Criteria (page 2-68).
Front
The front seat belt pretensioners are designed to deploy in moderate or severe frontal, near
frontal collisions.
In addition, the pretensioners operate when a side collision or a roll-over accident (with
roll-over sensor) is detected.
Rear Outboard*
The rear outboard seat belt pretensioners are designed to deploy in moderate or severe
frontal, near frontal collisions.
In addition, the pretensioners operate when a side collision or a roll-over accident is
detected.
▼ Driver Air Bag
The driver's air bag is mounted in the steering wheel.
When air bag crash sensors detect a frontal impact of greater than moderate force, the
driver's air bag inflates quickly helping to reduce injury mainly to the driver's head or chest
caused by directly hitting the steering wheel.
For more details about air bag deployment, refer to "SRS Air Bag Deployment Criteria"
(page 2-68).
2-64
*Some models.

Essential Safety Equipment
SRS Air Bags
(With Front Passenger Occupant Classification System)
The driver's dual-stage air bag controls air bag inflation in two energy stages. During an
impact of moderate severity, the driver's air bag deploys with lesser energy, whereas during
more severe impacts, it deploys with more energy.
▼ Front Passenger Air Bag
The front passenger air bag is mounted in the front passenger dashboard.
The inflation mechanism for the front passenger air bag is the same as the driver's air bag.
For more details about air bag deployment, refer to "SRS Air Bag Deployment Criteria"
(page 2-68).
(With Front Passenger Occupant Classification System)
In addition, the front passenger air bag is designed to only deploy when the front passenger
occupant classification sensor detects a passenger sitting on the front passenger's seat. For
details, refer to the front passenger occupant classification system (page 2-72).
▼ Side Air Bags
The side air bags are mounted in the outboard sides of the front seatbacks.
When the air bag crash sensors detect a side impact of greater than moderate force, the
system inflates the side air bag only on the side in which the vehicle was hit. The side air
bag inflates quickly to reduce injury to the driver or front passenger's chest caused by
directly hitting interior parts such as a door or window.
2-65

Essential Safety Equipment
SRS Air Bags
For more details about air bag deployment, refer to "SRS Air Bag Deployment Criteria"
(page 2-68).
(With Front Passenger Occupant Classification System)
In addition, the front passenger side air bag is designed to only deploy when the front
passenger occupant classification sensor detects a passenger sitting on the front passenger's
seat. For details, refer to the front passenger occupant classification system (page 2-72).
▼ Curtain Air Bags
The curtain air bags are mounted in the front and rear window pillars, and the roof edge
along both sides.
When the air bag crash sensors detect a side impact of greater than moderate force, the
curtain air bag inflates quickly and helps to reduce injury mainly to the rear outboard
passenger's head caused by directly hitting interior parts such as a door or window.
For more details about air bag deployment, refer to "SRS Air Bag Deployment Criteria"
(page 2-68).
In a side impact:
Greater than moderate impact to one side of the vehicle will cause the curtain air bag on that
side only to inflate.
Only one side curtain air bag will
deploy on the side of the vehicle
that receives the force of an impact.
2-66

Essential Safety Equipment
SRS Air Bags
(With Front Passenger Occupant Classification System)
In a roll-over:
In response to a vehicle roll-over, both curtain air bags inflate.
Both curtain air bags will
deploy after the roll-over
accident is detected.
▼ Warning Light/Beep
A system malfunction or operation conditions are indicated by a warning.
Refer to Contact an Authorized Mazda Dealer and Have Vehicle Inspected on page 7-25.
Refer to Warning Sound is Activated on page 7-41.
2-67

Essential Safety Equipment
SRS Air Bags
SRS Air Bag Deployment Criteria
This chart indicates the applicable SRS equipment that will deploy depending on the type of
collision.
(The illustrations are the representative cases of collisions.)
Types of collision
A severe frontal/near frontal colli-
A severe side colli-
A roll-over/near
A rear collision
sion
sion*2
roll-over*3
SRS equip-
ment
Front seat
belt preten-
X*1
X*1
X*1
sioner
Rear seat
belt preten-
X
X
X
sioner*
No air bag and seat
Driver air
X
belt pretensioner
bag
will be activated in
Front pas-
a rear collision.
senger air
X*1
bag
X*1 (impact side
Side air bag
only)
Curtain air
X (impact side on-
X (both sides)
bag
ly)
X: The SRS air bag equipment is designed to deploy in a collision.
*1
(With Front Passenger Occupant Classification System)
The front passenger front and side air bags and the seat belt pretensioner are designed to deploy when the front
passenger occupant classification sensor detects a passenger sitting on the front passenger's seat.
*2
In a side collision, the seat belt pretensioners and the side/curtain air bags deploy.
*3
(With Front Passenger Occupant Classification System)
In a roll-over accident, the seat belt pretensioners and the curtain air bags deploy.
2-68
*Some models.
Essential Safety Equipment
SRS Air Bags
NOTE
In a frontal offset collision, the equipped air bags and pretensioners may all deploy
depending on the direction, angle, and rate of impact.
2-69

Essential Safety Equipment
SRS Air Bags
Limitations to SRS Air Bag
In severe collisions such as those described previously in "SRS Air Bag Deployment
Criteria", the applicable SRS air bag equipment will deploy. However, in some accidents,
the equipment may not deploy depending on the type of collision and its severity.
Limitations to front/near front collision detection:
The following illustrations are examples of front/near front collisions that may not be
detected as severe enough to deploy the SRS air bag equipment.
Impacts involving trees or poles
Frontal offset impact to the vehicle
Rear-ending or running under a truck's tail gate
2-70

Essential Safety Equipment
SRS Air Bags
Limitations to side collision detection:
The following illustrations are examples of side collisions that may not be detected as
severe enough to deploy the SRS air bag equipment.
Side impacts involving trees or poles
Side impacts with two-wheeled vehicles
Roll-over (Without Front Passenger Occupant Classification System)
(With Front Passenger Occupant Classification System)
Limitations to roll-over detection:
The following illustration is an example of an accident that may not be detected as a
roll-over accident. Therefore, the front seat belt pretensioners and curtain air bags may not
deploy.
Pitch end over end
2-71

Essential Safety Equipment
SRS Air Bags
Front Passenger Occupant Classification System*
First, please read "Supplemental Restraint System (SRS) Precautions" (page 2-56) carefully.
▼ Front Passenger Occupant Classification Sensor
Your vehicle is equipped with a front passenger occupant classification sensor as a part of
the supplemental restraint system. This sensor is equipped in the front passenger's seat
cushion. This sensor measures the electrostatic capacity of the front passenger's seat. The
SAS unit is designed to prevent the front passenger front and side air bags and seat belt
pretensioner system from deploying if the front passenger air bag deactivation indicator
light turns on.
To reduce the chance of injuries caused by deployment of the front passenger air bag, the
system deactivates the front passenger front and side air bags and also the seat belt
pretensioner system when the front passenger air bag deactivation indicator light turns on.
Refer to the following table for the front passenger air bag deactivation indicator light
illumination conditions.
This system shuts off the front passenger front and side air bags and seat belt pretensioner
system, so make sure the front passenger air bag deactivation indicator light turns on
according to the following table.
The air bag/front seat belt pretensioner system warning light flashes and the front passenger
air bag deactivation indicator light illuminates if the sensors have a possible malfunction. If
this happens, the front passenger front and side air bags and seat belt pretensioner system
will not deploy.
Front passenger air bag deactivation indicator light
This indicator light turns on to remind you that the front passenger front and side air bags
and seat belt pretensioner will not deploy during a collision.
2-72
*Some models.

Essential Safety Equipment
SRS Air Bags
If the front passenger occupant classification sensor is normal, the indicator light turns on
when the ignition is switched ON. The light turns off after a few seconds. Then, the
indicator light turns on or is off under the following conditions:
Front passenger air bag deactivation indicator light on/off condition chart
Condition detected by the front
Front passenger air
Front passenger seat
Front passenger front
passenger occupant classificaဨ
bag deactivation indiဨ
belt pretensioner sysဨ
and side air bags
tion system
cator light
tem
Empty (Not occupied)
On
Deactivated
Deactivated
A child less than 1 year old is
On
Deactivated
Deactivated
seated in a child-restraint system
Child*1
On or off
Deactivated or ready
Deactivated or ready
Adult*2
Off
Ready
Ready
*1
The occupant classification sensor may not detect a child seated on the seat, in a child-restraint system, or a
junior seat depending on the child's physical size and seated posture.
*2
If a smaller adult sits on the front passenger seat, the sensors might detect the person as being a child
depending on the person's physique.
The curtain air bag is ready for inflating regardless of what the front passenger air bag
deactivation indicator light on/off condition chart indicates.
If the front passenger air bag deactivation indicator light does not turn on when the ignition
is switched ON and does not turn on as indicated in the front passenger air bag deactivation
indicator light on/off condition chart, do not allow an occupant to sit in the front passenger
seat and consult an Authorized Mazda Dealer as soon as possible. The system may not work
properly in an accident.
WARNING
Do not allow an occupant in the front passenger's seat to sit with a posture which makes it
difficult for the front passenger occupant classification sensor to detect the occupant
correctly:
Sitting in the front passenger's seat with a posture which makes it difficult for the front
passenger occupant classification sensor to detect the occupant correctly is dangerous. If the
front passenger occupant classification sensor cannot detect the occupant sitting on the front
passenger's seat correctly, the front passenger front and side air bags and pretensioner
system may not operate (non-deploy) or they may operate (deploy) accidentally. The front
passenger will not have the supplementary protection of the air bags or the accidental
operation (deployment) of the air bags could result in serious injury or death.
Under the following conditions, the front passenger occupant classification sensor cannot
detect a passenger sitting on the front passenger's seat correctly and the deployment/
non-deployment of the air bags cannot be controlled as indicated in the front passenger air
bag deactivation indicator light on/off condition chart. For example:
2-73

Essential Safety Equipment
SRS Air Bags
¾ A front passenger is seated as shown in the following figure:
¾ A rear passenger pushes up on the front passenger seat with their feet.
¾ Luggage or other items placed under the front passenger seat or between the front
passenger seat and driver seat that push up the front passenger seat bottom.
¾ An object, such as a seat cushion, is put on the front passenger's seat or between the
passenger's back and the seatback.
¾ A seat cover is put on the front passenger's seat.
¾ Luggage or other items are placed on the seat with the child in the child-restraint system.
¾ A rear passenger or luggage push or pull down on the front passenger seatback.
¾ Luggage or other items are placed on the seatback or hung on the head restraint.
¾ The seat is washed.
¾ Liquids are spilled on the seat.
¾ The front passenger seat is moved backward, pushing into luggage or other items placed
behind it.
¾ The front passenger seatback contacts the rear seat.
¾ Luggage or other items are placed between the front passenger seat and driver seat.
¾ An electric device is put on the front passenger's seat.
¾ An additional electrical device, such as a seat warmer is installed to the surface of the front
passenger seat.
2-74
Essential Safety Equipment
SRS Air Bags
The front passenger front and side air bags and seat belt pretensioner systems will deactivate
if the front passenger air bag deactivation indicator light turns on.
CAUTION
¾ To assure proper deployment of the front air bag and to prevent damage to the sensor in
the front seat cushion:
¾ Do not place sharp objects on the front seat cushion or leave heavy luggage on them.
¾ Do not spill any liquids on the front seats or under the front seats.
¾ To allow the sensors to function properly, always perform the following:
¾ Adjust the front seats as far back as possible and always sit upright against the seatbacks
with seat belts worn properly.
¾ If you place your child on the front passenger seat, secure the child-restraint system
properly and slide the front passenger seat as far back as possible (page 2-48).
NOTE
The system requires about 10 seconds to alternate between turning the front passenger
front and side air bags and seat belt pretensioner system on or off.
The front passenger air bag deactivation indicator light may turn on repeatedly if luggage
or other items are put on the front passenger seat, or if the temperature of the vehicle's
interior changes suddenly.
The front passenger air bag deactivation indicator light may turn on for 10 seconds if the
electrostatic capacity on the front passenger seat changes.
The air bag/front seat belt pretensioner system warning light might turn on if the front
passenger seat receives a severe impact.
If the front passenger air bag deactivation indicator light does not turn on after installing
a child-restraint system on the front passenger seat, first, re-install your child-restraint
system according to the procedure in this owner's manual. Then, if the front passenger air
bag deactivation indicator light still does not turn on, install the child-restraint system on
the rear seat and consult an Authorized Mazda Dealer as soon as possible.
If the front passenger air bag deactivation indicator light turns on when an occupant is
seated directly in the front passenger seat, have the passenger re-adjust their posture by
sitting with their feet on the floor, and then re-fastening the seat belt. If the front
passenger air bag deactivation indicator light remains turned on, move the passenger to
the rear seat. If sitting in the rear seat is not possible, slide the front passenger seat as far
back as possible. Consult an Authorized Mazda Dealer as soon as possible.
2-75
Essential Safety Equipment
SRS Air Bags
▼ Driver and Front Passenger Buckle Switches
The buckle switches on the front seat belts detect whether or not the front seat belts are
securely fastened and further control the deployment of the air bags.
2-76
Essential Safety Equipment
SRS Air Bags
Constant Monitoring
The following components of the air bag systems are monitored by a diagnostic system:
Front air bag sensors
Crash sensors, and diagnostic module (SAS unit)
Side crash sensors
Air bag modules
Seat belt pretensioners
Air bag/Seat belt pretensioner system warning light
Related wiring
(With Front Passenger Occupant Classification System)
Front passenger occupant classification sensor
Front passenger occupant classification module
Front passenger air bag deactivation indicator light
The diagnostic module continuously monitors the system's readiness. This begins when the
ignition is switched ON and continues while the vehicle is being driven.
2-77
Before Driving
3
Use of various features, including keys, doors, mirrors and windows.
Keys
3-2
Security System
3-42
Keys
3-2
Modification and Add-On
Keyless Entry System
3-4
Equipment
3-42
Immobilizer System
3-42
Theft-Deterrent System*
3-44
Advanced Keyless Entry
System
3-10
Advanced Keyless Entry System*
Driving Tips
3-46
. . . . . . . . . . . . . 3-10
Break-In Period
3-46
Operational Range
3-11
Saving Fuel and Protection of the
Environment
3-46
Hazardous Driving
3-47
Doors and Locks
3-12
Floor Mat
3-48
Door Locks
3-12
Rocking the Vehicle
3-48
Liftgate
3-19
Winter Driving
3-49
Driving In Flooded Area
3-51
Fuel and Emission
3-26
Overloading
3-51
Fuel and Engine Exhaust
Driving on Uneven Road
3-52
Precautions
3-26
Turbocharger Information
Fuel-Filler Lid and Cap
3-29
(SKYACTIV-G 2.5T)
3-53
Mirrors
3-31
Towing
3-54
Mirrors
3-31
Trailer Towing (U.S.A. and
Canada)
3-54
Windows
3-36
Recreational Towing
3-62
Power Windows
3-36
Moonroof*
3-39
*Some models.
3-1

Before Driving
Keys
¾ Drop the key.
Keys
¾ Get the key wet.
¾ Disassemble the key.
WARNING
¾ Expose the key to high temperatures
on places such as the dashboard or
Do not leave the key in your vehicle with
hood, under direct sunlight.
children and keep them in a place where
¾ Expose the key to any kind of magnetic
your children will not find or play with
field.
them:
¾ Place heavy objects on the key.
Leaving children in a vehicle with the key is
¾ Put the key in an ultrasonic cleaner.
dangerous. This could result in someone
¾ Put any magnetized objects close to
being badly injured or even killed. Children
the key.
may find these keys to be an interesting toy
to play with and could cause the power
NOTE
windows or other controls to operate, or
The driver must carry the key to ensure the
even make the vehicle move.
system functions properly.
Transmitter
Auxiliary key
CAUTION
¾ Because the key (transmitter) uses
low-intensity radio waves, it may not
function correctly under the following
conditions:
¾ The key is carried with communication
devices such as cellular phones.
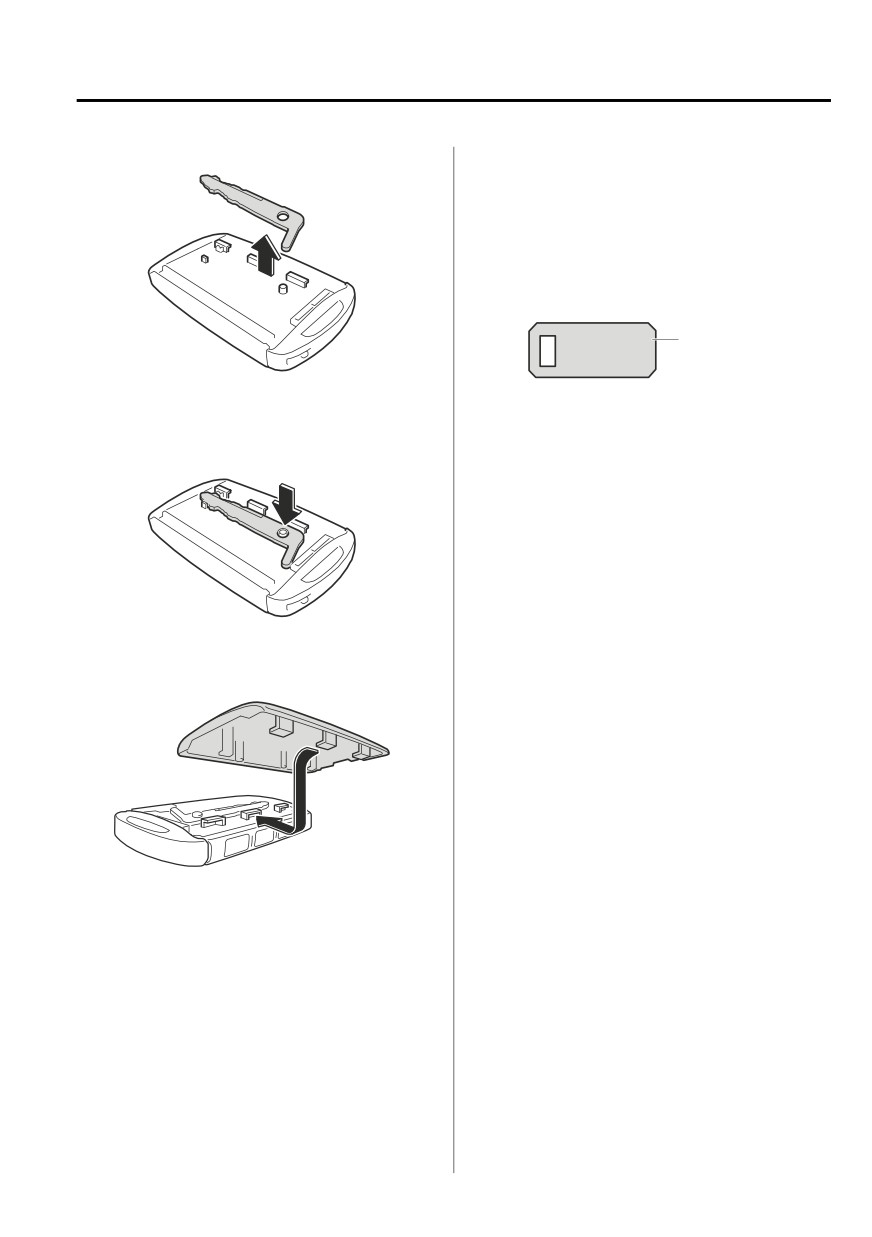
Removing the auxiliary key
¾ The key contacts or is covered by a
1. Remove the lower cover while sliding
metal object.
the knob in the direction of the arrow.
¾ The key is near electronic devices such
as personal computers.
¾ Non-Mazda genuine electronic
equipment is installed in the vehicle.
¾ There is equipment which discharges
radio waves near the vehicle.
¾ The key (transmitter) may consume
battery power excessively if it receives
high-intensity radio waves. Do not place
the key near electronic devices such as
televisions or personal computers.
¾ To avoid damage to the key
(transmitter), DO NOT:
3-2
Before Driving
Keys
2. Remove the auxiliary key.
Also write down the code number and
keep it in a separate safe and convenient
place, but not in the vehicle.
If your key (auxiliary key) is lost, consult
an Authorized Mazda Dealer, and have
your code number ready.
Key code
number plate
Installing the auxiliary key
1. Install the auxiliary key as the
illustration.
2. Insert the tabs of the lower cover into
the slots of the transmitter and install
the lower cover.
Key code number plate
A code number is stamped on the plate
attached to the key set; detach this plate
and store it in a safe place (not in the
vehicle) for use if you need to make a
replacement key (auxiliary key).
3-3

Before Driving
Keys
possible for a replacement and to make the
Keyless Entry System
lost or stolen key inoperative.
This system uses the key buttons to
remotely lock and unlock the doors and
CAUTION
the liftgate, and opens/closes the liftgate.
The system can start the engine without
Radio equipment like this is governed by
having to take the key out of your purse or
laws in the United States.
pocket.
Changes or modifications not expressly
It can also help you signal for attention or
approved by the party responsible for
help.
compliance could void the user's authority
Operating the theft-deterrent system is
to operate the equipment.
also possible on theft-deterrent
system-equipped vehicles.
NOTE
The keyless entry system operation may
System malfunctions or warnings are
vary due to local conditions.
indicated by the following warning lights
The keyless entry system is fully
or beeps.
operational (door/liftgate lock/unlock)
For vehicles with the type A/type B
when the ignition is switched off. The
instrument cluster, check the displayed
system does not operate if the ignition is
message for more information and, if
switched to any position other than off.
necessary, have the vehicle inspected at an
If the key does not operate when
Authorized Mazda Dealer, according to
pressing a button or the operational
the indication.
range becomes too small, the battery
KEY Warning Light (Red)
may be weak. To install a new battery,
Refer to Contact Authorized Mazda
refer to Key Battery Replacement (page
Dealer and Have Vehicle Inspected on
6-33).
page 7-25.
Battery life is about 1 year. Replace the
Refer to Taking Action on page 7-31.
battery with a new one if the KEY
Ignition Not Switched Off (STOP)
indicator light (green) flashes in the
Warning Beep
instrument cluster (for vehicles with a
Refer to Ignition Not Switched Off
type A/type B instrument cluster (page
(STOP) Warning Beep on page 7-42.
4-12, 4-31), messages are displayed
Key Removed from Vehicle Warning
in the instrument cluster). Replacing the
Beep
battery about once a year is
Refer to Key Removed from Vehicle
recommended because the KEY warning
Warning Beep on page 7-42.
light/indicator light may not illuminate
or flash depending on the rate of battery
If you have a problem with the key,
depletion.
consult an Authorized Mazda Dealer.
If your key is lost or stolen, consult an
Authorized Mazda Dealer as soon as
3-4

Before Driving
Keys
Additional keys can be obtained at an
Use the following procedure to change the
Authorized Mazda Dealer. Up to 6 keys
setting.
can be used with the keyless functions
1.
Switch the ignition off and close all of
per vehicle. Bring all keys to the
the doors and the liftgate.
Authorized Mazda Dealer when
2.
Open the driver's door.
additional keys are required.
3.
Within 30 seconds of opening the
driver's door, press and hold the LOCK
▼ Transmitter
button on the key for 5 seconds or
Operation indicator light
longer (All of the doors and the liftgate
are locked and unlocked when the
LOCK button on the key is pressed and
Operation
held for 5 seconds.).
buttons
The beep sound activates at the
currently set volume. The setting
changes each time the LOCK button on
the key is pressed and the beep sound
activates at the set volume. (If the beep
sound has been set to not activate, it
will not activate.)
4.
The setting change is completed by
NOTE
doing any one of the following:
The headlights turn on/off by operating
Switching the ignition to ACC or
the transmitter. Refer to Leaving Home
ON.
Light on page 4-77.
(With theft-deterrent system)
Closing the driver's door.
Opening the liftgate.
The hazard warning lights flash when
Not operating the key for ten
the theft-deterrent system is armed or
seconds.
turned off.
Refer to Theft-Deterrent System on page
Pressing any button except the
LOCK button on the key.
3-44.
(With the advanced keyless function)
Pressing a request switch.
A beep sound can be heard for
The operation indicator light flashes when
confirmation when the doors and the
the buttons are pressed.
liftgate are locked/unlocked using the
Lock button
key. If you prefer, the beep sound can be
turned off.
To lock the doors and the liftgate, press the
The volume of the beep sound can also
lock button and the hazard warning lights
be changed.
will flash once.
Refer to the Settings section in the
Mazda Connect Owner's Manual.
3-5

Before Driving
Keys
(With the advanced keyless function)
seconds and two more beep sounds will be
A beep sound will be heard once.
heard.
To confirm that all doors and the liftgate
have been locked, press the lock button
again within 5 seconds. If they are closed
and locked, the horn will sound.
NOTE
The system can be set to unlock all
doors by performing a single operation.
Refer to the Settings section in the
Mazda Connect Owner's Manual.
NOTE
Use the following procedure to change
The doors and the liftgate can be locked
the setting.
by pressing the lock button while any
1.
Switch the ignition off and close all
other door or the liftgate is open. The
of the doors and the liftgate.
hazard warning lights will not flash.
2.
Open the driver's door.
When the lock button is pressed while
3.
Within 30 seconds of opening the
any door is open and then the door is
driver's door, press and hold the
closed, all the doors and the liftgate are
UNLOCK button on the key for 5
locked.
seconds or longer (the sound of the
Confirm that all doors and the liftgate
doors locking/unlocking can be
are locked visually or audibly by use of
heard).
the double click.
After this, the system switches the
Make sure all doors and the liftgate are
setting each time the UNLOCK
locked after pressing the button.
button is pressed (the sound of the
(With theft-deterrent system)
doors locking/unlocking can be
When the doors are locked by pressing
heard).
the lock button on the key while the
4.
The setting change is completed by
theft-deterrent system is armed, the
doing any one of the following:
hazard warning lights will flash once to
indicate that the system is armed.
Switching the ignition to ACC or
ON.
Unlock button
Closing the driver's door.
To unlock the driver's door, press the
Opening the liftgate.
unlock button and the hazard warning
Not operating the key for ten
lights will flash twice.
seconds.
(With the advanced keyless function)
Pressing any button except the
A beep sound will be heard twice.
UNLOCK button on the key.
Pressing a request switch.
To unlock all doors and the liftgate, press
the unlock button again within three
3-6

Before Driving
Keys
(Auto re-lock function)
Panic button
After unlocking with the key, all doors
If you witness from a distance someone
and the liftgate will automatically lock if
attempting to break into or damage your
any of the following operations are not
vehicle, press and hold the panic button to
performed within about 60 seconds. If
activate the vehicle's alarm. Call
your vehicle has a theft-deterrent
emergency services if necessary.
system, the hazard warning lights will
flash for confirmation.
The time required for the doors to lock
automatically can be changed.
Refer to the Settings section in the
Mazda Connect Owner's Manual.
NOTE
A door or the liftgate is opened.
The panic button will work whether any
The ignition is switched to any
door or the liftgate is open or closed.
position other than off.
(With theft-deterrent system)
(Turning on the alarm)
When the doors are unlocked by
Pressing the panic button for 1 second or
pressing the unlock button on the key
longer will trigger the alarm for about 2
while the theft-deterrent system is turned
minutes and 30 seconds, and the following
off, the hazard warning lights will flash
will occur:
twice to indicate that the system is
turned off.
The horn sounds intermittently.
The hazard warning lights flash.
Power liftgate button*
(Turning off the alarm)
To open/close the liftgate, press the power
liftgate button for one second or longer
The alarm stops by pressing any button on
with the liftgate in the fully closed/open
the key.
position.
Power saving function
The hazard warning lights flash twice and
the liftgate opens/closes after the beep
By turning on the transmitter power saving
sounds.
function, the advanced keyless entry*1 and
push button start system functions turn off
and the battery power consumption of the
transmitter is restricted.
The remote control function is operational
by operating the transmitter switch even
while the power saving function is turned
on. However, the operation indicator light
of the transmitter does not turn on/flash.
*Some models.
3-7

Before Driving
Keys
Turning on the power saving function
Starting the Engine
After you have turned on the power saving
NOTE
function according to the following
procedure, the hazard warning lights and
Starting the engine may be possible even
sound operate*1 one time.
if the key is outside of the vehicle and
extremely close to a door and window,
1. Press the lock button on the transmitter
4 times within 3 seconds to turn on the
however, always start the engine from
operation indicator light.
the driver's seat.
2. Press the lock button continuously for
If the vehicle is started and the key is not
in the vehicle, the vehicle will not restart
1.5 seconds or longer while the
operation indicator light turns on (for 5
after it is shut off and the ignition is
seconds).
switched to off.
3. Press any of the buttons on the
The luggage compartment is out of the
assured operational range, however, if
transmitter to make sure that the
operation indicator light does not turn
the key (transmitter) is operable the
on/flash.
engine will start.
Turning off the power saving function
With the advanced keyless function
After you have turned off the power
Interior antenna
saving function according to the following
procedure, the hazard warning lights and
sound operate*1 one time.
1. Press any of the buttons on the
transmitter to make sure that the
operation indicator light does not turn
on/flash.
2. Press the lock button on the transmitter
Operational range
4 times within 3 seconds to turn on the
Without the advanced keyless function
operation indicator light.
3. Press the lock button continuously for
Interior antenna
1.5 seconds or longer while the
operation indicator light turns on (for 5
seconds).
*1
With the advanced keyless function
▼ Operational Range
The system operates only when the driver
is in the vehicle or within operational
Operational range
range while the key is being carried.
3-8
Before Driving
Keys
NOTE
The engine may not start if the key is
placed in the following areas:
Around the dashboard
In the storage compartments such as the
glove compartment or the center console
▼ Key Suspend Function
If a key is left in the vehicle, the functions
of the key left in the vehicle are
temporarily suspended to prevent theft of
the vehicle.
To restore the functions, press the unlock
button on the functions-suspended key in
the vehicle.
3-9
Before Driving
Advanced Keyless Entry System
NOTE
Advanced Keyless Entry
The advanced keyless entry system
System*
functions can be deactivated to prevent
any possible adverse effect on a user
wearing a pacemaker or other medical
WARNING
device. If the system is deactivated, you
will be unable to start the engine by
Radio waves from the key may affect
carrying the key. Consult an Authorized
medical devices such as pacemakers:
Mazda Dealer for details. If the advanced
Before using the key near people who use
keyless entry system has been deactivated,
medical devices, ask the medical device
you can start the engine by following the
manufacturer or your physician if radio
procedure indicated when the key battery
waves from the key will affect the device.
goes dead.
Refer to Engine Start Function When Key
The advanced keyless function allows you
Battery is Dead on page 4-8.
to lock/unlock the door and the liftgate, or
open the liftgate while carrying the key.
System malfunctions or warnings are
indicated by the following warning beeps.
Request switch Inoperable Warning
Beep
Refer to Request Switch Inoperable
Warning Beep (With the advanced
keyless function) on page 7-43.
Key Left-in-luggage Compartment
Warning Beep
Refer to Key Left-in-luggage
Compartment Warning Beep (With the
advanced keyless function) on page
7-43.
Key Left-in-vehicle Warning Beep
Refer to Key Left-in-vehicle Warning
Beep (With the advanced keyless
function) on page 7-43.
3-10
*Some models.

Before Driving
Advanced Keyless Entry System
NOTE
Operational Range
The system may not operate if you are
The system operates only when the driver
too close to the windows or door
is in the vehicle or within operational
handles, or liftgate.
range while the key is being carried.
If the key is left in the following areas
NOTE
and you leave the vehicle, the doors may
When the battery power is low, or in
be locked depending on the radio wave
places where there are high-intensity radio
conditions even if the key is left in the
waves or noise, the operational range may
vehicle.
become narrower or the system may not
Around the dashboard
operate. For determining battery
In the storage compartments such as
replacement, Refer to Keyless Entry
the glove compartment or the center
System on page 3-4.
console
Next to a communication device such
▼ Locking, Unlocking the Doors and
the Liftgate
as a mobile phone
Lock
▼ Opening the Liftgate
Exterior antenna
80cm (31in)
Exterior antenna
80cm (31in)
80cm (31in)
80cm (31in)
Operational range
Operational range
Unlock
Exterior antenna
80cm (31in)
80cm (31in)
Operational range
3-11

Before Driving
Doors and Locks
Doors and the liftgate not securely closed
Door Locks
are dangerous, if the vehicle is driven with
a door and the liftgate not securely closed,
WARNING
the door and the liftgate could open
unexpectedly resulting in an accident.
Always take all children and pets with you
Always confirm the safety around the
or leave a responsible person with them:
vehicle before opening a door and the
Leaving a child or a pet unattended in a
liftgate:
parked vehicle is dangerous. In hot
Suddenly opening a door and the liftgate is
weather, temperatures inside a vehicle can
dangerous. A passing vehicle or a
become high enough to cause brain
pedestrian could be hit and cause an
damage or even death.
accident.
Do not leave the key in your vehicle with
children and keep them in a place where
CAUTION
your children will not find or play with
them:
¾ Always confirm the conditions around
Leaving children in a vehicle with the key is
the vehicle before opening/closing the
dangerous. This could result in someone
doors and the liftgate and use caution
being badly injured or even killed.
during strong winds or when parked on
an incline. Not being aware of the
Keep all doors locked when driving:
conditions around the vehicle is
Unlocked doors in a moving vehicle are
dangerous because fingers could get
dangerous. Passengers can fall out if a
caught in the door and the liftgate or a
door is accidentally opened and can more
passing pedestrian could be hit, resulting
easily be thrown out in an accident.
in an unexpected accident or injury.
Always close all the windows and
NOTE
moonroof, lock the doors and the liftgate
Always stop the engine and lock the
and take the key with you when leaving
doors. In addition, to prevent theft of
your vehicle unattended:
valuables, do not leave them inside the
Leaving your vehicle unlocked is dangerous
cabin.
as children could lock themselves in a hot
If the key is left in the following areas
vehicle, which could result in death. Also, a
and you leave the vehicle, the doors may
vehicle left unlocked becomes an easy
be locked depending on the radio wave
target for thieves and intruders.
conditions even if the key is left in the
vehicle.
After closing the doors and the liftgate,
always verify that they are securely closed:
Around the dashboard
3-12

Before Driving
Doors and Locks
In the storage compartments such as
This system automatically unlocks the
the glove compartment or the center
doors and the liftgate in the event the
console
vehicle is involved in an accident to
Next to a communication device such
allow passengers to get out of the
as a mobile phone
vehicle immediately and prevent being
When the ignition is switched to ACC or
trapped inside. While the ignition is
ON, the vehicle lock-out prevention
switched ON and in the event the vehicle
feature prevents you from locking
receives an impact strong enough to
yourself out of the vehicle.
inflate the air bags, all the doors and the
All doors and the liftgate will
liftgate are automatically unlocked after
automatically unlock if they are locked
about 6 seconds have elapsed from the
using the power door locks with any
time of the accident.
door or the liftgate open.
The doors and the liftgate may not
The vehicle lock-out prevention feature
unlock depending on how an impact is
does not operate while the ignition is
applied, the force of the impact, and
switched off.
other conditions of the accident.
When all doors and the liftgate are
If door-related systems or the battery is
locked using the power door lock with
malfunctioning, the doors and the
any door or the liftgate open, the closed
liftgate will not unlock.
doors and the liftgate are locked. After
▼ Locking, Unlocking with Request
that, when all doors and the liftgate are
Switch (With the advanced keyless
closed, all doors and the liftgate are
function)
locked. However, if the key is inside the
vehicle, all doors and the liftgate are
All doors and the liftgate can be locked/
automatically unlocked.
unlocked by pressing the request switch on
(With the advanced keyless function)
the front doors while the key is being
The beep sound is heard for about 10
carried.
seconds to notify the driver that the key
has been left in the vehicle.
The request switch on the liftgate can only
(Without the advanced keyless
be used to lock all doors and the liftgate.
function)
Front doors
The horn sound is heard twice to notify
the driver that the key has been left in
the vehicle.
(Door unlock (control) system with
collision detection)
Request switch
3-13

Before Driving
Doors and Locks
Liftgate (Lock only)
Use the following procedure to change
the setting.
1.
Switch the ignition off and close all
of the doors and the liftgate.
2.
Open the driver's door.
3.
Within 30 seconds of opening the
driver's door, press and hold the
Request switch
UNLOCK button on the key for 5
seconds or longer (the sound of the
doors locking/unlocking can be
heard).
After this, the system switches the
setting of pressing the driver's
To lock
request switch once or twice to
To lock the doors and the liftgate, press the
unlock all doors and the liftgate
request switch and the hazard warning
each time the UNLOCK button is
lights will flash once.
pressed (the sound of the doors
A beep sound will be heard once.
locking/unlocking can be heard).
4.
The setting change is completed by
To unlock
doing any one of the following:
Driver's door request switch
Switching the ignition to ACC or
To unlock the driver's door, press the
ON.
request switch. A beep sound will be heard
Closing the driver's door.
twice and the hazard warning lights will
Opening the liftgate.
flash twice.
Not operating the key for ten
To unlock all doors and the liftgate, press
seconds.
the request switch again within three
Pressing any button except the
seconds and two more beep sounds will be
UNLOCK button on the key.
heard.
Pressing a request switch.
Confirm that all doors and the liftgate
Front passenger door request switch
are securely locked.
To unlock all doors and the liftgate, press
For the liftgate, move it without pressing
the request switch. A beep sound will be
the electric liftgate opener to verify that
heard twice and the hazard warning lights
the liftgate has not been left ajar.
will flash twice.
All doors and the liftgate cannot be
locked when any door or the liftgate is
NOTE
open.
The system can be set to unlock all
It may require a few seconds for the
doors by performing a single operation.
doors to unlock after the request switch
Refer to the Settings section in the
is pressed.
Mazda Connect Owner's Manual.
3-14
Before Driving
Doors and Locks
A beep sound is heard for confirmation
The hazard warning lights flash when
when the doors and the liftgate are
the theft-deterrent system is armed or
locked/unlocked using the request
turned off.
switch. If you prefer, the beep sound can
Refer to Theft-Deterrent System on page
be turned off.
3-44.
The volume of the beep sound can also
The setting can be changed so that the
be changed.
doors and the liftgate are locked
Refer to the Settings section in the
automatically without pressing the
Mazda Connect Owner's Manual.
request switch.
Use the following procedure to change
Refer to the Settings section in the
the setting.
Mazda Connect Owner's Manual.
1.
Switch the ignition off and close all
(Walk-away auto lock function)
of the doors and the liftgate.
A beep sound is heard when all doors
2.
Open the driver's door.
and the liftgate are closed while the
3.
Within 30 seconds of opening the
advanced key is being carried. All doors
driver's door, press and hold the
and the liftgate are locked automatically
LOCK button on the key for 5
after about three seconds when the
seconds or longer (All of the doors
advanced key is out of the operational
and the liftgate are locked and
range. Also, the hazard warning lights
unlocked when the LOCK button on
flash once. (Even if the driver is in the
the key is pressed and held for 5
operational range, all doors and the
seconds.).
liftgate are locked automatically after
The beep sound activates at the
about 30 seconds.) If you are out of the
currently set volume. The setting
operational range before the doors and
changes each time the LOCK button
the liftgate are completely closed or
on the key is pressed and the beep
another key is left in the vehicle, the
sound activates at the set volume. (If
walk-away auto lock function will not
the beep sound has been set to not
work. Always make sure that all doors
activate, it will not activate.)
and the liftgate are closed and locked
4.
The setting change is completed by
before leaving the vehicle. The
doing any one of the following:
walk-away auto lock function does not
close the power windows.
Switching the ignition to ACC or
(Auto re-lock function)
ON.
After unlocking with the request switch,
Closing the driver's door.
all doors and the liftgate will
Opening the liftgate.
automatically lock if any of the
Not operating the key for ten
following operations are not performed
seconds.
within about 60 seconds. If your vehicle
Pressing any button except the
has a theft-deterrent system, the hazard
LOCK button on the key.
warning lights will flash for
Pressing a request switch.
confirmation.
(With theft-deterrent system)
3-15

Before Driving
Doors and Locks
The time required for the doors to lock
Front passenger's door
automatically can be changed.
Refer to the Settings section in the
Lock
Mazda Connect Owner's Manual.
Unlock
Opening a door or the liftgate.
Switching the ignition to any position
other than off.
▼ Locking, Unlocking with
Transmitter
All doors and the liftgate can be locked/
unlocked by operating the keyless entry
To lock all the doors and the liftgate from
system transmitter, refer to Keyless Entry
an open front door, press the lock side of
System (page 3-4).
the door lock switch and then close the
▼ Locking, Unlocking with Door-Lock
door.
Switch
NOTE
When locking the doors this way, be
All doors and the liftgate lock
careful not to leave the key inside the
automatically when the lock side is
pressed. They unlock when the unlock
vehicle.
side is pressed.
▼ Auto Lock/Unlock Function*
Driver's door
Lock
WARNING
Unlock
Do not pull the inner handle on a front
door:
Pulling the inner handle on a front door
while the vehicle is moving is dangerous.
Passengers can fall out of the vehicle if the
door opens accidentally, which could result
in death or serious injury.
When the vehicle speed exceeds 20
km/h (12 mph), all the doors and liftgate
lock automatically.
When the ignition is switched off, all the
doors and liftgate unlock automatically.
The auto lock/unlock function settings can
be changed.
3-16
*Some models.

Before Driving
Doors and Locks
Refer to the Settings section in the Mazda
▼ Locking, Unlocking with Door-Lock
Connect Owner's Manual.
Knob
▼ Locking, Unlocking with Auxiliary
Operation from inside
Key
To lock any door from the inside, press the
Turn the auxiliary key toward the front to
door-lock knob.
lock, toward the back to unlock.
To unlock, pull it outward.
This does not operate the other door locks.
To lock
All doors lock automatically when the
Unlocked: Red indicator
driver's door is locked using the auxiliary
Lock
key.
To unlock
The driver’s door unlocks when the
auxiliary key is turned briefly to the
Unlock
unlock position and then immediately
returned to the center position.
Operation from outside
All doors unlock when the driver's door is
To lock any door using its door-lock knob
unlocked and the auxiliary key is held in
from the outside, press the door-lock knob
the unlock position for one second or
to the lock position and close the door
longer.
(holding the door handle in the open
position is not required).
Lock
Unlock
3-17

Before Driving
Doors and Locks
This does not operate the other door locks.
▼ Rear Door Child Safety Locks
These locks are intended to help prevent
Door-lock knob
children from accidentally opening the
rear doors. Use them on both rear doors
whenever a child rides in the rear seat of
the vehicle.
If you slide the child safety lock to the
lock position before closing that door, the
door cannot be opened from the inside.
The door can only be opened by pulling
the outside handle.
Unlock
Lock
NOTE
When locking the door this way:
Be careful not to leave the key inside the
vehicle.
The doors cannot be locked using the
driver's door lock knob if any door is
open when the ignition is switched to
ACC or ON.
3-18
Большое спасибо!
Ваше мнение очень важно для нас.
Нет комментариевНе стесняйтесь поделиться с нами вашим ценным мнением.
Текст