Mazda 2 Hybrid (2021 year). Manual in english — page 2

42
1-1. For safe use
WARNING
ODo not attach anything to or lean
anything against areas such as the
O Do not allow a child to stand in front
dashboard or steering wheel pad.
of the SRS front passenger airbag
These items can become projectiles
unit or sit on the knees of a front
when the SRS driver and front pas-
passenger.
senger airbags deploy.
O Do not allow the front seat occu-
pants to hold items on their knees.
ODo not attach anything to areas
such as a door, windshield, side
O Do not lean against the door, the
windows, front or rear pillar, roof
roof side rail or the front, side and
side rail and assist grip. (Except for
rear pillars.
the speed limit label →P.390)
O Do not allow anyone to kneel on the
O Do not hang coat hangers or other
passenger seat toward the door or
hard objects on the coat hooks. All
put their head or hands outside the
of these items could become pro-
vehicle.
jectiles and may cause death or
serious injury, should the SRS cur-
tain shield airbags deploy.
O Do not use seat accessories which
cover the parts where the SRS side
airbags inflate as they may interfere
with inflation of the SRS airbags.
Such accessories may prevent the
side airbags from activating cor-
rectly, disable the system or cause
the side airbags to inflate acciden-
tally, resulting in death or serious
injury.

1-1. For safe use
43
WARNING
OModifications to the front door panel
(such as making a hole in it)
O Do not strike or apply significant
levels of force to the area of the
O Repairs or modifications of the front
SRS airbag components or the
fender, front bumper, or side of the
front doors.
occupant compartment
Doing so can cause the SRS air-
OInstallation of a grille guard (bull
bags to malfunction.
bars, kangaroo bar, etc.), snow
O Do not touch any of the component
plows or winches
1
parts immediately after the SRS air-
OModifications to the vehicle’s sus-
bags have deployed (inflated) as
pension system
they may be hot.
OInstallation of electronic devices
O If breathing becomes difficult after
such as mobile two-way radios (RF-
the SRS airbags have deployed,
transmitter) and CD players
open a door or window to allow
fresh air in, or leave the vehicle if it
is safe to do so. Wash off any resi-
due as soon as possible to prevent
skin irritation.
O If the areas where the SRS airbags
are stored, such as the steering
wheel pad and front and rear pillar
garnishes, are damaged or
cracked, have them replaced by
any authorized Mazda dealer or
repairer, or another duly qualified
and equipped professional.
Q Modification and disposal of SRS
airbag system components
Do not dispose of your vehicle or per-
form any of the following modifica-
tions without consulting your Mazda
retailer or Mazda authorized repairer,
or any reliable repairer. The SRS air-
bags may malfunction or deploy
(inflate) accidentally, causing death or
serious injury.
O Installation, removal, disassembly
and repair of the SRS airbags
O Repairs, modifications, removal or
replacement of the steering wheel,
instrument panel, dashboard, seats
or seat upholstery, front, side and
rear pillars, roof side rails, front
door panels, front door trims or front
door speakers

44
1-1. For safe use
Exhaust gas precautions
QExhaust pipe
The exhaust system needs to be
checked periodically. If there is a hole
Harmful substance to the
or crack caused by corrosion, dam-
human body is included in
age to a joint or abnormal exhaust
noise, be sure to have the vehicle
exhaust gases if inhaled.
inspected and repaired by any autho-
rized Mazda retailer or Mazda autho-
WARNING
rized repairer, or any reliable repairer.
Exhaust gases include harmful car-
bon monoxide (CO), which is color-
less and odorless. Observe the
following precautions.
Failure to do so may cause exhaust
gases enter the vehicle and may lead
to an accident caused by light-head-
edness, or may lead to death or a
serious health hazard.
Q Important points while driving
OKeep the back door closed.
O If you smell exhaust gases in the
vehicle even when the back door is
closed, open the windows and have
the vehicle inspected at any autho-
rized Mazda retailer or Mazda
authorized repairer, or any reliable
repairer as soon as possible.
Q When parking
O If the vehicle is in a poorly venti-
lated area or a closed area, such as
a garage, stop the hybrid system.
O Do not leave the vehicle with the
hybrid system on for a long time.
If such a situation cannot be
avoided, park the vehicle in an
open space and ensure that
exhaust fumes do not enter the
vehicle interior.
O Do not leave the hybrid system
operating in an area with snow
build-up, or where it is snowing. If
snowbanks build up around the
vehicle while the hybrid system is
operating, exhaust gases may col-
lect and enter the vehicle.

1-2. Child safety
45
Airbag manual on-off
Deactivating the front seat
system
passenger airbag
Vehicles without a smart entry &
This system deactivates the
start system: Insert the key into the
front passenger airbag.
cylinder and turn to the “OFF” posi-
Only deactivate the airbag
tion.
when using a child restraint
1
The “OFF” indicator light turns on (only
system on the front passenger
when the power switch is in ON).
seat.
Vehicles with a smart entry & start
system: Insert the mechanical key
System components
into the cylinder and turn to the
“OFF” position.
The “OFF” indicator light turns on (only
when the power switch is in ON).
Q “PASSENGER AIR
BAG” indicator
information
If any of the following problems occur, it
is possible that there is a malfunction in
the system. Have the vehicle inspected
by any authorized Mazda retailer or
“PASSENGER AIR BAG” indica-
Mazda authorized repairer, or any reli-
tor
able repairer.
“PASSENGER AIR BAG” and “ON”
OThe “OFF” indicator does not illumi-
indicator light turns on when the airbag
nate when the airbag manual on-off
switch is set to “OFF”.
system is on, and about after 60 sec-
onds they go off. (only when the power
OThe indicator light does not change
when the airbag manual on-off switch
switch is in ON)
is switched to “ON” or “OFF”.
Airbag manual on-off switch
46
1-2. Child safety
WARNING
Riding with children
Q When installing a child restraint
system
Observe the following precau-
For safety reasons, always install a
tions when children are in the
child restraint system in a rear seat. In
vehicle.
the event that the rear seat cannot be
used, the front seat can be used as
Use a child restraint system
long as the airbag manual on-off sys-
appropriate for the child, until
tem is set to “OFF”.
the child becomes large
If the airbag manual on-off system is
left on, the strong impact of the airbag
enough to properly wear the
deployment (inflation) may cause
vehicle’s seat belt.
serious injury or even death.
z
It is recommended that chil-
Q When a child restraint system is
not installed on the front passen-
dren sit in the rear seats to
ger seat
avoid accidental contact with
Ensure that the airbag manual on-off
the shift lever, wiper switch,
system is set to “ON”.
etc.
If it is left off, the airbag may not
deploy in the event of an accident,
z
Use the rear door child-protec-
which may result in serious injury or
tor lock or the window lock
even death.
switch to avoid children open-
ing the door while driving or
operating the power window
accidentally. (→P.130, 151)
z
Do not let small children oper-
ate equipment which may
catch or pinch body parts, such
as the power window, hood,
back door, seats, etc.
WARNING
QWhen children are in the vehicle
Never leave children unattended in
the vehicle, and never allow children
to have or use the key.
Children may be able to start the vehi-
cle or shift the vehicle into neutral.
There is also a danger that children
may injure themselves by playing with
the windows or other features of the
vehicle. In addition, heat build-up or
extremely cold temperatures inside
the vehicle can be fatal to children.
1-2. Child safety
47
• Fixed with a seat belt: P.59
Child restraint systems
• Fixed with an ISOFIX lower
anchorage: P.60
Before installing a child
• Using a top tether anchorage:
restraint system in the vehicle,
P.61
there are precautions that need
to be observed, different types
Points to remember
1
of child restraint systems, as
well as installation methods,
z
Prioritize and observe the warn-
etc., written in this manual.
ings, as well as the laws and reg-
z
Use a child restraint system
ulations for child restraint
when riding with a small child
systems.
that cannot properly use a seat
z
Use a child restraint system until
belt. For the child’s safety,
the child becomes large enough
install the child restraint sys-
to properly wear the vehicle’s
tem to a rear seat. Be sure to
seat belt.
follow the installation method
z
Choose a child restraint system
that is in the operation manual
appropriate to the age and size
enclosed with the restraint sys-
of the child.
tem.
z
Note that not all child restraint
z
The use of a Mazda genuine
systems can fit in all vehicles.
child restraint system is rec-
Before using or purchasing a
ommended, as it is safer to
child restraint system, check the
use in this vehicle. Mazda gen-
compatibility of the child restraint
uine child restraint systems
system with seat positions.
are made specifically for
(→P.51)
Mazda vehicles. They can be
purchased at a Mazda dealer.
WARNING
QWhen a child is riding
Table of contents
Observe the following precautions.
Failure to do so may result in death or
Points to remember: P.47
serious injury.
When using a child restraint sys-
tem: P.48
Child restraint system compatibility
for each seating position: P.51
Child restraint system installation
method: P.58
48
1-2. Child safety
WARNING
O Depending on the child restraint
system, installation may be difficult
O For effective protection in automo-
or impossible. In those cases,
bile accidents and sudden stops, a
check whether the child restraint
child must be properly restrained,
system is suitable for installment in
using a seat belt or child restraint
the vehicle. (→P.51) Be sure to
system which is correctly installed.
install and observe the usage rules
For installation details, refer to the
after carefully reading the child
operation manual enclosed with the
restraint system fixing method in
child restraint system. General
this manual, as well as the opera-
installation instruction is provided in
tion manual enclosed with the child
this manual.
restraint system.
O Mazda strongly urges the use of a
OKeep the child restraint system
proper child restraint system that
properly secured on the seat even if
conforms to the weight and size of
it is not in use. Do not store the
the child, installed on the rear seat.
child restraint system unsecured in
According to accident statistics, the
the passenger compartment.
child is safer when properly
restrained in the rear seat than in
OIf it is necessary to detach the child
the front seat.
restraint system, remove it from the
vehicle or store it securely in the
O Holding a child in your or someone
luggage compartment.
else’s arms is not a substitute for a
child restraint system. In an acci-
dent, the child can be crushed
When using a child restraint
against the windshield or between
system
the holder and the interior of the
vehicle.
Q When installing a child
QHandling the child restraint sys-
restraint system to a front pas-
tem
senger seat
If the child restraint system is not
properly fixed in place, the child or
For the safety of a child, install a
other passengers may be seriously
child restraint system to a rear seat.
injured or even killed in the event of
sudden braking, sudden swerving, or
When installing a child restraint
an accident.
system to a front passenger seat is
O If the vehicle were to receive a
unavoidable, adjust the seat as fol-
strong impact from an accident,
lows and install the child restraint
etc., it is possible that the child
system:
restraint system has damage that is
not readily visible. In such cases,
z Move the front seat fully rear-
do not reuse the restraint system.
ward.
z Adjust the seat height to the
upper most position.
z Adjust the seatback angle to the
most upright position.
When installing a forward-facing child

1-2. Child safety
49
seat, if there is a gap between the child
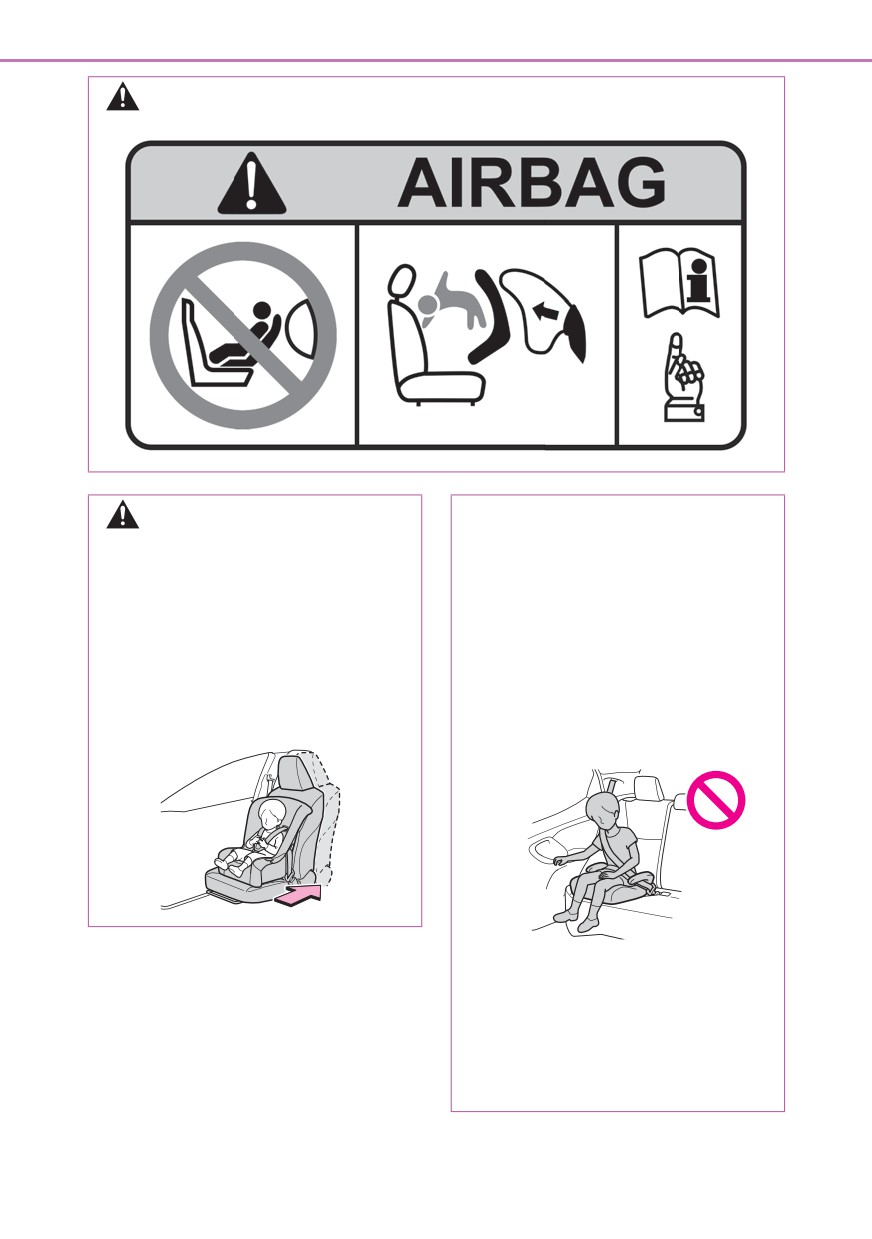
OThere is a label(s) on the passen-
seat and the seatback, adjust the seat-
ger side sun visor, indicating it is
back angle until good contact is
forbidden to attach a rear-facing
achieved.
child restraint system to the front
passenger seat.
z If the head restraint interferes
Details of the label(s) are shown in
with your child restraint system,
the illustration below.
and the head restraint can be
1
removed, remove the head
restraint. Otherwise, put the
head restraint in the upper most
position.
WARNING
Q When using a child restraint sys-
tem
Observe the following precautions.
Failure to do so may result in death or
serious injury.
O Never use a rear-facing child
restraint system on the front pas-
senger seat when the airbag man-
ual on-off switch is on. (→P.45) The
force of the rapid inflation of the
front passenger airbag can cause
death or serious injury to children in
the event of an accident.
50
1-2. Child safety
WARNING
WARNING
ODo not allow the child to lean
his/her head or any part of his/her
O Only put a forward-facing child
body against the door or the area of
restraint system on the front seat
the seat, front or rear pillars, or roof
when unavoidable. When installing
side rails from which the SRS side
a forward-facing child restraint on
airbags or SRS curtain shield air-
the front passenger seat, move the
bags deploy even if the child is
seat as far back as possible. Failing
seated in the child restraint system.
to do so may result in death or seri-
It is dangerous if the SRS side and
ous injury if the airbags deploy
curtain shield airbags inflate, and
(inflate).
the impact could cause death or
serious injury to the child.
OWhen a junior seat is installed,
always ensure that the shoulder
belt is positioned across the center
of the child’s shoulder. The belt
should be kept away from the
child’s neck, but not so that it could
fall off the child’s shoulder.

1-2. Child safety
51
Check the selected child restraint
WARNING
system together with the following
O Use child restraint system suitable
[Before confirming the compatibility
to the age and size of the child and
install it to the rear seat.
of each seating position with child
restraint systems].
O If the driver’s seat interferes with
the child restraint system and pre-
Q Before confirming the compat-
vents it from being attached cor-
ibility of each seating position
1
rectly, attach the child restraint
system to the right-hand rear seat
with child restraint systems
(left-hand drive vehicles) or the left-
1
Checking the child restraint sys-
hand rear seat (right-hand drive
vehicles). (→P.56)
tem standards.
Use a child restraint system that
conforms to UN (ECE) R44*1 or
UN (ECE) R129*1, 2.
The following approval mark is
displayed on child restraint sys-
tems which are conformed.
Check for an approval mark
attached to the child restraint
Child restraint system com-
system.
patibility for each seating
position
Q Child restraint system compat-
ibility for each seating posi-
tion
Compatibility of each seating posi-
tion with child restraint systems
(→P.52) displays the type of child
restraint systems that can be used
and possible seating positions for
installation using symbols.
Also, the recommended child
restraint system that is suitable for
Example of the displayed regulation
your child can be selected.
number
Otherwise, check [Recommended
UN (ECE) R44 approval mark*3
child restraint systems information]
The weight range of the child
for recommended child restraint
who is applicable for an UN
systems. (→P.56)
(ECE) R44 approval mark is

52
1-2. Child safety
indicated.
*3: The displayed mark may differ
depending on the product.
UN (ECE) R129 approval
Q Compatibility of each seating
mark*3
position with child restraint
The height range of the child
systems
who is applicable as well as
available weights for an UN
X Left-hand drive vehicles
(ECE) R129 approval mark is
indicated.
2
Checking the category of the
child restraint system.
Check the approval mark of the
child restraint system for which
of the following categories the
child restraint system is suitable.
Also, if there are any uncertain-
ties, check the user’s guide
included with the child restraint
system or contact the retailer of
the child restraint system.
•
“universal”
•
“semi-universal”
•
“restricted”
•
“vehicle specific”
*1: UN (ECE) R44 and UN (ECE) R129
are U.N. regulations for child
restraint systems.
*2: The child restraint systems men-
tioned in the table may not be avail-
able outside of the EU area.

1-2. Child safety
53
X Right-hand drive vehicles
Suitable for i-Size and ISOFIX
child restraint system.
Includes a top tether anchorage
point.
*1: Move the front seat fully rearward. If
the passenger seat height can be
1
adjusted, move it to the upper most
position.
*2: Adjust the seatback angle to the
most upright position. When install-
ing a forward-facing child seat, if
there is a gap between the child seat
and the seatback, adjust the seat-
back angle until good contact is
achieved.
Deactivation of front passenger
airbag.
Activation of front passenger
airbag. Never use a rear-facing child
*3: If the head restraint interferes with
restraint system on the front passenger
your child restraint system, and the
seat when the airbag manual on-off
head restraint can be removed,
switch is on.
remove the head restraint.
Suitable for “universal” category
Otherwise, put the head restraint in
child restraint system fixed with
the upper most position.
the seat belt.
*4: Not suitable for child restraint sys-
Suitable for forward-facing “Uni-
tems with support leg.
versal” category child restraints
system fixed with the seat belt.
Suitable for child restraint sys-
tems given on recommended
child restraint systems and
compatibility table (→P.56).

54
1-2. Child safety
Q Detail information for child restraint systems installation
Seating position
Airbag manual on-
Seat position number
off switch
ON
OFF
Yes
Seating position suitable for
Forward-
Yes
Yes
Yes*2
Yes
universal belted (Yes/No)*1
facing
only
i-Size seating position
No
No
Yes
No
Yes
(Yes/No)
Seating position suitable for
No
No
No
No
No
lateral fixture (L1/L2/No)
Suitable rearward facing fix-
R1, R2X,
R1, R2X,
No
No
No
ture (R1/R2X/R2/R3/No)
R2, R3*3
R2, R3*4
Suitable forward facing fix-
F2X, F2,
F2X, F2,
No
No
No
ture (F2X/F2/F3/No)
F3
F3
Suitable junior seat fixture
No
No
B2, B3
No
B2, B3
(B2/B3/No)
*1: All Universal categories (group 0, 0+, I, II and III).
*2: Not suitable for child restraint systems with support leg.
*3: Adjust the driver’s seat to the highest position.
*4: Before installing a child restraint system to this seat, adjust the position of the
front passenger’s seat to between the 1st lock position and 12th lock position
(16th lock position from the rear).

1-2. Child safety
55
1
1st lock position
12th lock position
Mazda suggests the users to use
and
seating positions.
ISOFIX child restraint systems are divided into different “fixture”. The child
restraint system can be used in the seating positions for “fixture” mentioned
in the table above. For kind of “fixture” relation, confirm the following table.
If your child restraint system has no kind of “fixture” (or if you cannot find
information in the table below), please refer to the child restraint system
“vehicle list” for compatibility information or ask the retailer of your child
seat.
Mass
Child weight
Size class
Fixture
Description
groups
E
R1
Rearward-facing infant seat
Left lateral-facing infant seat
up to 10 kg
F
L1
0
(Carrycot)
(22 lb.)
Right lateral-facing infant seat
G
L2
(Carrycot)
Full-size, rearward-facing child
C
R3
restraint systems
Reduced-size, rearward-facing
D
R2
up to 13 kg
child restraint systems
0+
(28 lb.)
Reduced-size, rearward-facing
—
R2X
child restraint systems
E
R1
Rearward-facing infant seat

56
1-2. Child safety
Mass
Child weight
Size class
Fixture
Description
groups
Full-height, forward-facing child
A
F3
restraint systems
Reduced-height, forward-facing
B
F2
child restraint systems
9 to 18 kg
Reduced-height, forward-facing
I
B1
F2X
(20 to 39 lb.)
child restraint systems
Full-size, rearward-facing child
C
R3
restraint systems
Reduced-size, rearward-facing
D
R2
child restraint systems
15 to 25 kg
II
(34 to 55 lb.)
—
B2, B3
Junior seat
22 to 36 kg
III
(48 to 79 lb.)
Q Recommended child restraint systems information
Fixation
Recommended child
Direction of
fixed with
Size
fixed with a
restraint system
travel
lower
seat belt
anchorages
Up to 13 kg
Rearward-fac-
Not applica-
Maxi Cosi Cabriofix
Yes
(Up to 28 lb.)
ing use only
ble
76 to 105cm
Britax TRIFIX 2 i-
Forward-facing
Not applica-
9 to 18 kg
Yes
SIZE
use only
ble
(20 to 39 lb.)
100 to 150cm
Britax KIDFIX i-
Forward-facing
15 to 36kg
Yes
No
SIZE*1
use only
(34 to 79 lb.)
15 to 36kg
Forward-facing
Britax KIDFIX II R*1, 2
Yes
Yes
(34 to 79 lb.)
use only
15 to 36kg
Forward-facing
TAKATA MAXI PLUS
Yes
Yes
(34 to 79 lb.)
use only
*1:Be sure to attach the seat belt through the SecureGuard.(ĺ P.57)

1-2. Child safety
57
*2:Adjust the child restraint system headrest so that it does not interfere with the
vehicle interior.
When securing some types of child
restraint systems in rear seat, it
may not be possible to properly use
the seat belts in positions next to
the child restraint without interfering
1
with it or affecting seat belt effec-
tiveness. Be sure your seat belt fits
snugly across your shoulder and
low on your hips. If it does not, or if
z
When installing a junior seat, if
it interferes with the child restraint,
the child in your child restraint
move to a different position. Failure
system is in a very upright posi-
to do so may result in death or seri-
tion, adjust the seatback angle to
ous injury.
the most comfortable position.
z When installing a child restraint
And if the seat belt shoulder
in the rear seats, adjust the front
anchor is ahead of the child seat
seat so that it does not interfere
belt guide, move the seat cush-
with the child or child restraint
ion forward.
system.
z
When using the child restraint
z When installing a child seat with
system with SecureGuard, be
support base, if the child seat
sure to guide the lap belt into
interferes with the seatback
SecureGuard
as shown in the
when latching it into the support
illustration.
base, adjust the seatback rear-
ward until there is no interfer-
ence.
z If the seat belt shoulder anchor is
ahead of the child seat belt
guide, move the seat cushion
forward.

58
1-2. Child safety
Child restraint system installation method
Confirm with the operation manual enclosed with the child restraint system
about the installation of the child restraint system.
Installation method
Page
Seat belt attachment
P.59
ISOFIX lower anchorage
P.60
attachment
Top tether anchorage
P.61
attachment

1-2. Child safety
59
dance to the directions enclosed
Child restraint system fixed
with the child restraint system.
with a seat belt
Q Installing child restraint sys-
tem using a seat belt
Install the child restraint system in
accordance to the operation man-
1
ual enclosed with the child restraint
system.
If the child restraint system on hand
is not within the “universal” cate-
4
After installing the child restraint
gory (or the necessary information
system, rock it back and forth to
is not in the table), refer to the
ensure that it is installed
“Vehicle List” provided by the child
securely. (→P.59)
restraint system maker for various
possible installation positions, or
Q Removing a child restraint
check the compatibility after asking
system installed with a seat
the retailer of the child seat.
belt
(→P.51, 52)
Press the buckle release button
1
If installing the child restraint
and fully retract the seat belt.
system to the front passenger
When releasing the buckle, the child
seat is unavoidable, refer to
restraint system may spring up due to
P.48 for the front passenger seat
the rebound of the seat cushion.
adjustment.
Release the buckle while holding down
the child restraint system.
2
If the head restraint interferes
Since the seat belt automatically reels
with your child restraint system,
itself, slowly return it to the stowing
and the head restraint can be
position.
removed, remove the head
restraint. Otherwise, put the
WARNING
head restraint in the upper most
QWhen installing a child restraint
position. (→P.141)
system
Observe the following precautions.
3
Run the seat belt through the
Failure to do so may result in death or
child restraint system and insert
serious injury.
the plate into the buckle. Make
sure that the belt is not twisted.
Securely fix the seat belt to the
child restraint system in accor-

60
1-2. Child safety
WARNING
O Do not allow children to play with
the seat belt. If the seat belt
becomes twisted around a child’s
neck, it may lead to choking or
other serious injuries that could
result in death. If this occurs and
the buckle cannot be unfastened,
scissors should be used to cut the
belt.
Q Installation with ISOFIX lower
OEnsure that the belt and plate are
securely locked and the seat belt is
anchorage (ISOFIX child
not twisted.
restraint system)
OShake the child restraint system left
Install the child restraint system in
and right, and forward and back-
accordance to the operation man-
ward to ensure that it has been
securely installed.
ual enclosed with the child restraint
system.
OAfter securing a child restraint sys-
tem, never adjust the seat.
If the child restraint system on hand
is not within the “universal” cate-
O When a junior seat is installed,
always ensure that the shoulder
gory (or the necessary information
belt is positioned across the center
is not in the table), refer to the
of the child’s shoulder. The belt
“Vehicle List” provided by the child
should be kept away from the
child’s neck, but not so that it could
restraint system maker for various
fall off the child’s shoulder.
possible installation positions, or
O Follow all installation instructions
check the compatibility after asking
provided by the child restraint sys-
the retailer of the child seat.
tem manufacturer.
(→P.51, 52)
1 If the head restraint interferes
Child restraint system fixed
with your child restraint system,
with an ISOFIX lower
and the head restraint can be
anchorage
removed, remove the head
restraint. Otherwise, put the
Q ISOFIX lower anchorages
head restraint in the upper most
(ISOFIX child restraint system)
position. (→P.141)
Lower anchorages are provided for
2 Remove the anchorage covers,
the outboard rear seats. (Marks dis-
and install the child restraint
playing the location of the anchor-
system to the seat.
ages are attached to the seats.)
The bars are installed behind the

1-2. Child safety
61
anchorage covers.
for the outboard rear seats.
Use top tether anchorages when
fixing the top strap.
1
Top tether anchorages
3 After installing the child restraint
Top strap
system, rock it back and forth to
Q Fixing the top strap to the top
ensure that it is installed
tether anchorage
securely. (→P.59)
Install the child restraint system in
accordance to the operation man-
WARNING
ual enclosed with the child restraint
Q When installing a child restraint
system.
system
Observe the following precautions.
1 Vehicles with the tonneau cover:
Failure to do so may result in death or
Remove the tonneau cover.
serious injury.
(→P.298)
OAfter securing a child restraint sys-
2 Adjust the head restraint to the
tem, never adjust the seat.
upmost position.
O When using the lower anchorages,
be sure that there are no foreign
If the head restraint interferes with the
objects around the anchorages and
child restraint system or top strap instal-
that the seat belt is not caught
lation and the head restraint can be
behind the child restraint system.
removed, remove the head restraint.
(→P.141)
O Follow all installation instructions
3 Latch the hook onto the top
provided by the child restraint sys-
tem manufacturer.
tether anchorage and tighten
the top strap.
Using a top tether anchor-
Make sure the top strap is securely
latched. (→P.59)
age
When installing the child restraint sys-
tem with the head restraint being
Q Top tether anchorages
raised, be sure to have the top strap
Top tether anchorages are provided

62
1-2. Child safety
pass underneath the head restraint.
Hook
Top strap
4 Vehicles with the tonneau cover:
Reinstall the tonneau cover.
WARNING
Q When installing a child restraint
system
Observe the following precautions.
Failure to do so may result in death or
serious injury.
O Firmly attach the top strap and
make sure that the belt is not
twisted.
O Do not attach the top strap to any-
thing other than the top tether
anchorage.
OAfter securing a child restraint sys-
tem, never adjust the seat.
O Follow all installation instructions
provided by the child restraint sys-
tem manufacturer.
O When installing the child restraint
system with the head restraint
being raised, after the head
restraint has been raised and then
the top tether anchorage has been
fixed, do not lower the head
restraint.

1-3. Emergency assistance
63
Speaker
eCall*1, 2
*: This button is intended for communi-
*1: If equipped
cation with the eCall system operator.
*2: Operates within the eCall coverage.
Other SOS buttons available in other
The system name differs depending
systems of a motor vehicle do not
on the country.
relate to the device and are not
intended for communication with the
eCall is a telematics service
1
eCall system operator.
that uses Global Navigation
Satellite System (GNSS) data
Emergency Notification Ser-
and embedded cellular tech-
vices
nology to enable the following
emergency calls to be made:
Q Automatic Emergency Calls
Automatic emergency calls
If any airbag deploys, the system is
(Automatic Collision Notifica-
designed to automatically call the
tion) and manual emergency
eCall control center.* The answer-
calls (by pressing the “SOS”
ing operator receives the vehicle’s
button). This service is
location, the time of the incident
required by European Union
and the vehicle VIN, and attempts
Regulations.
to speak with the vehicle occupants
to assess the situation. If the occu-
System components
pants are unable to communicate,
the operator automatically treats
the call as an emergency and con-
tacts the nearest emergency ser-
vices provider (112 system etc.) to
describe the situation and request
that assistance be sent to the loca-
tion.
*: In some cases, the call cannot be
made. (→P.64)
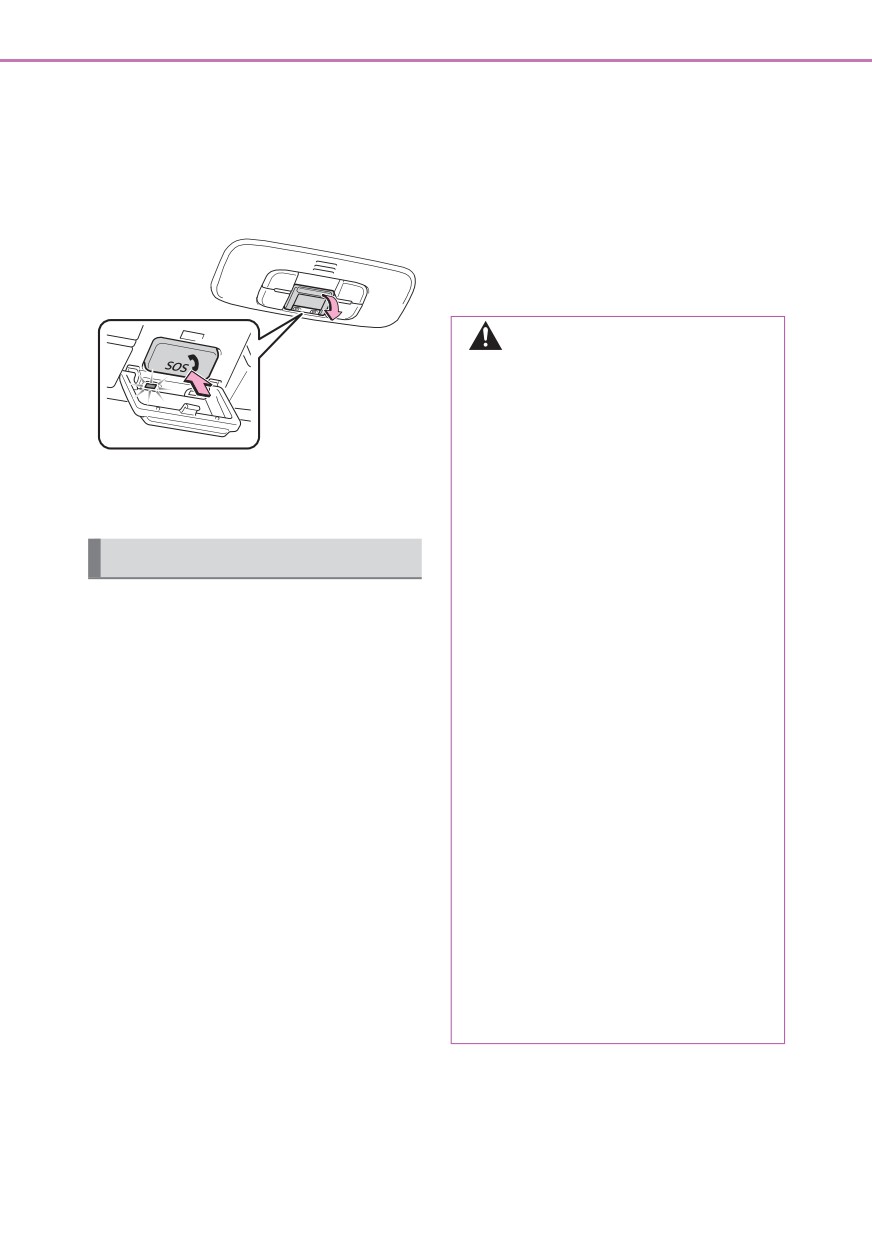
Q Manual Emergency Calls
In the event of an emergency, press
the “SOS” button to call the eCall
control center.* The answering
Microphone
operator will determine your vehi-
“SOS” button*
cle’s location, assess the situation,
and dispatch the necessary assis-
Indicator lights
tance required.
64
1-3. Emergency assistance
Make sure to open the cover before
depleted.
pressing the “SOS” button.
z If the red indicator light blinks for
If you accidentally press the “SOS” but-
approximately 30 seconds during
ton, tell the operator that you are not
an Emergency Call, the call has
experiencing an emergency.
been disconnected or the cellular
network signal is weak.
The service life of the backup battery
does not exceed 3 years.
WARNING
QWhen the Emergency Call may
not be made
OIt may not be possible to make
Emergency Calls in any of the fol-
lowing situations. In such cases,
*: In some cases, the call cannot be
report to emergency services pro-
made. (→P.64)
vider (112 system etc.) by other
means such as nearby public
phones.
Indicator lights
•
Even when the vehicle is in the cel-
When the power switch is turned to
lular phone service area, it may be
difficult to connect to the eCall con-
ON, the red indicator light will illumi-
trol center if the reception is poor or
nate for 10 seconds and then the
the line is busy. In such cases, even
green indicator light will illuminate,
though the system attempts to con-
nect to the eCall control center, you
indicating that the system is
may not be able to connect to the
enabled. The indicator lights indi-
eCall control center to make Emer-
cate the following:
gency Calls and contact emergency
services.
z If the green indicator light illumi-
•
When the vehicle is out of the cellu-
nates and stays on, the system is
lar phone service area, the Emer-
enabled.
gency Calls cannot be made.
z If the green indicator light flashes
•
When any related equipment (such
twice per second, an automatic
as the “SOS” button panel, indicator
lights, microphone, speaker, DCM,
or manual Emergency Call is
antenna, or any wires connecting
being made.
the equipment) is malfunctioning,
damaged or broken, the Emer-
z If the red indicator light illumi-
gency Call cannot be made.
nates at any time other than
immediately after the power
switch is turned to ON, the sys-
tem may be malfunctioning or
the backup battery may be
1-3. Emergency assistance
65
WARNING
OIf the airbags deploy when the sys-
tem is operating normally, the sys-
• During an Emergency Call, the sys-
tem makes emergency call. The
tem makes repeated attempts to
system also makes emergency call
connect to the eCall control center.
when the vehicle is struck from the
However, if it cannot connect to the
rear or rolls over, even if the airbags
eCall control center due to poor
do not deploy.
radio wave reception, the system
may not be able to connect to the
OFor safety, do not make the Emer-
1
cellular network and the call may
gency Call while driving.
finish without connecting. The red
Making calls during driving may
indicator light will blink for approxi-
cause mishandling of the steering
mately 30 seconds to indicate this
wheel, which may lead to unex-
disconnection.
pected accidents.
Stop the vehicle and confirm the
O If the 12-volt battery’s voltage
safety of your surroundings before
decreases or there is a disconnec-
making the Emergency Call.
tion, the system may not be able to
connect to the eCall control center.
OWhen changing fuses, please use
the specified fuses. Using other
O The Emergency Call system might
fuses may cause ignition or smoke
not work outside of EU area,
in the circuit and lead to a fire.
depending on the available infra-
structure in the country.
O Using the system while there is
smoke or an unusual smell may
Q When the Emergency Call sys-
cause a fire. Stop using the system
tem is replaced with a new one
immediately and consult any autho-
The Emergency Call system should
rized Mazda retailer or Mazda
be registered. Contact any authorized
authorized repairer, or any reliable
Mazda retailer or Mazda authorized
repairer.
repairer, or any reliable repairer.
Q For your safety
NOTICE
OPlease drive safely.
Q To prevent damage
The function of this system is to
assist you in making the Emer-
Do not pour any liquids onto the
gency Call in case of accidents
“SOS” button panel, etc. and do not
such as traffic accidents or sudden
impact it.
medical emergencies, and it does
QIf the “SOS” button panel,
not protect the driver or passengers
speaker or microphone malfunc-
in any way. Please drive safely and
tions during an Emergency Call
fasten your seatbelts at all times for
or manual maintenance check
your safety.
It may not be possible to make Emer-
O In case of an emergency, make
gency Calls, confirm the system sta-
lives the top priority.
tus, or communicate with the eCall
control center operator. If any of the
O If you smell anything burning or
above equipment is damaged, please
other unusual smells, leave the
consult any authorized Mazda retailer
vehicle and evacuate to a safe area
or Mazda authorized repairer, or any
immediately.
reliable repairer.
66
1-3. Emergency assistance
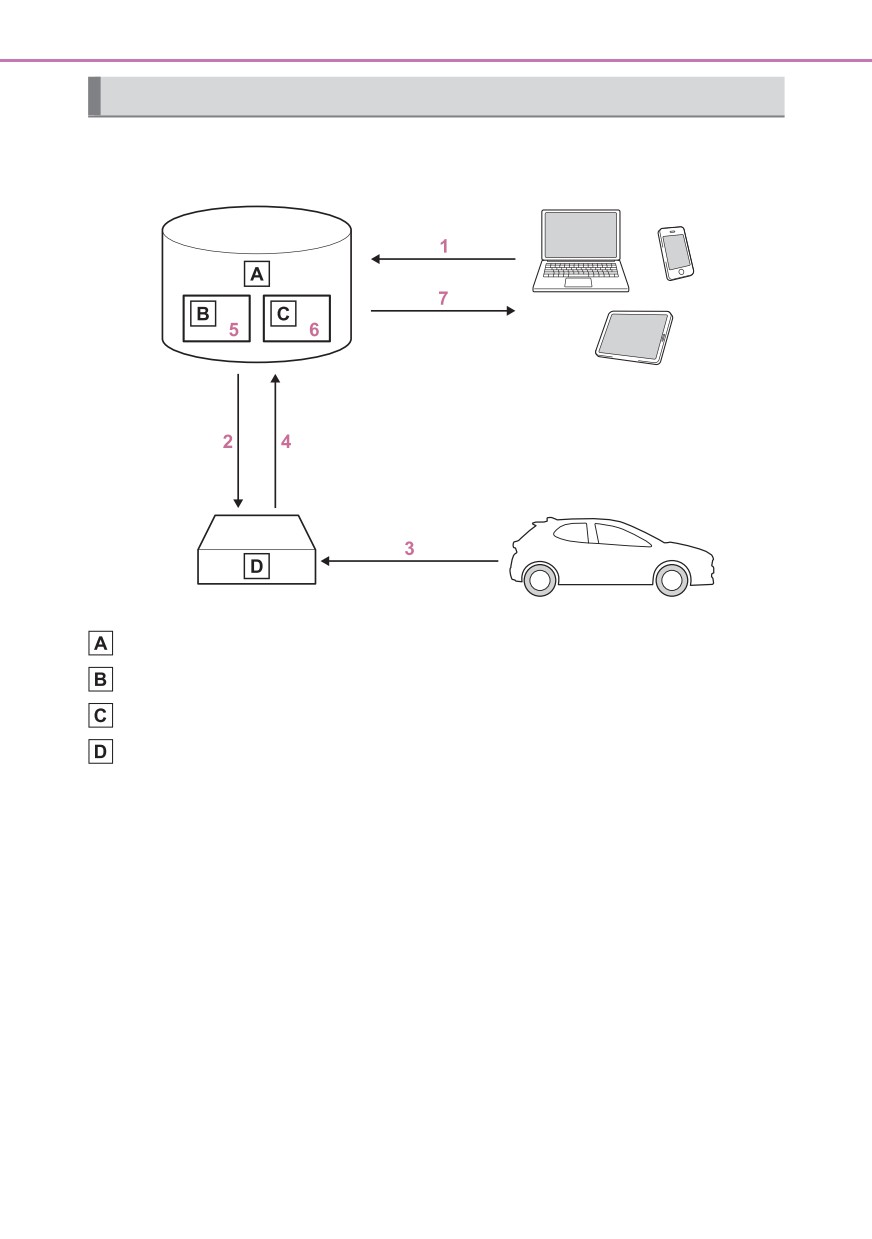
System overview of added service
Q Data processing flow
Server
Storage
Processing
DCM
1 Activation of data sharing is done by enabling a service on the “MyT by
Mazda” app or purchasing a service that requires data collection.
2 Server activates the service in the DCM and defines which vehicle data
to collect.
3 Defined vehicle data is collected by the DCM.
4 Data is shared with the server.
5 Data is stored in the server.
6 Data is processed in the server for fulfilling the service.
7 Processed data is presented to the customer.
For a list of eligible services in your region please visit the Mazda website or contact
any authorized Mazda retailer or Mazda authorized repairer, or any reliable repairer.
1-3. Emergency assistance
67
Implementing Regulation
Implementing Regulation Annex1 PART3 User Information
Conformity
1. DESCRIPTION OF THE ECALL IN-VEHICLE SYSTEM
Overview of the 112-based eCall in-vehicle sys-
1.1.
O
tem, its operation and functionalities
1
The 112-based eCall service is a public service
1.2.
of general interest and is accessible free of
O
charge.
The 112-based eCall in-vehicle system is acti-
vated by default. It is activated automatically by
means of in-vehicle sensors in the event of a
1.3.
severe accident. It will also be triggered automat-
O
ically when the vehicle is equipped with a TPS
system which does not function in the event of a
severe accident.
The 112-based eCall in-vehicle system can also
1.4.
be triggered manually, if needed. Instructions for
O
manual activation of the system
In the event of a critical system failure that would
disable the 112-based eCall in-vehicle system,
1.5.
O
the following warning will be given to the occu-
pants of the vehicle

68
1-3. Emergency assistance
Implementing Regulation Annex1 PART3 User Information
Conformity
2. INFORMATION ON DATA PROCESSING
Any processing of personal data through the 112-
based eCall in-vehicle system shall comply with
the personal data protection rules provided for in
2.1.
Directives 95/46/EC and 2002/58/EC, and in par-
O
ticular, shall be based on the necessity to protect
the vital interests of the individuals in accordance
with Article 7(d) of Directive 95/46/EC.
Processing of such data is strictly limited to the
2.2.
purpose of handling the emergency eCall to the
O
single European emergency number 112.
2.3. Types of data and its recipients
The 112-based eCall in-vehicle system may col-
lect and process only the following data: Vehicle
Identification Number, Vehicle type (passenger
vehicle or light commercial vehicle), Vehicle pro-
2.3.1.
pulsion storage type (gasoline/die-
O
sel/CNG/LPG/electric/hydrogen), Vehicle last
three locations and direction of travel, Log file of
the automatic activation of the system and its
timestamp, Any additional data (if applicable)
Recipients of data processed by the 112-based
eCall in-vehicle system are the relevant public
safety answering points designated by the
respective public authorities of the country on
2.3.2.
O
which territory they are located, to first receive
and handle eCalls to the single European emer-
gency number 112. Additional information (if
available):

1-3. Emergency assistance
69
Implementing Regulation Annex1 PART3 User Information
Conformity
2.4. Arrangements for data processing
The 112-based eCall in-vehicle system is
designed in such a way as to ensure that the
2.4.1.
data contained in the system memory is not
O
available outside the system before an eCall is
triggered. Additional remarks (if any):
1
The 112-based eCall in-vehicle system is
designed in such a way as to ensure that it is not
2.4.2.
traceable and not subject to any constant track-
O
ing in its normal operation status. Additional
remarks (if any):
The 112-based eCall in-vehicle system is
designed in such a way as to ensure that data in
2.4.3.
O
the system internal memory is automatically and
continuously removed.
The vehicle location data is constantly overwrit-
ten in the internal memory of the system so as
2.4.3.1.
always to keep maximum of the last three up-to-
O
date locations of the vehicle necessary for the
normal functioning of the system.
The log of activity data in the 112-based eCall in-
vehicle system is kept for no longer than neces-
sary for attaining the purpose of handling the
2.4.3.2.
O
emergency eCall and in any case not beyond 13
hours from the moment an emergency eCall was
initiated.

70
1-3. Emergency assistance
Implementing Regulation Annex1 PART3 User Information
Conformity
2.5. Modalities for exercising data subject’s rights
The data subject (the vehicle’s owner) has a right
of access to data and as appropriate to request
the rectification, erasure or blocking of data, con-
cerning him or her, the processing of which does
not comply with the provisions of Directive
2.5.1.
O
95/46/EC. Any third parties to whom the data
have been disclosed have to be notified of such
rectification, erasure or blocking carried out in
compliance with this Directive, unless it proves
impossible or involves a disproportionate effort.
The data subject has a right to complain to the
competent data protection authority if he or she
2.5.2.
considers that his or her rights have been
O
infringed as a result of the processing of his or
her personal data.
Contact service responsible for handling access
2.5.3.
requests (if any):
O
→P.71

1-3. Emergency assistance
71
Implementing Regulation Annex1 PART3 User Information
Conformity
3. INFORMATION ON THIRD PARTY SERVICES AND OTHER ADDED VALUE
SERVICES (IF FITTED)
Description of the operation and the functional-
3.1.
→P.66
ities of the TPS system/added value service
Any processing of personal data through the
1
TPS system/other added value service shall
3.2.
comply with the personal data protection rules
O
provided for in Directives 95/46/EC and
2002/58/EC.
The Euro-
pean Union
Legal basis for the use of TPS system and/or
General
3.2.1.
added value services and for processing data
Data Protec-
through them
tion Regula-
tion
The TPS system and/or other added value ser-
vices shall process personal data only on the
3.3.
O
base of the explicit consent of the data subject
(the vehicle’s owner or owners).
Modalities for data processing through TPS sys-
tem and/or other added value services, including
3.4.
any necessary additional information regarding
→P.66
traceability, tracking and processing of personal
data
The owner of a vehicle equipped with a TPS
eCall system and/or other added value service in
addition to the 112-based eCall in-vehicle system
3.5.
O
has the right to choose to use the 112-based
eCall in-vehicle system rather than the TPS eCall
system and the other added value service.
Contact details for handling TPS eCall system
3.5.1.
N/A
deactivation requests
(For Europe)
Contact service responsible for handling access requests:
Please contact your local Mazda Organisation for data protection requests. Contact
details related thereto are listed in the Privacy Statement which you find on your
country-specific webpage.
Please visit “https://www.mazda.eu” to find your country-specific webpage.
72
1-3. Emergency assistance
QFree/Open Source Software Information
This product contains Free/Open Source Software (FOSS). The license information
and/or the source code of such FOSS can be found at the following URL.
QCertification for eCall
→P.441
Большое спасибо!
Ваше мнение очень важно для нас.
Нет комментариевНе стесняйтесь поделиться с нами вашим ценным мнением.
Текст