Great Wall Florid. Manual — part 64

GWFLORID Maintenance Manual
254
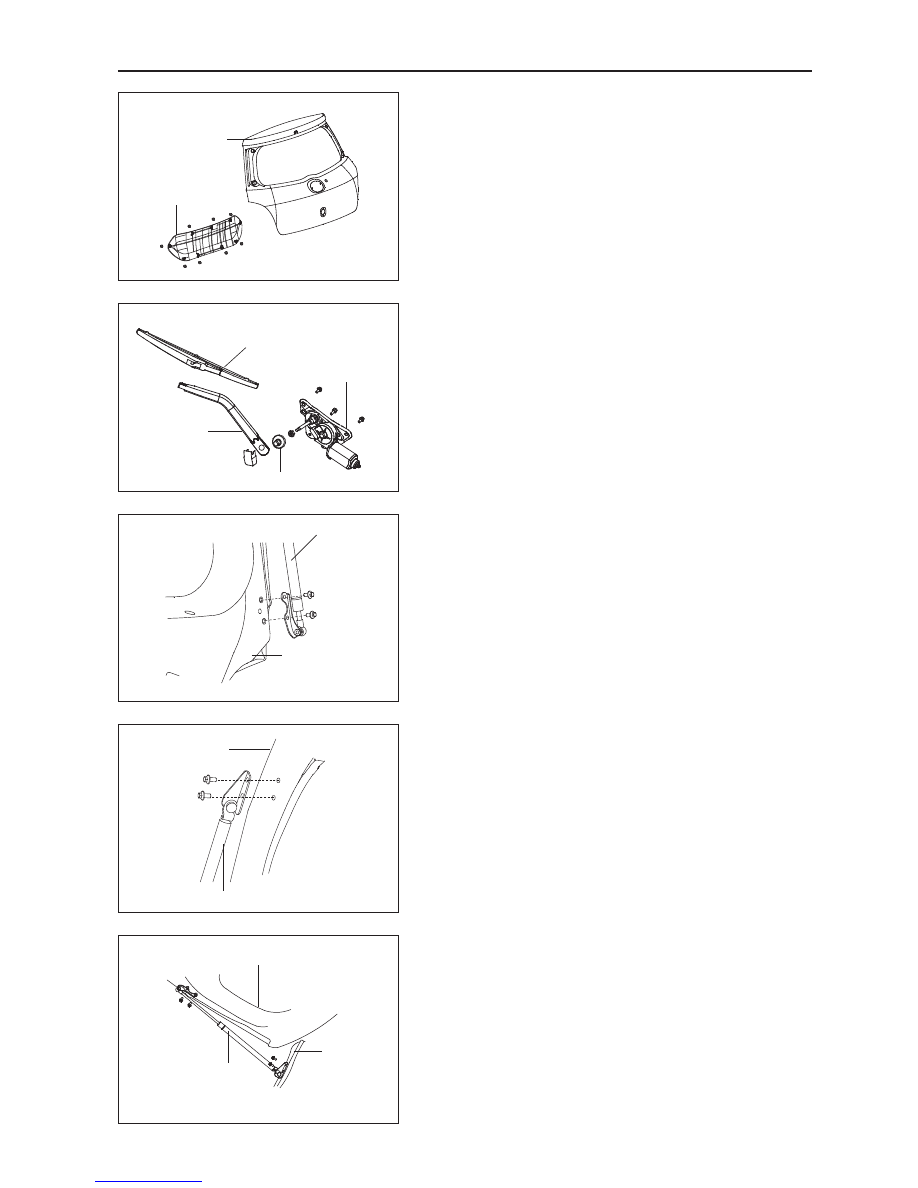
Trunk Door Assembly
Components
Right side
decorative block
Left side deco-
rative block
High mount brake lamp cap
Spoiler panel assembly
Trunk door assembly
High mount brake lampshade
High mount brake lamp assembly
Trunk door main lock assembly
Trunk door right side air spring
Trunk door hinge assembly
Trunk door
assembly
Trunk door outside
handle assembly
Trunk door plate
Trunk door handle
Trunk door protector assembly
Trunk door weatherstrip
Trunk door left
side air spring
Rear wiper assembly
Trunk door glass
weatherstrip
Trunk door lock button
High mount brake
lamp assembly 2
Trunk door resonance block
Trunk door glass weatherstrip
255
Vehicle Body
Trunk door removal
1. Remove the door inner decoration board.
(a) Remove the inside handle.
(b) Insert the buckle screwdriver between the fixed buckle
and the door inner decoration board to pry them loose.
Caution: Before using a buckle screwdriver, make sure
to wrap its head in tape.
(c) Take the door inner decoration board off.
2. Remove the vehicle inner lock button.
3. Remove the rear wiper arm assembly.
(a) Remove a rear wiper arm mounting bolt, and pull out
the rear wiper arm.
(b) Remove the three mounting bolts of the rear wiper mo-
tor, and pull the rear wiper motor out.
(c) Remove the rear wiper waterproof rubber plug.
4. Install it by reversing the removal steps.
Trunk door air spring removal
1. Open the trunk door.
2. Remove the air spring mounting bolts from the trunk
door.
3. Remove the air spring mounting bolts from the side
sheet metal of the rear body.
Trunk door air spring installation
Special Note: Different metals making direct contact
will accelerate corrosion. Make sure to use the correct
fastening piece to avoid premature corrosion.
1. Open the trunk door.
2. Install the air spring bracket onto side sheet metal of
the rear body with bolts.
3. Install the air spring bracket onto the side sheet metal
of the trunk door with bolts.
Trunk door
protector assembly
Trunk door
assembly
Rear wiper blade
Rear wiper motor
Rear wiper waterproof rubber plug
Rear wiper arm
Trunk door assembly
Trunk door left side air spring
Trunk door left side air spring
Body sheet metal
Trunk door left side
air spring
Body sheet metal
Trunk door
assembly

GWFLORID Maintenance Manual
256
Front Bumper
Components
1
2
3
4
5
6
7
8
9
10
11
9
8
6
5
3
11
11
11
11
1. Front bumper plastic support
2. Front bumper energy absorbing block
3. Cross slot & concave hexagon head self-tapping screw and large washer subassembly (Q2754819+Q422)
4. Front bumper left mounting bracket
5. Cross slot & concave hexagon head self-tapping screw and large washer subassembly (Q2756319+Q421)
6. Front bumper plastic nut seat 1
7. Front bumper body
8. Hexagon head bolt and flat washer subassembly (Q1400616)
9. Front bumper plastic nut seat 2
10. Front bumper right mounting bracket
11. Expansion button

257
Vehicle Body
Front bumper removal
1. Remove nut seat 2.
Screw off the lower air guide plate mounting screws below
the vehicle body from left & right front bumper plastic nut
seat 2, and remove left & right front bumper plastic nut seat 2.
2. Remove nut seat 1.
Screw off the screws of the front splash pad from the left &
right front bumper plastic nut seat 1, and pull left & right
front bumper plastic nut seat 1 out, then screw off the self-
tapping screws which are installed on the front bumper of
the left & right lower air guide plate and splash pad.
3. Remove the vehicle body bolts.
Screw off the hexagon head bolt and flat washer subassem-
bly (Q1400616) that is on the left & right side bracket of the
bumper and connected to vehicle body.
4. Remove the bumper bolts.
Screw off the mounting bolts where the front bumper and
left & right side bracket connects.
5. Remove the expansion button connecting the upper
part of the front bumper and vehicle body.
6. Pull the front bumper body out of the mounting bracket
of the left & right side bumper.
Front bumper plastic nut seat 2
Front bumper body
Front bumper body
Front bumper body
Front bumper body
Front bumper plastic
nut seat 1
Hexagon head bolt and flat
washer subassembly
Front bumper left side
mounting bracket
Cross slot & concave
hexagon head self-tap-
ping screw and large
washer subassembly
Front bumper body
Expansion button
Нет комментариевНе стесняйтесь поделиться с нами вашим ценным мнением.
Текст