Lexus RX350 L (2022 year). Manual in english — page 4
73
2-1. Instrument cluster
2
Vehi
cle
status
inform
ati
on a
nd i
ndic
ators
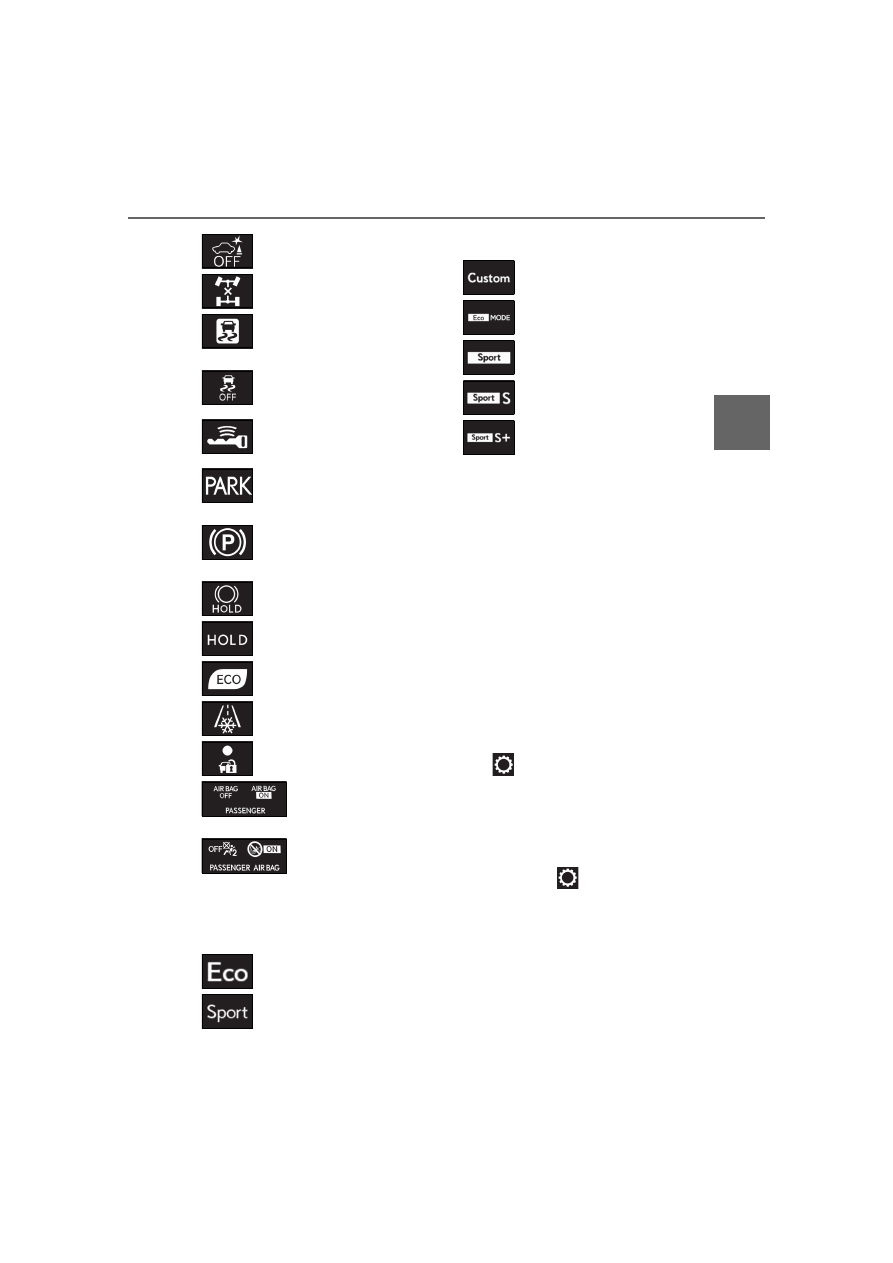
Drive mode indicators
Except F SPORT models
F SPORT models
*1
: These lights turn on when the engine
switch is turned to IGNITION ON
mode to indicate that a system check is
being performed. They will turn off after
the engine is started, or after a few sec-
onds. There may be a malfunction in a
system if a light does not come on, or
turn off. Have the vehicle inspected by
your Lexus dealer.
*2
: This light comes on when the system is
turned off.
*3
: In order to confirm operation, the BSM
outside rear view mirror indicators illu-
minate in the following situations:
When the BSM function is enabled
on
of the multi-information dis-
play, the engine switch is turned to
IGNITION ON mode.
When the engine switch is in IGNI-
TION ON mode, the BSM function
is enabled on
of the multi-infor-
mation display.
If the system is functioning correctly,
the BSM outside rear view mirror indi-
cators will turn off after a few seconds.
If the BSM outside rear view mirror
indicators do not illuminate or do not
turn off, there may be a malfunction in
PKSB OFF indicator
*1, 2
(if
equipped) (
All-wheel drive lock indicator
*1
(AWD models only) (
(flashes)
Slip indicator
*1
(
VSC OFF indicator
*1, 2
(
Smart access system with
push-button start indicator
*5
(
(U.S.A.)
Parking brake indicator
(
(Canada)
Parking brake indicator
(
Brake hold standby indicator
*1
(
Brake hold operated indicator
*1
(
Eco Driving Indicator Light
*1
(
Low outside temperature indi-
cator
*6
(
Security indicator
*7
(
P.66,
(U.S.A.)
“AIR BAG ON/OFF”
indicator
*1, 7
(
(Canada)
“AIR BAG ON/OFF”
indicator
*1, 7
(
Eco drive mode indicator
(
Sport mode indicator (if
equipped) (
Customize mode indicator
(
Eco drive mode indicator
(
Sport mode indicator (if
equipped) (
Sport S mode indicator
(
Sport S+ mode indicator
(
74
2-1. Instrument cluster
the system. If this occurs, have the vehi-
cle inspected by your Lexus dealer.
*4
: This light illuminates on the outside rear
view mirrors.
*5
: This light illuminates on the multi-infor-
mation display.
*6
: When the outside temperature is
approximately 37°F (3°C) or lower, this
indicator will flash for approximately 10
seconds, then stay on.
*7
: This light illuminates on the center
panel.
75
2-1. Instrument cluster
2
Vehi
cle
status
inform
ati
on a
nd i
ndic
ators
■
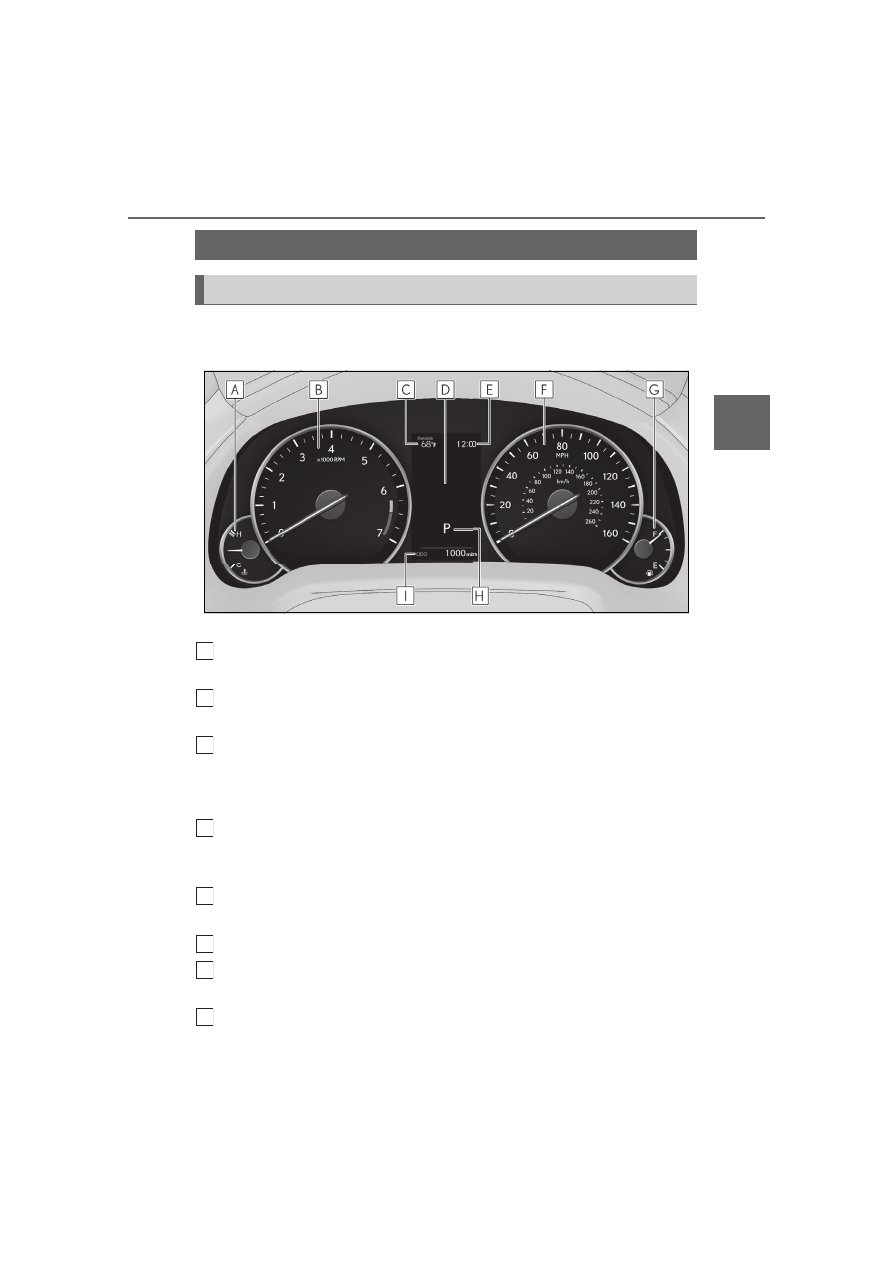
Locations of gauges and meters
Except F SPORT models
The units used on the meters may differ depending on the target region.
Engine coolant temperature gauge
Displays the engine coolant temperature
Tachometer
Displays the engine speed in revolutions per minute
Outside temperature
Displays the outside temperature within the range of -40°F (-40°C) to 122°F (50°C). Low
outside temperature indicator comes on when the ambient temperature is 37°F (3°C) or
lower.
Multi-information display
Presents the driver with a variety of vehicle data (
Displays warning messages in case of a malfunction (
Clock
Time displayed is linked to the analog clock on the instrument panel. (
Speedometer
Fuel gauge
Displays the quantity of fuel remaining in the tank
Shift position display (
Gauges and meters
Meter display
A
B
C
D
E
F
G
H
76
2-1. Instrument cluster
Odometer and trip meter display (
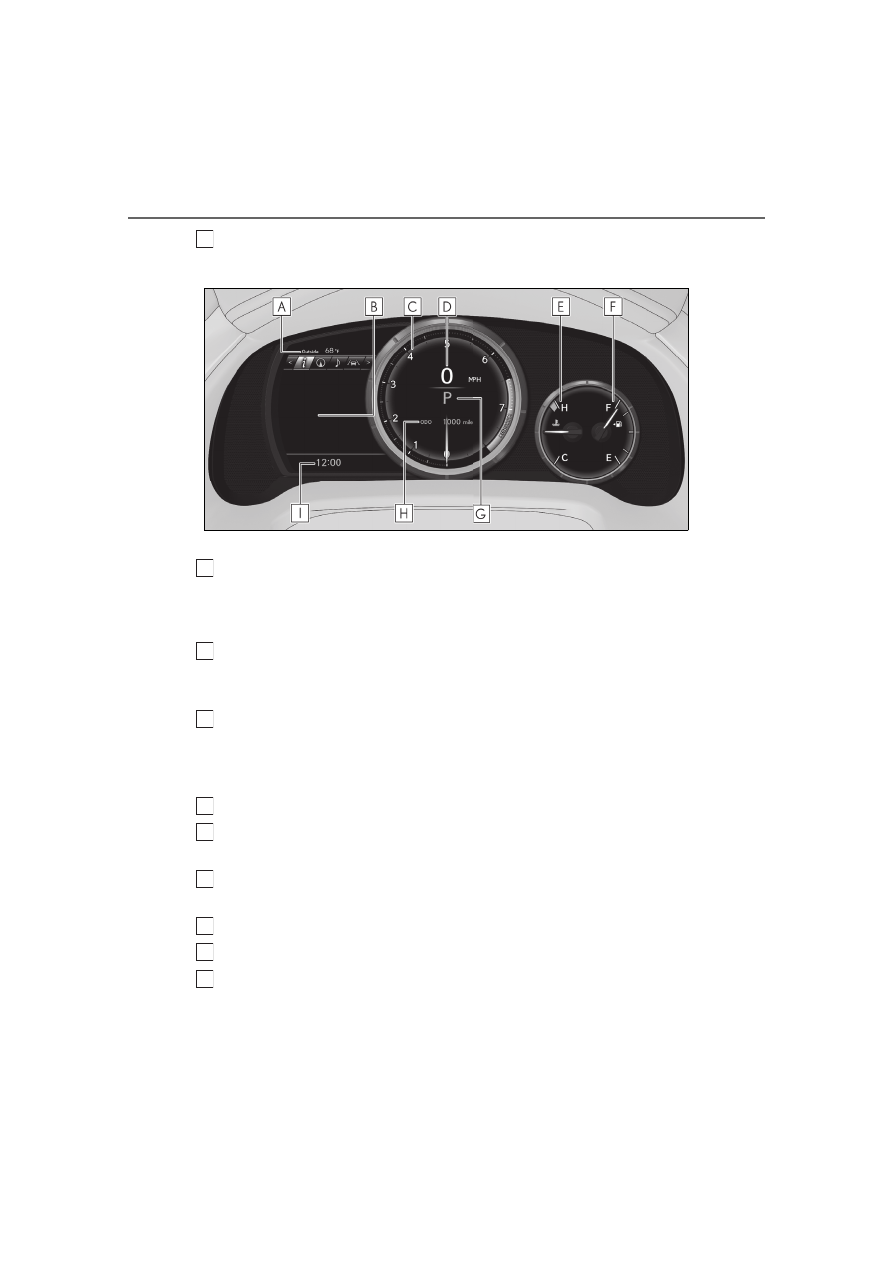
F SPORT models
The units used on the meters may differ depending on the target region.
Outside temperature
Displays the outside temperature within the range of -40°F (-40°C) to 122°F (50°C). Low
outside temperature indicator comes on when the ambient temperature is 37°F (3°C) or
lower.
Multi-information display
Presents the driver with a variety of vehicle data (
Displays warning messages in case of a malfunction (
Tachometer
Displays the engine speed in revolutions per minute
When sport mode is selected for the driving mode, the periphery of the tachometer will
change color and the scale of the tachometer will be emphasized.
Speedometer
Engine coolant temperature gauge
Displays the engine coolant temperature
Fuel gauge
Displays the quantity of fuel remaining in the tank
Shift position display (
Odometer and trip meter display (
Clock
Time displayed is linked to the analog clock on the instrument panel. (
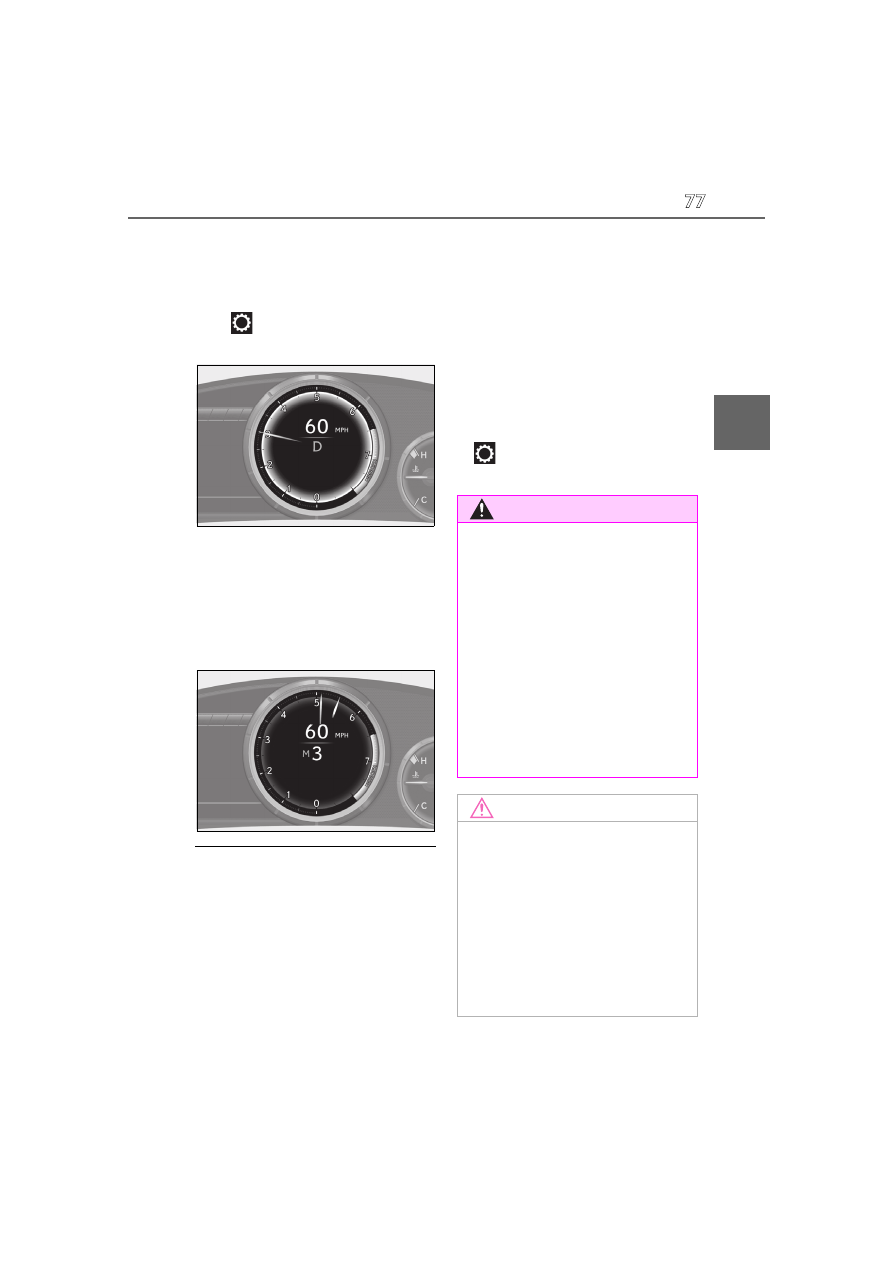
■
Rev indicator (F SPORT models)
When the engine speed reaches a set
I
A
B
C
D
E
F
G
H
I
77
2-1. Instrument cluster
2
Vehi
cle
status
inform
ati
on a
nd i
ndic
ators
speed, a ring-shaped indicator will be
displayed on the tachometer.
The desired engine speed at which the Rev
indicator will begin to be displayed can be
set on
of the multi-information display.
(
■
Rev peak (F SPORT models)
The engine speed reaches or exceeds
5000 rpm, an afterimage of the
tachometer will be displayed at the
highest engine speed for approxi-
mately 1 second.
■
The meters and display illuminate when
The engine switch is in IGNITION ON
mode.
■
Outside temperature display
●
In the following situations, the correct
outside temperature may not be dis-
played, or the display may take longer
than normal to change:
• When stopped, or driving at low speeds
(less than 12 mph [20 km/h])
• When the outside temperature has
changed suddenly (at the entrance/exit of
a garage, tunnel, etc.)
●
When “--” or “E” is displayed, the system
may be malfunctioning. Take your vehicle
to your Lexus dealer.
■
Liquid crystal display
Small spots or light spots may appear on the
display. This phenomenon is characteristic
of liquid crystal displays, and there is no
problem continuing to use the display.
■
Customization
The gauges and meters can be customized
on
of the multi-information display.
(
WARNING
■
The information display at low tem-
peratures
Allow the interior of the vehicle to warm
up before using the liquid crystal infor-
mation display. At extremely low tem-
peratures, the information display
monitor may respond slowly, and display
changes may be delayed.
For example, there is a lag between the
driver’s shifting and the new gear number
appearing on the display. This lag could
cause the driver to downshift again,
causing rapid and excessive engine brak-
ing and possibly an accident resulting in
death or injury.
NOTICE
■
To prevent damage to the engine and
its components
●
Do not let the indicator needle of the
tachometer enter the red zone, which
indicates the maximum engine speed.
●
The engine may be overheating if the
engine coolant temperature gauge is
in the red zone (H). In this case, imme-
diately stop the vehicle in a safe place,
and check the engine after it has
cooled completely. (
78
2-1. Instrument cluster
■
Display items
Odometer
Displays the total distance the vehicle has
been driven.
Trip meter A/trip meter B
Displays the distance the vehicle has been
driven since the meter was last reset. Trip
meters A and B can be used to record and
display different distances independently.
Distance until next engine oil
change
Displays the distance the vehicle can be
driven until an oil change is necessary.
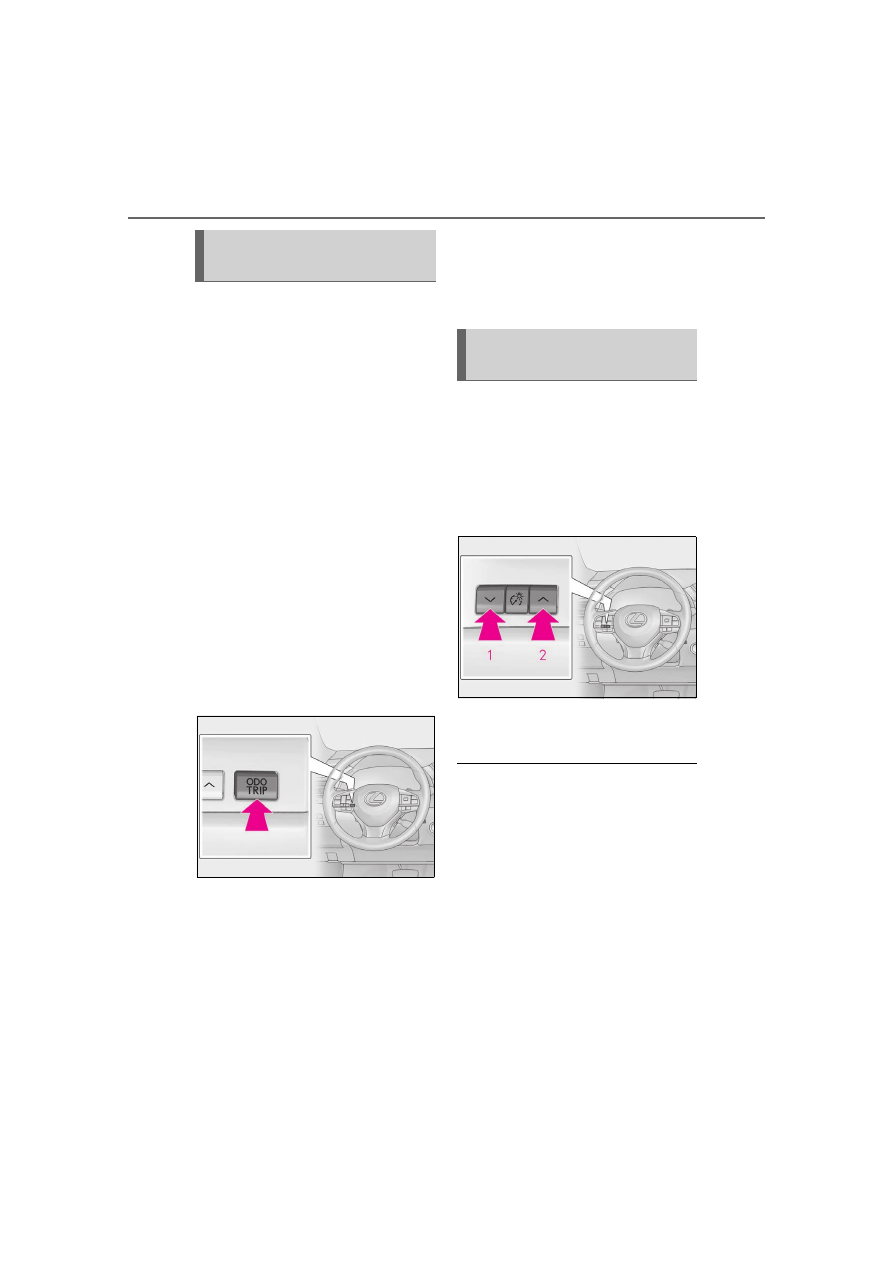
■
Changing the display
Each time the “ODO TRIP” switch is
pressed, the displayed item will be
changed. When the trip meter is dis-
played, pressing and holding the switch
will reset the trip meter.
■
Pop-up display
Distance until next engine oil change
Displays the distance until the next engine
oil change. This display will be displayed in
the following situations:
When the engine switch is turned to
IGNITION ON mode.
When a warning message indicating
that oil maintenance should be per-
formed soon or is required is dis-
played.
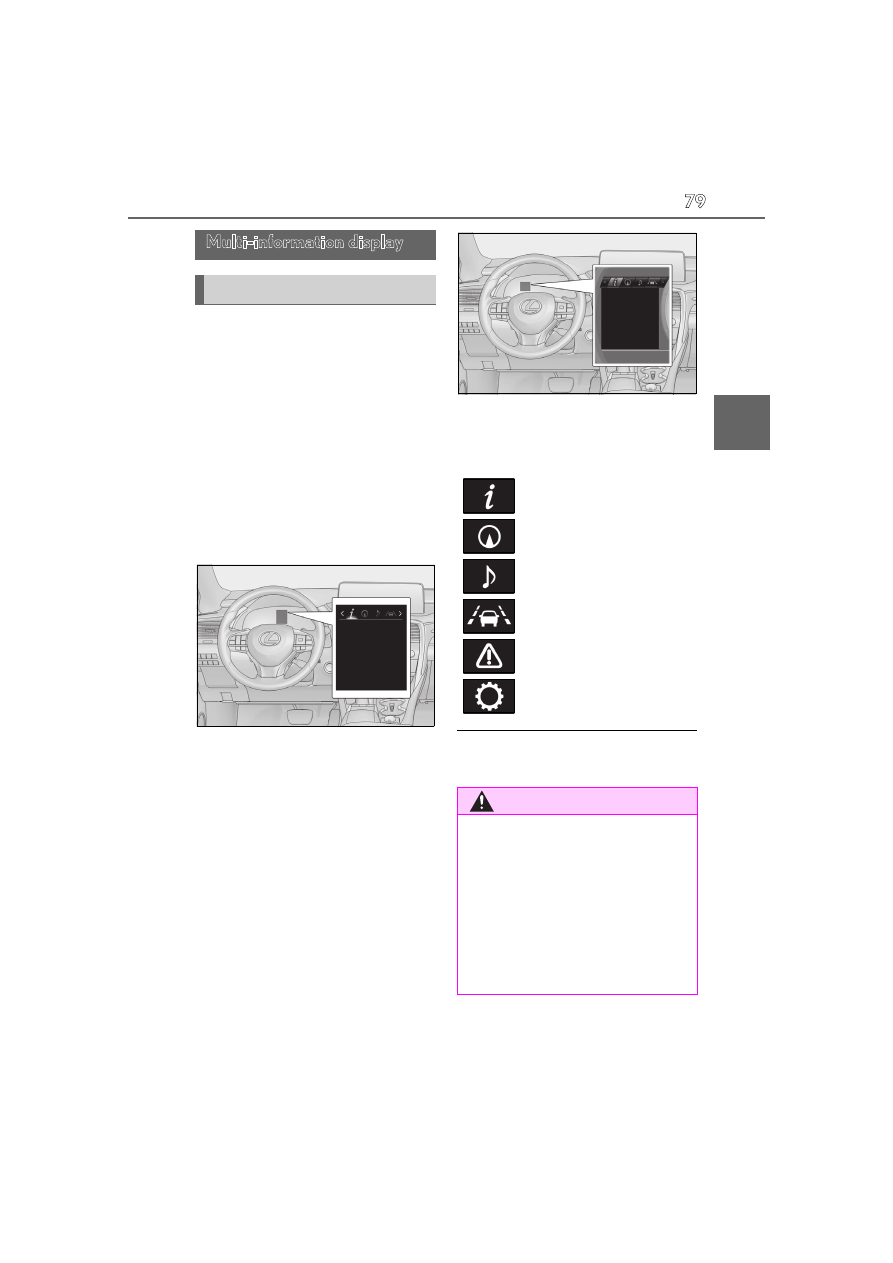
The brightness of the instrument panel
lights can be adjusted.
If the brightness is adjusted when the sur-
roundings are bright and the tail lights are
on (day mode brightness adjustment), the
brightness level of night mode will be
adjusted at the same time.
1
Darker
2
Brighter
■
Brightness of the meters (day mode and
night mode)
The brightness of the meters is changed
between day mode and night mode.
●
Day mode: When the tail lights are off or
when the tail lights are on but the sur-
rounding area is bright
●
Night mode: When the tail lights are on
and the surrounding area is dark
Odometer and trip meter dis-
play
Changing the instrument panel
light brightness
79
2-1. Instrument cluster
2
Vehi
cle
status
inform
ati
on a
nd i
ndic
ators
■
Display
Except F SPORT models
By selecting menu icons on the
multi-information display, a variety of
driving-related information can be dis-
played. The multi-information display
can also be used to change display set-
tings and other vehicle settings.
Warning or suggestion/advice pop-up
displays are also displayed in certain
situations.
F SPORT models
By selecting menu icons on the
multi-information display, a variety of
driving-related information can be dis-
played. The multi-information display
can also be used to change display set-
tings and other vehicle settings.
Warning or suggestion/advice pop-up
displays are also displayed in certain
situations.
■
Menu icons
Select a menu icon to display its con-
tent.
■
Liquid crystal display
Multi-information display
Display and menu icons
Driving information (
P.80)
Navigation system-linked dis-
play (if equipped) (
Audio system-linked display
(
P.83)
Driving assist system informa-
tion (
Warning message display
(
Settings display (
WARNING
■
Caution for use while driving
●
When operating the multi-information
display while driving, pay extra atten-
tion to the safety of the area around the
vehicle.
●
Do not look continuously at the
multi-information display while driving
as you may fail to see pedestrians,
objects on the road, etc. ahead of the
vehicle.

80
2-1. Instrument cluster
The multi-information display is oper-
ated using the meter control switches.
: Select menu icons
: Change displayed content,
scroll up/down the screen and
move the cursor
Press: Enter/Set
Press and hold: Reset
Return to the previous screen
Pressing and holding the switch will display
the first screen of the selected menu icon.
Press: Display the top screen
Press and hold: Register current
screen as the top screen
Call sending/receiving and history
display
Linked with the hands-free system, sending
or receiving call is displayed. For details
regarding the hands-free system, refer to
the “NAVIGATION AND MULTIMEDIA
SYSTEM OWNER’S MANUAL”.
■
Registering a top screen
The displayed top screen can be
changed to a registered screen of your
choice. To register a screen as the top
screen, display the desired screen and
press and hold
.
A message asking to confirm if reg-
istration is desired will be displayed.
If the selected screen cannot be
registered, a registration failure
message will be displayed.
When no screen has been regis-
tered, the drive information screen
will be displayed.
■
Content displayed as drive infor-
mation
Displays drive information such as the
following:
Drive information 1
• Current fuel consumption
• Average fuel economy (after reset)
Drive information 2
• Distance (driving range)
• Average vehicle speed (after reset)
Drive information 3
• Average fuel economy (after refuel)
• Elapsed time (after start)
Displayed items (listed below) can be
changed on
. (
Current fuel consumption
Displays instantaneous current fuel con-
sumption
WARNING
■
The information display at low tem-
peratures
Changing the meter display
A
B
C
D
E
Drive information
81
2-1. Instrument cluster
2
Vehi
cle
status
inform
ati
on a
nd i
ndic
ators
Average fuel economy
After reset: Displays average fuel con-
sumption since the display was reset
*1, 2
After start: Displays average fuel con-
sumption since engine start
*2
After refuel: Displays average fuel con-
sumption since refuel
*2, 3
Average vehicle speed
After reset: Displays average vehicle
speed since the display was reset
*1
After start: Displays average vehicle speed
since engine start
Elapsed time
After reset: Displays elapsed time since the
display was reset
*1
After start: Displays elapsed time since
engine start
Distance
Driving range: Displays driving range with
remaining fuel
*3, 4
After start: Displays drive distance since
vehicle start
Other
Blank: No item
*1
: To reset, display the desired item and
press and hold
of the meter con-
trol switch.
If both of the displayed items are reset-
table, a message will be displayed ask-
ing which item(s) to reset.
*2
: Use the displayed fuel consumption as a
reference.
*3
: When only a small amount of fuel is
added to the tank, the display may not
be updated.
When refueling, turn the engine switch
off. If the vehicle is refueled without
turning the engine switch off, the display
may not be updated.
*4
: This distance is computed based on
your average fuel consumption. As a
result, the actual distance that can be
driven may differ from that displayed.
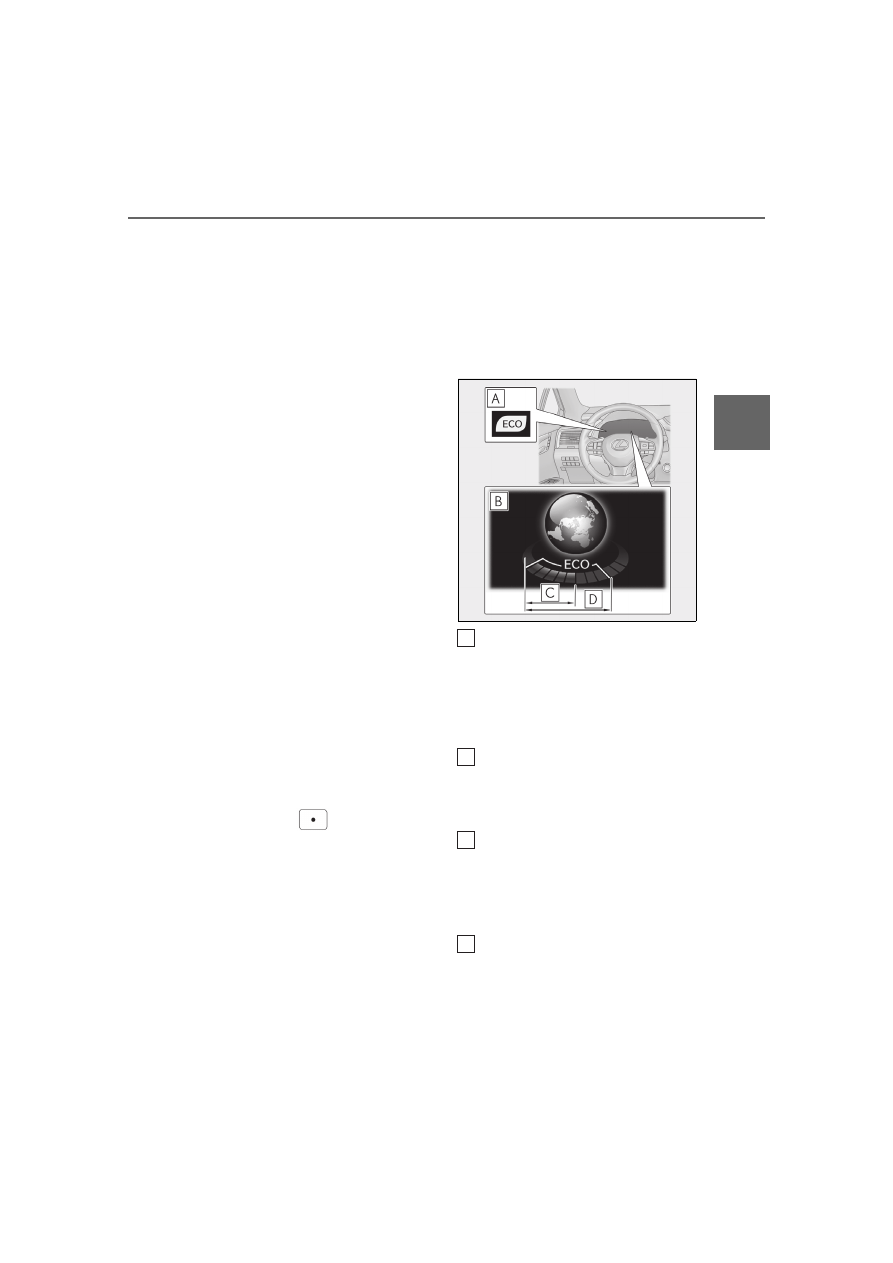
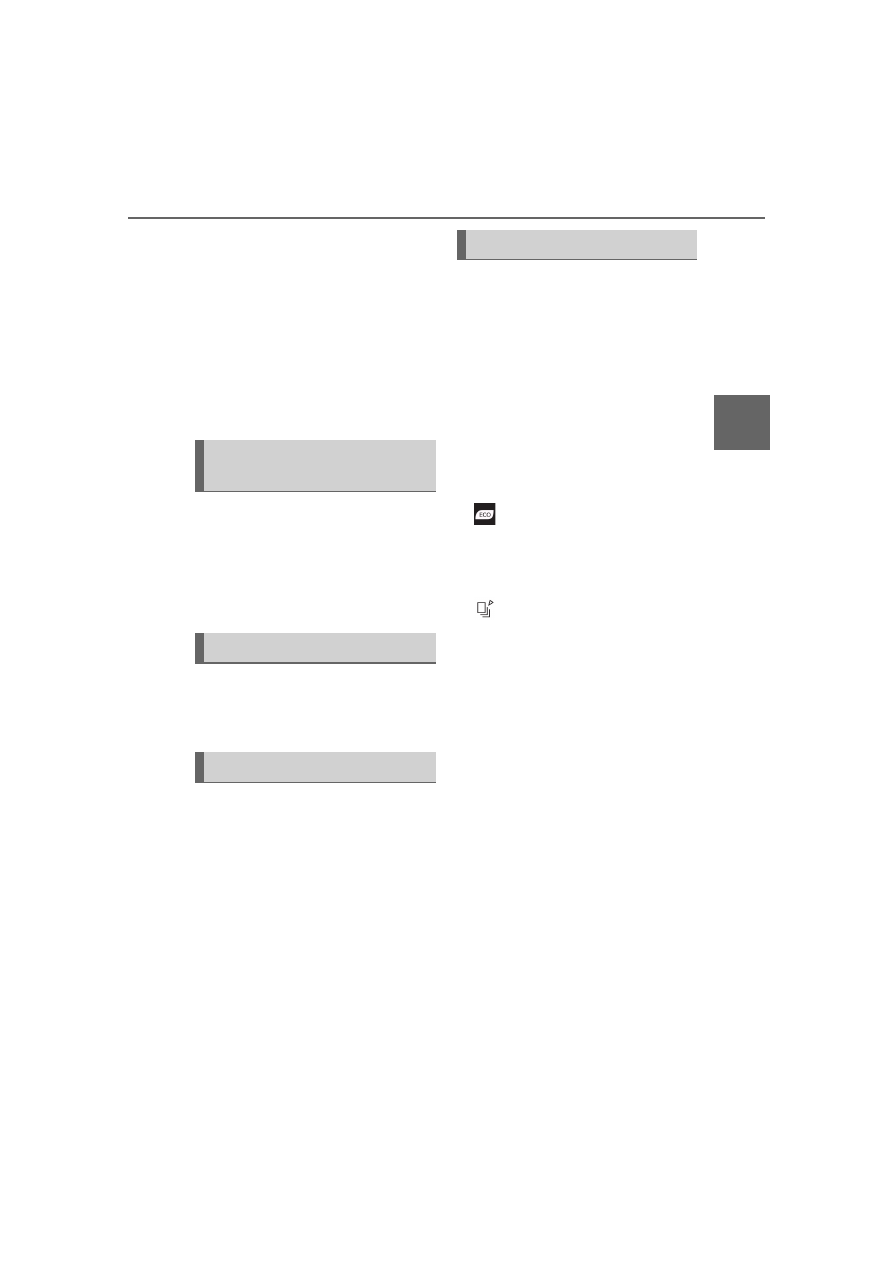
■
Eco Driving Indicator
Eco Driving Indicator Light
During Eco-friendly acceleration (Eco
driving), the Eco Driving Indicator Light
will turn on. When the acceleration
exceeds the Zone of Eco driving, or when
the vehicle is stopped, the light turns off.
Eco Driving Indicator Zone Display
Suggests the Zone of Eco driving with cur-
rent Eco driving ratio based on accelera-
tion.
Eco driving ratio based on acceler-
ation
If the acceleration exceeds the Zone of
Eco driving, the right side of the Eco Driv-
ing Indicator Zone Display will illuminate.
Zone of Eco driving
■
AWD Control (if equipped)
Displays the driving force applied to
each wheel using segments.
A
B
C
D
82
2-1. Instrument cluster
The greater the number of segments
displayed, the greater the driving force
applied.
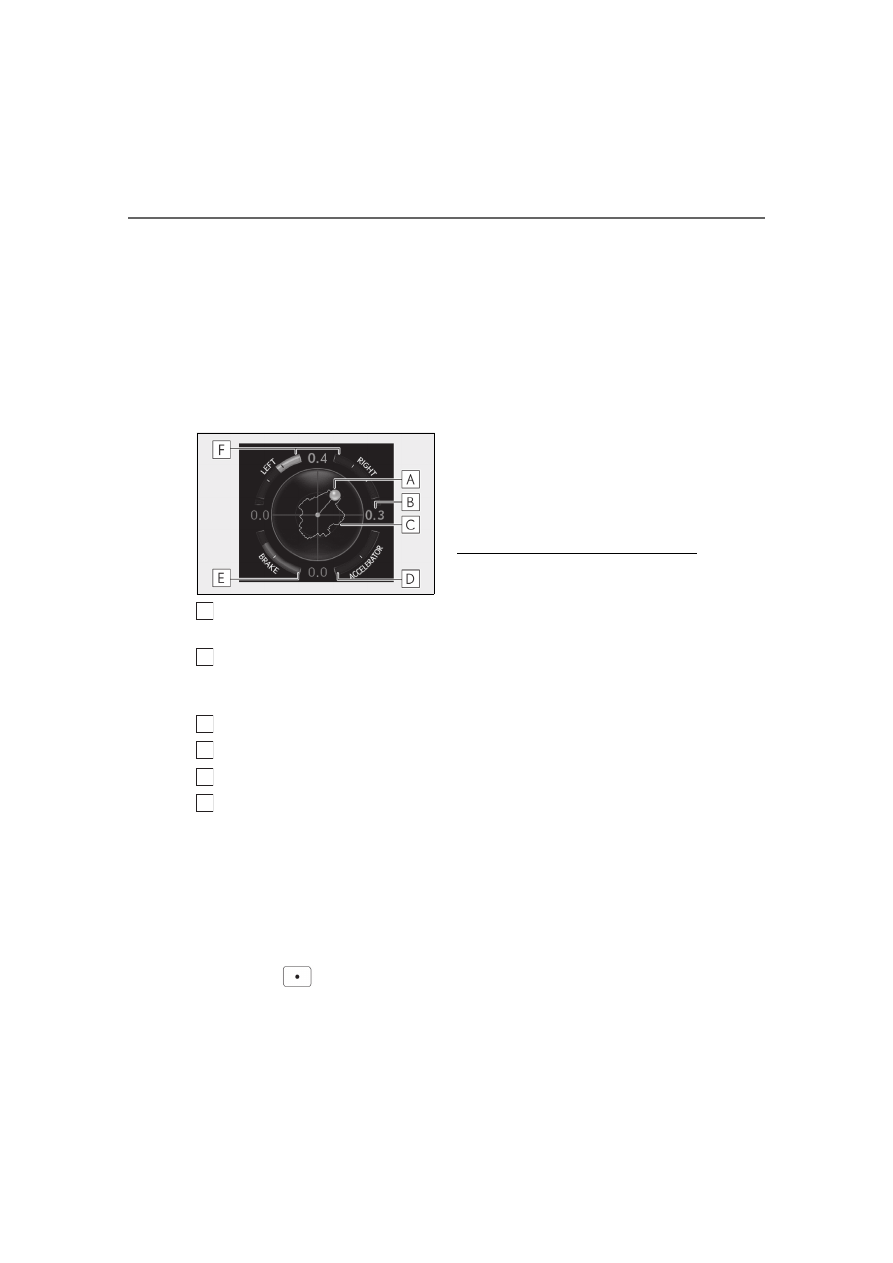
■
G-force (if equipped)
Displays lateral G-forces on the vehi-
cle. Also displays, around the periph-
ery of the G-force display, the left and
right steering amount, accelerator
pedal input, and brake fluid pressure.
Acceleration G-force on the vehi-
cle
Current G-force value (analyzed
value of front/rear and left/right
G-forces)
Record of the maximum G-forces
Accelerator pedal input
Brake fluid pressure
Steering amount
This display is intended for use as a guide-
line. Depending on factors such as the road
surface condition, temperature and vehicle
speed, the display may not show the actual
condition of the vehicle.
Resetting the record of maximum
G-forces
Press and hold
of the meter control
switch to reset the record.
Peak hold function
If lateral G-forces of 0.5 G or greater are
generated, the G-force value display will
turn amber and be held for 2 seconds.
■
Tire pressure
■
Units (if equipped)
The units of measure used can be
changed while driving.
Unlike the units setting performed on the
settings display, the units setting per-
formed on the drive information display
can be changed while driving.
■
Blank (No items)
Displays no drive information contents.
■
Eco Driving Indicator
Eco Driving Indicator will not operate
under the following conditions:
●
The shift lever is in any position other than
D.
●
A paddle shift switch is operated.
●
Sport mode is selected.
●
The driving mode is set to customized
mode and the powertrain control is set to
power (
●
The vehicle speed is approximately 80
mph (130 km/h) or higher.
■
G-force display (if equipped)
●
The G-force values may not be zero even
when the vehicle is parked, such as when
it is parked on an incline.
●
Depending on the vehicle usage condi-
tions, the brake fluid pressure display may
not reach its maximum reading even
though the brake pedal is fully depressed.
●
If a battery terminal is disconnected and
reconnected, the steering amount display
may be disabled temporarily. After driv-
ing the vehicle for a while, the display will
be enabled.
■
Tire pressure
• It may take a few minutes to display the
A
B
C
D
E
F
83
2-1. Instrument cluster
2
Vehi
cle
status
inform
ati
on a
nd i
ndic
ators
tire inflation pressure after the engine
switch is turned to IGNITION ON mode.
It may also take a few minutes to display
the tire inflation pressure after inflation
pressure has been adjusted.
• “---” may be displayed if the tire position
information cannot be determined due to
unfavorable radio wave conditions.
• Tire inflation pressure changes with tem-
perature. The displayed values may also
be different from the values measured
using a tire pressure gauge.
Select to display the following naviga-
tion system-linked information.
Route guidance
Compass display (heading-up dis-
play)
Select to enable selection of an audio
source or track on the meter using the
meter control switches.
Select to display the operational status
of the following systems:
LTA (Lane Tracing Assist) (
RSA (Road Sign Assist) (if
equipped) (
Dynamic radar cruise control with
full-speed range (
■
Meter display settings that can be
changed
Clock
Select to switch between 12-hour display
and 24-hour display.
Language
Select to change the language displayed.
Units
Select to change the units of measure dis-
played.
Eco Driving Indicator Light
(
Select to enable/disable the Eco Driving
Indicator Light.
Switch settings
Select to display how to change the top
screen.
Drive information 1/Drive informa-
tion 2/Drive information 3
Select to select up to 2 items (
will be displayed on each Drive information
screen (Drive information 1 screen, Drive
information 2 screen, and Drive informa-
tion 3 screen) respectively.
Pop-up display
Select to enable/disable the pop-up dis-
play.
• Intersection guidance (if equipped)
• Incoming calls
• Brightness adjustment
Color (except F SPORT models)
Select to set the color of the cursor on the
multi-information display.
Needle (F SPORT models)
Navigation system-linked dis-
play (if equipped)
Audio system-linked display
Driving assist system information
Settings display
84
2-1. Instrument cluster
Select to set the tachometer needle color.
Rev indicator (F SPORT models)
(
• Select to enable/disable the Rev indica-
tor.
• Select to set the desired engine speed at
which the Rev indicator will begin to be
displayed.
Selectable engine speed range:
2000 rpm to 6500 rpm
Rev peak (F SPORT models)
(
Select to enable/disable the Rev peak.
Default setting
Select to reset the meter display settings to
the default setting.
■
Vehicle functions and settings that
can be changed
■
Background color of the indicator/shift
position display area (except F SPORT
models)
The background color of the indicator/shift
position display area is changed according
to the driving mode as follows (
●
Eco drive mode: Blue
●
Sport mode: Red
■
Suspension of the settings display
●
Some settings cannot be changed while
driving. When changing settings, park
the vehicle in a safe place.
●
If a warning message is displayed, opera-
tion of the settings display will be sus-
pended.
Displays suggestions to the driver in
the following situations. To select a
response to a displayed suggestion,
use the meter control switches.
■
Suggestion to enable the power
back door
If the power back door system is dis-
abled (setting on
set to off) and the
power back door switch on the instru-
ment panel is operated, a suggestion
message will be displayed asking if you
wish to enable the power back door
system.
To enable the power back door system,
select “Yes”.
After enabling the power back door sys-
tem, press the power back door switch
again to open or close the power back
door.
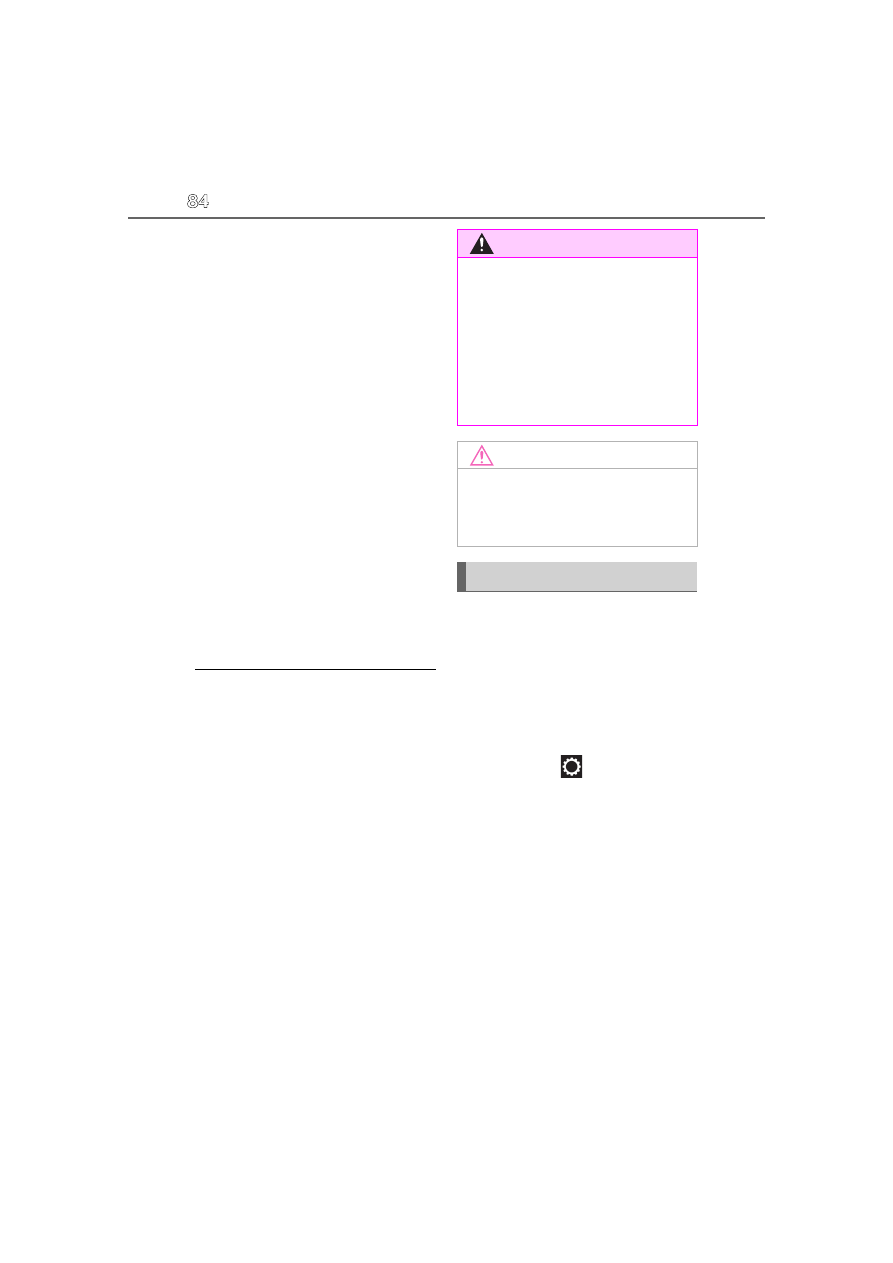
WARNING
■
Cautions during setting up the dis-
play
As the engine needs to be running
during setting up the display, ensure that
the vehicle is parked in a place with ade-
quate ventilation. In a closed area such as
a garage, exhaust gases including harm-
ful carbon monoxide (CO) may collect
and enter the vehicle. This may lead to
death or a serious health hazard.
NOTICE
■
While setting up the display
To prevent battery discharge, ensure that
the engine is running while setting up the
display features.
Suggestion function
85
2-1. Instrument cluster
2
Vehi
cle
status
inform
ati
on a
nd i
ndic
ators
■
Suggestion to turn off the head-
lights
If the headlights are left on for a certain
amount of time after the engine switch
has been turned off, a suggestion mes-
sage will be displayed asking if you
wish to turn the headlights off.
To turn the headlights off, select “Yes”.
If a front door is opened after the engine
switch is turned off, this suggestion mes-
sage will not be displayed.
■
Customization
Some functions can be customized.
(
86
2-1. Instrument cluster
*
: If equipped
Illustrations used in this text are intended as examples, and may differ from the image that is
actually displayed by the head-up display.
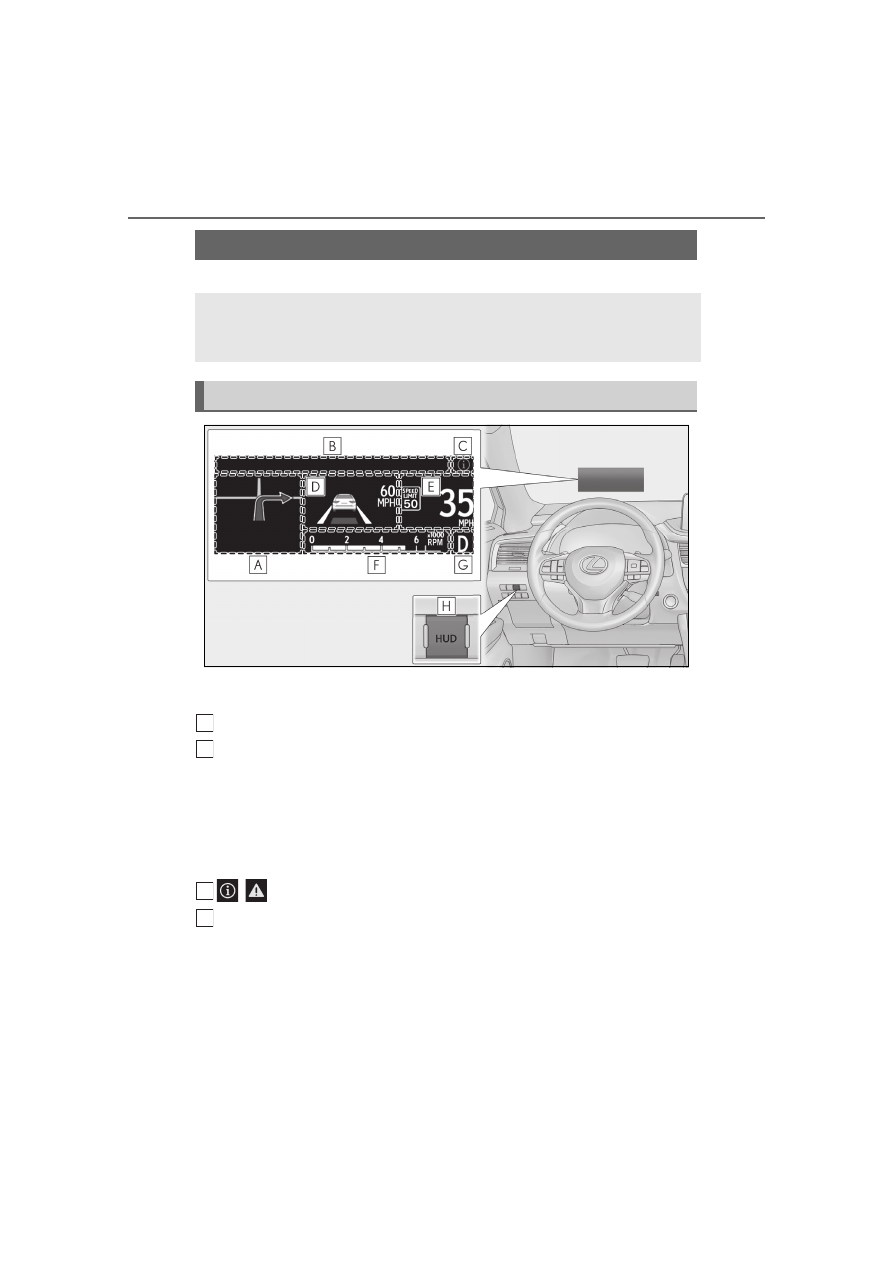
Navigation system-linked display area (if equipped) (
Message display area (
Displays the following items:
• Warning/Message (if equipped)
• Audio system operation status
• Outside temperature
Displays the following item, which are linked to the navigation system:
• Street name
/
icon (
Driving assist system status display area (if equipped)
Displays the operational status of the following systems:
• Dynamic radar cruise control with full-speed range (
• LTA (Lane Tracing Assist) (
• Intuitive parking assist (
• Parking Support Brake function (for static objects) (
Displayed content is the same as that displayed on the multi-information display. For details,
Head-up display
*
The head-up display is linked to the meters and navigation system (if equipped)
and projects a variety of information in front of the driver, such as the current
vehicle speed and route guidance to a set destination.
System components
A
B
C
D
87
2-1. Instrument cluster
2
Vehi
cle
status
inform
ati
on a
nd i
ndic
ators
refer to the explanations of each system.
Vehicle speed display area
Displays the following items:
• Vehicle speed
• Speed limit (vehicles with a navigation system) (U.S.A. only)
• Road sign icons recognized by the RSA (
Eco Driving Indicator/Tachometer (
Shift position display (
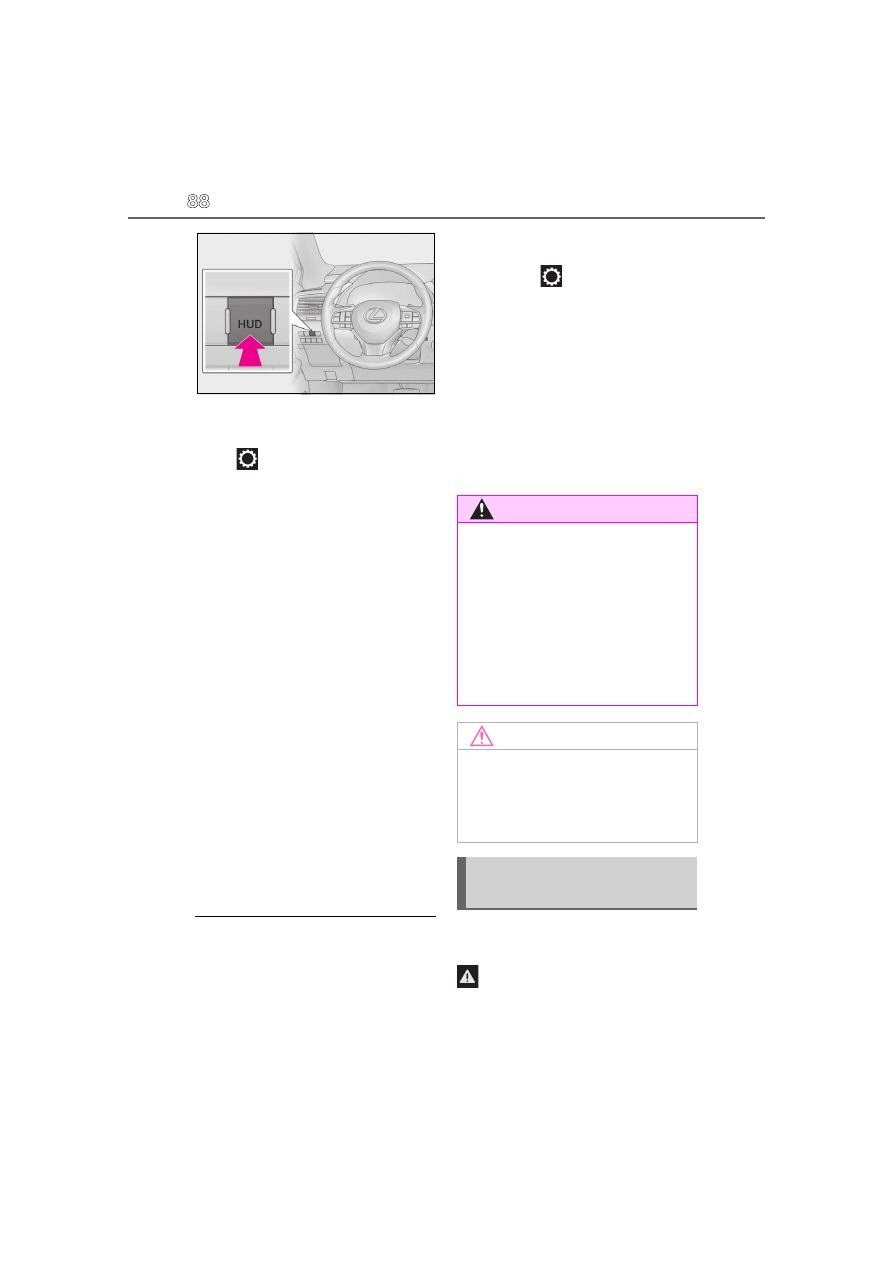
HUD (Head-up display) switch (
■
Head-up display
The head-up display may seem dark or hard
to see when viewed through sunglasses,
especially polarized sunglasses. Adjust the
brightness of the head-up display or
remove your sunglasses.
■
Enabling/Disabling the head-up
display
Press the HUD (Head-up display)
switch.
E
F
G
H
WARNING
■
Before using the head-up display
●
Check that the position and brightness
of the head-up display image does not
interfere with safe driving. Incorrect
adjustment of the image’s position or
brightness may obstruct the driver’s
view and lead to an accident, resulting
in death or serious injury.
●
Do not continuously look at the
head-up display while driving as you
may fail to see pedestrians, objects on
the road, etc. ahead of the vehicle.
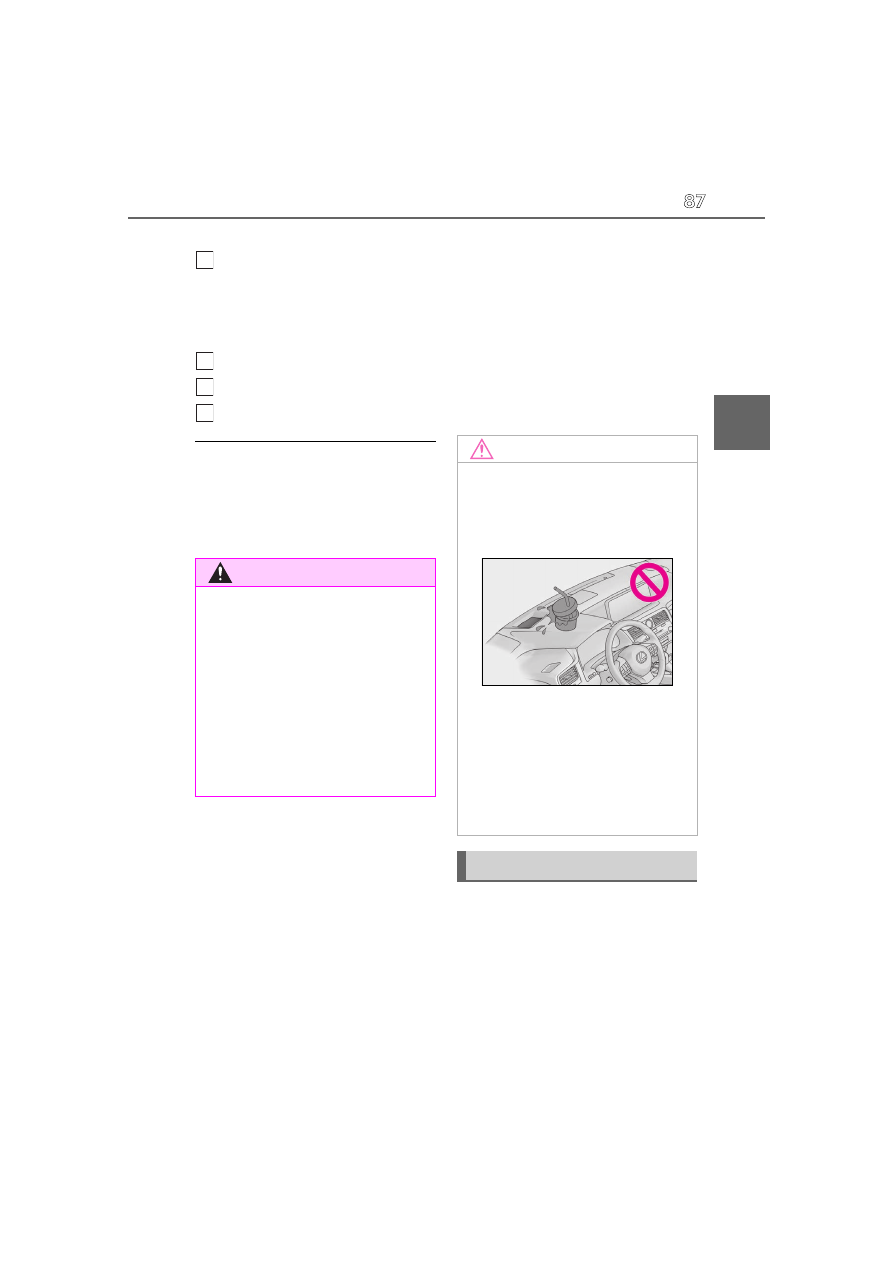
NOTICE
■
To prevent damage to components
●
Do not place any drinks near the
head-up display projector. If the pro-
jector gets wet, electrical malfunctions
may result.
●
Do not place anything on or put stick-
ers onto the head-up display projector.
Doing so could interrupt head-up dis-
play indications.
●
Do not touch the inside of the head-up
display projector or thrust sharp edges
or the like into the projector. Doing so
could cause mechanical malfunctions.
Using the head-up display
88
2-1. Instrument cluster
■
Changing settings of the head-up
display
Select
on the multi-information
display (
lowing settings:
Display brightness/position
Select to adjust the brightness and position
of the head-up display.
Display content
Select to enable/disable the following
items:
• Route guidance to destination (if
equipped)
• Driving assist system status (if equipped)
• Compass (if equipped)
• Audio system operation status
Eco Driving Indicator/Tachometer
Select to display Eco Driving Indica-
tor/tachometer/no content.
Display angle
Select to adjust the angle of the head-up
display.
■
Enabling/disabling of the head-up dis-
play
If the head-up display is disabled, it will
remain disabled when the engine switch is
turned off then back to IGNITION ON
mode.
■
Display brightness
The brightness of the head-up display can
be adjusted on
of the multi-information
display. Also, it is automatically adjusted
according to the ambient brightness.
■
Automatic adjustment of the head-up
display position (if equipped)
A desired head-up display position can be
entered to memory and recalled automati-
cally by the driving position memory sys-
tem. (
■
When the battery is disconnected
The customize settings of the head-up dis-
play will be reset.
Displays the following multi-informa-
tion display linked icons:
: Master warning icon
Displayed when a warning message is dis-
played on the multi-information display.
WARNING
■
Caution for changing settings of the
head-up display
As the engine needs to be running while
changing the settings of the head-up dis-
play, ensure that the vehicle is parked in a
place with adequate ventilation. In a
closed area such as a garage, exhaust
gases including harmful carbon monox-
ide (CO) may collect and enter the vehi-
cle. This may lead to death or a serious
health hazard.
NOTICE
■
When changing the settings of the
head-up display
To prevent battery discharge, ensure that
the engine is running while the changing
the settings of the head-up display.
Information icon/Master warn-
ing icon
Нет комментариевНе стесняйтесь поделиться с нами вашим ценным мнением.
Текст