KIA Niro Plug-in Hybrid (2018 year). Instruction — part 11
4 37
Features of your vehicle
Always check that the fuel cap is
installed securely to prevent fuel
spillage in the event of an accident.
WARNING
- Fire/explo-
sion risk
Read and follow all warnings
posted at the gas station facili-
ty. Failure to follow all warnings
may result in severe personal
injury, severe burns or death
due to fire or explosion.
WARNING
- Static
electricity
• Before touching the fuel noz-
zle,
you should eliminate
potentially dangerous static
electricity discharge by touch-
ing another metal part of the
vehicle, a safe distance away
from the fuel filler neck, noz-
zle, or other gas source.
• Do not get back into a vehicle
once you have begun refueling
since you can generate static
electricity by touching, rubbing
or sliding against any item or
fabric (polyester, satin, nylon,
etc.) capable of producing stat-
ic electricity. Static electricity
discharge can ignite fuel
vapors resulting in rapid burn-
ing. If you must reenter the
vehicle, you should once again
eliminate potentially danger-
ous static electricity discharge
by touching a metal part of the
vehicle, away from the fuel filler
neck, nozzle or other gasoline
source.
WARNING
- Refueling
Always remove the fuel cap
carefully and slowly. If the cap
is venting fuel or if you hear a
hissing sound, wait until the
condition stops before com-
pletely removing the cap. If
pressurized fuel sprays out, it
can cover your clothes or skin
and subject you to the risk of
fire and burns.
Features of your vehicle
38
4
Make sure to refuel your vehicle
according to the “Fuel requirements”
suggested in chapter 1.
If the fuel filler cap requires replace-
ment, use only a genuine Kia cap or
the equivalent specified for your vehi-
cle. An incorrect fuel filler cap can
result in a serious malfunction of the
fuel system or emission control sys-
tem.
WARNING
- Cell phone
fires
Do not use cellular phones
while refueling. Electric current
and/or electronic interference
from cellular phones can poten-
tially ignite fuel vapors causing
a fire.
WARNING
- Smoking
DO NOT use matches or a
lighter and DO NOT SMOKE or
leave a lit cigarette in your vehi-
cle while at a gas station espe-
cially during refueling.
Automotive fuel is highly flam-
mable and can, when ignited,
result in fire.
WARNING
- Refueling &
Vehicle fires
When refueling, always shut the
engine off. Sparks produced by
electrical components related
to the engine can ignite fuel
vapors causing a fire. Once
refueling is complete, check to
make sure the filler cap and
filler door are securely closed,
before starting the engine.
CAUTION
- Exterior paint
Do not spill fuel on the exterior
surfaces of the vehicle. Any
type of fuel spilled on painted
surfaces may damage the paint.
WARNING
- Portable fuel
container
When using an approved
portable fuel container, be sure
to place the container on the
ground prior to refueling. Static
electricity discharge from the
container can ignite fuel vapors
causing a fire. Once refueling
has begun, contact with the
vehicle should be maintained
until the filling is complete. Use
only approved portable plastic
fuel containers designed to
carry and store gasoline.
4 39
Features of your vehicle
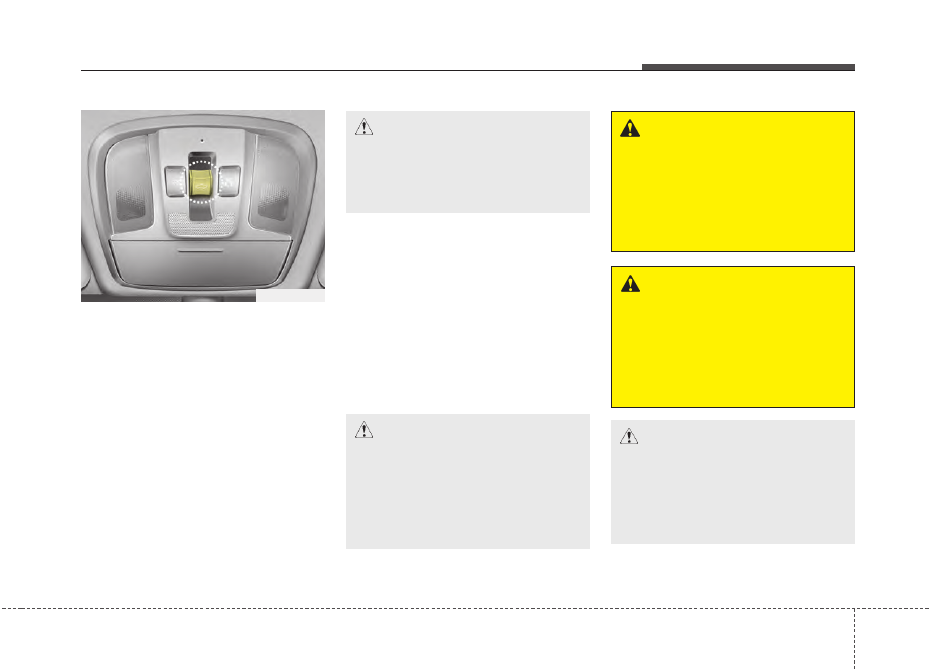
If your vehicle is equipped with a
sunroof, you can slide or tilt your
sunroof with the sunroof control lever
located on the overhead console.
The sunroof can only be opened,
closed, or tilted when the ignition
switch is in the ON position.
The sunroof can be operated for
approximately 30 seconds after the
ignition key is removed or turned to
the ACC or LOCK (or OFF) position.
However, if the front door is opened,
the sunroof cannot be operated even
within the 30 seconds period.
In cold and wet climates, the sunroof
may not work properly due to freez-
ing conditions.
After the vehicle is washed or in a
rainstorm, be sure to wipe off any
water that is on the sunroof before
operating it.
The sunroof cannot slide when it is in
the tilt position nor can it be tilted
while in an open or slide position.
SUNROOF (IF EQUIPPED)
ODE046035L
CAUTION
- Sunroof
control lever
Do not continue to press the sun-
roof control lever after the sun-
roof is fully opened, closed, or
tilted. Damage to the motor or
system components could occur.
CAUTION
Make sure the sunroof is fully
closed when leaving your vehi-
cle. If the sunroof is opened,
rain or snow may leak through
the sunroof and wet the interior.
WARNING
- Sunroof
operation
When closing the sunroof, make
sure there are no body parts in
the movement range of the slid-
ing roof. Parts of the body could
become trapped or crushed.
CAUTION
To prevent damage to the sun-
roof, periodically remove any
dirt that may accumulate on the
guide rail.
WARNING
Never adjust the sunroof or
sunshade while driving. This
could result in loss of control
and an accident that may cause
death, serious injury, or proper-
ty damage.
Features of your vehicle
40
4
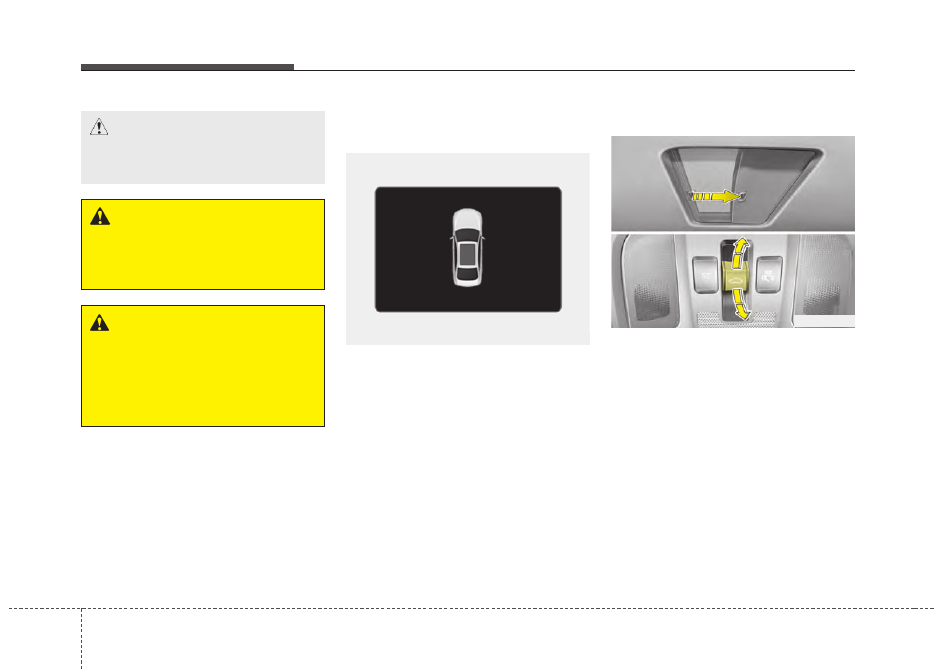
Sunroof open warning
(if equipped)
If the driver removes the ignition key
(smart key: turns off the engine)
when the sunroof is not fully closed,
the warning chime will sound for a
few seconds and a warning image
will appear on the LCD window.
Close the sunroof securely when
leaving your vehicle.
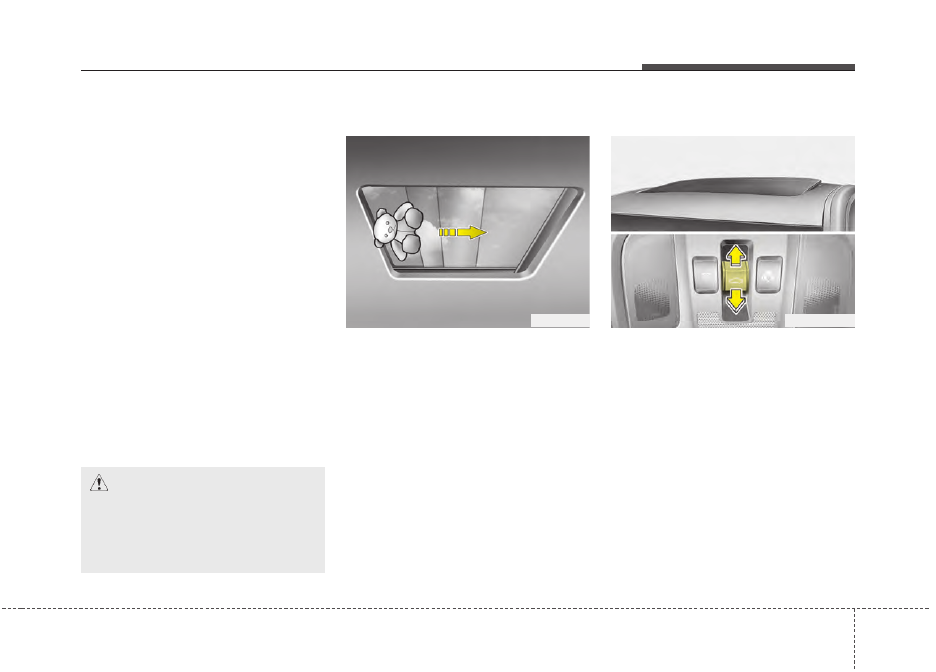
Sliding the sunroof
To open or close the sunroof (manu-
al slide feature), push the sunroof
control lever backward or forward to
the first detent position.
To open the sunroof (autoslide fea-
ture), push the sunroof control switch
backward to the second detent posi-
tion.
The sunroof will slide to the recom-
mended open position (about 3 in.(7
cm) before the maximum slide open
position).
To stop the sunroof sliding at any
point, push the sunroof control
switch momentarily.
ODE046020
ODE046119
WARNING
To avoid accidental injury, do
not let children operate the sun-
roof without adult supervision.
CAUTION
Do not extend any luggage out-
side the sunroof while driving.
WARNING -
Roof cargo
Do not operate the sun roof
while using the roof rack to
transport cargo. This may cause
the cargo to come loose and
distract the driver.
4 41
Features of your vehicle
To open the sunroof to the maximum
slide open position, press the switch
towards the rear of the vehicle once
again and hold it until the sunroof
slide all the way open.
✽
✽
NOTICE
To reduce wind noise while driving,
we recommend you to drive at the
recommended position (about 3
in.(7 cm) before the maximum slide
open position).
To close the sunroof (autoslide fea-
ture), move the sunroof control
switch forward to the second detent
position.
The sunroof will close all the way. To
stop the sunroof sliding at any point,
pull or push the sunroof control
switch momentarily.
Automatic reversal
If an object or part of the body is
detected while the sunroof glass
automatically, it will reverse the direc-
tion, and then stop.
The auto reverse function does not
work if a tiny obstacle is between the
sliding glass and the sunroof sash.
You should always check that all pas-
sengers and objects are away from
the sunroof before closing it.
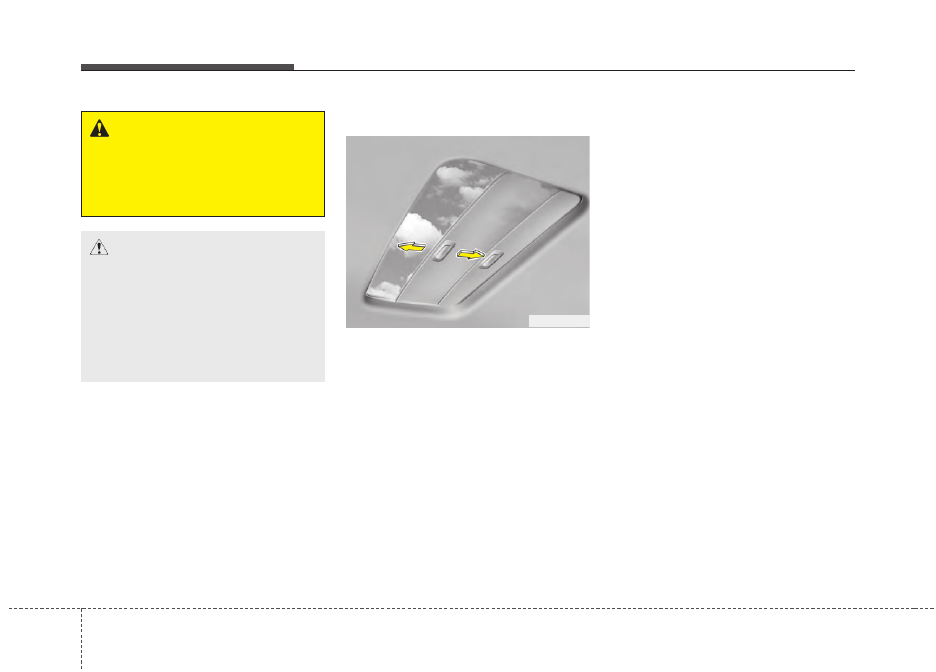
Tilting the sunroof
To open the sunroof, push the sun-
roof control lever upward until the
sunroof moves to the desired posi-
tion.
To close the sunroof, push the sun-
roof lever forward until the sunroof
moves to the desired position.
OYF049215
ODE046021L
CAUTION
To prevent damage to the sun-
roof, periodically remove any
dirt that may accumulate on the
guide rail.
Features of your vehicle
42
4
Sunshade
When opening the sunroof, the sun-
shade will also open. Once the sun-
roof is closed, the sunshade can be
manually closed.
Resetting the sunroof
Whenever the vehicle battery is dis-
connected or discharged, or related
fuse is blown, you must reset your
sunroof system as follows:
1.Turn the ignition switch to the ON
position or start the engine. We
recommend resetting the sunroof
while the engine is running.
2.Close the sunroof completely if
opened.
3.Release the sunroof control lever.
4.Move the sunroof control lever for-
ward in the direction of close until
the sunroof moves tilt up. Then,
release the lever.
5.Move the sunroof control lever for-
ward in the direction of close, until
the sunroof operates as follows
again:
Tilt down
→ Slide Open → Slide
Close.
OBK049019
CAUTION
- Sunroof
motor damage
If you try to open the sunroof
when the temperature is below
freezing or when the sunroof is
covered with snow or ice, the
glass or the motor could be
damaged.
WARNING
- Sunroof
Do not extend the face, neck,
arms or body outside through
the sunroof opening while driv-
ing or operating the sunroof.
4 43
Features of your vehicle
✽
✽
NOTICE
Do not release the lever until the
operation is completed.
If you release the lever during oper-
ation, try again from step 2.
6. Release the sunroof control lever
after all operation has completed.
(The sunroof system has been
reset.)
❈ For more detailed information,
contact an authorized Kia dealer.
✽
✽
NOTICE
If the sunroof is not reset when the
vehicle battery is disconnected or
discharged, or related fuse is blown,
the sunroof may operate improper-
ly.
Features of your vehicle
44
4
Electronic power steering
(EPS)
The power steering uses a motor to
assist you in steering the vehicle. If
the engine is off or if the power steer-
ing system becomes inoperative, the
vehicle may still be steered, but it will
require increased steering effort.
The EPS is controlled by a power
steering control unit which senses
the steering wheel torque and vehi-
cle speed to command the motor.
The steering becomes heavier as the
vehicle’s speed increases and
becomes lighter as the vehicle’s
speed decreases for optimum steer-
ing control.
Should you notice any change in the
effort required to steer during normal
vehicle operation, have the power
steering checked by an authorized
Kia dealer.
• If the Electronic Power Steering
System does not operate normally,
the warning light will illuminate on
the instrument cluster. The steering
wheel may require increased
steering effort. Take your vehicle to
an authorized Kia dealer and have
the vehicle checked as soon as
possible.
• When you operate the steering
wheel in low temperature, noise
may occur. If temperature rises, the
noise will likely disappear. This is a
normal condition.
• When the vehicle is stationary, and
the steering wheel is turned all the
way to the left or right continuous-
ly, the steering wheel becomes
harder to turn. The power assist is
limited to protect the motor from
overheating.
As time passes, the steering wheel
will return to its normal condition.
✽
✽
NOTICE
The following symptoms may occur
during normal vehicle operation:
• The EPS warning light does not
illuminate.
• The steering gets heavy immedi-
ately after turning the Engine
Start/Stop button is ON position.
This happens as the system per-
forms the EPS system diagnostics.
When the diagnostics are complet-
ed, the steering wheel will return
to its normal condition.
• A click noise may be heard from
the EPS relay after turning the
Engine Start/Stop button is ON or
OFF position.
• A motor noise may be heard when
the vehicle is at a stop or at a low
driving speed.
• If the Electronic Power Steering
System does not operate normally,
the warning light will illuminate on
the instrument cluster. The steer-
ing wheel may become difficult to
control or operate abnormally.
Take your vehicle to an authorized
Kia dealer and have the vehicle
checked as soon as possible.
(Continued)
STEERING WHEEL
4 45
Features of your vehicle
(Continued)
• When the charging system warning
light comes on due to the low volt-
age (When the alternator or bat-
tery) does not operate normally or
malfunctions), the steering wheel
may require increased steering
effort.
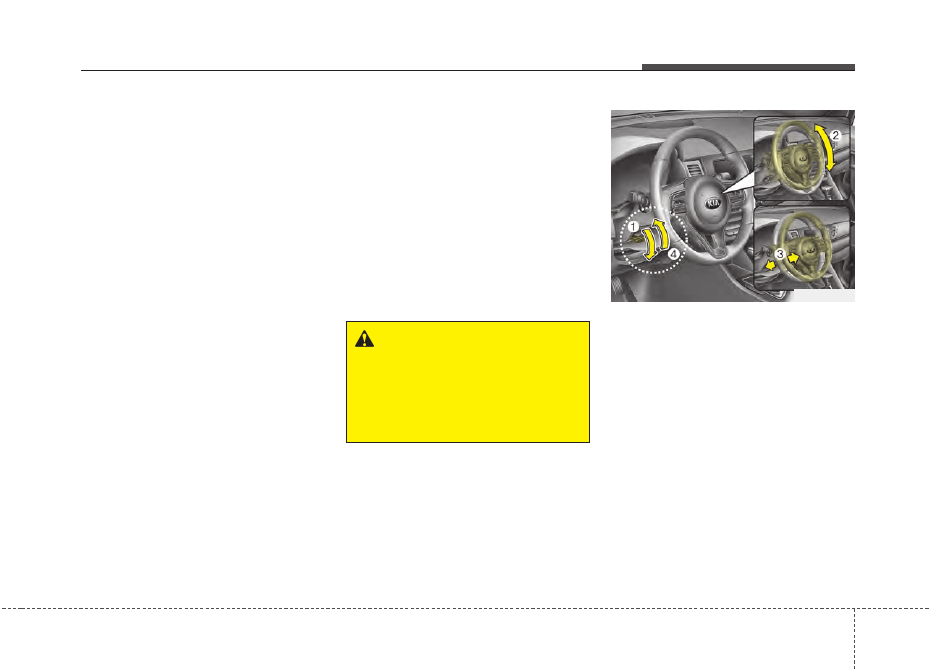
Tilt and telescopic steering
Tilt and telescopic steering allows
you to adjust the steering wheel
before you drive. You can also raise it
to give your legs more room when
you exit and enter the vehicle.
The steering wheel should be posi-
tioned so that it is comfortable for
you to drive, while permitting you to
see the instrument panel warning
lights and gauges.
To change the steering wheel angle,
pull down the lock-release lever (1),
adjust the steering wheel to the
desired angle (2) and height (3) then
pull up the lock-release lever to lock
(4) the steering wheel in place. Be
sure to adjust the steering wheel to
the desired position before driving.
✽
✽
NOTICE
After adjustment, sometimes the
lock release lever may not lock the
steering wheel. It is not a malfunc-
tion. This occurs when two gears are
not engaged correctly. In this case,
adjust the steering wheel again and
then lock the steering wheel.
WARNING
- Steering
wheel adjustment
Never adjust the angle and
height of the steering wheel
while driving. You may lose
steering control.
ODE046022
Features of your vehicle
46
4
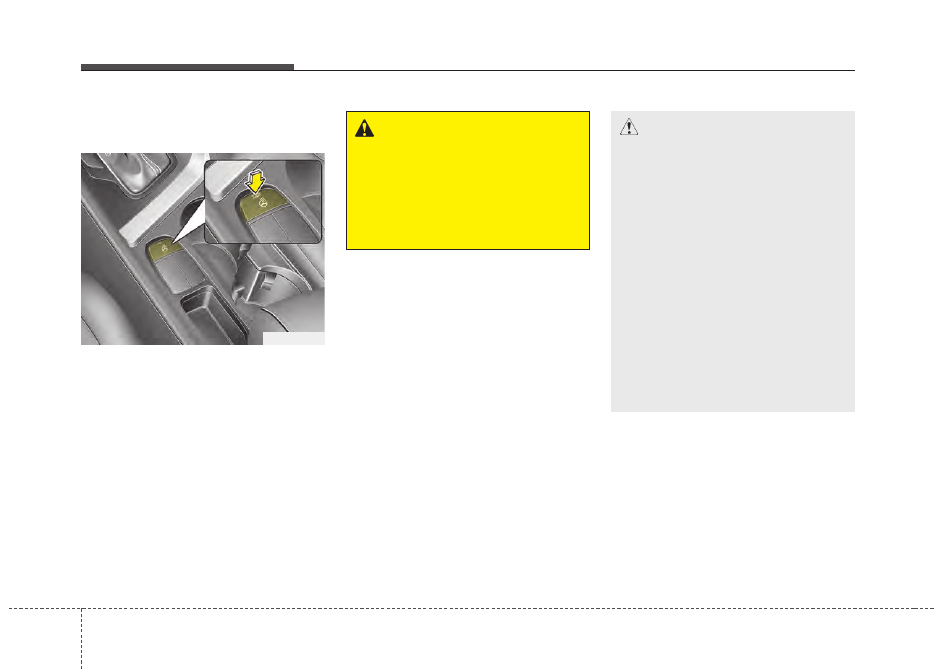
Heated steering wheel
(if equipped)
With the Engine Start/Stop button is
ON position, pressing the heated
steering wheel button warms the
steering wheel. The indicator on the
button will illuminate.
To turn the heated steering wheel off,
press the button once again. The
indicator on the button will turn off.
✽
✽
NOTICE
The heated steering wheel will turn
off automatically approximately 30
minutes after the heated steering
wheel is turned on.
CAUTION
• Do not install any type of grip
cover for the steering wheel, it
may impair the function of the
heated steering wheel system.
• When cleaning the heated
steering wheel, do not use an
organic solvent such as paint
thinner, benzene, alcohol and
gasoline. Doing so may dam-
age the surface of the steering
wheel.
• If the surface of steering
wheel is damaged by sharp
object, damage to the heated
steering wheel components
could occur.
ODE046023
WARNING
If the steering wheel becomes
too warm, turn the system off.
The heated steering wheel may
cause burns even at low tem-
peratures, especially if used for
long periods of time.
4 47
Features of your vehicle
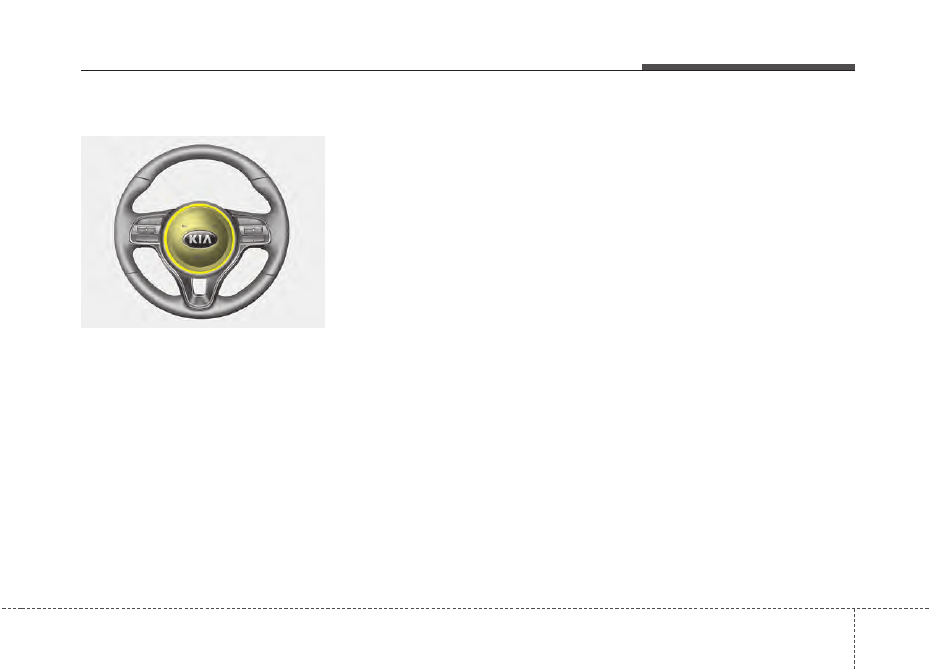
Horn
To sound the horn, press the horn
symbols on your steering wheel.
Check the horn regularly to be sure it
operates properly.
✽
✽
NOTICE
To sound the horn, press the area
indicated by the horn symbol on
your steering wheel (see illustra-
tion). The horn will operate only
when this area is pressed.
ODE046024
Features of your vehicle
48
4
MIRRORS
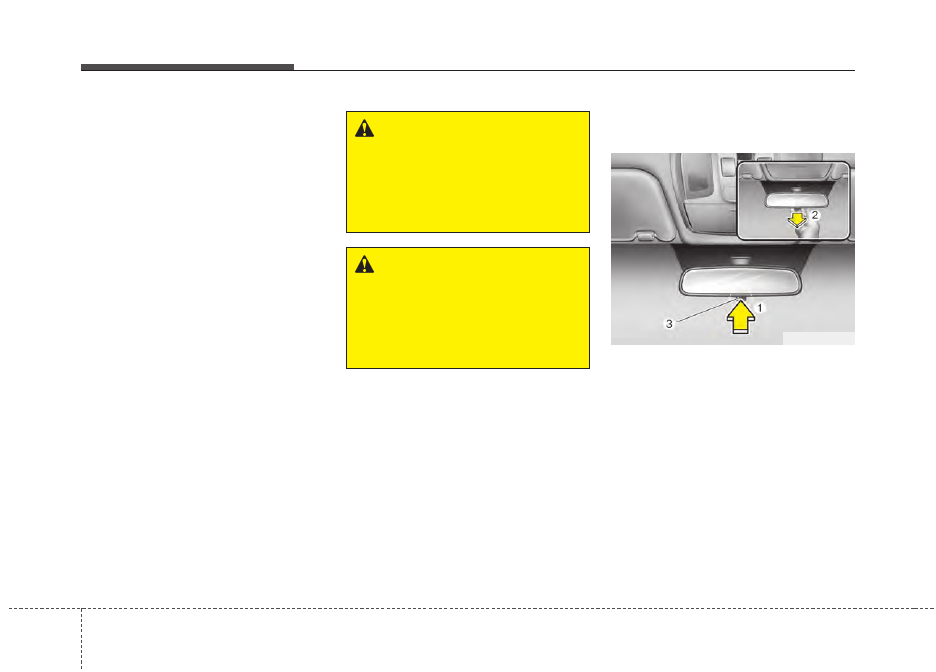
Inside rearview mirror
Adjust the rearview mirror so that the
center view through the rear window
is seen. Make this adjustment before
you start driving.
Do not place objects in the rear seat
or cargo area which would interfere
with your vision through the rear win-
dow.
Day/night rearview mirror
(if equipped)
Make this adjustment before you
start driving and while the day/night
lever (3) is in the day position.
Pull the day/night lever (3) toward
you to reduce the glare from the
headlights of the vehicles behind you
during night driving.
Remember that you lose some
rearview clarity in the night position.
❈(1) : Day, (2) : Night
WARNING
- Mirror adjust-
ment
Do not adjust the rearview mir-
ror while the vehicle is moving.
This could result in loss of con-
trol.
WARNING
Do not modify the inside mirror
and don’t install a wide mirror. It
could result in injury during an
accident or deployment of the
air bag.
ODE046025L
4 49
Features of your vehicle
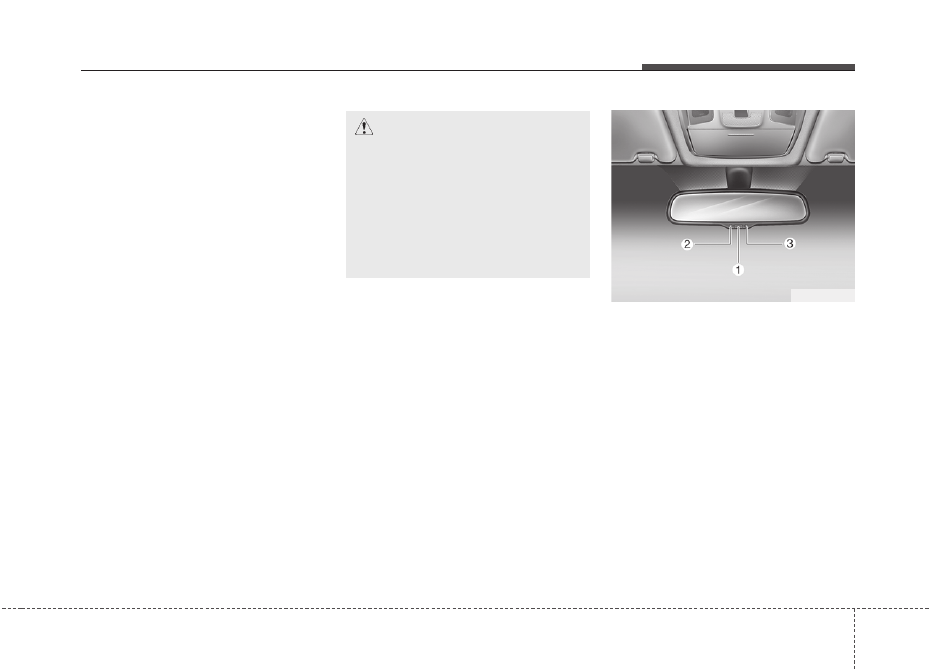
Electric chromatic mirror (ECM)
(if equipped)
The electric rearview mirror automat-
ically controls the glare from the
headlights of the vehicles behind you
in nighttime or low light driving condi-
tions. The sensor mounted in the mir-
ror senses the light level around the
vehicle and automatically controls
the headlight glare from the vehicles
behind you.
When the engine is running, the
glare is automatically controlled by
the sensor mounted in the rearview
mirror.
Whenever the shift lever is shifted
into reverse (R), the mirror will auto-
matically go to the brightest setting in
order to improve the drivers view
behind the vehicle.
To operate the electric rearview mirror:
• The mirror defaults to the ON posi-
tion whenever the ignition switch is
turned on.
• Press the ON/OFF button (1) to
turn the automatic dimming func-
tion off. The mirror indicator light
(2) will turn off.
Press the ON/OFF button (1) to
turn the automatic dimming func-
tion on. The mirror indicator light
(2) will illuminate.
❈(2) : Indicator, (3) : Sensor
CAUTION -
Cleaning
mirror
When cleaning the mirror, use a
paper towel or similar material
dampened with glass cleaner.
Do not spray glass cleaner
directly on the mirror. It may
cause the liquid cleaner to enter
the mirror housing.
ODE046036L
Features of your vehicle
50
4
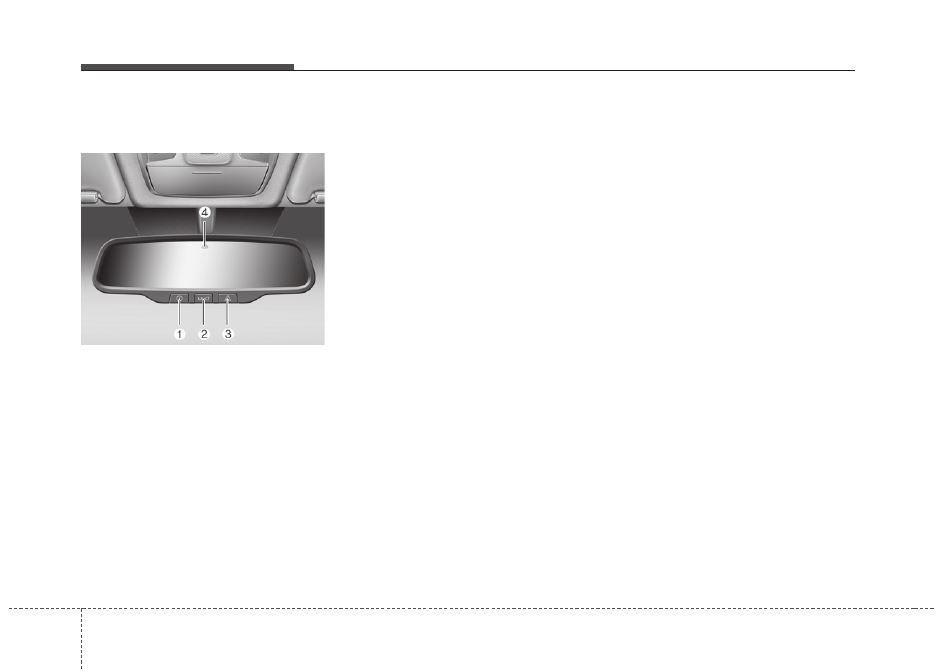
Electric chromatic mirror (ECM)
with UVO service (if equipped)
The electric rearview mirror automat-
ically controls the glare from the
headlights of the vehicles behind you
in nighttime or low light driving condi-
tions. The sensor (4) mounted in the
mirror senses the light level around
the vehicle, and automatically con-
rols the headlight glare from the vehi-
cles behind you.
When the engine is running, the
glare is automatically controlled by
the sensor mounted in the rearview
mirror.
And telematics buttons are on the
mirror.
1) eService guide button
2) UVO(Voice local search) button
3) Roadside assist button
Outside rearview mirror
Be sure to adjust the mirror angles
before driving.
Your vehicle is equipped with both
left-hand and right-hand outside
rearview mirrors. The mirrors can be
adjusted remotely with the remote
switch. The mirror heads can be fold-
ed back to prevent damage during an
automatic vehicle wash or when
passing through a narrow street.
The right outside rearview mirror is
convex. Objects seen in the mirror
are closer than they appear.
Use your interior rearview mirror or
direct observation to determine the
actual distance of following vehicles
when changing lanes.
ODEP047475N
4 51
Features of your vehicle
If the mirror is jammed with ice, do
not adjust the mirror by force. Use an
approved spray de-icer (not radiator
antifreeze) to release the frozen
mechanism or move the vehicle to a
warm place and allow the ice to melt.
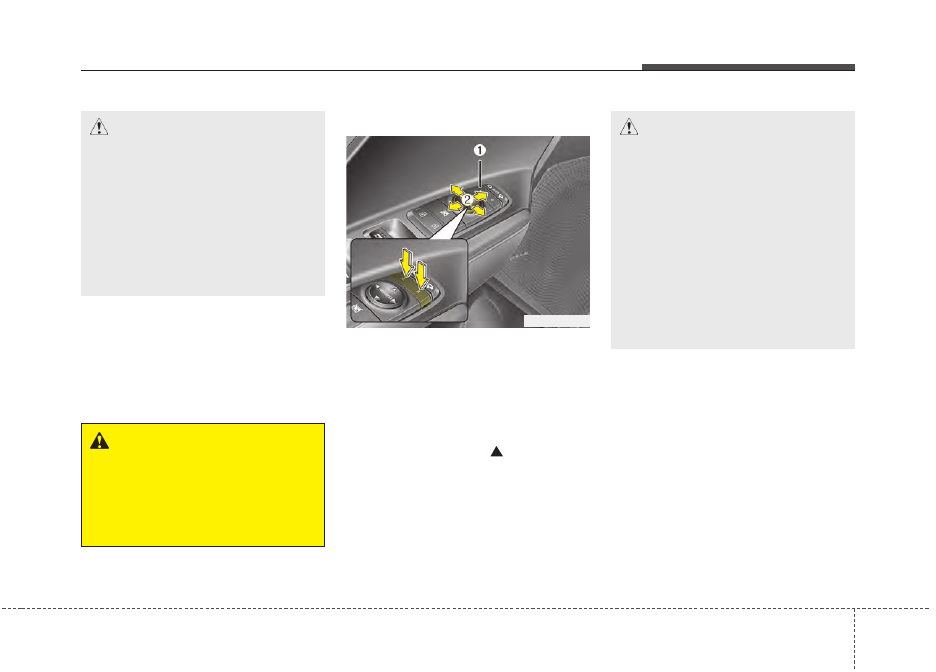
Adjusting outside rearview mirror
The electric remote control mirror
switch allows you to adjust the posi-
tion of the left and right outside
rearview mirrors. To adjust the posi-
tion of either mirror, press the R or L
button (1) to select the right side mir-
ror or the left side mirror, then press a
corresponding point (
) on the mir-
ror adjustment control to position the
selected mirror up, down, left or right.
After adjustment, press the R or L
button again to prevent the inadver-
tent adjustment.
CAUTION -
Outside mirror
• The mirrors stop moving when
they reach the maximum
adjusting angles,
but the
motor continues to operate
while the switch is pressed.
Do not press the switch longer
than necessary, the motor
may be damaged.
• Do not attempt to adjust the
outside rearview mirror by
hand. Doing so may damage
the parts.
ODE046028L
WARNING
- Mirror
adjustment
Do not adjust or fold the outside
rearview mirrors while the vehi-
cle is moving. This could result
in loss of control.
CAUTION -
Rearview
mirror
Do not scrape ice off the mirror
face; this may damage the sur-
face of the glass. If ice should
restrict the movement of the mir-
ror, do not force the mirror for
adjustment. To remove ice, use a
deicer spray, a sponge or soft
cloth with very warm water.
Features of your vehicle
52
4
Folding the outside rearview mirror
(if equipped)
Electric type
The outside rearview mirror can be
folded or unfolded by pressing the
switch when the Engine Start/Stop
button is in the ON position as below.
Left
: The mirror will unfold.
Right
: The mirror will fold.
Center (AUTO)
:
The mirror will fold or unfold automat-
ically as follows:
• The mirror will fold or unfold when
the door is locked or unlocked by
the folding key or smart key.
• The mirror will fold or unfold when
the door is locked or unlocked by the
button on the outside door handle.
• The mirror will unfold when you
approach the vehicle (all doors
closed and locked) with a smart
key in possession. (if equipped)
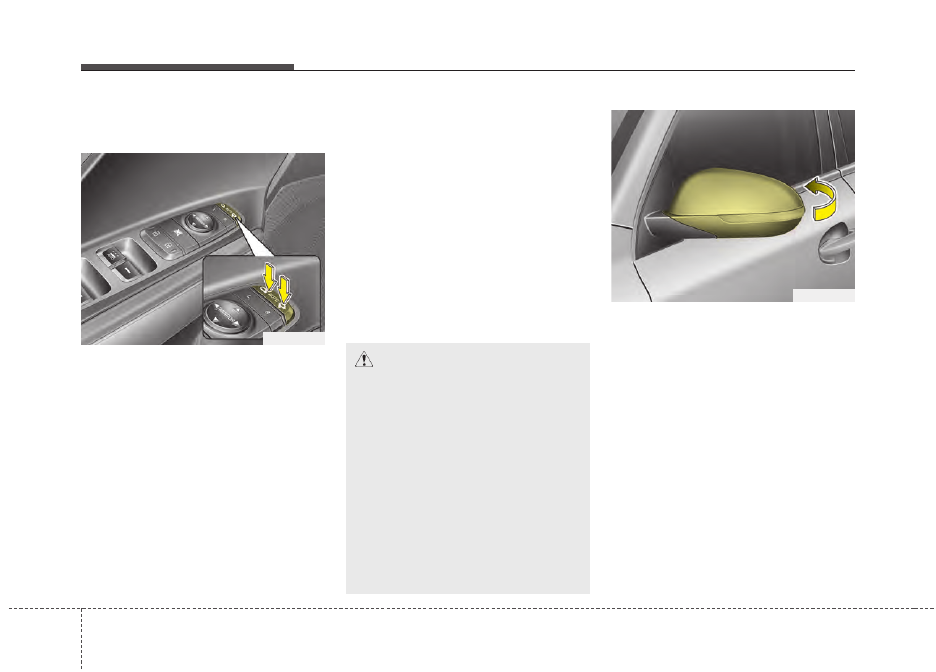
Manual type
To fold the outside rearview mirror,
grasp the housing of the mirror and
then fold it toward the rear of the
vehicle.
ODE046029
CAUTION -
Electric type
outside rearview mirror
The electric type outside rearview
mirror operates even though the
engine start/stop button is in the
OFF position. However, to prevent
unnecessary battery discharge,
do not adjust the mirrors longer
than necessary while the engine
is not running.
In case it is an electric type out-
side rearview mirror, don’t fold it
by hand. It could cause motor fail-
ure.
ODE046030
Нет комментариевНе стесняйтесь поделиться с нами вашим ценным мнением.
Текст