KIA Optima Hybrid (2018 year). Instruction — part 31
Maintenance
76
8
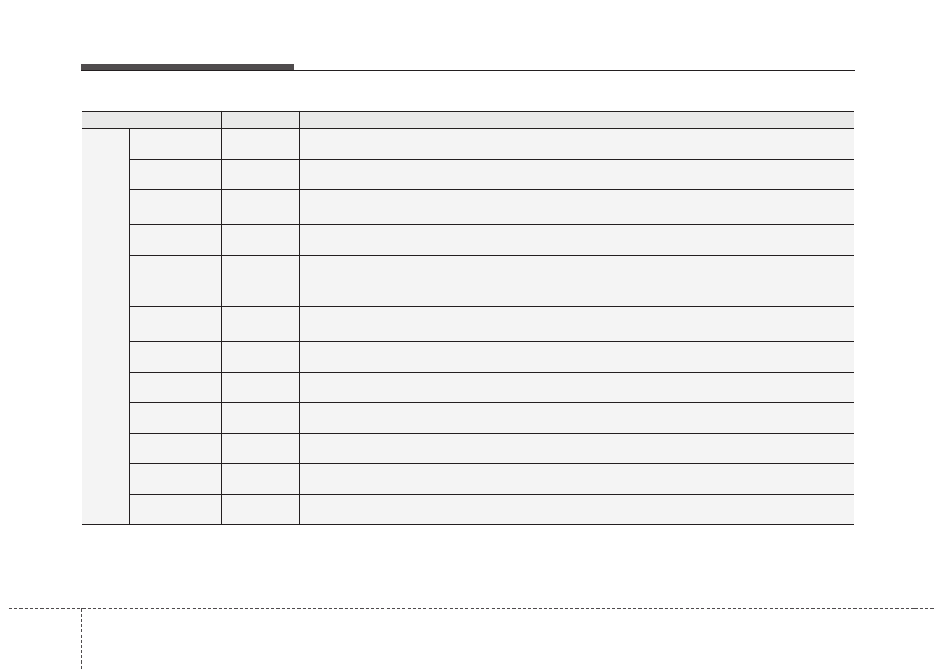
Fuse Name
Fuse rating
Circuit Protected
FUSE
FUEL PUMP
20A
Fuel Pump Relay
ECU 1
20A
PCM
SENSORS 2
10A
Mass Air Flow Sensor, Fuel Pump Relay, Oil Control Valve #1/#2, Canister Close Valve, Camshaft
Position Sensor #1/#2, Purge Control Solenoid Valve
TCU 2
15A
Transaxle Range Switch
ACTIVE
HYDRAULIC
BOOTER 3
10A
Multipurpose Check Connector, Integrated Brake Actuation Unit
POWER
OUTLET 3
20A
Rear Power Outlet
B/UP LAMP
10A
PCM, Transaxle Range Switch, Electro Chromic Mirror, Rear Combination Lamp (IN) LH/RH
OBC
10A
HEV OBC SIG, INLET
IG3 4
20A
IG3 1 RLY
IG3 1
10A
HEV WATER PUMP
IG3 2
15A
HEV OBC SIG
IG3 3
10A
PCU, HPCU, POSITION SW, CLUSTER, BMS EXTN, AVN, IGPM, CHARGER IND
8 77
Maintenance
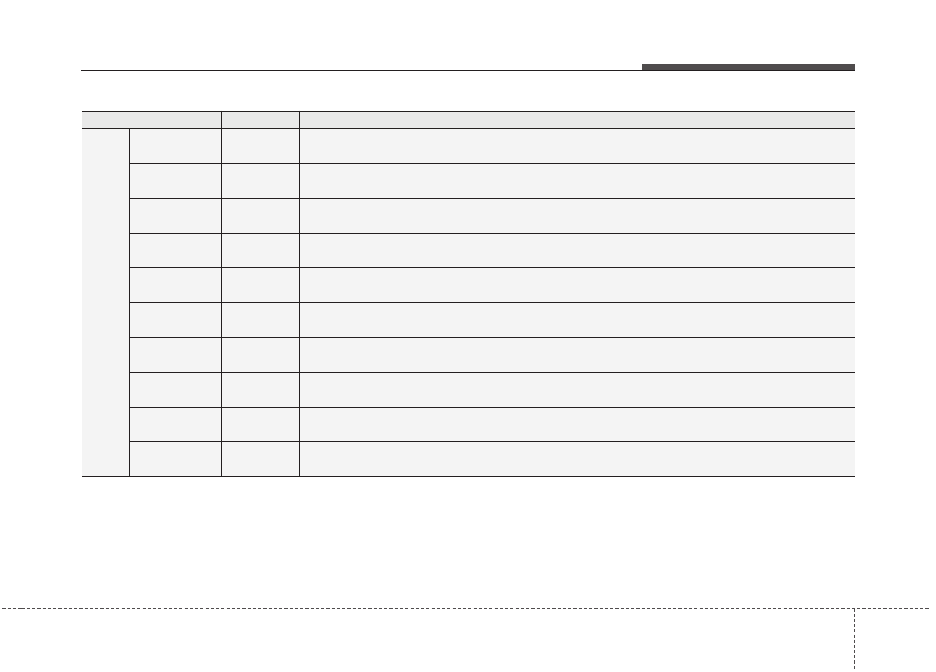
Fuse Name
Fuse rating
Circuit Protected
FUSE
SENSOR 1
15A
Oxygen Sensor (Up/Down), E/R Junction Block (Cooling Fan Relay)
IGN COIL
20A
Ignition Coil #1/#2/#3/#4
ECU 2
10A
PCM
TCU 1
10A
PCM
HEV ECU 2
10A
HPCU, E/R Junction Block (Battery C/Fan Relay)
ECU 3
10A
PCM
POWER OUT-
LET2
20A
Front Power Outlet #1
HORN
20A
Horn Relay, ICM Relay Box (Burglar Alarm Horn Relay)
WIPER 1
30A
Wiper Power Relay
BATTERY
C/FAN
15A
E/R Junction Block (Battery C/Fan Relay)
Maintenance
78
8
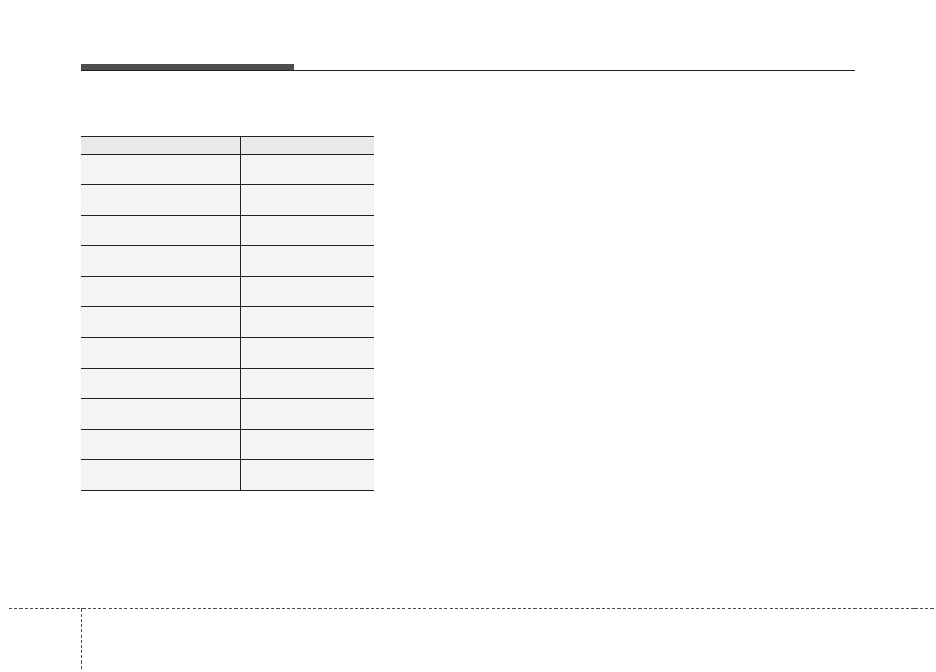
Relay Name
Type
COOLING FAN Relay
MINI
BLOWER Relay
MICRO
BATTERY C/FAN Relay
MICRO
H/LAMP HI Relay
MICRO
POWER OUTLET Relay
MICRO
H/LAMP WASHER Rela
MICRO
DEICER Relay
MICRO
REAR HEATED Relay
MINI
PTC HEATER 1
MINI
PTC HEATER 2
MINI
IG3 3
MICRO
Relay
8 79
Maintenance
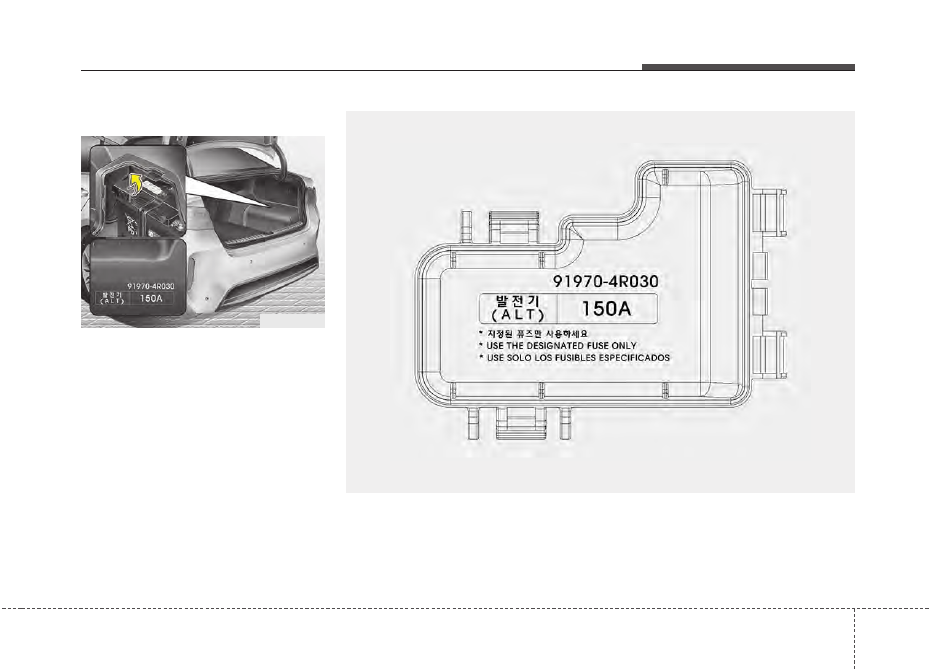
Battery terminal cover
✽
✽
NOTICE
Not all fuse panel descriptions in
this manual may be applicable to
your vehicle. It is accurate at the
time of printing. When you inspect
the fuse panel in your vehicle, refer
to the fuse panel label.
OJFH075172
OJFH075171
Maintenance
80
8
LIGHT BULBS
Bulb replacement precaution
Please keep extra bulbs on hand
with appropriate wattage ratings in
case of emergencies.
Refer to “Bulb Wattage” in chapter 9.
When changing lamps, first turn off
the engine at a safe place, firmly
apply the parking brake and detach
the battery’s negative (-) terminal.
Use only bulbs of the specified
wattage.
✽
✽
NOTICE
• If the light bulb or lamp connector
is removed while the lamp is still
on, the fuse box's electronic sys-
tem may log it as a malfunction.
Therefore, a lamp malfunction
incident may be recorded as a
Diagnostic Trouble Code (DTC) in
the fuse box.
• It is normal for an operating lamp
to flicker momentarily. This is due
to a stabilization function of the
vehicle’s electronic control device.
If the lamp lights up normally
after momentarily blinking, then
it is functioning as normal.
However, if the lamp continues to
flicker several times or turns off
completely, there may be an error
in the vehicle’s electronic control
device. Please have the vehicle
checked by an authorized Kia
dealer immediately.
WARNING
- Working on
the lights
Prior to working on the light,
firmly apply the parking brake,
ensure that the engine
start/stop button is in OFF posi-
tion and turn off the lights to
avoid sudden movement of the
vehicle and burning your fingers
or receiving an electric shock.
CAUTION -
Light replace-
ment
Be sure to replace the burned-
out bulb with one of the same
wattage rating. Otherwise, it
may cause damage to the fuse
or electric wiring system.
CAUTION -
Headlamp
Lens
To prevent damage, do not
clean the headlamp lens with
chemical solvents or strong
detergents.
8 81
Maintenance
If you don’t have the necessary tools,
the correct bulbs and the expertise,
consult an authorized Kia dealer. In
many cases, it is difficult to replace
vehicle light bulbs because other
parts of the vehicle must be removed
before you can get to the bulb. This is
especially true if you have to remove
the headlamp assembly to get to the
bulb(s).
Removing/installing the headlamp
assembly can result in damage to
the vehicle.
If non-genuine parts or substandard
bulbs are used, it may lead to blow-
ing a fuse or other wiring damages.
Do not install extra lamps or LEDs to
the vehicle. If additional lights are
installed, it may lead to lamp mal-
functions and flickering. Additionally,
the fuse box and other writing may
be damaged.
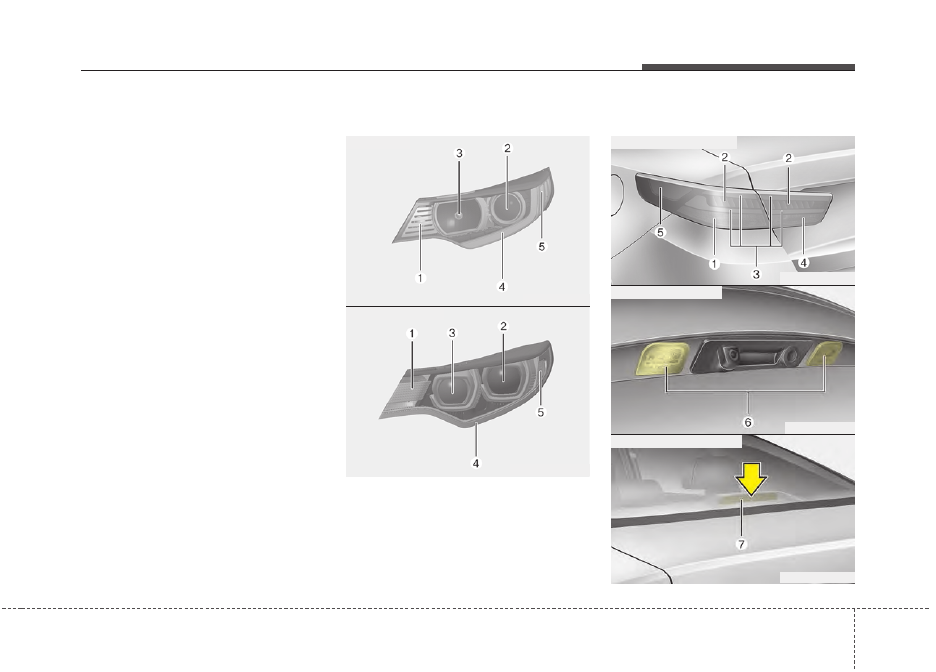
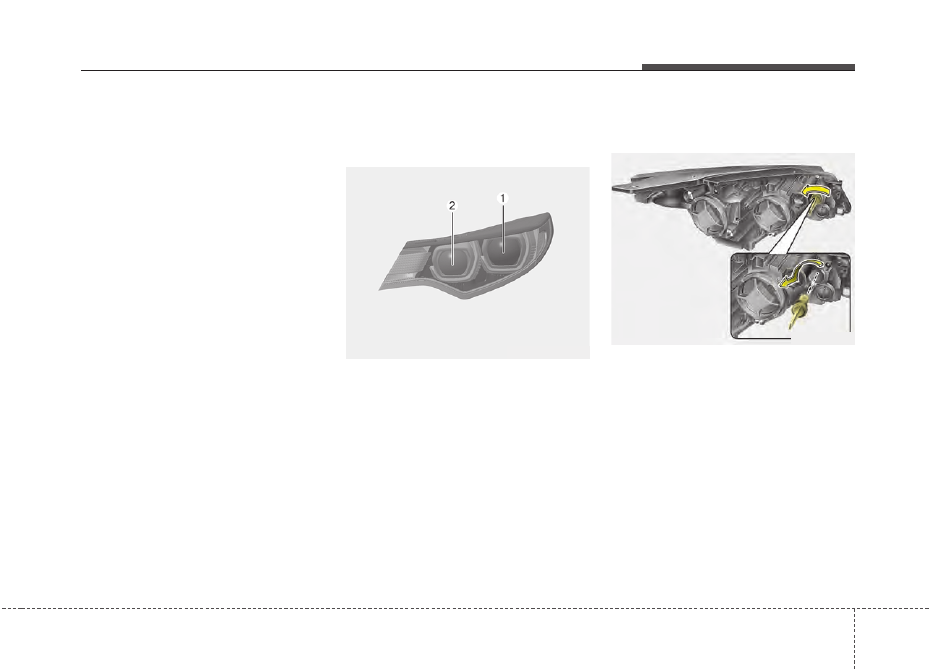
Light bulb position (Front)
(1) Front turn signal lamp
(2) Headlamp (Low)
(3) Headlamp (High)
(4) Day time running lamp/Position
lamp (LED type)
(5) Side marker
Light bulb position (Rear)
OJFH076040N
OJFH075180L
OJFH075181L
■
Rear combination lamp
■
License plate lamp
■
High mounted stop lamp
OJFA076135
OJFHP076190N
■
Type A
■
Type B
Maintenance
82
8
(1) Rear turn signal lamp
(2) Stop lamp (LED type)
(3) Tail lamp (LED type)
(4) Back-up lamp
(5) Side marker
(6) License plate lamp
(7) High mounted stop lamp
Light bulb position (Side)
(1) Side repeater lamp (LED type)
Headlamp (HID type) bulb
replacement (For Hybrid)
If the light bulb does not operate,
have the vehicle checked by an
authorized Kia dealer.
OJF075039L
WARNING
- HID
Headlamp (if equipped)
Do not attempt to replace or
inspect the HID headlamp
(XENON bulb) due to electric
shock danger. If the light bulb
does not operate, have your
vehicle checked by an author-
ized Kia dealer.
8 83
Maintenance
✽
✽
NOTICE
HID lamps have superior perform-
ance vs. halogen bulbs. HID lamps
are estimated by the manufacturer to
last twice as long or longer than halo-
gen bulbs depending on their fre-
quency of use. They will probably
require replacement at some point in
the life of the vehicle. Cycling the
headlamps on and off more than typ-
ical use will shorten HID lamps life.
HID lamps do not fail in the same
manner as halogen incandescent
lamps. If a headlamp goes out after a
period of operation but will immedi-
ately relight when the headlamp
switch is cycled it is likely the HID
lamp needs to be replaced. HID
lamping components are more com-
plex than conventional halogen bulbs
thus have higher replacement cost.
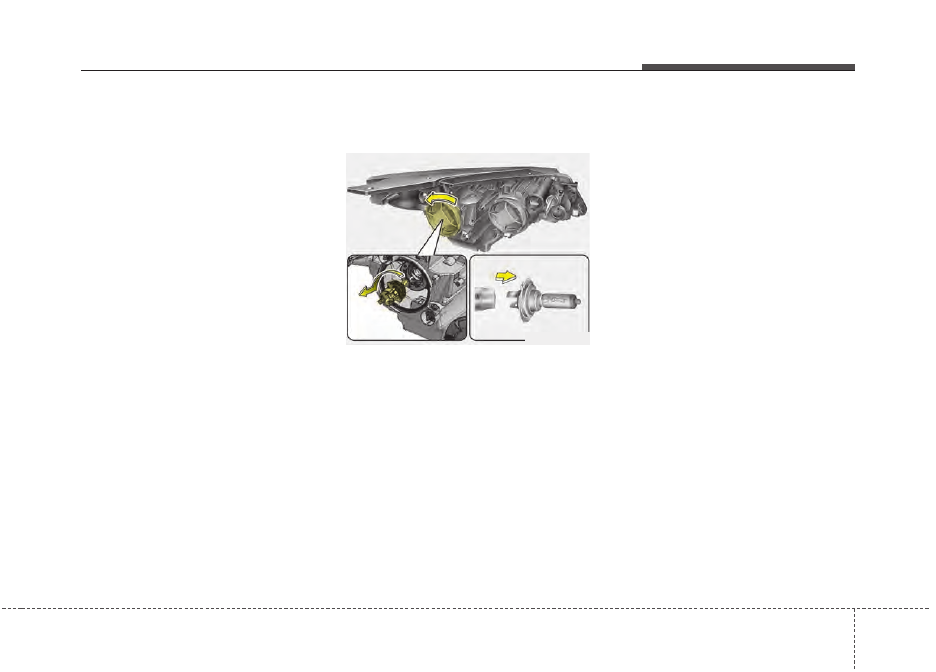
Headlamp (Low beam) bulb
replacement (For Hybrid)
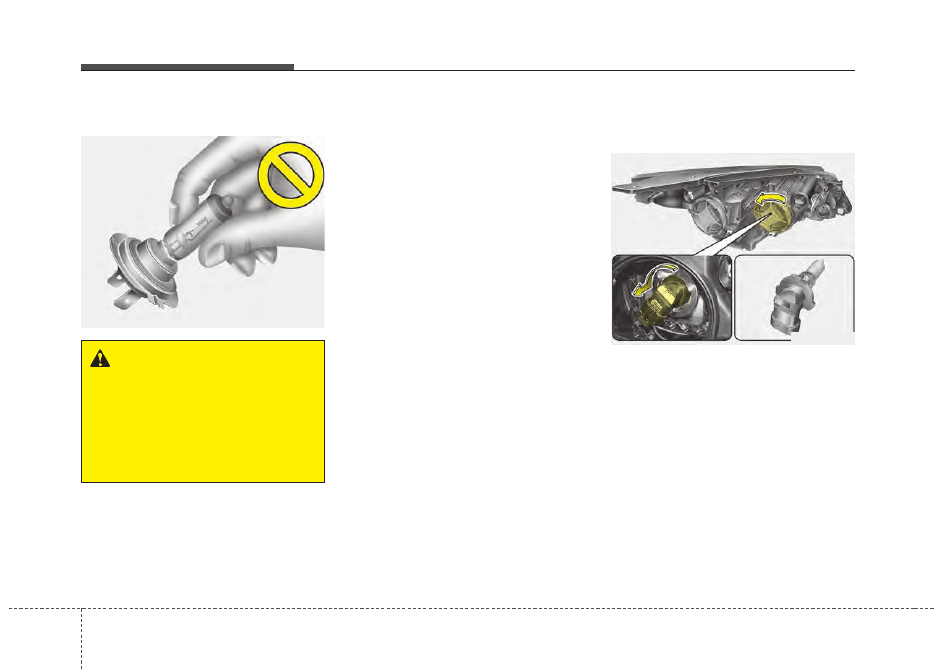
1. Open the hood.
2. Remove the headlamp bulb cover
by turning it counterclockwise.
3. Remove the bulb-socket from the
headlamp assembly by turning the
bulb-socket counterclockwise until
the tabs on the bulb-socket align
with the slots on the headlamp
assembly.
4. Remove the bulb from bulb-socket
by pulling it out.
5. Insert a new bulb by inserting it
into the bulb-socket.
6. Install the bulb-socket in the head-
lamp assembly by aligning the
tabs on the bulb-socket with the
slots in the headlamp assembly.
Push the bulb-socket into the
headlamp assembly and turn the
bulb-socket clockwise.
7. Install the headlamp bulb cover by
turning it clockwise.
OJFA075073
Maintenance
84
8
Headlamp bulb
• Always handle them carefully, and
avoid scratches and abrasions. If
the bulbs are lit, avoid contact with
liquids. Never touch the glass with
bare hands. Residual oil may
cause the bulb to overheat and
burst when lit. A bulb should be
operated only when installed in a
headlamp.
• If a bulb becomes damaged or
cracked, replace it immediately
and carefully dispose of it.
• Wear eye protection when chang-
ing a bulb. Allow the bulb to cool
down before handling it.
Headlamp (High beam) bulb
replacement (For Hybrid)
1. Open the hood.
2. Remove the headlamp bulb cover
by turning it counterclockwise.
3. Disconnect the headlamp bulb
socket-connector.
4. Remove the bulb-socket from the
headlamp assembly by turning the
bulb-socket counterclockwise until
the tabs on the bulb-socket align
with the slots on the headlamp
assembly.
WARNING
- Halogen
bulbs
Handle halogen bulbs with care.
• Halogen bulbs contain pres-
surized gas that will produce
flying pieces of glass if bro-
ken.
OHD076046
OJFA075076
8 85
Maintenance
5. Install a new bulb-socket assem-
bly in the headlamp assembly by
aligning the tabs on the bulb-sock-
et with the slots in the headlamp
assembly. Push the bulb-socket
into the headlamp assembly and
turn the bulb-socket clockwise.
6. Install the headlamp bulb cover by
turning it clockwise.
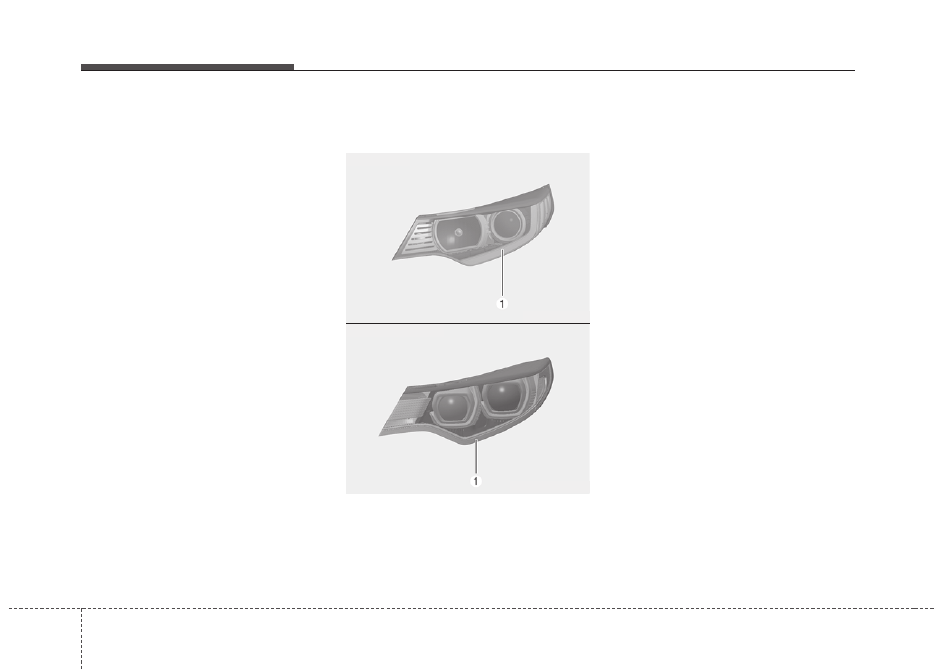
Headlamp (Low/High
beam,LED type) bulb replace-
ment (For Plug-in Hybrid)
If the head lamp (LED) (1,2) does not
operate, have the vehicle checked by
an authorized Kia dealer. The LED
lamps cannot be replaced as a sin-
gle unit because it is an inte grated
unit. The LED lamps has to be
replaced with the unit. A skilled tech-
nician should check or repair the
head lamp (LED), for it may damage
related parts of the vehicle.
Front turn signal lamp bulb
replacement
1. Open the hood.
2. Remove the bulb-socket from the
headlamp assembly by turning the
bulb-socket counterclockwise until
the tabs on the bulb-socket align
with the slots on the headlamp
assembly.
3. Remove the bulb from the bulb-
socket by pressing it in and rotat-
ing it counterclockwise until the
tabs on the bulb align with the
slots in the bulb-socket. Pull the
bulb out of the bulb-socket
OJFA075079
OJFHP076231N
Maintenance
86
8
4. Insert a new bulb by inserting it
into the bulb-socket and rotating it
until it locks into place.
5. Install the socket in the headlamp
assembly by aligning the tabs on
the bulb-socket with the slots in
the assembly. Push the bulb-sock-
et into the headlamp assembly
and turn the socket clockwise.
Position lamp + DRL (LED
type) bulb replacement
If the position lamp + DRL* (1) does
not operate, have the vehicle
checked by an authorized Kia dealer.
The LED lamps cannot be replaced
as a single unit because it is an inte-
grated unit. The LED lamps has to be
replaced with the unit.
A skilled technician should check or
repair the position lamp + DRL* (1),
for it may damage related parts of
the vehicle.
* : if equipped
OJFH075175
OJFHP076191L
■
for hybrid
■
for plug-in hybrid
8 87
Maintenance
Side repeater lamp bulb
replacement
If the Side repeater lamp does not
operate, have the vehicle checked by
an authorized Kia dealer.
The LED lamps cannot be replaced
as a single unit because it is an inte-
grated unit. The LED lamps has to be
replaced with the unit.
A skilled technician should check or
repair the side repeater lamp, for it
may damage related parts of the
vehicle.
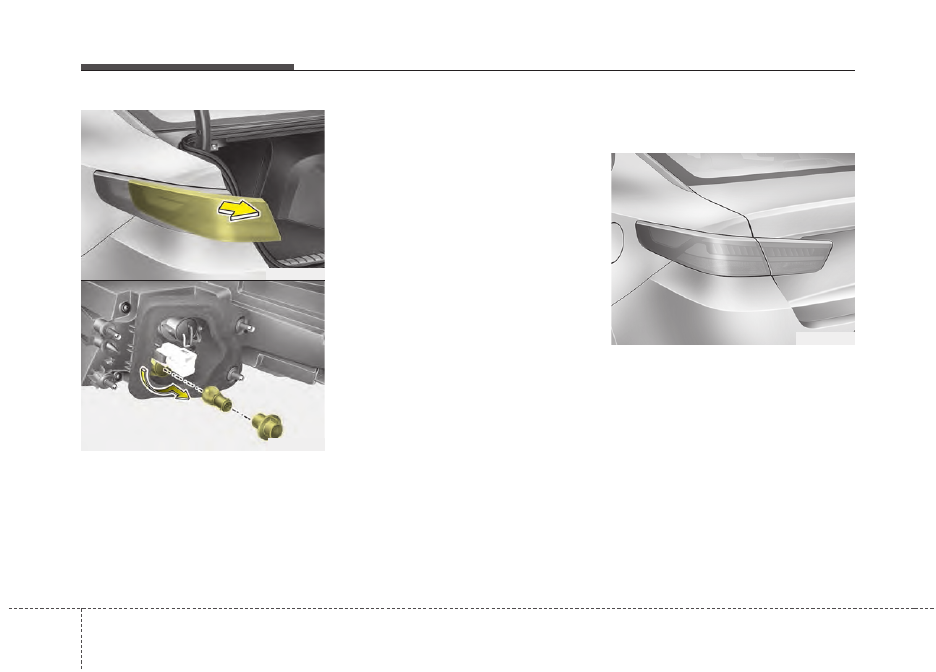
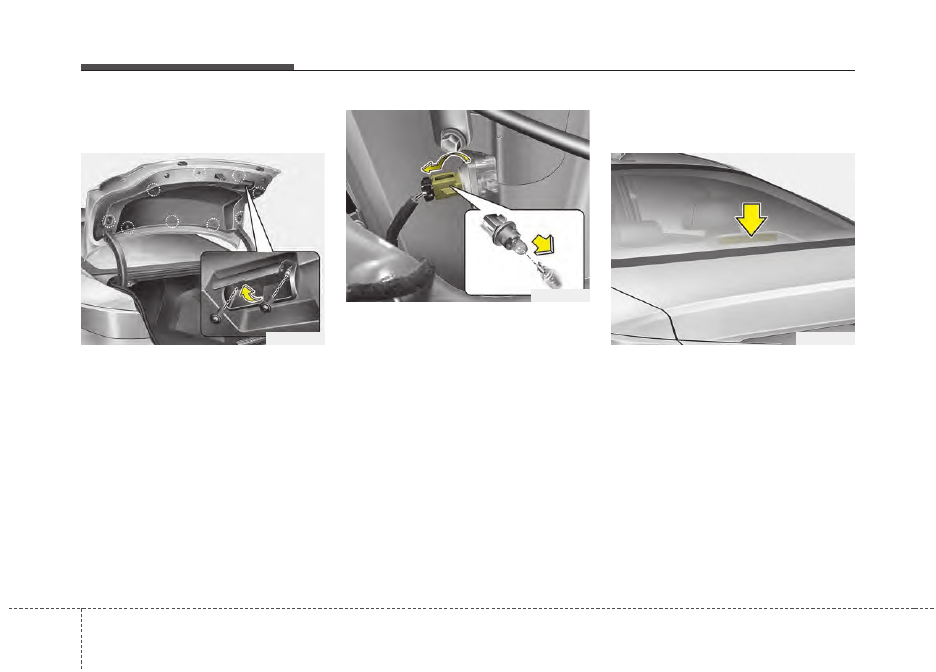
Rear turn signal lamp bulb
replacement
1. Open the trunk lid.
2. Open the service cover.
3. Remove the nuts from the vehicle.
4. Disconnect the rear combination
lamp connector.
OJF075039
OJF075041
OJF075042
Maintenance
88
8
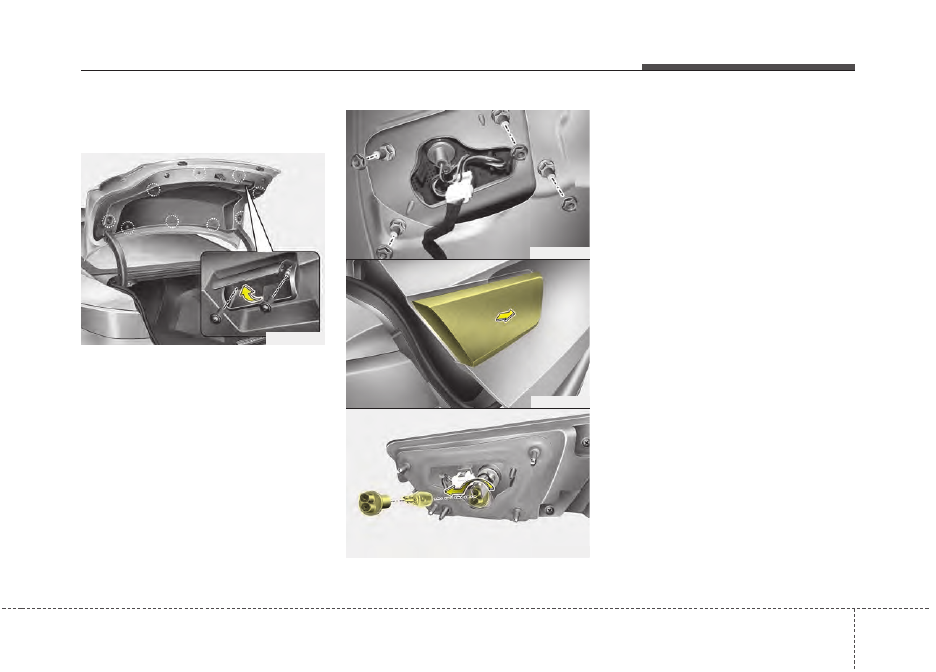
5. Remove the rear combination
lamp assembly from the body of
the vehicle.
6. Remove the socket from the
assembly by turning the socket
counterclockwise until the tabs on
the socket align with the slots on
the assembly.
7. Remove the bulb from the socket
by pressing it in and rotating it
counterclockwise until the tabs on
the bulb align with the slots in the
socket. Pull the bulb out of the
socket.
8. Insert a new bulb by inserting it
into the socket and rotating it until
it locks into place.
9. Install the socket in the assembly
by aligning the tabs on the socket
with the slots in the assembly.
Push the socket into the assembly
and turn the socket clockwise.
10. Install the rear combination lamp
assembly to the body of the vehi-
cle.
11. Install the service cover by put-
ting it into the service hole.
Stop and tail lamp (LED type)
bulb replacement
If the stop and tail lamp (LED) does
not operate, have the vehicle
checked by an authorized Kia dealer.
The LED lamps cannot be replaced
as a single unit because it is an inte-
grated unit. The LED lamps has to be
replaced with the unit. A skilled tech-
nician should check or repair the
stop and tail lamp (LED), for it may
damage related parts of the vehicle.
OJF075043
OJF075093
OJF075040
8 89
Maintenance
Back-up lamp bulb replace-
ment
1. Open the trunk lid.
2. Loosen the retaining screw of the
trunk lid cover and then remove
the cover.
3. Remove the nuts from the vehicle.
4. Disconnect the rear combination
lamp (inside) connector.
5. Remove the rear combination
lamp (inside) assembly from the
body of the vehicle.
6. Remove the socket from the
assembly by turning the socket
counterclockwise until the tabs on
the socket align with the slots on
the assembly.
7. Remove the bulb from bulb-socket
by pulling it out.
8. Insert a new bulb by inserting it
into the bulb-socket.
9. Install the socket in the assembly
by aligning the tabs on the socket
with the slots in the assembly.
Push the socket into the assembly
and turn the socket clockwise.
10. Install the rear combination lamp
(inside) assembly to the body of
the vehicle.
11. Install the trunk lid cover.
OJF075081
OJF075082
OJF075083
OJF075094
Maintenance
90
8
License plate lamp bulb
replacement
1. Open the trunk lid.
2. Loosen the retaining screw of the
trunk lid cover and then remove
the cover.
3. Remove the socket from the
assembly by turning the socket
counterclockwise until the tabs on
the socket align with the slots on
the assembly.
4. Remove the bulb from bulb-socket
by pulling it out.
5. Insert a new bulb by inserting it
into the bulb-socket.
6. Install the socket in the assembly
by aligning the tabs on the socket
with the slots in the assembly.
Push the socket into the assembly
and turn the socket clockwise.
7. Install the trunk lid cover.
High mounted stop lamp bulb
replacement
If the high mounted stop lamp (LED)
does not operate, have the vehicle
checked by an authorized Kia dealer.
The LED lamps cannot be replaced
as a single unit because it is an inte-
grated unit. The LED lamps has to be
replaced with the unit.
A skilled technician should check or
repair the high mounted stop lamp
(LED), for it may damage related
parts of the vehicle.
OJF075081
OJF075085
OJF075049
8 91
Maintenance
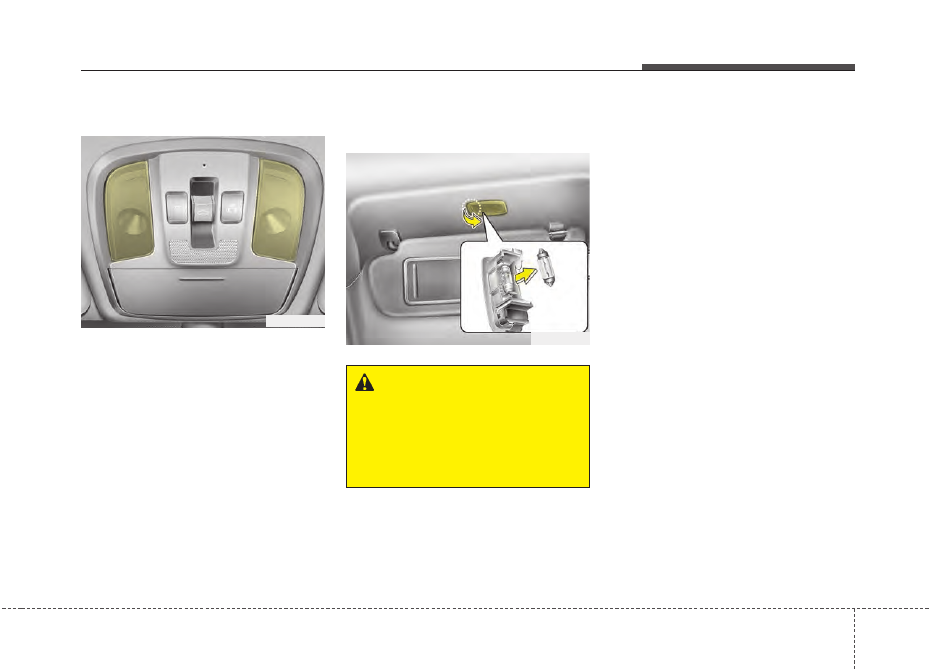
Map lamp bulb replacement
If the map lamp (bulb and LED type)
does not operate, have the vehicle
checked by an authorized Kia dealer.
The LED lamps cannot be replaced
as a single unit because it is an inte-
grated unit. The LED lamps has to be
replaced with the unit.
A skilled technician should check or
repair the map lamp (bulb and LED
type), for it may damage related
parts of the vehicle.
Vanity mirror lamp bulb
replacement
1. Using a flat-blade screwdriver,
gently pry the lamp assembly from
interior.
2. Remove the bulb by pulling it
straight out.
3. Install a new bulb in the socket.
4. Install the lamp assembly to interior.
✽
✽
NOTICE
Be careful not to dirty or damage the
lens, lens tab, and plastic housings.
OJF075050
WARNING
- Interior lamps
Prior to working on the Interior
lamps, ensure that the “OFF”
button is depressed to avoid
burning your fingers or receiv-
ing an electric shock.
OJF075051
Нет комментариевНе стесняйтесь поделиться с нами вашим ценным мнением.
Текст