KIA Soul EV (2018 year). Instruction — part 29
7 67
Maintenance
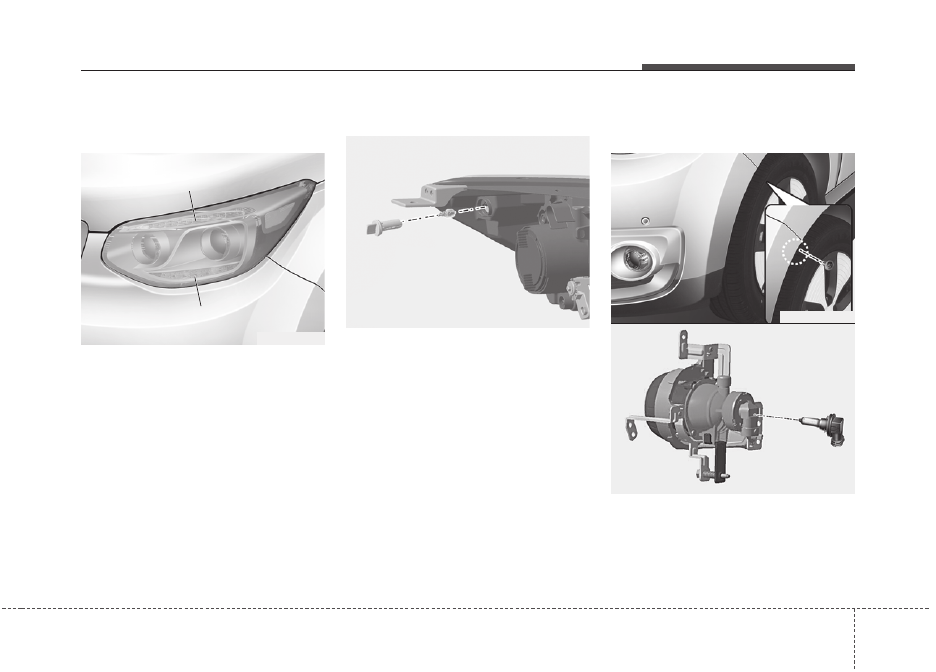
Front turn signal / position light /
DRL
LED type
If the light bulb is not operating, have
the vehicle checked by an authorized
Kia dealer.
Front side marker
Follow the steps 1 to 6 from the pre-
vious page.
7.Remove the socket from the
assembly by turning the socket
counterclockwise until the tabs on
the socket align with the slots on
the assembly.
8.Pull the bulb out of the socket.
9.Insert a new bulb into the socket.
10. Install the socket into the assem-
bly by aligning the tabs on the
socket with the slots on the
assembly and turning the socket
clockwise.
Front fog lamp bulbs
(if equipped)
1. Remove the front bumper under
cover.
2. Reach your hand into the back of
the front bumper.
OPSE074017
Position
light/DRL
Turn signal
light
OPSE076035L
OPSE074029L
OPS073025
Maintenance
68
7
3. Disconnect the power connector
from the socket.
4. Remove the bulb-socket from the
housing by turning the socket
counter clockwise until the tabs on
the socket align with the slots on
the housing.
5. Install the new bulb-socket into the
housing by aligning the tabs on
the socket with the slots in the
housing. Push the socket into the
housing and turn the socket clock-
wise.
6. Connect the power connector to
the socket.
7. Reinstall the front bumper under
cover.
✽
✽
NOTICE
If the headlight aiming adjustment
is necessary after the headlight
assembly is reinstalled, consult an
authorized Kia dealer.
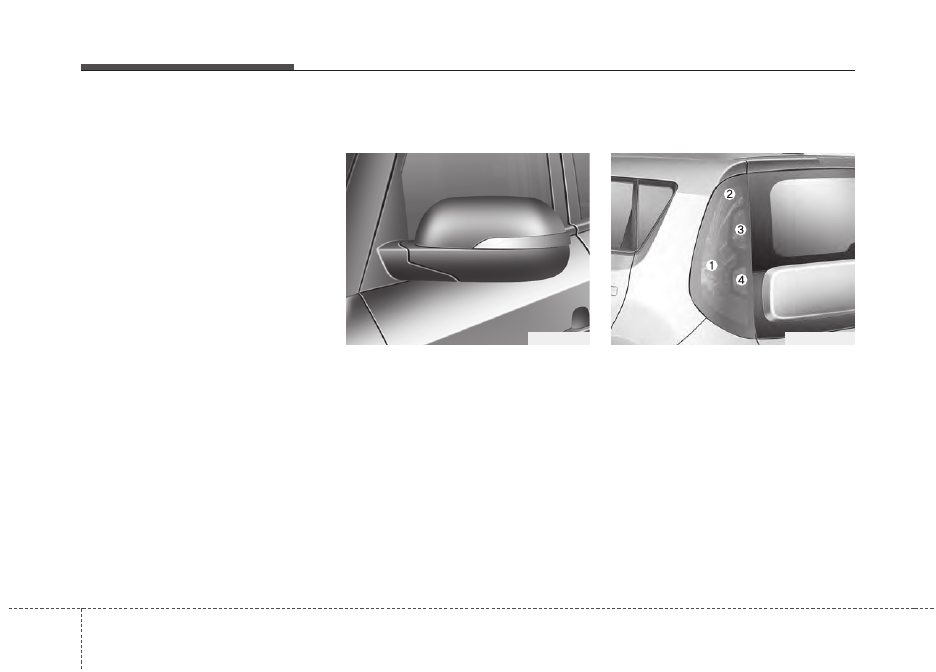
Side repeater light bulb
replacement (if equipped)
If the light bulb is not operating, have
the vehicle checked by an authorized
Kia dealer.
Rear combination light bulb
replacement
(1) Tail and stop light/
Side marker light (LED)
(2) Tail and side marker light(LED)
(3) Rear turn signal light
(4) Back-up light
OPS073035
OPSE074020
7 69
Maintenance
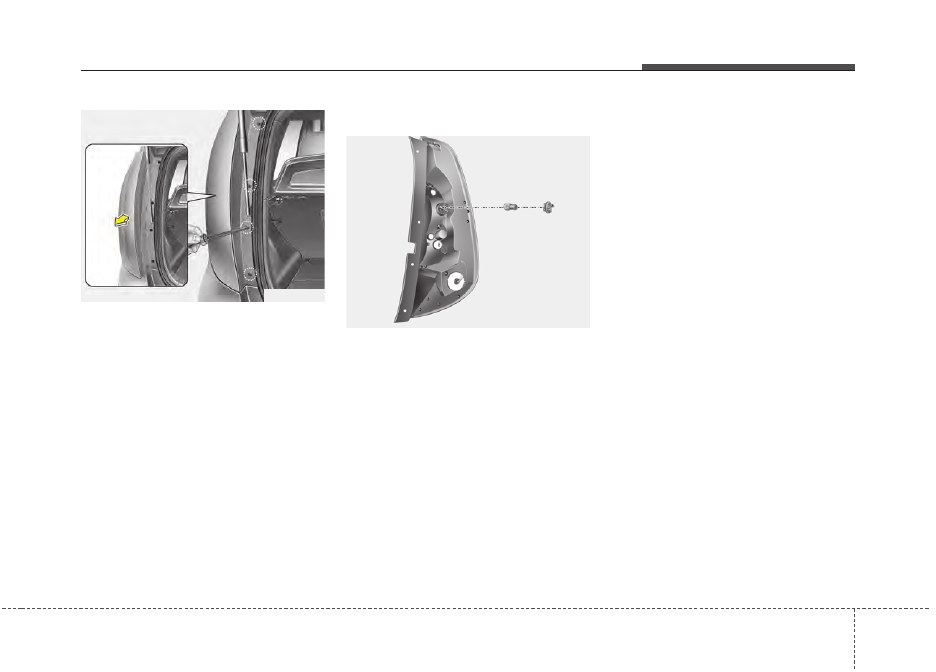
1. Open the tailgate.
2. Loosen the light assembly retain-
ing screws with a philips head
screwdriver.
3. Remove the rear combination light
assembly from the body of the
vehicle.
Turn signal light
4. Remove the socket from the
assembly by turning the socket
counterclockwise until the tabs on
the socket align with the slots on
the assembly.
5. Remove the bulb from the socket
by pressing it in and rotating it
counterclockwise until the tabs on
the bulb align with the slots in the
socket.
6. Insert a new bulb by inserting it
into the socket and rotating it until
it locks into place.
7. Install the socket in the assembly
by aligning the tabs on the socket
with the slots in the assembly and
turning the socket clockwise.
8. Reinstall the light assembly to the
body of the vehicle.
OPS073031
OPS073034
Maintenance
70
7
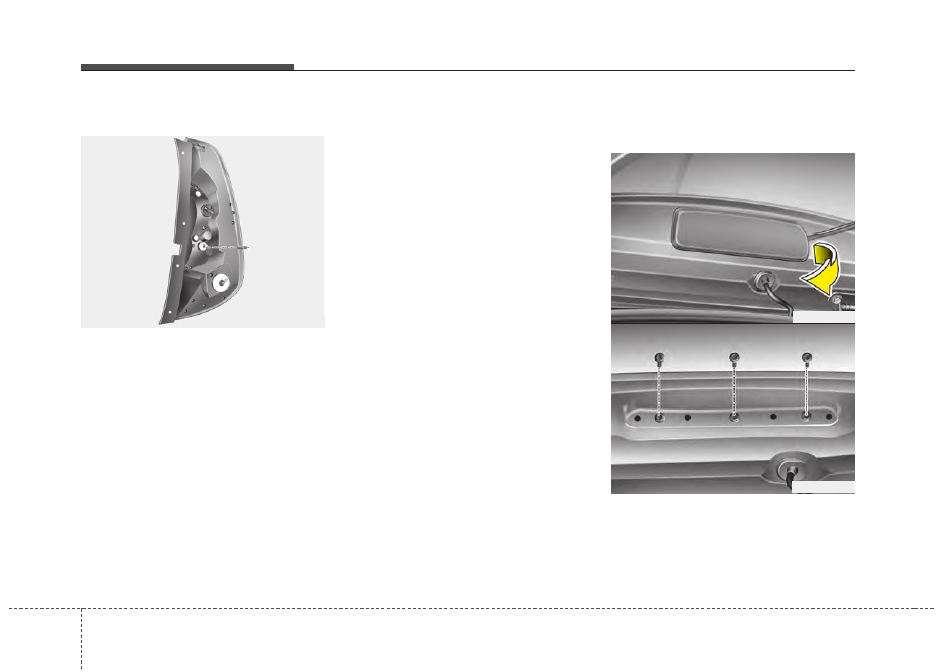
Back-up light
Follow the steps 1 to 3 from the pre-
vious page.
4. Remove the socket from the
assembly by turning the socket
counterclockwise until the tabs on
the socket align with the slots on
the assembly.
5. Pull the bulb out of the socket.
6. Insert a new bulb into the socket.
7. Install the socket into the assem-
bly by aligning the tabs on the
socket with the slots on the
assembly and turning the socket
clockwise.
8. Reinstall the light assembly to the
body of the vehicle.
Tail,stop light and side marker light
(LED type)
If the light does not operate, have the
system be checked by an authorized
Kia dealer.
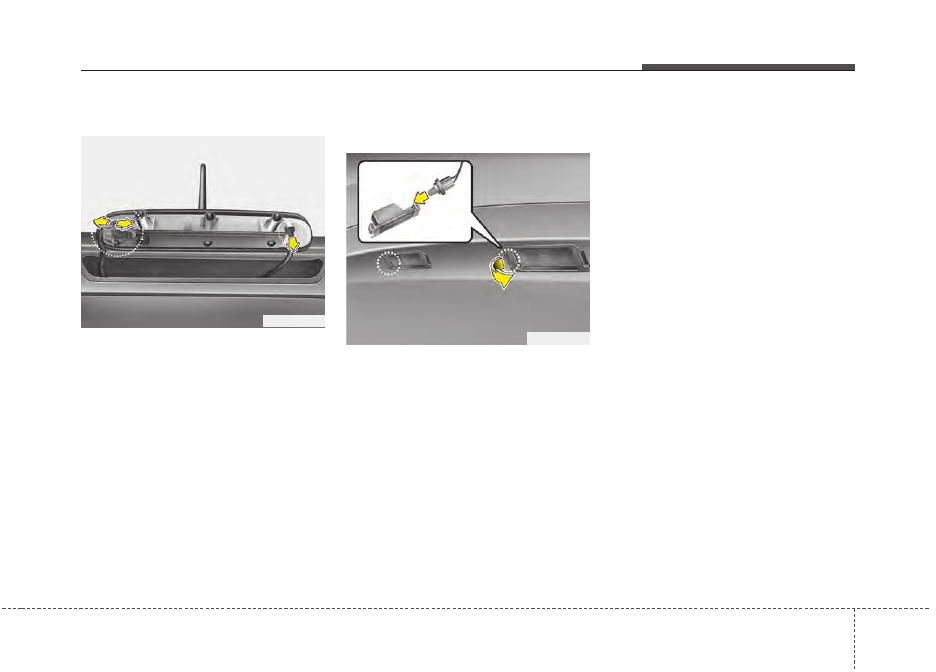
High mounted stop light
replacement
1. Open the tailgate.
2. Remove the cover.
3. Loosen the retaining bolts.
OPS073036
OPS073052
OPS073045
Back-up
7 71
Maintenance
LED type
4.Pull out the module from the high
mounted stop light assembly by
pulling both clips.
5.Replace the LED with new one.
6.Reinstall in the reverse order.
License plate light bulb
replacement
1. Remove the lens by pressing the
tabs.
2. Remove the socket from the lens.
3. Remove the bulb by turning it
counter clockwise.
4. Install a new bulb in the socket
and install the socket to the lens.
5. Reinstall the lens securely.
OPS073053
OPS073050
Maintenance
72
7
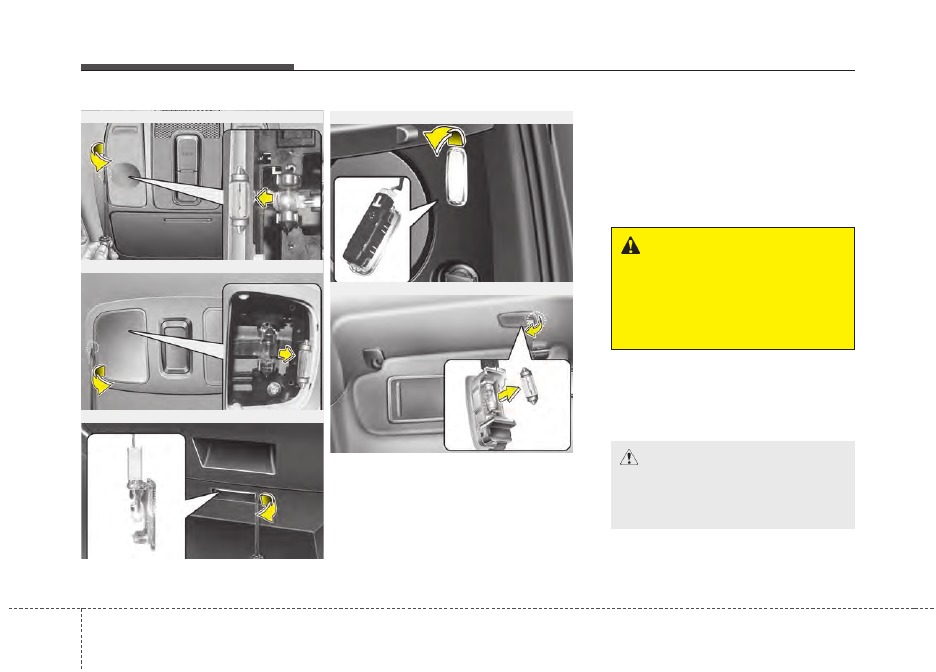
Interior light bulb replacement
1. Using a flat-blade screwdriver,
gently pry the lens from the interi-
or light housing.
2. Remove the bulb by pulling it
straight out.
3. Install a new bulb in the socket.
4. Align the lens tabs with the interior
light housing notches and snap
the lens into place.
Map lamp
Room lamp
Glove box lamp
Luggage lamp
Vanity mirror lamp
OPS073041/OPS073042/OPS073043/
OPS073044/OXM079041
WARNING
- Interior lights
Prior to working on the Interior
Lights, ensure that the “OFF”
button is depressed to avoid
burning your fingers or receiv-
ing an electric shock.
CAUTION
Be careful not to dirty or dam-
age the lens, lens tab, and plas-
tic housings.
7 73
Maintenance
APPEARANCE CARE
Exterior care
Exterior general caution
It is very important to follow the label
directions when using any chemical
cleaner or polish. Read all warning
and caution statements that appear
on the label.
Finish maintenance
Washing
To help protect your vehicle’s finish
from rust and deterioration, wash it
thoroughly and frequently at least once
a month with lukewarm or cold water.
If you use your vehicle for off-road
driving, you should wash it after each
off-road trip. Pay special attention to
the removal of any accumulation of
salt, dirt, mud, and other foreign mate-
rials. Make sure the drain holes in the
lower edges of the doors and rocker
panels are kept clear and clean.
Insects, tar, tree sap, bird droppings,
industrial pollution and similar
deposits can damage your vehicle’s
finish if not removed immediately.
Even prompt washing with plain
water may not completely remove all
these deposits. A mild soap, safe for
use on painted surfaces, may be
used.
After washing, rinse the vehicle thor-
oughly with lukewarm or cold water.
Do not allow soap to dry on the fin-
ish.
After washing the vehicle, test the
brakes while driving slowly to see if
they have been affected by water. If
braking performance is impaired, dry
the brakes by applying them lightly
while maintaining a slow forward
speed.
CAUTION
• Do not use strong soap, chem-
ical detergents or hot water,
and do not wash the vehicle in
direct sunlight or when the
body of the vehicle is warm.
• Be careful when washing the
side windows of your vehicle.
Especially, with high-pressure
water. Water may leak through
the windows and wet the inte-
rior.
• To prevent damage to the
plastic parts and lamps, do
not clean with chemical sol-
vents or strong detergents.
Maintenance
74
7
High-pressure washing
• When using high-pressure wash-
ers, make sure to maintain suffi-
cient distance from the vehicle.
Insufficient clearance or excessive
pressure can lead to component
damage or water penetration.
• Do not spray the camera, sensors
or its surrounding area directly with
a high pressure washer. Shock
applied from high pressure water
may cause the device to not oper-
ate normally.
• Do not bring the nozzle tip close to
boots (rubber or plastic covers) or
connectors as they may be dam-
aged if they come into contact with
high pressure water.
Waxing
Wax the vehicle when water will no
longer bead on the paint.
Always wash and dry the vehicle
before waxing. Use a good quality
liquid or paste wax, and follow the
manufacturer’s instructions. Wax all
metal trim to protect it and to main-
tain its luster.
Removing oil, tar, and similar materi-
als with a spot remover will usually
strip the wax from the finish. Be sure to
re-wax these areas even if the rest of
the vehicle does not yet need waxing.
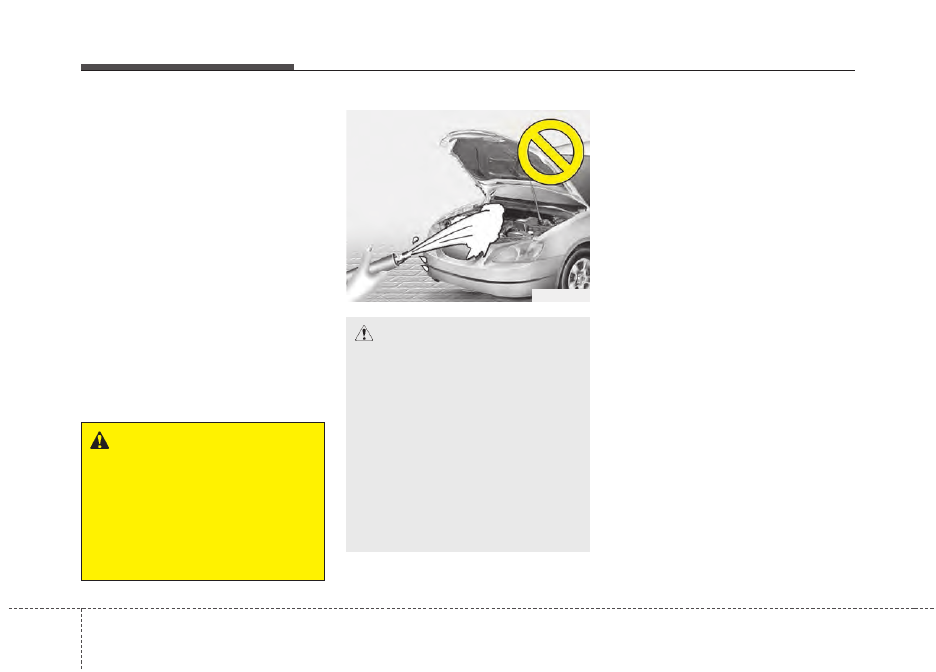
CAUTION
- Wetting motor
compartment
• Water washing in the motor-
compartment including high
pressure water washing may
cause the failure of electrical
circuits located in the motor
compartment.
• Never allow water or other liq-
uids to come in contact with
electrical/electronic compo-
nents inside the vehicle as
this may damage them.
OJB037800
WARNING
After washing the vehicle, test
the brakes while driving slowly
to see if they have been affected
by water. If braking performance
is impaired, dry the brakes by
applying them lightly while main-
taining a slow forward speed.
7 75
Maintenance
Finish damage repair
Deep scratches or stone chips in the
painted surface must be repaired
promptly. Exposed metal will quickly
rust and may develop into a major
repair expense.
✽
✽
NOTICE
If your vehicle is damaged and
requires any metal repair
or
replacement, be sure the body shop
applies anti-corrosion materials to
the parts repaired or replaced.
Bright-metal maintenance
• To remove road tar and insects,
use a tar remover, not a scraper or
other sharp object.
• To protect the surfaces of bright-
metal parts from corrosion, apply a
coating of wax or chrome preser-
vative and rub to a high luster.
• During winter weather or in coastal
areas, cover the bright metal parts
with a heavier coating of wax or
preservative. If necessary, coat the
parts with non-corrosive petroleum
jelly or other protective compound.
Underbody maintenance
Road salt and other corrosive chemi-
cals are used in cold weather states to
melt snow and prevent ice accumula-
tion. If these chemicals are not regu-
larly removed, they will corrode the
vehicle underbody and over time dam-
age fuel lines, the fuel tank retention
system, the vehicle suspension, the
exhaust system, and even the body
frame. The National Highway Traffic
Safety Administration has warned all
vehicle owners of all brands of the
need to take the following steps:
• Wash the undercarriage of your
vehicle regularly during the winter
and whenever your vehicle has
been exposed to such salts or
chemicals.
• Do a thorough washing of the
undercarriage at the end of the
winter.
• Use professional service techni-
cians or governmental inspection
stations to annually inspect for cor-
rosion.
• Immediately seek an inspection of
your vehicle if you become visually
aware of corrosion flaking or scal-
ing or if you become aware of a
change in vehicle performance,
such as soft or spongy brakes, flu-
ids leaking, impairment of direc-
tional control, suspension noises
or rattling metal straps.
CAUTION
- Drying vehicle
• Wiping dust or dirt off the
body with a dry cloth will
scratch the finish.
• Do not use steel wool, abra-
sive cleaners, acid detergents
or strong detergents contain-
ing high alkaline or caustic
agents on chrome-plated or
anodized aluminum parts.
This may result in damage to
the protective coating and
cause discoloration or paint
deterioration.
Maintenance
76
7
Aluminum wheel maintenance
The aluminum wheels are coated
with a clear protective finish.
• Do not use any abrasive cleaner,
polishing compound, solvent, or
wire brushes on aluminum wheels.
They may scratch or damage the
finish.
• Clean the wheel when it has
cooled.
• Use only a mild soap or neutral
detergent, and rinse thoroughly
with water. Also, be sure to clean
the wheels after driving on salted
roads. This helps prevent corro-
sion.
• Avoid washing the wheels with
highspeed vehicle wash brushes.
• Do not use any alkaline or acid
detergents It may damage and cor-
rode the aluminum wheels coated
with a clear protective finish.
Corrosion protection
Protecting your vehicle from corro-
sion
By using the most advanced design
and construction practices to combat
corrosion, we produce vehicles of
the highest quality. However, this is
only part of the job. To achieve the
long-term corrosion resistance your
vehicle can deliver, the owner's
cooperation and assistance is also
required.
Common causes of corrosion
The most common causes of corro-
sion on your vehicle are:
• Road salt, dirt and moisture that is
allowed to accumulate underneath
the vehicle.
• Removal of paint or protective
coatings by stones, gravel, abra-
sion or minor scrapes and dents
which leave unprotected metal
exposed to corrosion.
High-corrosion areas
If you live in an area where your vehi-
cle is regularly exposed to corrosive
materials, corrosion protection is
particularly important. Some of the
common causes of accelerated cor-
rosion are road salts, dust control
chemicals, ocean air and industrial
pollution.
Moisture breeds corrosion
Moisture creates the conditions in
which corrosion is most likely to
occur. For example, corrosion is
accelerated by high humidity, partic-
ularly when temperatures are just
above freezing. In such conditions,
the corrosive material is kept in con-
tact with the vehicle’s surface by
moisture that evaporates slowly.
Mud is particularly corrosive
because it dries slowly and holds
moisture in contact with the vehicle.
Although the mud appears to be dry,
it can still retain the moisture and
promote corrosion.
7 77
Maintenance
High temperatures can also acceler-
ate corrosion of parts that are not
properly ventilated so the moisture
can be dispersed. For all these rea-
sons, it is particularly important to
keep your vehicle clean and free of
mud or accumulations of other mate-
rials. This applies not only to the vis-
ible surfaces but particularly to the
underside of the vehicle.
To help prevent corrosion
You can help prevent corrosion from
beginning by observing the following:
Keep your vehicle clean
The best way to prevent corrosion is
to keep your vehicle clean and free
of corrosive materials. Attention to
the underside of the vehicle is partic-
ularly important.
• If you live in a high-corrosion area
— where road salts are used, near
the ocean, areas with industrial
pollution, acid rain, etc.—, you
should take extra care to prevent
corrosion. In winter, hose off the
underside of your vehicle at least
once a month and be sure to clean
the underside thoroughly when
winter is over.
• When cleaning underneath the
vehicle, give particular attention to
the components under the fenders
and other areas that are hidden
from view. Do a thorough job; just
dampening the accumulated mud
rather than washing it away will
accelerate corrosion rather than
prevent it. Water under high pres-
sure and steam are particularly
effective in removing accumulated
mud and corrosive materials.
• When cleaning lower door panels,
rocker panels and frame members,
be sure that drain holes are kept
open so that moisture can escape
and not be trapped inside to accel-
erate corrosion.
Keep your garage dry
Don't park your vehicle in a damp,
poorly ventilated garage. This cre-
ates a favorable environment for cor-
rosion. This is particularly true if you
wash your vehicle in the garage or
drive it into the garage when it is still
wet or covered with snow, ice or
mud. Even a heated garage can con-
tribute to corrosion unless it is well
ventilated so moisture is dispersed.
Maintenance
78
7
Keep paint and trim in good con-
dition
Scratches or chips in the finish
should be covered with "touch-up"
paint as soon as possible to reduce
the possibility of corrosion. If bare
metal is showing through, the atten-
tion of a qualified body and paint
shop is recommended.
Bird droppings : Bird droppings are
highly corrosive and may damage
painted surfaces in just a few hours.
Always remove bird droppings as
soon as possible.
Don't neglect the interior
Moisture can collect under the floor
mats and carpeting and cause corro-
sion. Check under the mats periodi-
cally to be sure the carpeting is dry.
Use particular care if you carry fertil-
izers, cleaning materials or chemi-
cals in the vehicle.
These should be carried only in prop-
er containers and any spills or leaks
should be cleaned up, flushed with
clean water and thoroughly dried.
Interior care
Interior general precautions
Prevent chemicals such as perfume,
cosmetic oil, sun cream, hand clean-
er, and air freshener from contacting
the interior parts because they may
cause damage or discoloration. If
they do contact the interior parts,
wipe them off immediately. If neces-
sary, use a vinyl cleaner, see product
instructions for correct usage.
CAUTION
- Electrical
components
Never allow water or other liq-
uids to come in contact with
electrical/electronic compo-
nents inside the vehicle as this
may damage them.
CAUTION
- Leather
When cleaning leather products
(steering wheel, seats etc.), use
neutral detergents or low alco-
hol content solutions. If you use
high alcohol content solutions
or acid/alkaline detergents, the
color of the leather may fade or
the surface may get stripped off.
7 79
Maintenance
Taking care of leather seats
• Vacuum the seat periodically to
remove dust and sand on the seat.
It will prevent abrasion or damage of
the leather and maintain its quality.
• Wipe the natural leather seat cover
often with dry or soft cloth.
• Sufficient use of a leather protec-
tive may prevent abrasion of the
cover and helps maintain the color.
Be sure to read the instructions
and consult a specialist when
using leather coating or protective
agents.
• Leather with bright colors(beige,
cream beige) is easily contaminat-
ed and clear in appearance. Clean
the seats frequently.
• Avoid wiping with wet cloth. It may
cause the surface to crack.
Cleaning the leather seats
• Remove all contaminations instant-
ly. Refer to instructions below for
removal of each contaminant.
• Cosmetic products(sunscreen,
foundation, etc.)
- Apply cleansing cream on a cloth
and wipe the contaminated point.
Wipe off the cream with a wet
cloth and remove water with a dry
cloth.
• Beverages(coffee, soft drink, etc.)
- Apply a small amount of neutral
detergent and wipe until contami-
nations do not smear.
• Oil
-
Remove oil instantly with
absorbable cloth and wipe with
stain remover for natural leather
only.
• Chewing gum
- Harden the gum with ice and
remove gradually.
Fabric seat cover (If equipped)
Please clean the fabric seats regu-
larly with a vacuum cleaner in con-
sideration of fabric material charac-
teristics. If they are heavily soiled
with beverage stains, etc., use a suit-
able interior cleaner. To prevent dam-
age to seat covers, wipe off the seat
covers down to the seams with a
large wiping motion and moderate
pressure using a soft sponge or
microfiber cloth.
Velcro closures on clothing or sharp
objects may cause snagging or
scratches on the surface of the
seats.
Make sure not to rub such objects
against the surface.

Maintenance
80
7
CALIFORNIA PERCHLO-
RATE NOTICE
Cleaning the upholstery and inte-
rior trim
Vinyl
Remove dust and loose dirt from
vinyl with a whisk broom or vacuum
cleaner. Clean vinyl surfaces with a
vinyl cleaner.
Fabric
Remove dust and loose dirt from fab-
ric with a whisk broom or vacuum
cleaner. Clean with a mild soap solu-
tion recommended for upholstery or
carpets. Remove fresh spots imme-
diately with a fabric spot cleaner. If
fresh spots do not receive immediate
attention, the fabric can be stained
and its color can be affected. Also, its
fire-resistant properties can be
reduced if the material is not proper-
ly maintained.
Using anything but recommended
cleaners and procedures may affect
the fabric’s appearance and fire-
resistant properties.
Cleaning the lap/shoulder belt
webbing
Clean the belt webbing with any mild
soap solution recommended for
cleaning upholstery or carpet. Follow
the instructions provided with the
soap. Do not bleach or re-dye the
webbing because this may weaken
it.
Cleaning the interior window glass
If the interior glass surfaces of the
vehicle become fogged (that is, cov-
ered with an oily, greasy or waxy
film), they should be cleaned with a
glass cleaner. Follow the directions
on the glass cleaner container.
Perchlorate Material-special handling
may apply, See www.dtsc.ca.gov/haz-
ardouswaste/ perchlorate.
Notice to California Vehicle Dismantlers:
Perchlorate containing materials,
such as air bag inflators, seatbelt
pretensioners and keyless remote
entry batteries, must be disposed of
according to Title 22 California Code
of Regulations Section 67384.10 (a).
CAUTION
- Rear window
Do not scrape or scratch the
inside of the rear window. This
may result in damage of the rear
window defroster grid.
Specifications, Consumer information and Reporting safety defects
Dimensions . . . . . . . . . . . . . . . . . . . . . . . . . . . . . . . . 8-2
Power electric specifications . . . . . . . . . . . . . . . . . . 8-2
Gross vehicle weight . . . . . . . . . . . . . . . . . . . . . . . . 8-3
Luggage volume . . . . . . . . . . . . . . . . . . . . . . . . . . . . 8-3
Air conditioning system . . . . . . . . . . . . . . . . . . . . . . 8-3
Bulb wattage . . . . . . . . . . . . . . . . . . . . . . . . . . . . . . . 8-4
Tires and wheels . . . . . . . . . . . . . . . . . . . . . . . . . . . . 8-5
Recommended lubricants and capacities. . . . . . . . 8-6
Vehicle identification number (VIN) . . . . . . . . . . . 8-7
Vehicle certification label. . . . . . . . . . . . . . . . . . . . . 8-7
Motor number . . . . . . . . . . . . . . . . . . . . . . . . . . . . . 8-8
Tire specification and pressure label . . . . . . . . . . . 8-8
Air conditioner compressor label . . . . . . . . . . . . . . 8-8
Refrigerant label. . . . . . . . . . . . . . . . . . . . . . . . . . . . 8-9
8
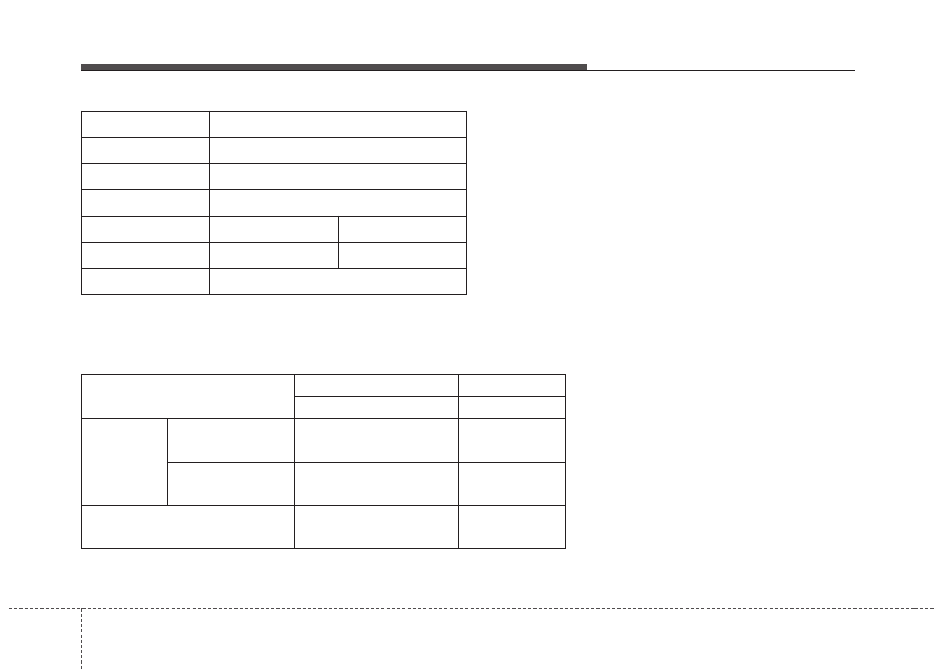
POWER ELECTRIC SPECIFICATIONS
Item
in (mm)
Overall length
162.9 (4,140)
Overall width
70.9 (1,800)
Overall height
62.9 (1,600)
Front tread
205/60R16
62.1 ( 1,576)
Rear tread
205/60R16
62.4 ( 1,585)
Wheelbase
101.2 ( 2,570)
MOTOR
Max. Output (KW)
81.4
Max. Torque (Nm)
285
EPCU
INVERTER
Input Voltage
250~430
LDC
Max. Output (KW)
1.7
CHARGER (OBC)
Max. Output (KW)
6.6
Specifications, Consumer information and Reporting safety defects
2
8
DIMENSIONS
Нет комментариевНе стесняйтесь поделиться с нами вашим ценным мнением.
Текст