Jeep Wagoneer (2022 year). Manual in english — page 4
GETTING TO KNOW YOUR VEHICLE
61
Rolling Code Garage Door Opener Final Steps
NOTE:
You have 30 seconds in which to initiate rolling
code final step 2, after completing rolling code
final step 1.
1. At the garage door opener motor (in the
garage), locate the “LEARN” or “TRAIN”
button. This can usually be found where the
hanging antenna wire is attached to the
garage door opener motor. Firmly push and
release the “LEARN” or “TRAIN” button.
2. Return to the vehicle and push the
programmed HomeLink® button three times
(holding the button for two seconds each
time). If the garage door opener motor
operates, programming is complete.
3. Push the programmed HomeLink® button to
confirm that the garage door opener motor
operates. If the garage door opener motor
does not operate, repeat the final steps for the
rolling code procedure.
Non-Rolling Code Garage Door Opener Final Steps
1. Push and hold the programmed HomeLink®
button and observe the HomeLink® indicator
light. If the HomeLink® indicator light stays
on constantly, programming is complete.
2. Push the programmed HomeLink® button to
confirm that the garage door opener motor
operates. If the garage door opener motor
does not operate, repeat the steps from the
beginning.
P
ROGRAMMING
H
OME
L
INK
® T
O
A
M
ISCELLANEOUS
D
EVICE
Refer to “Programming HomeLink® To A Garage
Door Opener” for the procedure on how to program
HomeLink® to a miscellaneous device, as it
follows the same procedure. Be sure to determine
if the device has a rolling code, or non-rolling code
before beginning the programming process.
NOTE:
Canadian Radio Frequency (RF) laws require trans
-
mitter signals to time-out (or quit) after several
seconds of transmission, which may not be long
enough for HomeLink® to pick up the signal during
programming. Similar to this Canadian law, some
U.S. gate operators are designed to time-out in the
same manner. The procedure may need to be
performed multiple times to successfully pair the
device to your HomeLink® buttons.
R
EPROGRAMMING
A S
INGLE
H
OME
L
INK
® B
UTTON
To reprogram a single HomeLink® button that has
been previously trained, without erasing all the
channels, follow the procedure below. Be sure to
determine whether the new device you want to
program the HomeLink® button to has a rolling
code, or non-rolling code.
1. Place the ignition to the ON/RUN position,
without starting the engine.
2. Push and hold the desired HomeLink® button
until the HomeLink® Indicator light begins to
flash after 20 seconds. Do not release the
button.
3. Without releasing the button, proceed with
Step 2 in “Programming HomeLink® To A
Garage Door Opener” and follow all remaining
steps.
WARNING!
Your motorized door or gate will open and
close while you are programming the
universal transceiver. Do not program the
transceiver if people or pets are in the path of
the door or gate.
Do not run your vehicle in a closed garage or
confined area while programming the trans
-
ceiver. Exhaust gas from your vehicle contains
Carbon Monoxide (CO) which is odorless and
colorless. Carbon Monoxide is poisonous
when inhaled and can cause you and others to
be severely injured or killed.
2
62
GETTING TO KNOW YOUR VEHICLE
C
ANADIAN
/G
ATE
O
PERATOR
P
ROGRAMMING
For programming transmitters in Canada/United
States that require the transmitter signals to
“time-out” after several seconds of transmission:
Canadian Radio Frequency (RF) laws require
transmitter signals to time-out (or quit) after
several seconds of transmission, which may not be
long enough for HomeLink® to pick up the signal
during programming. Similar to this Canadian law,
some U.S. gate operators are designed to time-out
in the same manner.
It may be helpful to unplug the device during the
cycling process to prevent possible overheating of
the garage door or gate motor.
1. Place the ignition in the ON/RUN position.
NOTE:
For vehicles equipped with Keyless Enter ‘n Go™,
place the ignition in the RUN position. Make sure
while programming HomeLink® with the engine on
that your vehicle is outside of your garage, or that
the garage door remains open at all times.
2. Place the hand-held transmitter 1 to 3 inches
(3 to 8 cm) away from the HomeLink® button
you wish to program while keeping the
HomeLink® indicator light in view.
3. Continue to push and hold the HomeLink®
button while you push and release (cycle) your
hand-held transmitter every two seconds until
HomeLink® has successfully accepted the
frequency signal. The indicator light will flash
slowly and then rapidly when fully trained.
4. Watch for the HomeLink® indicator to change
flash rates. When it changes, it is
programmed. It may take up to 30 seconds or
longer in rare cases. The garage door may
open and close while you are programming.
5. Push and hold the programmed HomeLink®
button and observe the indicator light.
NOTE:
If the indicator light stays on constantly,
programming is complete and the garage
door/device should activate when the
HomeLink® button is pushed.
To program the two remaining HomeLink®
buttons, repeat each step for each remaining
button. DO NOT erase the channels.
If you unplugged the garage door opener/device
for programming, plug it back in at this time.
Reprogramming A Single HomeLink® Button
(Canadian/Gate Operator)
To reprogram a channel that has been previously
trained, follow these steps:
1. Place the ignition in the ON/RUN position.
2. Press and hold the desired HomeLink® button
until the indicator light begins to flash after 20
seconds. Do not release the button.
3. Without releasing the button, proceed with
“Canadian/Gate Operator Programming” Step
2 and follow all remaining steps.
S
ECURITY
It is advised to erase all channels before you sell or
turn in your vehicle.
To do this, push and hold the two outside buttons
for 20 seconds until the indicator flashes.
NOTE:
All channels will be erased. Individual channels
cannot be erased.
The HomeLink® Universal Transceiver is disabled
when the Vehicle Security system is active.
GETTING TO KNOW YOUR VEHICLE
63
T
ROUBLESHOOTING
T
IPS
If you are having trouble programming
HomeLink®, here are some of the most common
solutions:
Replace the battery in the garage door opener
hand-held transmitter.
Push the LEARN button on the garage door
opener to complete the training for a rolling
code.
Did you unplug the device for programming and
remember to plug it back in?
If you have any problems, or require assistance,
please call toll-free 1-800-355-3515 or, on the
assistance.
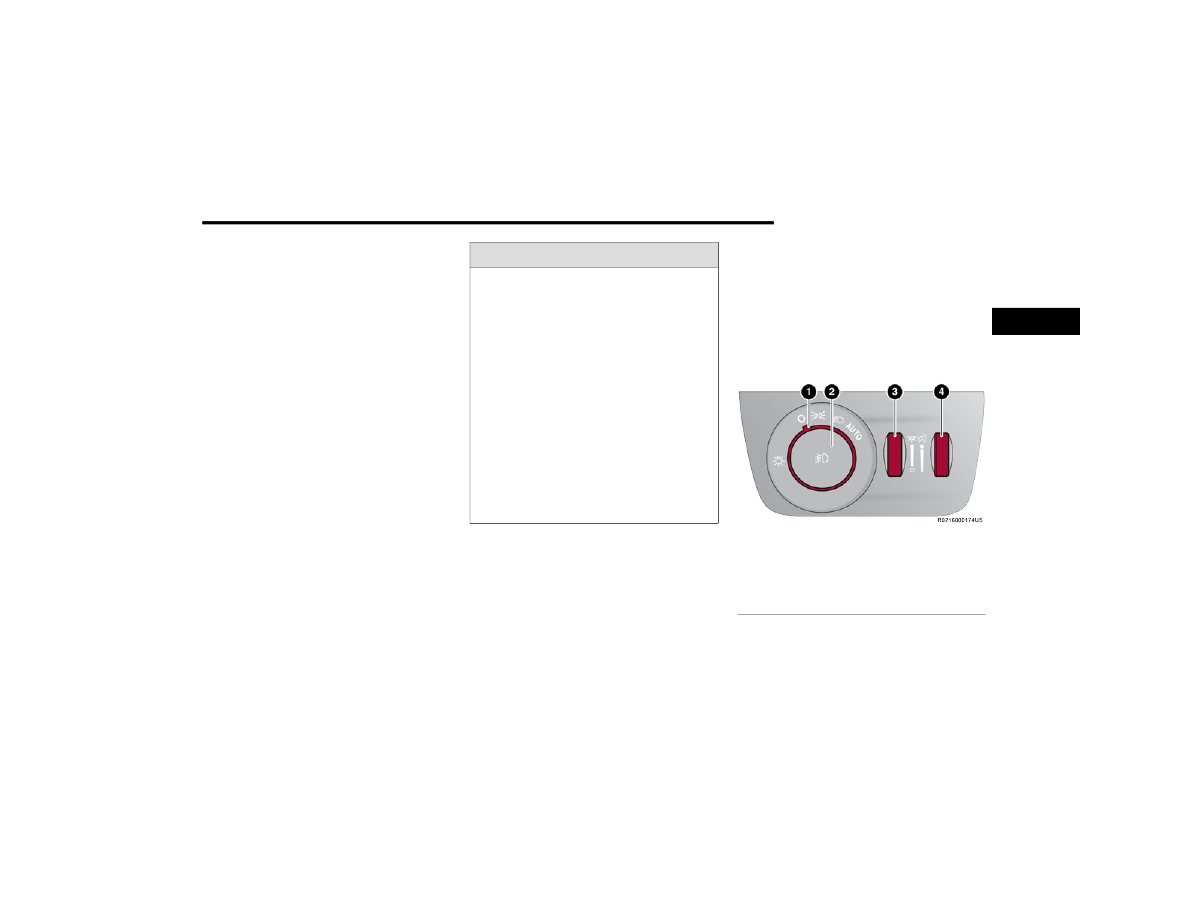
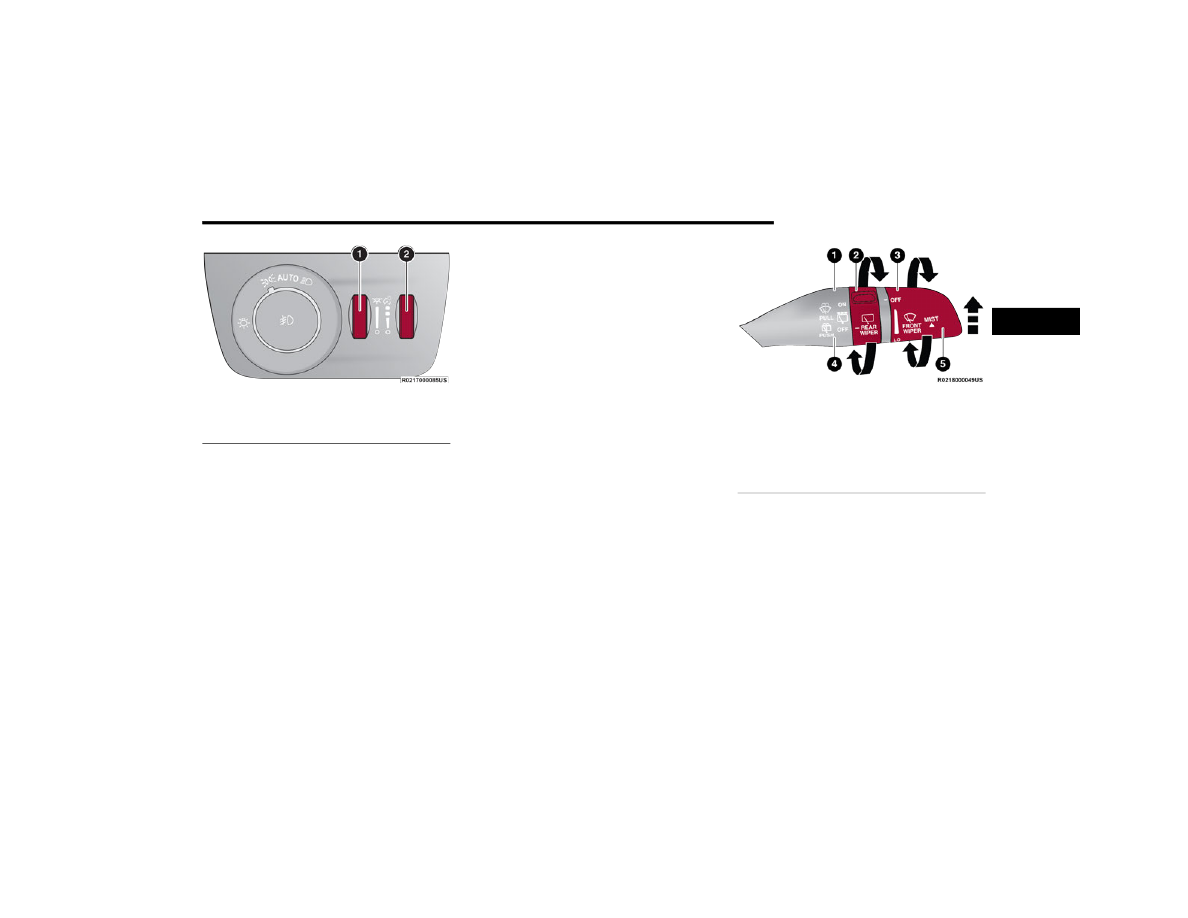
EXTERIOR LIGHTS
H
EADLIGHT
S
WITCH
The headlight switch is located on the left side of
the instrument panel, next to the steering wheel.
The headlight switch controls the operation of the
headlights, parking lights, instrument panel lights,
and fog lights (if equipped).
Headlight Switch
WARNING!
Vehicle exhaust contains carbon monoxide, a
dangerous gas. Do not run your vehicle in the
garage while programming the transceiver.
Exhaust gas can cause serious injury or death.
Your motorized door or gate will open and
close while you are programming the universal
transceiver. Do not program the transceiver if
people, pets or other objects are in the path of
the door or gate. Only use this transceiver with
a garage door opener that has a “stop and
reverse” feature as required by Federal safety
standards. This includes most garage door
opener models manufactured after 1982. Do
not use a garage door opener without these
safety features. Call toll-free 1-800-355-3515
or, on the Internet at
safety information or assistance.
1 — Rotate Headlight Control
2 — Push Front Fog Light Control
3 — Ambient Light Dimmer Control
4 — Instrument Panel Dimmer Control
2
64
GETTING TO KNOW YOUR VEHICLE
Headlight Switch (Vehicles Sold In Canada Only)
NOTE:
Vehicles sold in Canada are equipped with a head
-
light switch without the OFF position. In order to
turn the exterior lights off, the headlight switch
must be rotated to AUTO position.
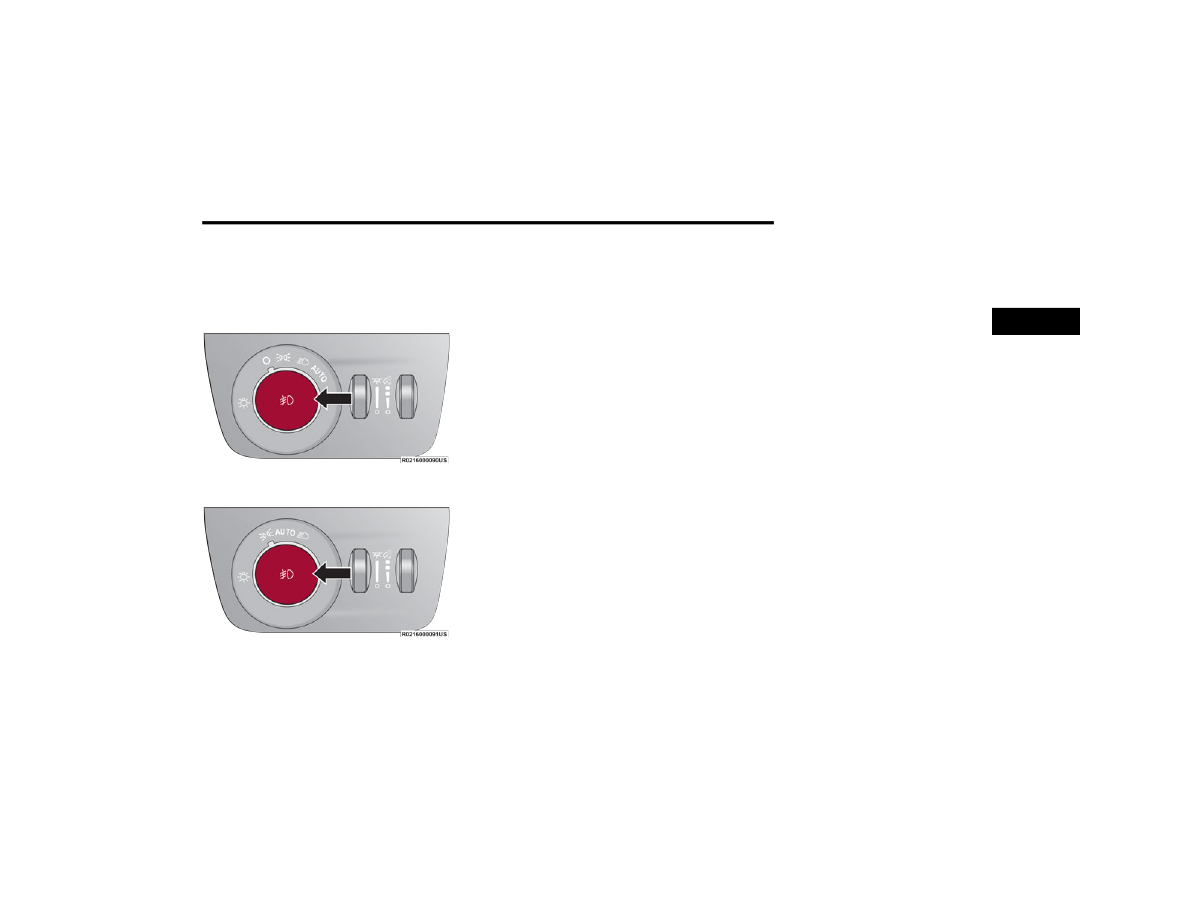
To turn on the headlights, rotate the headlight
switch clockwise. When the headlight switch is on,
the parking lights, taillights, license plate light and
instrument panel lights are also turned on. To turn
off the headlights, rotate the headlight switch back
to the O (off) position.
For vehicles sold in Canada, rotate the headlight
switch clockwise from the parking lights and
instrument panel lights position to the AUTO
position for automatic headlights. Rotate to the
second detent to turn on headlights, parking lights,
and instrument panel lights operation.
NOTE:
Your vehicle is equipped with plastic headlight
and fog light (if equipped) lenses that are lighter
and less susceptible to stone breakage than
glass lights. Plastic is not as scratch resistant as
glass and therefore different lens cleaning
procedures must be followed.
To minimize the possibility of scratching the
lenses and reducing light output, avoid wiping
with a dry cloth. To remove road dirt, wash with
a mild soap solution followed by rinsing.
M
ULTIFUNCTION
L
EVER
The multifunction lever is located on the left side of
the steering column.
Multifunction Lever
D
AYTIME
R
UNNING
L
IGHTS
(DRL
S
)
The Daytime Running Lights (DRLs) come on
whenever the engine is running, and the low
beams are not on. The lights will remain on until
the ignition is placed in the OFF or ON/RUN
position, or the parking brake is engaged. The
headlight switch must be used for normal
nighttime driving.
NOTE:
For vehicles sold in Canada, the Daytime
Running Lights will automatically deactivate
when the front fog lights are turned on.
If allowed by law in the country in which the
vehicle was purchased, the Daytime Running
Lights can be turned on and off using the
1 — Rotate Headlight Control
2 — Push Front Fog Light Control
3 — Ambient Light Dimmer Control
4 — Instrument Panel Dimmer Control
CAUTION!
Do not use abrasive cleaning components,
solvents, steel wool or other abrasive materials
to clean the lenses.
GETTING TO KNOW YOUR VEHICLE
65
On some vehicles, the Daytime Running Lights
may deactivate, or reduce intensity, on one side
of the vehicle (when a turn signal is activated on
that side), or on both sides of the vehicle (when
the hazard warning lights are activated).
H
IGH
/L
OW
B
EAM
S
WITCH
Push the multifunction lever toward the instrument
panel to switch the headlights to high beams.
Pulling the multifunction lever back toward the
steering wheel will turn the low beams back on, or
shut the high beams off.
A
UTOMATIC
H
IGH
B
EAMS
—
I
F
E
QUIPPED
The Automatic High Beam Headlight system
provides increased forward lighting at night by
automating high beam control through the use of a
digital camera mounted on the inside rearview
mirror. This camera detects vehicle specific light
and automatically switches from high beams to low
beams until the approaching vehicle is out of view.
NOTE:
The Automatic High Beam Headlight system can
be turned on or off by selecting or deselecting
“Auto High Beam” within Uconnect Settings
The headlight switch must also be turned to the
AUTO position after Automatic High Beams is
enabled within Uconnect Settings for the
feature to activate.
Automatic High Beams will only activate when
the vehicle speed is above 22 mph (35 km/h).
Broken, muddy, or obstructed headlights and
taillights of vehicles in the field of view will
cause headlights to remain on longer (closer to
the vehicle). Also, dirt, film, and other obstruc
-
tions on the windshield or camera lens will
cause the system to function improperly.
If the windshield or Automatic High Beam
Headlight Control mirror is replaced, the mirror
must be re-aimed to ensure proper performance.
See a local authorized dealer.
F
LASH
-T
O
-P
ASS
You can signal another vehicle with your headlights
by lightly pulling the multifunction lever toward you.
This will cause the high beam headlights to turn on,
and remain on, until the lever is released.
A
UTOMATIC
H
EADLIGHTS
This system automatically turns the headlights on
or off according to ambient light levels. To turn the
system on, rotate the headlight switch
counterclockwise to the AUTO position. When the
system is on, the headlight time delay feature is
also on. This means the headlights will stay on for
up to 90 seconds after you place the ignition into
the OFF position. The headlight time delay can be
To turn the automatic system off, move the
headlight switch out of the AUTO position.
NOTE:
The engine must be running before the headlights
will come on in the automatic mode.
P
ARKING
L
IGHTS
A
ND
P
ANEL
L
IGHTS
To turn on the parking lights and instrument panel
lights, rotate the headlight switch clockwise. To
turn off the parking lights, rotate the headlight
switch back to the O (off) position.
NOTE:
For vehicles sold in Canada, rotate the headlight
switch to the AUTO position to turn off the parking
lights.
H
EADLIGHTS
O
N
A
UTOMATICALLY
W
ITH
W
IPERS
If your vehicle is equipped with Automatic
Headlights, it also has this
customer-programmable feature. When your
headlights are in the automatic mode and the
engine is running, they will automatically turn on
when the wiper system is on. This feature is
programmable through the Uconnect system
2
66
GETTING TO KNOW YOUR VEHICLE
NOTE:
When your headlights come on during the daytime,
the vehicle will monitor outside brightness and
decide if the instrument panel needs to be dimmed
H
EADLIGHT
I
LLUMINATION
O
N
A
PPROACH
When enabled, the headlights, exterior door
handle pocket lights (if equipped), and interior
lights will illuminate when the unlock button on the
key fob is pushed as the operator is approaching
the vehicle. This feature can be turned on/off, and
the length of time the headlights stay on can be
programmed for up to 90 seconds within Uconnect
Proximity Wake-Up — If Equipped
This feature is enabled/disabled within the
Uconnect system, and is activated when the
operator approaches the driver’s door,
passenger’s door, or liftgate with a valid key fob on
their person. Some exterior and interior lights will
illuminate in order to provide an increased sense
of welcome and security as the operator
approaches the vehicle in the dark. “Headlight
Illumination On Approach” must be selected and
set to a time value other than zero within Uconnect
Settings for Proximity Wake-Up to activate.
The doors may be locked or unlocked for this
feature to activate, as long as the ignition is in the
OFF position, or during a Remote Start event. It will
not activate if the doors are locked and the ignition
was placed in the ON/RUN position.
NOTE:
Proximity Wake-Up may not activate under the
following conditions:
After numerous consecutive activations, in
order to conserve the vehicle’s battery
After the vehicle’s engine has been off for
several days
Headlight Animation — If Equipped
When “Headlight Illumination On Approach” is
turned on, and set to a time value above zero, the
exterior lights illuminate in a theatrical manner
during approach to the vehicle. This feature is
activated in the following situations:
Proximity Wake-Up (if equipped) is activated
Remote Start is activated
The unlock button on the key fob is pushed
NOTE:
For Headlight Animation to activate with Remote
Start or with the push of the unlock button,
“Greeting Lights” must also be selected within the
Uconnect system.
H
EADLIGHT
D
ELAY
To aid in your exit, your vehicle is equipped with a
headlight delay that will leave the headlights on for
approximately 90 seconds. This delay is initiated
when the ignition is placed in the OFF position
while the headlight switch is on, and then the
headlight switch is cycled off. Headlight delay can
be canceled by either turning the headlight switch
on then off, or by placing the ignition in the ON
position.
NOTE:
The headlight delay time is programmable through
L
IGHTS
-O
N
R
EMINDER
If the headlights or parking lights are left on after
the ignition is placed in the OFF position, a chime
will sound when the driver’s door is opened.
GETTING TO KNOW YOUR VEHICLE
67
F
OG
L
IGHTS
To activate the front fog lights, turn on the parking
lights or the low beam headlights, and push the fog
light button on the headlight switch.
Fog Light Button
Fog Light Button (Vehicles Sold In Canada Only)
The fog lights will operate only when the parking
lights are on, or when the vehicle headlights are on
low beam. An indicator light located in the
instrument cluster display will illuminate when the
fog lights are on. The fog lights will turn off when
the button is pushed a second time, when the
headlight switch is rotated to the off position, or
the high beam is selected.
Cornering Lights
The cornering lights are a feature to improve
visibility at night while turning the vehicle. When
activated, a light incorporated in the front fog light
will illuminate on the side of the vehicle the
steering wheel is rotated or the turn signal
indicator is on. It can be activated through the
T
URN
S
IGNALS
Move the multifunction lever up or down and the
arrows on each side of the instrument cluster will
flash to show proper operation of the front and rear
turn signal lights.
NOTE:
If either light remains on and does not flash, or
there is a very fast flash rate, check for a defective
outside light bulb.
L
ANE
C
HANGE
A
SSIST
— I
F
E
QUIPPED
Tap the multifunction lever up or down once,
without moving beyond the detent, and the turn
signal (right or left) will flash three times then
automatically turn off.
B
ATTERY
S
AVER
To protect the life of your vehicle’s battery, load
shedding is provided for both the interior and
exterior lights.
If the ignition is placed in the OFF position and any
door is left ajar for 10 minutes or if the overhead
console Dome ON switch is pressed, and the
interior lights are on for 10 minutes, the interior
lights will automatically turn off.
NOTE:
Battery saver mode is canceled if the ignition is in
the ON position.
If the headlights remain on while the ignition is
placed in the OFF position, the exterior lights will
automatically turn off after eight minutes. If the
headlights are turned on and left on for eight
minutes while the ignition is in the OFF position,
the exterior lights will automatically turn off.
2
68
GETTING TO KNOW YOUR VEHICLE
INTERIOR LIGHTS
C
OURTESY
L
IGHTS
Courtesy and dome lights are turned on when the
front doors are opened or the Dome ON button is
pushed on the overhead console. If your vehicle is
equipped with Remote Keyless Entry and the
unlock button is pushed on the key fob, the
courtesy and dome lights will turn on. When a door
is open and the interior lights are on, pressing the
Dome Defeat button on the overhead console will
cause all of the interior lights to turn off. This allows
the doors to stay open for extended periods of time
without discharging the vehicle’s battery.
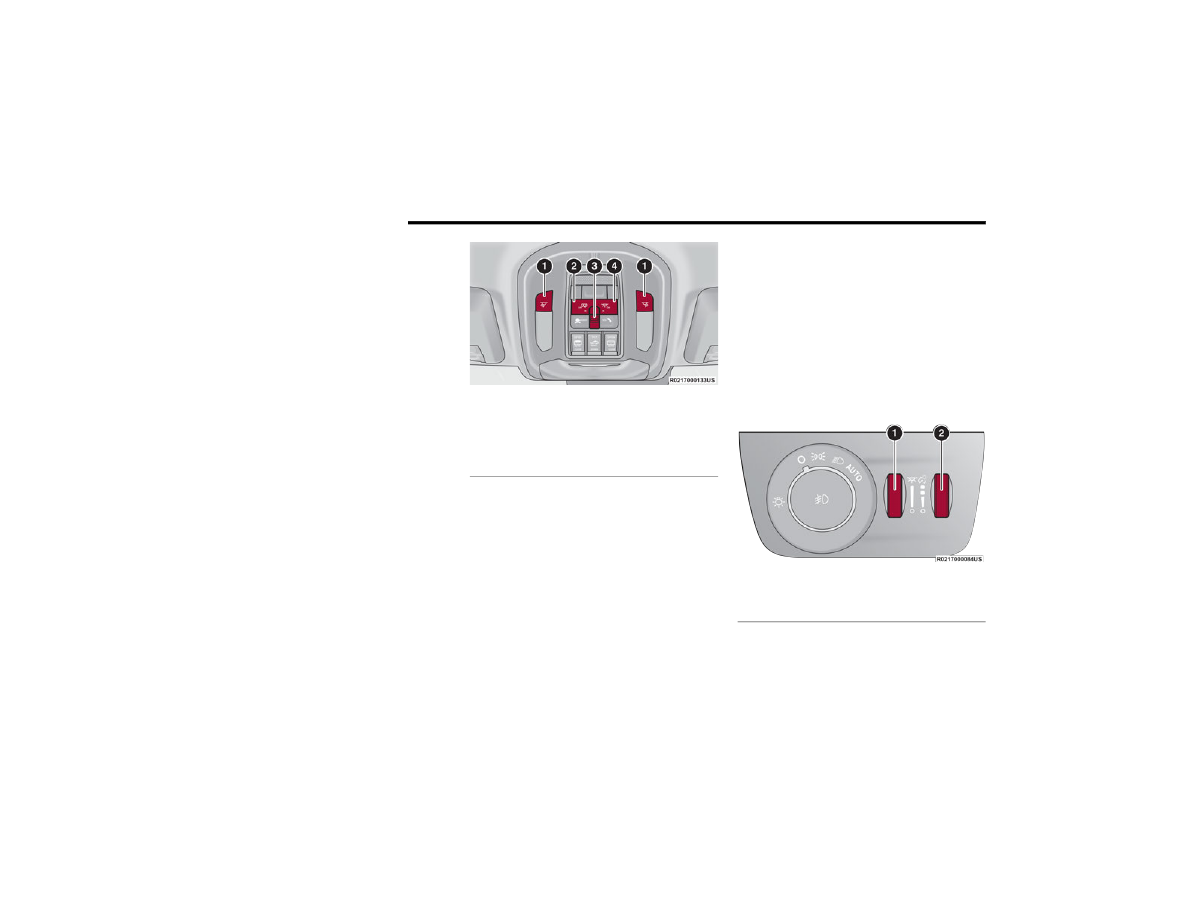
Front Map/Reading Lights
The overhead console lights can also be operated
individually as reading lights by pushing the
corresponding buttons.
Courtesy Lights
Rear Courtesy/Reading Lights
Located above the rear passenger seating in both
second and third rows, along the trim, are
courtesy/reading lights. The courtesy lights turn on
when a door or the liftgate is opened. The lights will
also turn on when the unlock button on the key fob
is pushed.
The courtesy lights also function as reading lights.
Push the lens button to turn these lights on while
inside the vehicle. Push the lens button a second
time to turn each light off.
Dimmer Controls
The dimmer controls are inboard and adjacent to
the headlight switch located on the left side of the
instrument panel.
With the parking lights or headlights on, rotating
the right dimmer control upward will increase the
brightness of the instrument cluster lights.
Rotating the left dimmer control will adjust the
interior light levels of the ambient lighting on the
instrument panel and doors. The ambient lighting
Dimmer Controls
1 — Reading Light On/Off Buttons
2 — Dome Defeat Button
3 — Ambient Light
4 — Dome ON Button
1 — Ambient Light Dimmer Control
2 — Instrument Panel Dimmer Control
GETTING TO KNOW YOUR VEHICLE
69
Dimmer Controls (Vehicles Sold In Canada Only)
NOTE:
Ambient lighting in the second and third row
seating areas may not be equipped in the
vehicle.
The dimming of the touchscreen is program
-
mable through the Uconnect system
Multicolor Ambient Lighting — If Equipped
The color of certain ambient lighting inside of the
vehicle can be selected within the Apps menu on
the radio screen, or within Uconnect Settings
page 216. Brightness is adjusted using the
ambient light dimmer control on the headlight
switch.
Five colors can be selected for the following two
zones inside of the vehicle:
Zone 1:
Instrument panel decorative ambient lights
Door panel decorative ambient lights
Zone 2:
Front seat footwell areas below the instru
-
ment panel
Lighting below the second row seats
Map pocket lighting on all four door panels
These areas can be set to different colors, or if the
SYNC button is selected within the settings menu,
all colored lights will be set to the same color
automatically.
NOTE:
All other ambient lighting inside of the vehicle will
remain white, and the ambient light dimmer
control switch will adjust all ambient lighting at the
same time.
WINDSHIELD WIPERS AND WASHERS
The windshield wiper/washer lever is located on
the right side of the steering column. The front
wipers are operated by rotating a switch, located
on the end of the lever.
Windshield Wiper Operation
W
INDSHIELD
W
IPER
O
PERATION
The wipers and washers are operated by a switch
within the wiper lever. Rotate the switch at the end
of the lever upward, to the first detent past the
intermittent settings for low-speed wiper
operation. Rotate the switch at the end of the lever
upward to the second detent past the intermittent
settings for high-speed wiper operation. To turn the
windshield wipers off, rotate the switch within the
lever all the way down to OFF.
1 — Ambient Light Dimmer Control
2 — Instrument Panel Dimmer Control
1 — Pull For Front Washer
2 — Rotate For Rear Wiper Operation
3 — Rotate For Front Wiper Operation
4 — Push Forward For Rear Washer
5 — Push Up For Mist
2
70
GETTING TO KNOW YOUR VEHICLE
Intermittent Wiper System
Use the intermittent wiper when weather
conditions make a single wiping cycle with a
variable pause between cycles desirable. Rotate
the switch at the end of the wiper lever to the first
detent position, and then turn the switch at the end
of the lever to select the desired delay interval.
There are four delay settings, which allow you to
regulate the wipe interval from a minimum of one
cycle every second to a maximum of approximately
36 seconds between cycles. The delay intervals
will double in duration when the vehicle speed is
10 mph (16 km/h) or less.
NOTE:
If the vehicle is moving less than 10 mph (16 km/h),
delay times will be doubled.
Windshield Washer Operation
To use the washer, pull the lever rearward toward
you and hold. If the lever is pulled while on the
intermittent setting, the wipers will turn on and
operate for several wipe cycles after the lever is
released, and then resume the intermittent
interval previously selected. If the lever is pulled
while the wipers are in the off position, the wipers
will operate several cycles, then turn off.
NOTE:
As a protective measure, the pump will stop if
the switch is held for more than 20 seconds.
Once the switch is released the pump will
resume normal operation.
If the front window washer feature is activated,
all of the front cameras (if equipped) on the
vehicle will be washed as well.
Mist
Use the Mist feature when weather conditions
make occasional usage of the wipers necessary.
Push the lever upward to the MIST position and
release for a single wiping cycle.
NOTE:
The Mist feature does not activate the washer
pump; therefore, no washer fluid will be sprayed on
the windshield. The wash function must be used in
order to spray the windshield with washer fluid.
For information on wiper care and replacement,
R
AIN
S
ENSING
W
IPERS
— I
F
E
QUIPPED
This feature senses rain or snowfall on the
windshield and automatically activates the wipers.
Rotate the end of the windshield wiper lever to one
of the four detent positions to activate this feature.
The sensitivity of the system is adjustable from the
windshield wiper lever. Wiper sensitivity position 1
is the least sensitive, and wiper sensitivity position
4 is the most sensitive.
NOTE:
The Rain Sensing feature will not operate when
the wiper switch is in the low or high position.
The Rain Sensing feature may not function prop
-
erly when ice or dried saltwater is present on the
windshield.
Use of Rain-X or products containing wax or sili
-
cone may reduce rain sensor performance.
The Rain Sensing feature can be turned on and
off through the Uconnect system
CAUTION!
Always remove any buildup of snow that
prevents the windshield wiper blades from
returning to the “park” position. If the windshield
wiper switch is turned off, and the blades cannot
return to the “park” position, damage to the
wiper motor may occur.
WARNING!
Sudden loss of visibility through the windshield
could lead to a collision. You might not see other
vehicles or other obstacles. To avoid sudden
icing of the windshield during freezing weather,
warm the windshield with the defroster before
and during windshield washer use.
GETTING TO KNOW YOUR VEHICLE
71
The Rain Sensing system has protective features
for the wiper blades and arms. It will not operate
under the following conditions:
Low Temperature Wipe Inhibit — The Rain
Sensing feature will not operate when the igni
-
tion is first placed in the ON position, when the
vehicle is stationary and the outside tempera
-
ture is below 32°F (0°C), unless the wiper
control on the windshield wiper lever is moved,
the vehicle speed becomes greater than 3 mph
(5 km/h) or the outside temperature rises
above freezing.
Neutral Wipe Inhibit — The Rain Sensing feature
will not operate when the ignition is ON, when
the transmission gear selector is in the
NEUTRAL position and the vehicle speed is less
than 3 mph (5 km/h), unless the wiper control
on the windshield wiper lever is moved, the
vehicle speed is greater than 3 mph (5 km/h) or
the gear selector is moved out of the NEUTRAL
position.
Remote Start Mode Inhibit — On vehicles
equipped with the Remote Start system, Rain
Sensing wipers are not operational when the
vehicle is in the Remote Start mode. Once the
operator is in the vehicle and has placed the
ignition switch in the ON/RUN position, rain
sensing wiper operation can resume, if it has
been selected, and no other inhibit conditions
(mentioned previously) exist.
R
EAR
W
IPER
A
ND
W
ASHER
The rear wiper/washer is operated by rotating a
switch, located at the middle of the lever.
Rotate the center portion of the lever
upward to the first detent for
intermittent operation and to the
second detent for continuous rear wiper
operation.
Rear Window Washer Operation
Pushing the windshield wiper lever
forward activates the rear window
washer. If the lever is pushed while on
the intermittent setting, the wipers will
turn on and operate for several wipe cycles after
the lever is released, and then resume the
intermittent interval previously selected. If the
lever is pushed while the wipers are in the off
position, the wipers will operate several wipe
cycles, then turn off.
NOTE:
When the rear window washer is activated, the rear
backup camera and digital rearview mirror (if
equipped) cameras are also washed.
W
INDSHIELD
W
IPER
D
E
-I
CER
—
I
F
E
QUIPPED
Your vehicle may be equipped with a Windshield
Wiper De-Icer feature that may be activated under
the following conditions:
Activation By Front Defrost — The Windshield
Wiper De-Icer shall be activated automatically in
the case of a cold weather manual start with full
front defrost, and when the ambient tempera
-
ture is below 33°F (0.6°C).
Activation By Rear Defrost — The Windshield
Wiper De-Icer shall be activated automatically
when the rear defrost is turned on and when the
ambient temperature is below 33°F (0.6°C).
Activation By Remote Start Operation — When
Remote Start is active and the outside ambient
temperature is less than 33°F (0.6°C), the
Windshield Wiper De-Icer will activate. Exiting
Remote Start will resume its previous operation.
If the Windshield Wiper De-Icer was active, the
timer and operation will continue.
2
72
GETTING TO KNOW YOUR VEHICLE
CLIMATE CONTROLS
The Climate Control system allows you to regulate
the temperature, air flow, and direction of air
circulating throughout the vehicle. The controls are
located on the touchscreen and on the instrument
panel below the radio.
A
UTOMATIC
C
LIMATE
C
ONTROL
D
ESCRIPTIONS
A
ND
F
UNCTIONS
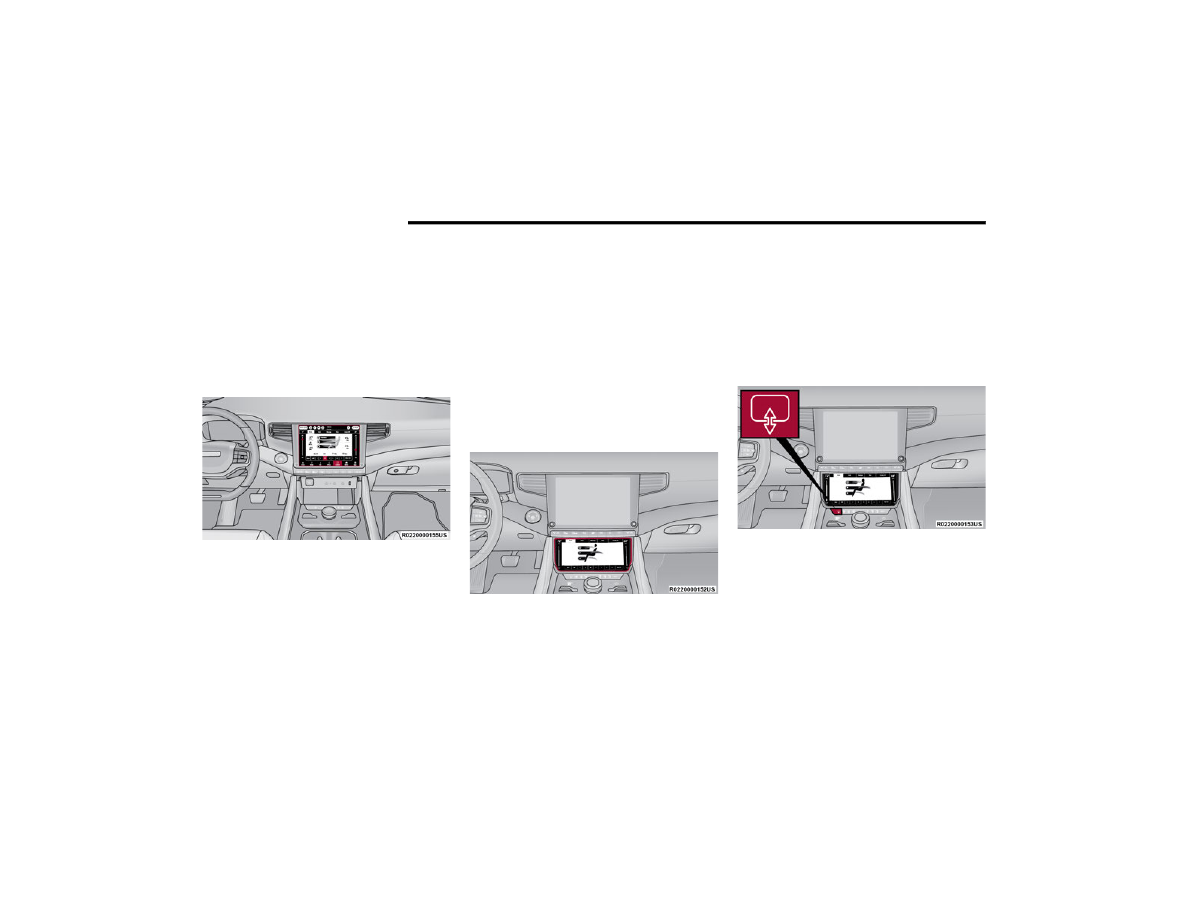
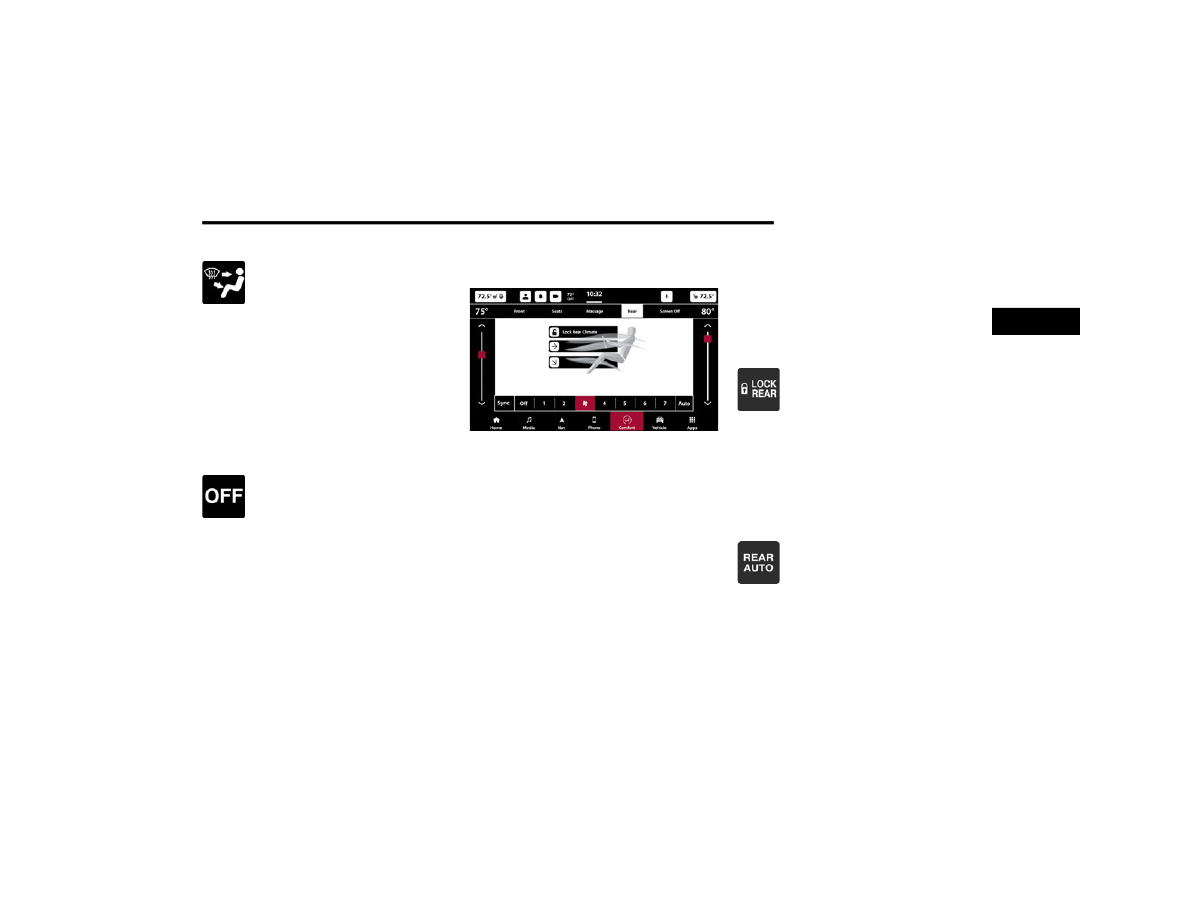
Uconnect 5 With 10.1-inch Or 12-inch Display
Temperature Controls
Front Comfort And Convenience Display —
If Equipped
The Front Comfort And Convenience Display is a
retractable screen located below the main
Uconnect display that controls the front and rear
climate settings just as the “Controls” menu would
within the Uconnect system.
Other front seat functions can also be adjusted
from this screen, such as:
Front Comfort And Convenience Display Location
NOTE:
The Front Comfort And Convenience Display can
only be used if the vehicle is in the ON/RUN
position.
To stow this display and access the power outlet,
USB ports, and wireless charging pad, push the
screen open/close hard button below the display,
in front of the gear selector. Pushing the button
again will lower the screen for use.
Screen Open/Close Button
NOTE:
When the open/close button is pushed to stow the
Comfort And Convenience display screen, the
screen will turn off and save the menu it was on
prior to being stowed.
GETTING TO KNOW YOUR VEHICLE
73
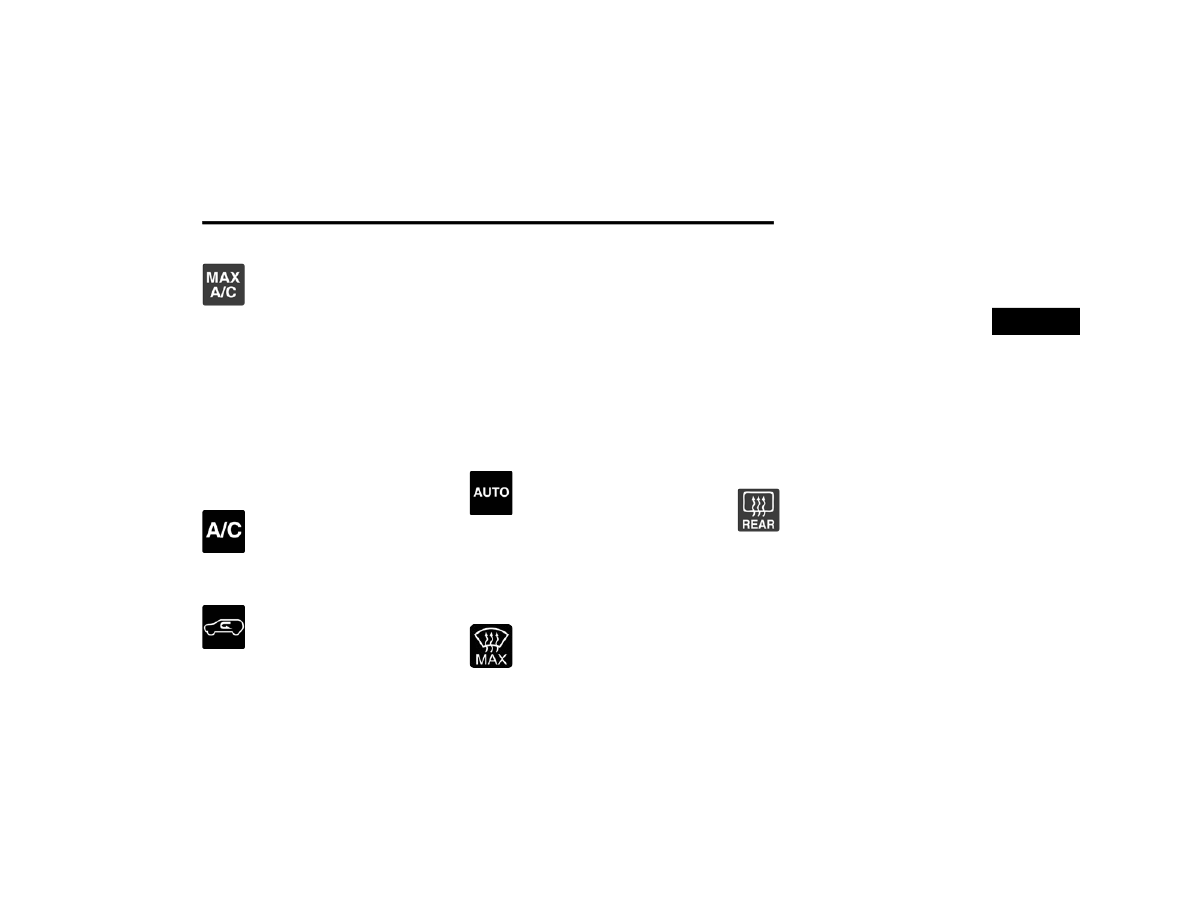
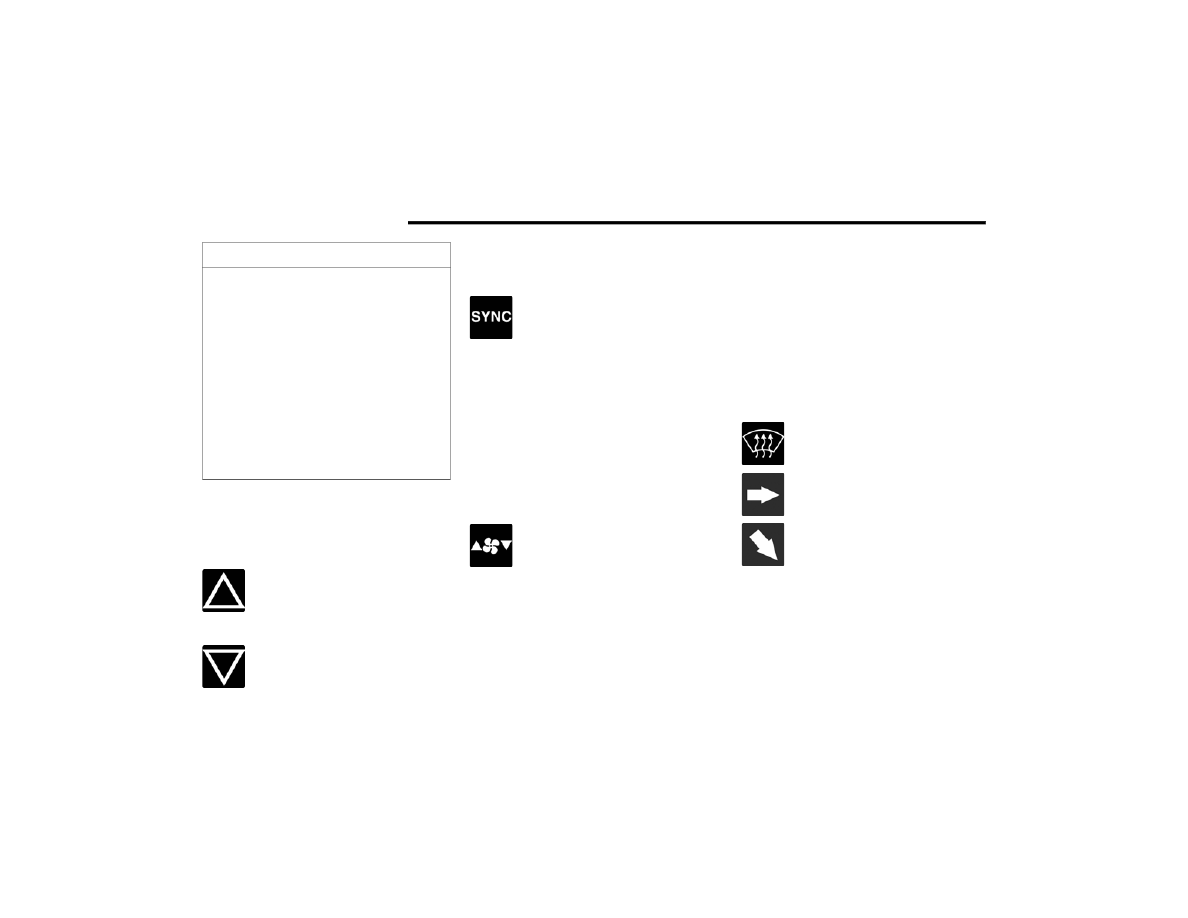
Max A/C Button
Press and release the MAX A/C button
on the touchscreen to automatically
turn the air conditioning on to the
coldest temperature setting and the
highest blower speed. The MAX A/C indicator
illuminates when MAX A/C is ON. Performing this
function again will cause the MAX A/C operation to
switch into manual mode and the MAX A/C
indicator will turn off. Pressing other setting
buttons will also cause the MAX A/C to turn off.
MAX A/C sets the control for maximum cooling
performance.
NOTE:
The MAX A/C button is only available on the touch
-
screen.
A/C Button
Press and release the A/C button on the
touchscreen, or push and release the
button on the faceplate, to turn the air
conditioning on. The A/C indicator
illuminates when A/C is on.
Recirculation Button
Press and release the Recirculation
button on the touchscreen, or push and
release the button on the faceplate, to
change the system between
recirculation mode and outside air mode.
Recirculation can be used when outside conditions
such as smoke, odors, dust, or high humidity are
present. Recirculation can be used in all modes.
Recirculation may be unavailable if conditions
exist that could create fogging on the inside of the
windshield. The A/C can be deselected manually
without disturbing the mode control selection.
Continuous use of Recirculation mode may make
the inside air stuffy and window fogging may occur.
Extended use of this mode if not recommended.
In cold weather, use of Recirculation mode may
lead to excessive window fogging. The
Recirculation feature may be unavailable if
conditions exist that could create fogging on the
inside of the windshield.
AUTO Button
Press the AUTO button on the
touchscreen, or push and release the
button on the faceplate to automatically
control the front driver and passenger
area’s temperature by adjusting distribution and
amount of airflow. Performing this function will
cause the system to switch between manual mode
page 78. AUTO mode is
highly recommended for efficiency.
MAX Defrost Button
Press the MAX Defrost button on the
touchscreen, or push and release the
button on the faceplate, to change the
current airflow setting to Defrost mode.
The indicator illuminates when this feature is on.
Performing this function will cause the automatic
climate controls to change to manual mode.
When MAX Defrost mode is selected:
The blower speed increases to full (all LEDs on)
Air conditioning compressor is turned on (LED on)
Both driver and passenger temperature controls
are set to HI
Defrost mode is selected (LED on)
Rear defroster is turned on (LED on)
Air recirculation is turned off (LED off)
If MAX Defrost mode is turned off, the Climate
Control system will return to the previous setting.
Rear Defrost Button
Press and release the button on the
touchscreen, or push and release the
button on the faceplate, to turn on the
rear window defroster and the heated
outside mirrors (if equipped). The Rear Defrost
indicator illuminates when the rear window
defroster is on. The rear window defroster
automatically turns off after 10 minutes.
2
74
GETTING TO KNOW YOUR VEHICLE
Driver And Passenger Temperature
Switches
These switches provide the driver and passenger
with independent temperature control.
Push the driver’s or passenger’s side
toggle switch on the faceplate upward,
or press and slide the temperature bar
towards the red arrow button on the
touchscreen for warmer temperature settings.
Push the driver’s or passenger’s side
toggle switch on the faceplate
downward, or press and slide the
temperature bar towards the blue arrow button on
the touchscreen for cooler temperature settings.
SYNC Button
Press the SYNC button on the
touchscreen to turn the SYNC feature
on/off. The SYNC indicator illuminates
when SYNC is on. SYNC is used to
synchronize the front passenger temperature and
rear passenger temperature, mode, and blower
settings with the driver temperature, mode, and
blower settings. Changing the front passenger
temperature or rear passenger temperature,
mode, and blower settings while in SYNC will
automatically exit this feature.
NOTE:
The SYNC setting is only available on the touch
-
screen.
Blower Control
Blower Control is used to regulate the
amount of air forced through the
Climate Control system. There are
several blower speeds available. The
speeds can be selected using the blower control
buttons on the touchscreen.
Use the small blower icon to reduce the blower
setting and the large blower icon to increase the
blower setting. Blower speed can also be selected
by pressing the numbered blower speed on the bar
area between the blower icons.
NOTE:
You can also adjust the blower speed by pushing
the blower control button on the faceplate. Push
down to decrease speed and up to increase speed.
Tri-Mode Climate
Three airflow distribution modes can be selected
on/off individually by pressing the icons on the
touchscreen for up to seven combinations of
airflow. The icons on the screen will illuminate
when selected, and turn off when deselected.
The three airflow modes are:
CAUTION!
Failure to follow these cautions can cause
damage to the heating elements:
Use care when washing the inside of the rear
window. Do not use abrasive window cleaners
on the interior surface of the window. Use a
soft cloth and a mild washing solution, wiping
parallel to the heating elements. Labels can
be peeled off after soaking with warm water.
Do not use scrapers, sharp instruments, or
abrasive window cleaners on the interior
surface of the window.
Keep all objects a safe distance from the
window.
Windshield (Front Defrost outlets)
Face (instrument panel outlets)
Feet (floor outlets)
GETTING TO KNOW YOUR VEHICLE
75
Mode Control Button On The Instrument Panel
The airflow distribution mode can also
be selected by pushing the hard button
on the instrument panel, below the radio
screen. Pushing this button will cycle
through the seven mode combinations in order:
Face, Face/Feet, Feet, Windshield/Feet,
Windshield, Windshield/Face, and Windshield/
Face/Feet. The cycle will repeat if the button is
continually pushed.
NOTE:
The distribution modes on the climate control
screen will also illuminate when a selection is
made using the button on the instrument panel.
Climate Control OFF Button
Press and release the OFF button on the
touchscreen, or push the blower control
button on the faceplate and release
when the OFF setting has been reached,
to turn the Climate Control system on/off.
Controlling The Rear Climate Controls
From The Front Climate Screen
Four-Zone Rear Climate Controls From Front Climate
Screen
The Three-Zone and Four-Zone Climate Control
system allows for adjustment of the rear climate
controls from the front screen. This can be done
through either the main Uconnect display, or the
Front Comfort And Convenience Display (if equipped).
NOTE:
If equipped with a Four-Zone Climate Control
system, the temperature of left and right sides of
the rear passenger zones can be adjusted sepa
-
rately from the front or rear climate screens.
To change to the rear climate control screen:
Press the “Rear” icon on the touchscreen to
display the rear climate controls. The control
functions now operate the rear system.
Press the “Front” icon on the touchscreen to
return to the front climate controls.
LOCK REAR CLIMATE
Press and release the “Lock Rear
Climate” icon to lock out manual control
of the rear temperature and blower
settings made from the rear climate
control display. The “Lock Rear Climate” icon will
illuminate and the text will update to “Unlock Rear
Climate” when this feature is selected. When the
feature is deselected, the text will change back to
“Lock Rear Climate” and will no longer be
illuminated.
REAR AUTO BUTTON
Press and release “Auto” on the rear
climate control screen to control the
selected rear passenger temperature by
automatically adjusting airflow
distribution and amount. The “Auto” icon will
illuminate when this feature is selected, and will
turn off when deselected. Pressing any other
climate control function for the rear system will
cause the rear system to switch between manual
2
76
GETTING TO KNOW YOUR VEHICLE
SYNC BUTTON
Press the SYNC icon on the rear climate
control screen to turn the SYNC feature
on/off. SYNC is used to synchronize the
rear passenger temperature, mode, and
blower settings with the driver’s temperature,
mode, and blower settings. The SYNC indicator will
illuminate when SYNC is on. Changing the front
driver climate settings will adjust the passenger
(front and rear) settings automatically. If the front
passenger or rear climate settings are adjusted
while SYNC is on, SYNC will automatically exit.
REAR BLOWER CONTROL
Rear Blower Control is used to regulate
the amount of air forced through the
rear climate system. There are several
blower speeds available. The speeds
can be selected using the buttons on the
touchscreen. Use the small blower icon (or blower
icon with the downward arrow) to reduce the
blower setting, and the large blower icon (or blower
icon with the upward arrow) to increase the blower
setting. Blower can also be selected by pressing
the blower bar area between the icons.
REAR MODE CONTROL
Two airflow distribution modes for the rear seat
passengers can be selected on/off from the front
climate screen by individually by pressing the icons
on the touchscreen for up to three combinations of
airflow. The icons on the screen will illuminate
when selected, and turn off when deselected.
The two airflow modes are:
NOTE:
If Auto is selected, these icons will no longer be
available and the current mode selection will be
overwritten.
REAR CLIMATE CONTROL OFF
To turn the rear climate controls off,
press the OFF button on the
touchscreen, near the blower buttons.
Rear Climate Control Description And
Functions
Rear Climate Touchscreen (If Equipped)
Rear Climate Buttons (If Equipped)
Face (panel outlets)
Feet (floor outlets)
Нет комментариевНе стесняйтесь поделиться с нами вашим ценным мнением.
Текст