Defender (1999-2002). Manual — part 75

CLUTCH
3
REPAIR
5. Disconnect multiplug from clutch pedal sensor.
6. Disconnect muliplug and harness clip from pedal
bracket.
7. Position cloth to collect fluid spillage.
8. Loosen pipe union, release pipe and plug pipe
and master cylinder.
9. Move brake master cylinder assembly aside and
lift out clutch master cylinder assembly.
10. Remove 6 screws, remove pedal box top cover
and discard gasket.
11. Remove nut securing push rod to clutch pedal
trunnion.
12. Remove 2 bolts and remove clutch master
cylinder from pedal bracket.
13. Remove clutch pedal sensor and pipe union
from master cylinder and discard sealing
washers.
Refit
14. Clean sensor and pipe union.
15. Fit clutch pedal sensor and pipe to master
cylinder using new sealing washers.
16. Position master cylinder to pedal bracket and
align push rod to pedal trunnion.
17. Fit bolts and nuts and secure master cylinder to
pedal bracket.
18. Fit nut securing push rod to clutch pedal trunnion
but do not tighten nut at this stage.
19. Move brake master cylinder aside and position
clutch master cylinder assembly.
20. Clean clutch pipe union.
21. Align pipe and tighten union.
22. Connect multiplug to clutch pedal sensor.
23. Tighten bolts securing clutch pedal and brake
pedal brackets to body.
24. Fit clutch pedal rubber.
25. Position closing panel and tighten screws to
lower ’A’ post.
33
CLUTCH
4
REPAIR
Clutch pedal setting
1. Loosen both locknuts on master cylinder push
rod.
2. Check distance from lower edge of clutch pedal
to floor. Correct measurement is 140 mm (5.50
in) without floor mat.
3. Adjust pedal stop to obtain correct setting.
4. Adjust master cylinder push rod to obtain
approximately 1.5 mm (0.06 in) free play
between push rod and master cylinder piston.
5. Tighten push rod locknuts.
6. Check operation of clutch pedal and ensure that
there is minimum of 6 mm (0.25in) of free play
before pressure is felt.
7. Fit pedal box top cover and multiplug bracket
using a new gasket and secure with screws.
8. Connect multiplug and harness clip to pedal
bracket.
9. Bleed clutch hydraulic system. See
Adjustment.
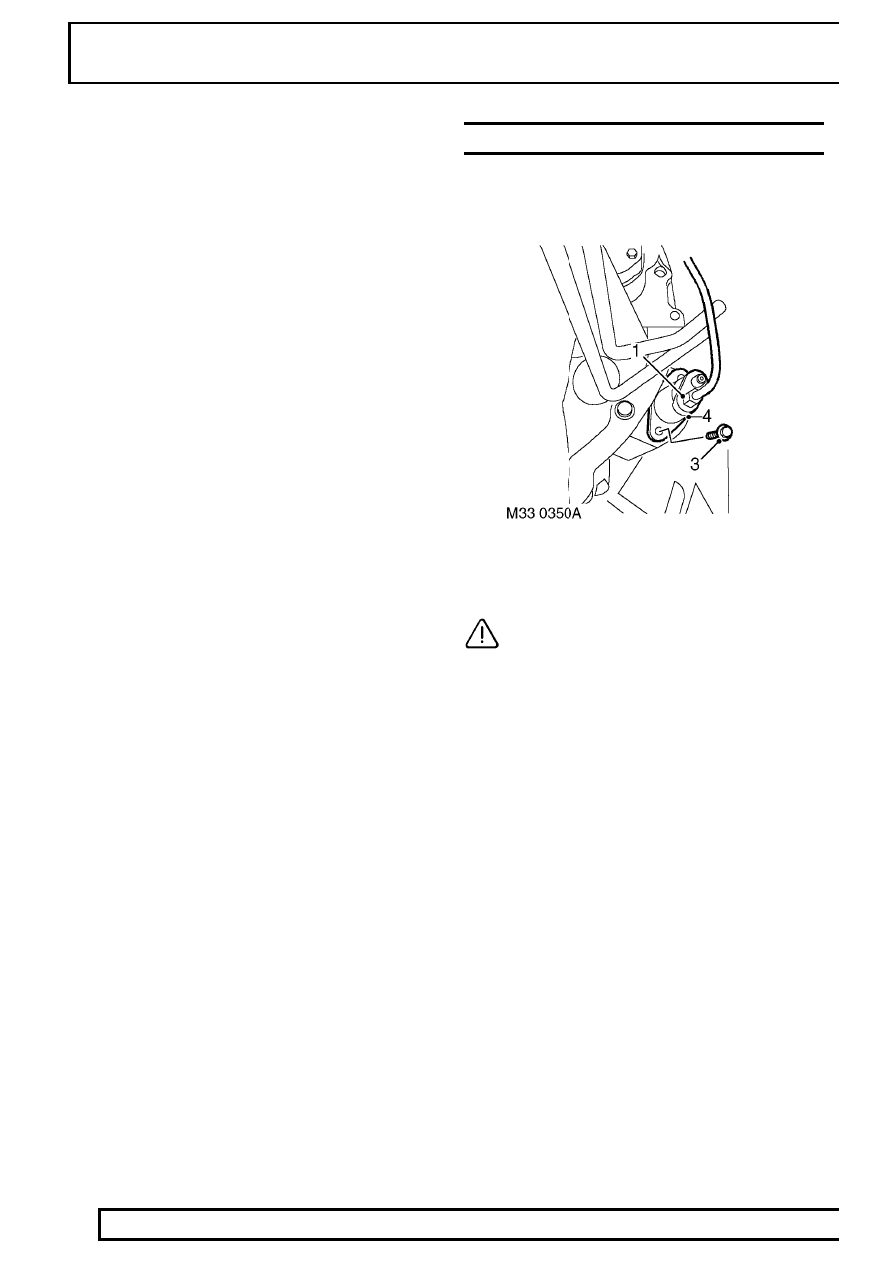
CYLINDER - CLUTCH SLAVE
Service repair no - 33.35.01
Remove
1. Disconnect pipe from slave cylinder.
CAUTION: Plug the connections.
2. Position container to catch spillage.
3. Remove 2 bolts securing slave cylinder to bell
housing.
4. Withdraw slave cylinder from bell housing and
push rod.
Refit
5. Clean ends of pipes, bell housing and slave
cylinder mating faces.
6. Lubricate end of push rod with Molybdenum
disulphide gease.
7. Locate slave cylinder to push rod and bell
housing.
8. Fit bolts and tighten to 25 Nm (18 lbf.ft).
9. Connect clutch pipe to slave clyinder.
10. Bleed clutch system. See Adjustment.
37 - MANUAL GEARBOX
CONTENTS
Page
ADJUSTMENT
SPRINGS - GEAR LEVER BIAS
1
. . . . . . . . . . . . . . . . . . ..
GEARBOX OIL - DRAIN AND REFILL
2
. . . . . . . . . . . . . . . . .
REPAIR
COVER - FRONT - RESEAL AND FIT NEW INPUT SHAFT OIL SEAL
1
. . . ..
LEVER - GEAR CHANGE
3
. . . . . . . . . . . . . . . . . . . . .
MECHANISM AND HOUSING - GEAR SELECTOR
4
. . . . . . . . . . ...
MECHANISM AND HOUSING - GEAR SELECTOR - RESEAL
6
. . . . . . ..
GEARBOX
7
. . . . . . . . . . . . . . . . . . . . . . . . . . ...
SWITCH - REVERSE LIGHT
12
. . . . . . . . . . . . . . . . . . . .
Нет комментариевНе стесняйтесь поделиться с нами вашим ценным мнением.
Текст