Defender (1999-2002). Manual — part 124
WIPERS AND WASHERS
5
REPAIR
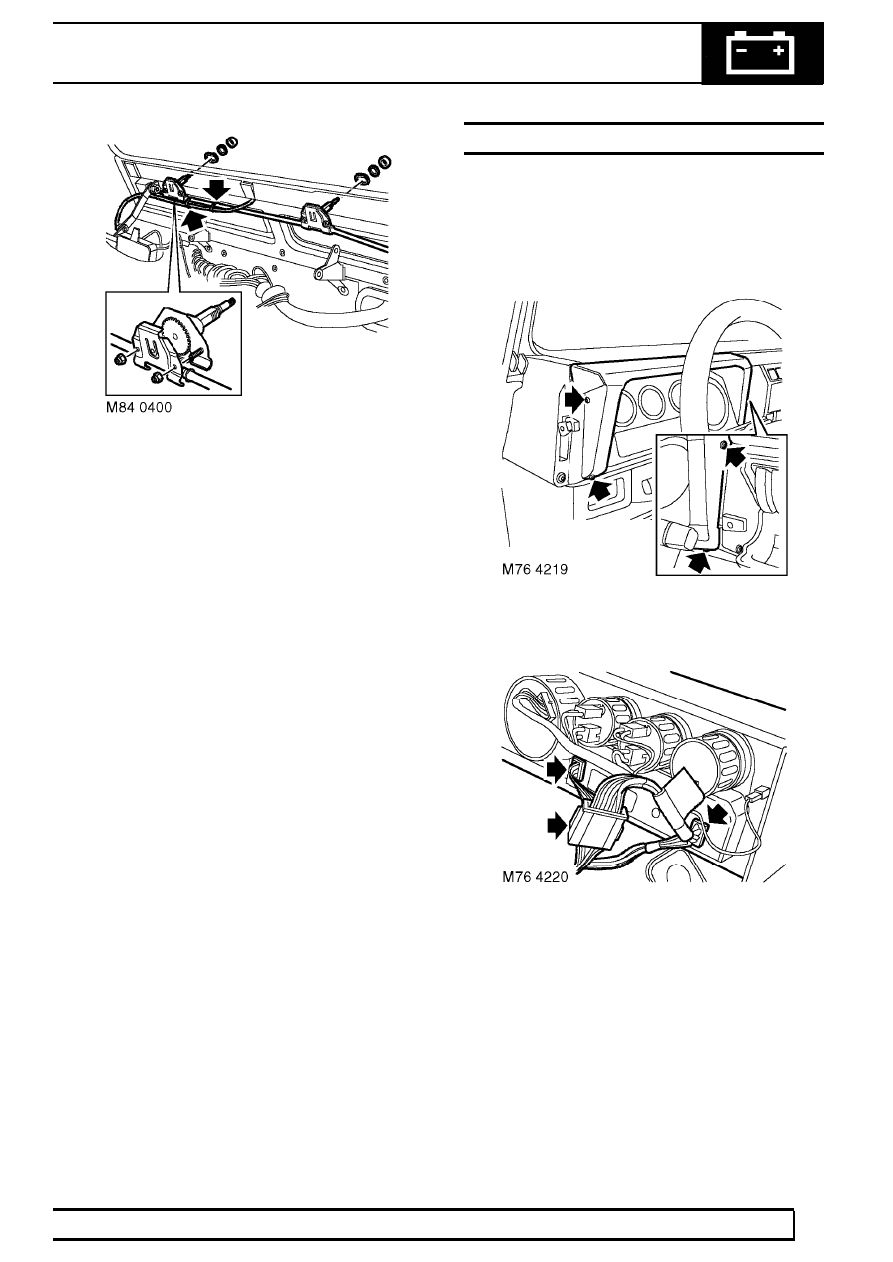
9. Remove cable ties securing washer tube to
windscreen wiper rack tube.
10. Loosen fully 4 nuts securing backplates to wheel
boxes and remove windscreen wiper rack tubes.
11. Remove seals from wheel box spindles.
12. Remove 2 nuts securing wheel boxes and
remove sealing washers.
13. Carefully pull fascia support rail from bulkhead
sufficiently to remove wheel boxes.
Refit
14. Loosen fully but do not remove nuts securing
wheel box back plates.
15. Grease wheel boxes.
16. Fit wheel boxes, fit sealing washers and tighten
nuts to 5 Nm (3.7 lbf.ft).
17. Fit spindle seals.
18. Fit wiper rack tubes and tighten wheel box back
plate nuts sufficiently to hold tubes. Tighten
wheel box back plate nuts to 6 Nm (4 lbf.ft)
after fitting windscreen wiper motor.
19. Align washer tube to rack tube and secure with
cable ties.
20. Align fascia support rail and secure with screws.
21. Fit steering column support bracket and tighten
bolt and nut and bolt to 45 Nm (33 lbf.ft).
22. Fit demister duct to tube, align relay bracket and
secure duct with screws.
23. Position heater fan switch and secure with
screws.
24. Fit wiper motor and drive rack. See this
Section.
25. Fit steering column nacelle. See STEERING,
Repair.
26. Connect battery negative lead. See
ELECTRICAL, Repair.
RELAY - WIPER DELAY - FROM 02MY
Service repair no - 84.15.37
Remove
1. Disconnect battery negative lead. See
ELECTRICAL, Repair.
2. Remove 4 screws securing instrument pack and
release pack from fascia.
3. Disconnect 2 multiplugs from warning lamp
panel.
4. Disconnect instrument pack multiplug from main
harness.
5. Remove instrument pack.
84
WIPERS AND WASHERS
6
REPAIR
6. Identify and remove relay.
Refit
7. Fit relay.
8. Position instrument pack and connect multiplugs.
9. Fit instrument pack to fascia and secure with
screws.
10. Connect battery negative lead. See
ELECTRICAL, Repair.
MOTOR - WIPER - TAIL DOOR - FROM 02MY
Service repair no - 84.35.12
Remove
1. Remove spare wheel from tail door.
2. Raise nut cover, remove nut and release wiper
arm.
3. Remove nut and collect washer securing wiper
motor to tail door.
4. Open tail door.
5. Remove tail door trim casing. See CHASSIS
AND BODY, Repair.
6. Remove bolt securing door locking solenoid to
tail door.
7. Pivot both assemblies and withdraw wiper motor
from tail door.
8. Disconnect multiplugs from wiper motor.
9. Remove wiper motor assembly.

WIPERS AND WASHERS
7
REPAIR
NOTE: Do not carry out further
dismantling if component is removed for
access only.
10. Remove 2 bolts securing wiper motor to
mounting bracket, remove bracket.
Refit
11. Fit mounting bracket to motor and tighten bolts
to 10 Nm (7 lbf.ft).
12. Fit motor spindle to rear door, connect multiplugs
and push motor fully home. Align motor
mounting bracket with solenoid mounting
bracket, fit bolt and tighten to 10 Nm ( 7 lbf.ft ).
13. Fit rear door trim casing. See CHASSIS AND
BODY, Repair.
14. Fit washer and nut to rear wiper assembly,
tighten nut to 3 Nm (2.2 lbf.ft).
15. Fit wiper arm to spindle, align blade to glass and
tighten nut to 17 Nm (13 lbf.ft).
16. Close nut cover.
17. Fit spare wheel and tighten nuts to 45 Nm (33
lbf.ft).
RELAY - TAIL DOOR WIPER - FROM 02MY
Service repair no - 84.35.38
Remove
1. Remove tail door trim casing. See CHASSIS
AND BODY, Repair.
2. Remove rear wiper motor relay.
Refit
3. Fit relay.
4. Fit tail door trim casing. See CHASSIS AND
BODY, Repair.
86 - ELECTRICAL
CONTENTS
Page
DESCRIPTION AND OPERATION
SECURITY AND CENTRAL DOOR LOCKING
1
. . . . . . . . . . . . .
SECURITY AND CENTRAL DOOR LOCKING
2
. . . . . . . . . . . . .
ANTI-THEFT ALARM - FROM 02MY
3
. . . . . . . . . . . . . . . . ...
IMMOBILISATION SYSTEM - FROM 02MY
12
. . . . . . . . . . . . . ..
CENTRAL DOOR LOCKING (CDL) - FROM 02MY
15
. . . . . . . . . . ...
ANTI-THEFT ALARM SYSTEM SELF TEST
17
. . . . . . . . . . . . . .
FASCIA CONSOLE
18
. . . . . . . . . . . . . . . . . . . . . . .
HEATED FRONT SCREEN - FROM 02MY
20
. . . . . . . . . . . . . ...
HEATED FRONT SEATS - FROM 02MY
22
. . . . . . . . . . . . . . ..
ELECTRIC FRONT WINDOWS - FROM 02MY
24
. . . . . . . . . . . . .
PASSENGER COMPARTMENT FUSE BOX
26
. . . . . . . . . . . . . .
UNDER SEAT FUSE BOX
27
. . . . . . . . . . . . . . . . . . . . .
ADJUSTMENT
HEADLAMPS - ALIGN BEAM
1
. . . . . . . . . . . . . . . . . . . ..
SOLENOID/MOTOR - FRONT DOOR - ADJUST
1
. . . . . . . . . . . .
REPAIR
BELT - AUXILLARY DRIVE
1
. . . . . . . . . . . . . . . . . . . . .
HARNESS - INJECTORS
1
. . . . . . . . . . . . . . . . . . . . .
STARTER MOTOR
2
. . . . . . . . . . . . . . . . . . . . . . . ..
CENTRE HIGH MOUNTED STOP LIGHT (CHMSL) - UP TO 02MY
2
. . . . ...
ALTERNATOR
3
. . . . . . . . . . . . . . . . . . . . . . . . . .
HORN - LH
4
. . . . . . . . . . . . . . . . . . . . . . . . . . ...
HEADLAMP
5
. . . . . . . . . . . . . . . . . . . . . . . . . . .
LAMP - TAIL
6
. . . . . . . . . . . . . . . . . . . . . . . . . . .
RADIO
6
. . . . . . . . . . . . . . . . . . . . . . . . . . . . ..
SPEAKER - FRONT
7
. . . . . . . . . . . . . . . . . . . . . . . .
SWITCH - TRANSMISSION BRAKE
7
. . . . . . . . . . . . . . . . ...
LAMP - FRONT FLASHER
8
. . . . . . . . . . . . . . . . . . . . ..
BATTERY - DISCONNECT - FROM 02MY
8
. . . . . . . . . . . . . . ..
MOTOR & REGULATOR - FRONT DOOR - FROM 02MY
9
. . . . . . . . ..
SWITCH - FASCIA - FROM 02MY
10
. . . . . . . . . . . . . . . . . .
HARNESS - FRONT DOOR - FROM 02MY
10
. . . . . . . . . . . . . ...
SOLENOID/MOTOR - TAIL DOOR - FROM 02MY
11
. . . . . . . . . . .
SOLENOID/MOTOR - FRONT DOOR - FROM 02MY
12
. . . . . . . . . ...
SOLENOID/MOTOR - REAR DOOR - FROM 02MY
13
. . . . . . . . . . .
HARNESS - REAR DOOR - FROM 02MY
14
. . . . . . . . . . . . . . .
REVERSE AND FOG GUARD LAMP - BULB
15
. . . . . . . . . . . . .
Нет комментариевНе стесняйтесь поделиться с нами вашим ценным мнением.
Текст