Freelander Body Repair Manual — part 71

PANEL REPAIRS
REPAIRS
19
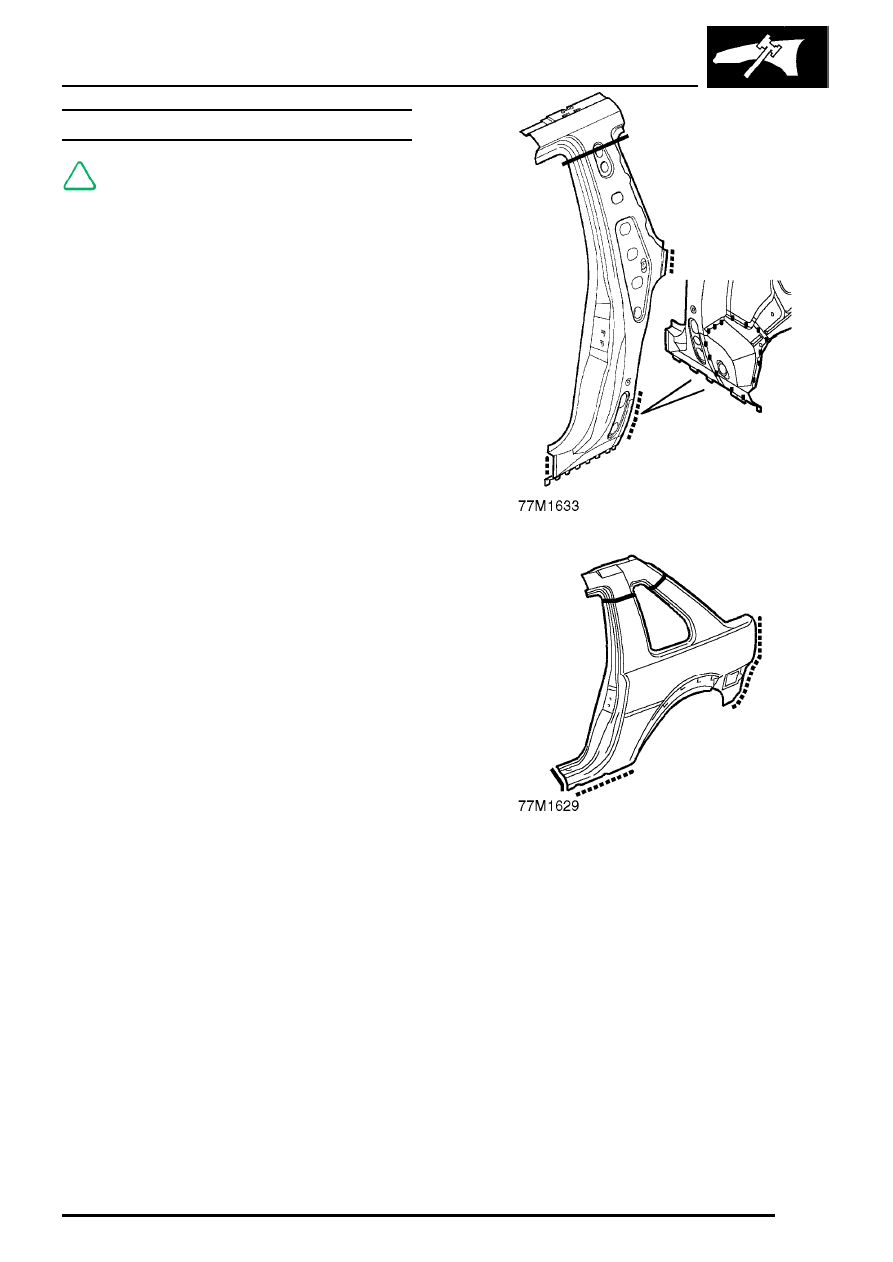
SILL REINFORCEMENT - 3 DOOR
NOTE: In this procedure, the lower outer
body side panel is replaced in conjunction
with the sill reinforcement.
Remove
1. Disconnect battery earth lead.
2. Disconnect alternator.
See ELECTRICAL,
Repairs.
3. Disconnect all ECUs.
4. Remove road wheel(s).
5. Remove front wing.
See BODY, Exterior
fittings.
6. Remove front door.
See BODY, Doors.
7. Remove front seat.
See BODY, Seats and
seat belts.
8. Remove rear seat.
See BODY, Seats and
seat belts.
9. Remove treadplate from front door aperture.
10. Remove side door aperture seal.
11. Remove rear body side casing.
See BODY,
Interior trim components.
12. Release carpet from inner sill and position
aside.
13. Release vehicle harness from inner sill and
position aside.
Repair
1. Remove existing panel(s), prepare panel joint
faces and install new panel(s) in accordance
with Panel Replacement Procedure. Punch or
drill holes in new panel for plug welding as
shown.
Refit
1. Secure vehicle harness to inner sill.
2. Position carpet to inner sill.
3. Fit rear body side casing.
See BODY, Interior
trim components.
4. Fit side door aperture seal(s).
5. Fit treadplate to side door aperture(s).
6. Fit rear seat.
See BODY, Seats and seat
belts.
7. Fit front seat.
See BODY, Seats and seat
belts.
8. Fit front door.
See BODY, Doors.
9. Fit front wing.
See BODY, Exterior fittings.
10. Fit road wheel(s) and tighten nuts to correct
torque.
See INFORMATION, Torque wrench
settings.
11. Connect all ECUs.
12. Connect alternator.
See ELECTRICAL,
Repairs.
13. Connect battery earth lead.

PANEL REPAIRS
20
REPAIRS
SILL REINFORCEMENT - 5 DOOR
NOTE: In this procedure, the lower outer
body side panel is replaced in conjunction
with the sill reinforcement.
Remove
1. Disconnect battery earth lead.
2. Disconnect alternator.
See ELECTRICAL,
Repairs.
3. Disconnect all ECUs.
4. Remove road wheel(s).
5. Remove front wing.
See BODY, Exterior
fittings.
6. Remove front door.
See BODY, Doors.
7. Remove rear door.
See BODY, Doors.
8. Remove B/C post lower finisher.
See BODY,
Interior trim components.
9. Remove front seat.
See BODY, Seats and
seat belts.
10. Remove rear seat.
See BODY, Seats and
seat belts.
11. Remove treadplate from side door apertures.
12. Remove side door aperture seals.
13. Release carpet from inner sill and position
aside.
14. Release vehicle harness from inner sill and
position aside.
Repair
1. Remove existing panel(s), prepare panel joint
faces and install new panel(s) in accordance
with Panel Replacement Procedure. Punch or
drill holes in new panel for plug welding as
shown.
Refit
1. Secure vehicle harness to inner sill.
2. Position carpet to inner sill.
3. Fit side door aperture seals.
4. Fit treadplate to side door apertures.
5. Fit rear seat.
See BODY, Seats and seat
belts.
6. Fit front seat.
See BODY, Seats and seat
belts.
7. Fit B/C post lower finisher.
See BODY,
Interior trim components.
8. Fit rear door.
See BODY, Doors.
9. Fit front door.
See BODY, Doors.
10. Fit front wing.
See BODY, Exterior fittings.
11. Fit road wheel(s) and tighten nuts to correct
torque.
See INFORMATION, Torque wrench
settings.
12. Connect all ECUs.
13. Connect alternator.
See ELECTRICAL,
Repairs.
14. Connect battery earth lead.
PANEL REPAIRS
REPAIRS
21
’B/C’ POST REINFORCEMENT - 3 DOOR
NOTE: In this procedure, the rear outer
body side panel and the rear quarter front
lower reinforcement are replaced in
conjunction with the ’B/C’ post reinforcement.
Remove
1. Disconnect battery earth lead.
2. Disconnect alternator.
See ELECTRICAL,
Repairs.
3. Disconnect all ECUs.
4. Remove road wheel(s).
5. Remove rear wheel arch extension.
See
BODY, Exterior fittings.
6. Remove rear wheel arch liner.
7. Remove front seat belt.
See RESTRAINT
SYSTEMS, Repairs.
8. Remove front door striker from B/C post.
9. Remove rear seat.
See BODY, Seats and
seat belts.
10. Remove rear body side casing.
See BODY,
Interior trim components.
11. Remove treadplate from side door aperture.
12. Remove side door aperture seal.
13. Release carpet from inner sill and position
aside.
14. Remove rear quarter vent and seal.
See
BODY, Exterior fittings.
15. Remove rear roof panel finisher.
16. Remove headlining.
See BODY, Interior trim
components.
17. Release vehicle harness from inner sill and
position aside.
Repair
1. Remove existing panel(s), prepare panel joint
faces and install new panel(s) in accordance
with Panel Replacement Procedure. Punch or
drill holes in new panel for plug welding as
shown.
PANEL REPAIRS
22
REPAIRS
Refit
1. Secure vehicle harness to inner sill.
2. Fit headlining.
See BODY, Interior trim
components.
3. Fit rear roof panel finisher.
4. Fit seal and rear quarter vent.
See BODY,
Exterior fittings.
5. Secure carpet to inner sill.
6. Fit side door aperture seal.
7. Fit treadplate from side door aperture.
8. Fit rear body side casing.
See BODY, Interior
trim components.
9. Fit rear seat.
See BODY, Seats and seat
belts.
10. Fit front door striker to B/C post.
11. Fit front seat belt.
See RESTRAINT
SYSTEMS, Repairs.
12. Fit rear wheel arch liner.
13. Fit rear wheel arch extension.
See BODY,
Exterior fittings.
14. Fit road wheel(s) and tighten nuts to correct
torque.
See INFORMATION, Torque wrench
settings.
15. Connect all ECUs.
16. Connect alternator.
See ELECTRICAL,
Repairs.
17. Connect battery earth lead.
’B/C’ POST REINFORCEMENT - 5 DOOR
NOTE: In this procedure, the rear outer
body side panel and the inner panel are
replaced in conjunction with the ’B/C’ post
reinforcement.
Remove
1. Disconnect battery earth lead.
2. Disconnect alternator.
See ELECTRICAL,
Repairs.
3. Disconnect all ECUs.
4. Remove rear door.
See BODY, Doors.
5. Remove headlining.
See BODY, Interior trim
components.
6. Remove front seat belt.
See RESTRAINT
SYSTEMS, Repairs.
7. Remove B/C post lower finisher.
See BODY,
Interior trim components.
8. Remove front door striker from B/C post.
9. Remove front seat.
See BODY, Seats and
seat belts.
10. Remove rear seat.
See BODY, Seats and
seat belts.
11. Remove treadplate from side door aperture(s).
12. Remove side door aperture seal(s).
13. Release carpet from inner sill and position
aside.
14. Release vehicle harness from inner sill and
position aside.
Repair
1. Remove existing panel(s), prepare panel joint
faces and install new panel(s) in accordance
with Panel Replacement Procedure. Punch or
drill holes in new panel for plug welding as
shown.
Нет комментариевНе стесняйтесь поделиться с нами вашим ценным мнением.
Текст