Discovery 2. Manual — part 254
SUNROOF
DESCRIPTION AND OPERATION 76-6-13
Operation
Ignition switched-off timeout
There are three timeout modes for operating the sunroof assemblies after the ignition is switched off. The BCU
determines the vehicle's timeout mode. The three modes are:
l
When the ignition is switched off, no sunroof operation is permitted.
l
When the ignition is switched off, sunroof remains functional for 45 seconds or until the driver door is opened.
l
When the ignition is switched off, sunroof remains functional for 45 seconds or until any door is opened.
Sunroof open and close
Both sunroof assemblies operate in the same manner. The front sunroof assembly has one switch while there are
two switches to control rear sunroof assembly, a rear sunroof front switch and a rear sunroof rear switch.
The sunroof ECU monitors the position of the sunroof microswitch to determine if the sunroof is to be tilted or opened.
In order for the sunroof to operate, either of the following conditions must exist:
l
Ignition switch in position II.
l
Ignition switched from on to off, doors closed (this may enable the system to operate for 45 seconds after the
ignition is switched off, or until a door is opened).
When the sunroof is closed, pressing the rear of the sunroof switch causes the sunroof ECU to operate the sunroof
motor and open the sunroof. When the sunroof opens, the sunroof microswitch opens. The sunroof continues to
open until the switch is released or the sunroof reaches the fully open position.
When the sunroof is open, pressing the front of the sunroof switch causes the sunroof ECU to operate the sunroof
motor and close the sunroof. The sunroof ECU continues to operate the motor until the sunroof microswitch closes.
This indicates to the sunroof ECU that the sunroof is fully closed.
Sunroof tilt
Both sunroof assemblies operate in the same manner. The front sunroof assembly has one switch while there are
two switches to control rear sunroof assembly, a rear sunroof front switch and a rear sunroof rear switch.
The sunroof ECU monitors the position of the sunroof microswitch to determine if the sunroof is to be tilted or opened.
In order for the sunroof to operate, either of the following conditions must exist.
l
Ignition in position II.
l
Ignition switched from on to off, doors closed (this may enable the system to operate for 45 seconds after the
ignition is switched off, or until a door is opened).
When the sunroof is closed and the front of the sunroof switch is pressed, the sunroof ECU detects the combination
of closed microswitch and front of sunroof switch being pressed and tilts the rear of the sunroof. This causes the
microswitch to open. The sunroof continues to open until the switch is released or the sunroof reaches the fully open
position.
When the sunroof is tilted and the rear of the sunroof switch is pressed, the sunroof ECU detects the combination of
open microswitch and rear of sunroof switch and closes the sunroof until the microswitch closes. This indicates to the
sunroof ECU that the sunroof is fully closed.
Rear sunroof isolation
The rear sunroof isolation switch prevents the rear sunroof rear switch from operating the rear sunroof. This can be
used to prevent small children sitting in the rear seat from playing with the rear sunroof.
Pressing the rear sunroof isolation switch opens the circuit between the rear sunroof rear switch and the sunroof ECU.
The sunroof ECU ignores the rear sunroof switch until the rear sunroof isolation switch is pressed and the circuit
closes.

SUNROOF
REPAIRS 76-6-15
REPAIRS
Sunroof - front
$% 76.84.01
Remove
1. Remove headlining.
2. Remove front sunroof motor.
3. Disconnect drain tubes from sunroof tray.
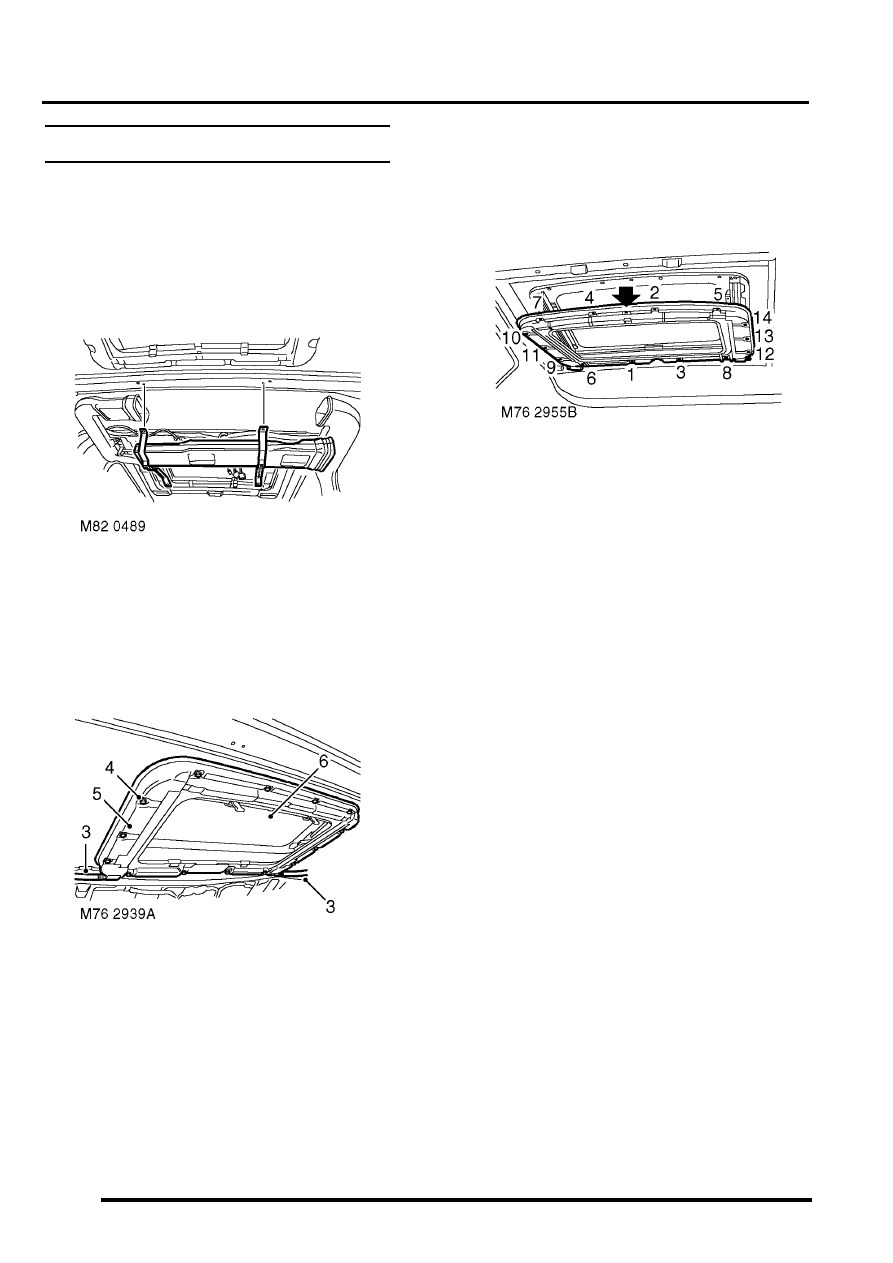
4. Remove 14 screws securing sunroof tray to
sunroof frame.
5. Carefully remove sunroof tray.
6. With assistance, remove sunroof frame and
glass assembly.
Refit
1. With assistance, fit sunroof frame and glass
assembly.
2. Position sunroof tray to roof and locate on front
edge and on rear location pin, arrowed in
illustration.
3. Fit Torx screws securing sunroof tray to frame
and tighten to 2 Nm (1.5 lbf.ft) in the order
shown.
4. Connect drain tubes to sunroof.
5. Fit sunroof motor. Do not fit headlining at this
stage.
6. Check operation of sunroof.
7. Pour water over sunroof and check for water
leaks.
8. Fit headlining.
SUNROOF
76-6-16 REPAIRS
Sunroof - rear
$% 76.84.02
Remove
1. Remove sunroof motor.
2. Models with rear A/C:
a Drill out 4 rivets securing rear centre duct to
roof.
b Release and remove rear centre duct.
c Drill out 2 rivets securing each upper side
duct to roof.
d Remove upper side ducts.
3. Disconnect drain tubes from sunroof tray.
4. Remove 14 screws securing sunroof tray to
sunroof frame.
5. Carefully remove sunroof tray.
6. With assistance, remove sunroof frame and
glass assembly.
Refit
1. With assistance, fit sunroof frame and glass
assembly.
2. Position sunroof tray to roof and locate on front
edge and on rear location pin, arrowed in
illustration.
3. Fit Torx screws securing sunroof tray to frame
and tighten to 2 Nm (1.5 lbf.ft) in the order
shown.
4. Fit sunroof motor. Do not fit headlining at this
5. Models with rear A/C:
a Fit upper side ducts and secure with rivets.
b Fit rear centre duct and secure with rivets.
6. Connect drain tubes to sunroof.
7. Check operation of sunroof.
8. Pour water over sunroof and check for water
leaks.
9. Fit headlining.
Нет комментариевНе стесняйтесь поделиться с нами вашим ценным мнением.
Текст