Discovery 2. Manual — part 701

PAINTING
PROCEDURES
77-5-1
PAINTING
PROCEDURES
Panel preparation
General
Replacement panels are supplied with a cathodic primer coating as part of the panel protection and in compliance
with the vehicle's Corrosion Warranty, where applicable. DO NOT remove the primer before paint refinishing. In
the event of localised surface damage or imperfections, ensure that only the minimum of primer is removed
during rectification work for effective repair.
Rectify damage as far as possible by panel beating or straightening. To remove corrosion or paint runs on outer
surfaces, abrade the primer coat in the affected area as necessary, then follow the procedure below:
1 Clean the panel using a solvent wipe
2 Treat exposed areas of metal with an etch phosphate process
3 Re-treat the affected area using either a separate acid-etch primer and two-pack surfacer, or an integrated etch
primer/filler
Panel preparation
The following procedures should be followed when repairing panels.
Welded panels
When replacing welded panels the following procedure must be observed:
1 Remove primer from the immediate vicinity of new and existing panel flanges, cleaning to bright metal finish
2 On joints to be spot welded, apply weld-through zinc rich primer to joint faces of both flanges. Make spot welds
while primer is still wet or according to the manufacturer's instructions
3 Dress accessible weld joints
4 Clean panel using solvent wipe
5 Treat bare metal with an etch phosphate process
6 Re-treat repaired areas
Sectioned panels
When replacing part or sectioned panels, the basic procedure is the same as for welded panels described above, with
the following variations:
1 Remove primer from both new and existing joint faces, cleaning to a bright metal finish
2 Where an overlap joint with the existing panel is to be spot welded, apply weld-through, zinc rich primer to both
joint faces and spot weld while the primer is still wet, or according to the manufacturer's instructions
3 MIG weld butt joints where applicable
4 Dress weld joints
5 Clean the panel with a solvent wipe.
6 Treat bare metal areas using an etch phosphate process
7 Re-treat the affected area using either a separate acid-etch primer and two-pack surfacer, or an integrated etch
primer/filler
8 Treat the inner faces of lap or butt joints with a suitable cavity wax
PANEL REPAIRS, PROCEDURES, Panel replacement procedure.
Clinched panels
When replacing clinched panels the following procedure must be observed:
1 Abrade primer on new and existing panel joint faces, and clean using a solvent wipe
2 Apply metal-to-metal adhesive where applicable
3 Where joints are to be spot welded, apply suitable weld-through, zinc rich primer to weld areas
4 Where joints are to be MIG, arc or gas welded, apply zinc rich primer in adjacent areas but leave the welded
area untreated
5 To retain the panel while clinching the flanges, tack spot weld or plug weld as appropriate
6 Clean the panel with a solvent wipe
7 Treat bare metal areas with a suitable etch phosphate process
8 Re-treat the affected area using either a separate acid-etch primer and two-pack surfacer, or an integrated etch
primer/filler

PAINTING
77-5-2
PROCEDURES
Paint preparation
Paint refinishing
The following process must be adhered to for paint refinishing operations.
1 Seal required exterior and interior seams with an approved seam sealer
BODY SEALING MATERIALS, MATERIALS AND APPLICATIONS, Approved materials.
2 Repair any damage to underbody sealers
CORROSION PREVENTION AND SEALING, CORROSION PREVENTION, Corrosion prevention.
3 Apply a two-pack paint refinishing system
4 Apply cavity wax to all interior surfaces which have not received refinish paint
Paint repairs
Before carrying out paintwork repairs, clean the vehicle thoroughly using either a steam cleaner or high-pressure
washer.
Wash locally repaired areas using a mild water-mixable detergent and wipe them clean with solvent, immediately
before paint application.
Ensure that damaged paintwork which has led to exposed metal is abraded until the metal is clean, extending beyond
the area of the original damage. Treat the bare metal with an etch phosphate to remove all traces of rust and to provide
a key for new paint coats. Re-treat the affected area using either a separate acid-etch primer and two-pack surfacer
or an integrated etch primer/filler, and follow with a two-pack paint system. Treat those surfaces not receiving paint
using an approved cavity wax, following paint operations.
a Two-pack top coat
b Two-pack primer filler and etch primer
c Etch phosphate
When heat curing paint repairs, the temperature must not exceed 65
°
C (149
°
F). Temperatures above this
figure will cause the reflective elements within the headlamps and taillamps to distort.
HEATING AND VENTILATION
DESCRIPTION AND OPERATION
80-1
HEATING AND VENTILATION
DESCRIPTION AND OPERATION
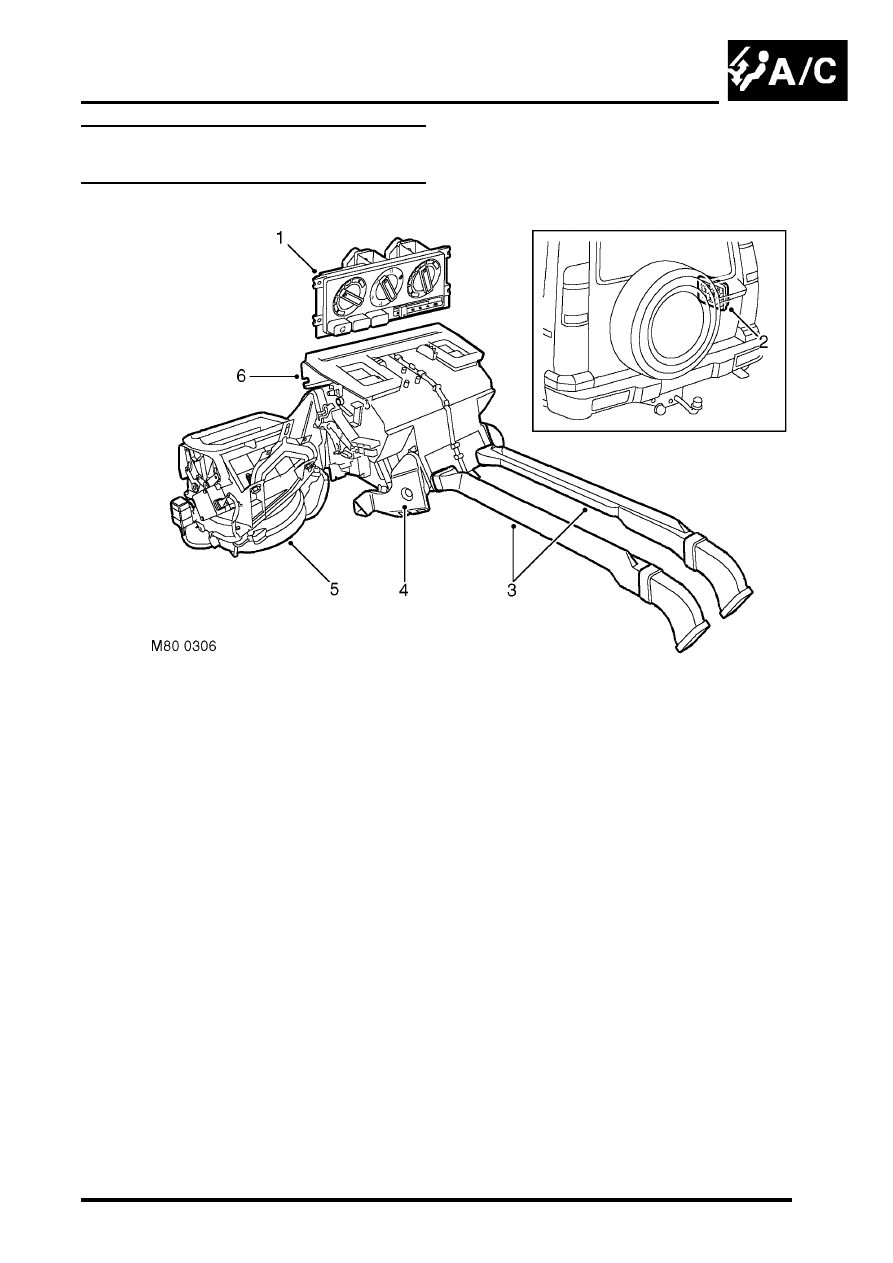
Heating and ventilation component
layout
RH drive shown, LH drive similar
1 Control panel
2 Outlet vent
3 Rear footwell ducts
4 Front footwell duct
5 Air inlet duct
6 Heater assembly
HEATING AND VENTILATION
80-2
DESCRIPTION AND OPERATION
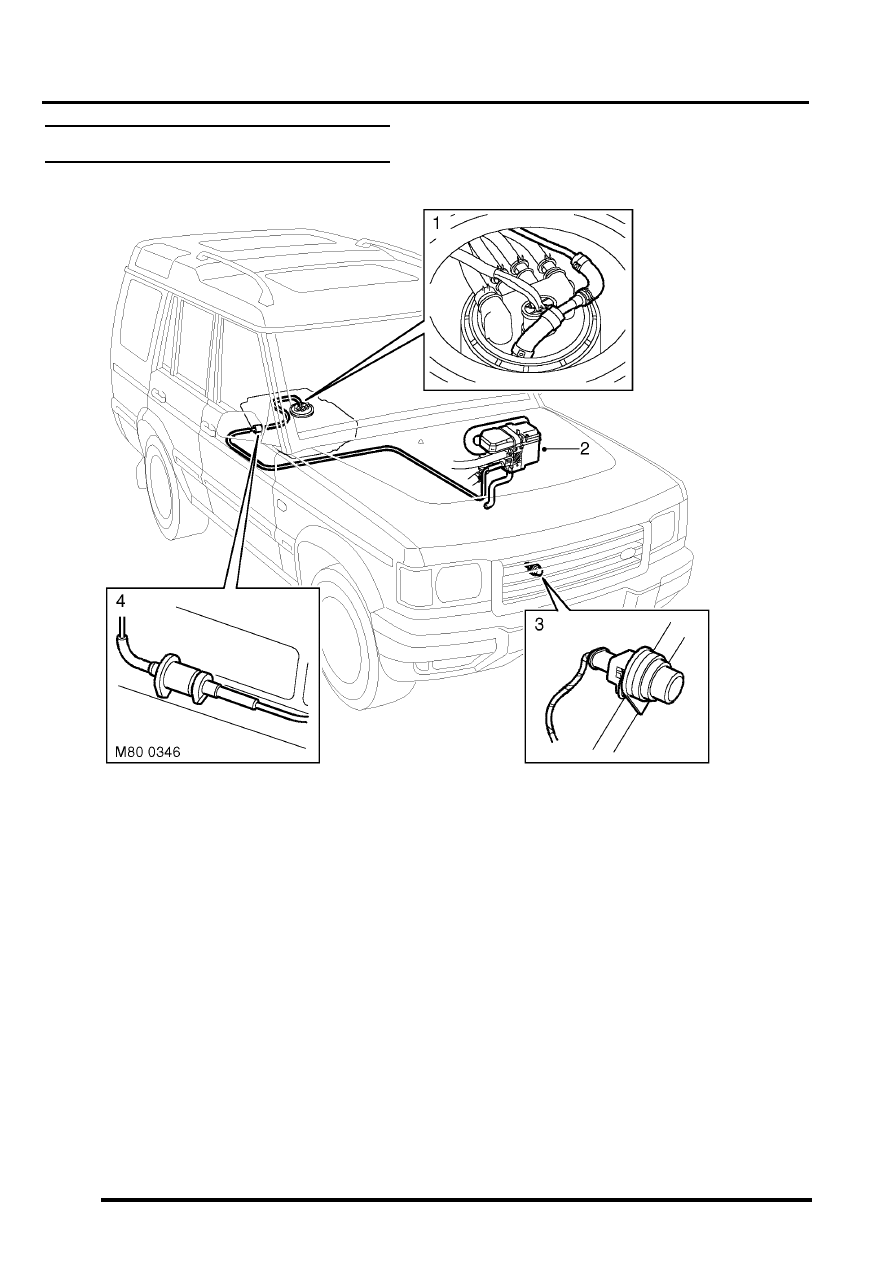
Fuel burning heater component layout
RH drive shown, LH drive similar
1 FBH fuel line connection
2 FBH unit
3 Air temperature sensor
4 FBH pump
Нет комментариевНе стесняйтесь поделиться с нами вашим ценным мнением.
Текст