Range Rover BORG WARNER 44-62 TRANSFER BOX. Manual — part 4
TRANSFER BOX
2
OVERHAUL
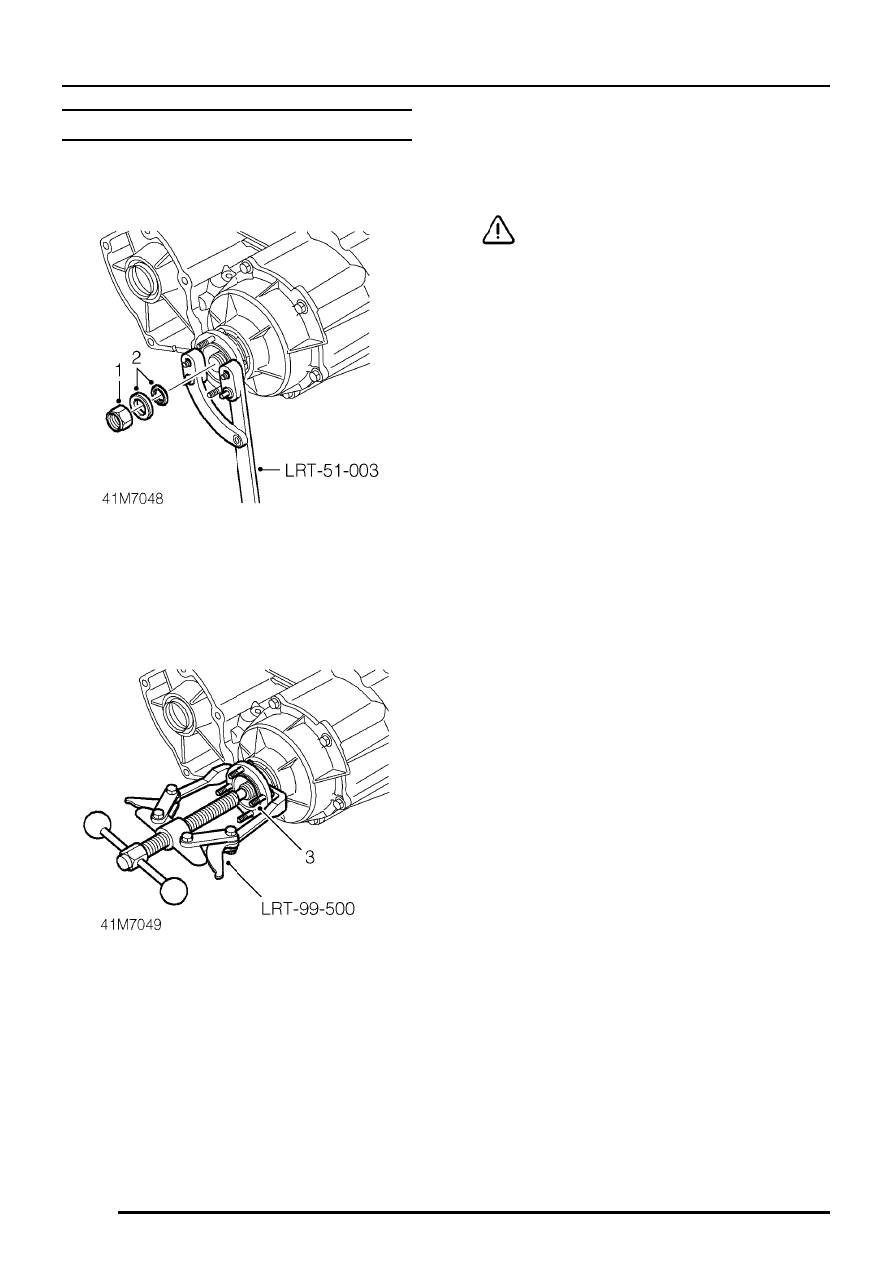
FRONT OUTPUT SHAFT DRIVE FLANGE
Service repair no - 41.20.15/01
Remove
1. Using LRT-51-003 to restrain front output shaft
drive flange, remove and discard nut securing
drive flange to front output shaft.
2. Collect washer and seal.
3. Using LRT-99-500 if necessary, remove drive
flange from front output shaft.
Refit
1. Clean running surface of drive flange. Ensure
all traces of rubber are removed.
CAUTION: Do not use a metal scraper as
this may damage sealing surface.
2. Fit drive flange to front output shaft.
3. Fit seal, washer and new nut to front output
shaft.
4. Using LRT-51-003 to restrain drive flange,
tighten nut to 220 Nm. (162 lbf.ft)

TRANSFER BOX
OVERHAUL
3
FRONT OUTPUT SHAFT OIL SEAL
Service repair no - 41.20.51/01
Remove
1. Remove front output shaft drive flange.
See
this section.
2. Using a flat bladed screwdriver free of rough
edges, ease front output shaft oil seal from
front casing.
CAUTION: Do not mark sealing surface of
front casing.
3. Remove oil seal.
Refit
1. Clean sealing area of front casing and running
surface of front drive flange. Ensure all traces
of rubber are removed.
CAUTION: Do not use a metal scraper as
this may damage sealing surfaces.
2. Lubricate sealing faces of new seal with clean
gearbox oil.
3. Using LRT-41-013 fit front output shaft oil seal
to front casing. Ensure that seal is square to
casing bore.
4. Fit front output shaft drive flange.
See this
section.

TRANSFER BOX
4
OVERHAUL
VISCOUS COUPLING UNIT (VCU)
Service repair no - 41.20.66/01
Remove
1. Remove front output shaft drive flange.
See
this section.
2. Remove 6 bolts securing VCU housing to
transfer box.
3. With care, break front face RTV seal and
remove VCU assembly.
Do not carry out further dismantling if
component is removed for access only.
4. Press out viscous coupling from housing.
CAUTION: Protect output shaft thread and
do not use excessive force when pressing
out viscous coupling.
Refit
1. Clean mating surfaces of viscous coupling
housing and transfer box.
CAUTION: Do not use a metal scraper as
this may damage sealing surfaces.
2. Clean bearing and VCU mating faces.
3. Press VCU into bearing.
4. Apply a continuous 2mm bead of sealant to
VCU housing mating face. Path to be around
inside of bolt holes.
5. Fit VCU assembly to transfer box ensuring
correct alignment of bolt holes before
disturbing RTV bead.
6. Fit bolts and progressively tighten to 35 Nm.
(26 lbf.ft)
7. Fit front output shaft drive flange.
See this
section.
EPICYCLIC GEAR SET
Service repair no - 41.20.68/01
Remove
1. Remove viscous coupling assembly.
See this
section.
2. Remove 17 bolts securing halves of transfer
box casing.
3. Carefully break RTV seal and remove front
transfer gearbox casing from rear casing.
4. Position front casing, input shaft upwards.
Position block of wood under epicyclic gear
set.

TRANSFER BOX
OVERHAUL
5
5. Using a flat bladed screwdriver free of rough
edges, ease input shaft oil seal from front
casing.
CAUTION: Do not mark sealing surface of
front casing.
6. Release circlip retaining epicyclic gear to front
casing. Epicyclic gear set will fall onto block of
wood.
7. Remove epicyclic gear set.
Refit
1. Clean RTV sealant from front and rear casing
mating surfaces.
CAUTION: Do not use a metal scraper as
this may damage sealing surfaces.
2. Clean bearing and input shaft mating faces.
3. Clean sealing area of front casing and running
surface of input shaft. Ensure all traces of
rubber are removed from sealing surfaces.
CAUTION: Do not use a metal scraper as
this may damage sealing surfaces.
4. Fit epicyclic gear set to front casing.
5. Fit circlip retaining epicyclic gear set to front
casing.
6. Lubricate sealing faces of seal with clean
gearbox oil.
7. Using LRT-41-011 drift input shaft seal into
front casing.
8. If removed, fit 2 dowels to front casing.
9. Apply a continuous 2 mm bead of RTV sealant
to rear casing mating face. Path to be around
inside of bolt holes.
10. Fit front casing to rear casing, ensure bolt
holes are aligned before disturbing RTV
sealant.
11. Fit bolts securing front casing to rear casing
and progressively tighten to 35 Nm. (26 lbf.ft)
12. Check freedom of rotation of input shaft and
that rear output shaft rotates.
13. Fit viscous coupling assembly.
See this
section.
Нет комментариевНе стесняйтесь поделиться с нами вашим ценным мнением.
Текст