Subaru Legacy (2022 year). Manual in english — page 2
(21,1)
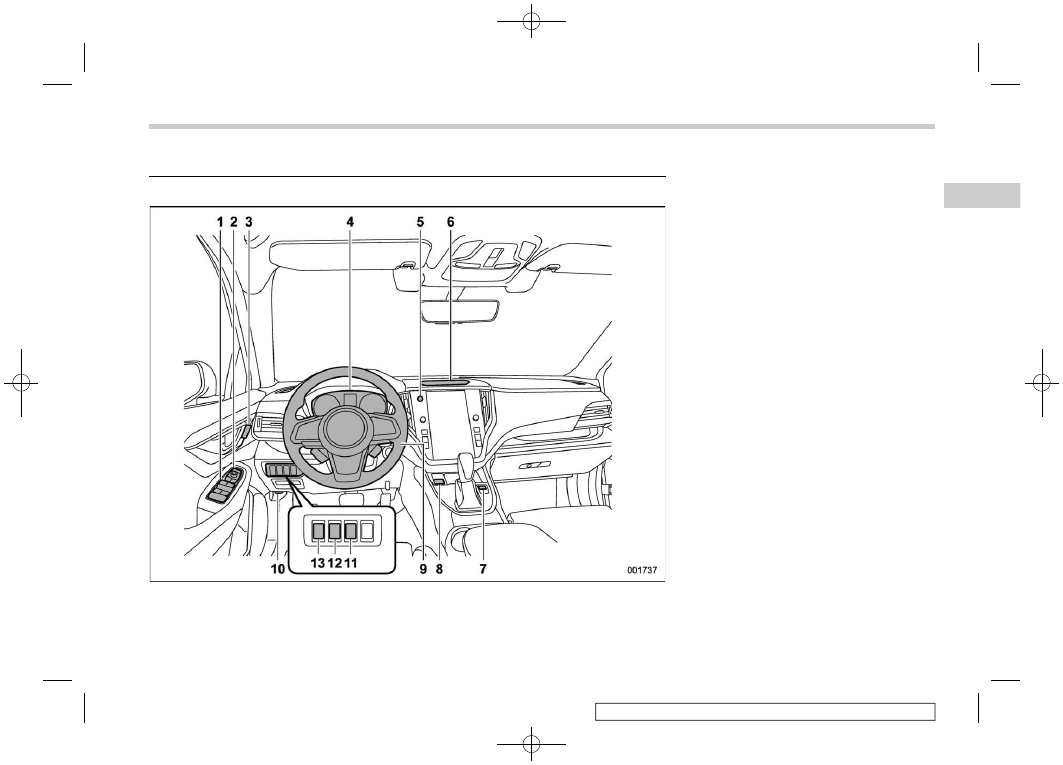
Instrument Panel
1)
Power window switches (page 147)
2)
Remote control mirror switch (page 275)
3)
Seat position memory buttons (page 33)
4)
Combination meter (page 175)
5)
Hazard warning flasher switch (page
174)
6)
Camera for Driver Monitoring System
(page 408)
7)
Front view monitor switch (page 381)
8)
Electronic parking brake switch (page
370)
9)
Tilt/Telescopic steering (page 278)
10) Hood release knob (page 497)
11) Hands-free Power Rear Gate off switch
(page 162)
12) Illumination brightness control dial (page
13) Trunk lid opener button (page 151)/
Power rear gate button (page 154)
Instrument Panel
19
Illustrated
Index
(22,1)
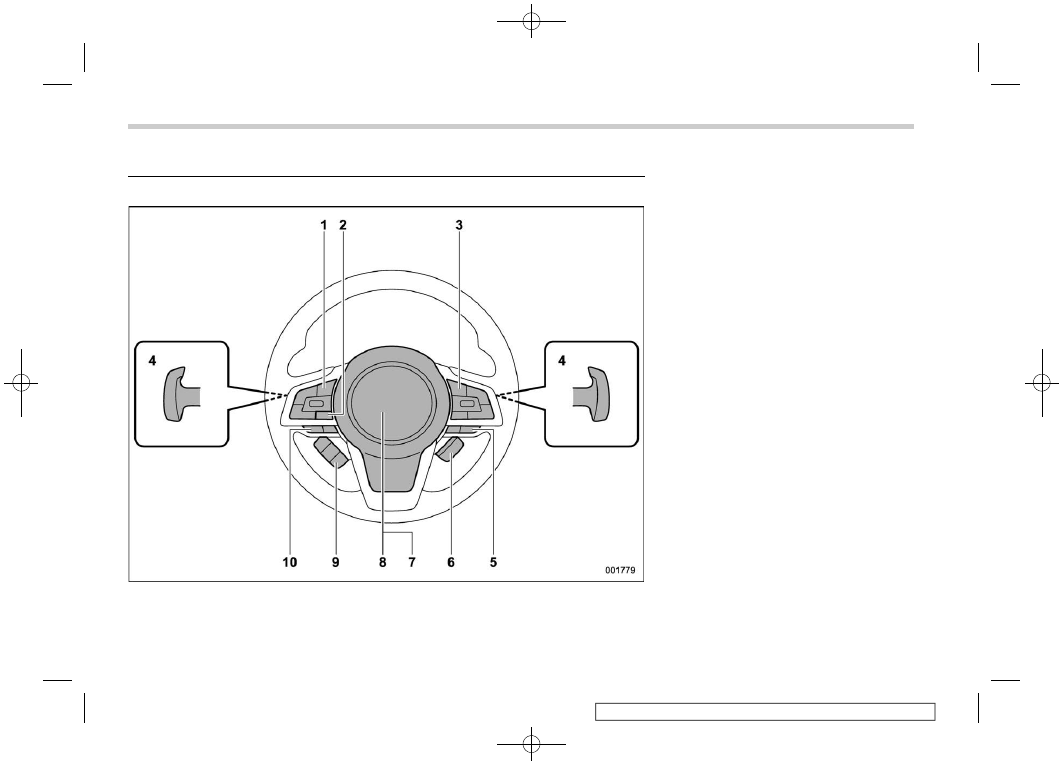
Steering Wheel
1)
Audio control switches*
1
2)
Talk switch for voice command system*
1
3)
Cruise control switches*
2
4)
Shift paddles (page 355)
5)
SI-DRIVE switches (page 357)
6)
Heated Steering Wheel switch (page
279)
7)
SRS airbag (page 78)
8)
Horn (page 280)
9)
Control switches for combination meter
display (color LCD) (page 204)
10) Hands-free phone switches*
1
*1: For details about how to use the switches,
refer to the separate navigation/audio
Owner’s Manual.
*2: For details about how to use the switches,
refer to the Owner’s Manual supplement
for the EyeSight system.
Steering Wheel
20
(23,1)
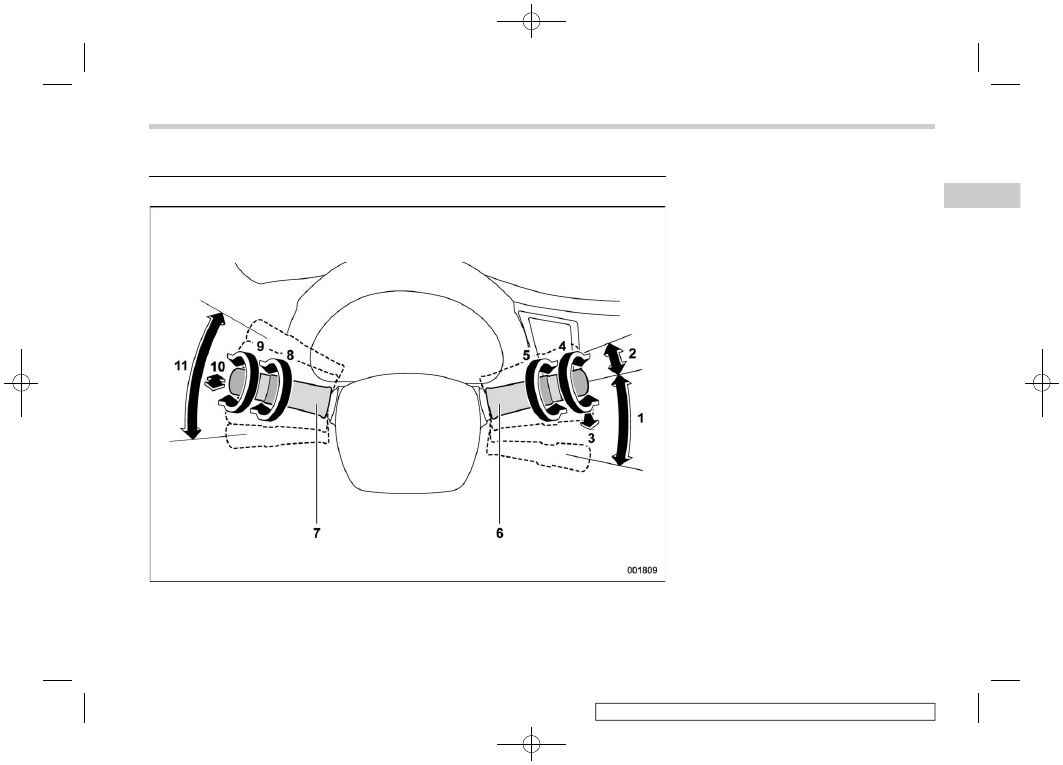
Light Control and Wiper Control Levers/Switches
1)
Windshield wiper (page 261)
2)
Mist (page 262)
3)
Windshield washer (page 263)
4)
Rear window wiper and washer switch
(page 264)
5)
Wiper intermittent time control switch
(page 263)
6)
Wiper control lever (page 262)
7)
Light control switch (page 251)
8)
Front fog light switch (page 259)
9)
Headlight ON/OFF/AUTO (page 251)
10) Headlight flasher High/Low beam change
(page 254)
11) Turn signal lever (page 260)
Light Control and Wiper Control Levers/Switches
21
Illustrated
Index
(24,1)
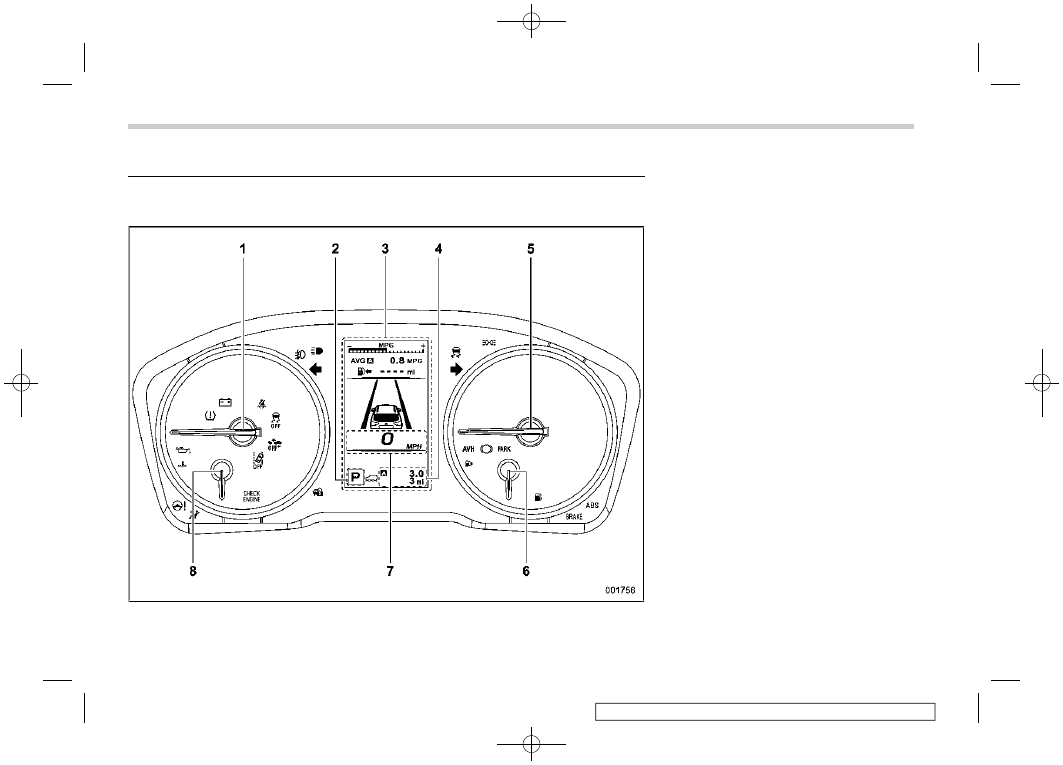
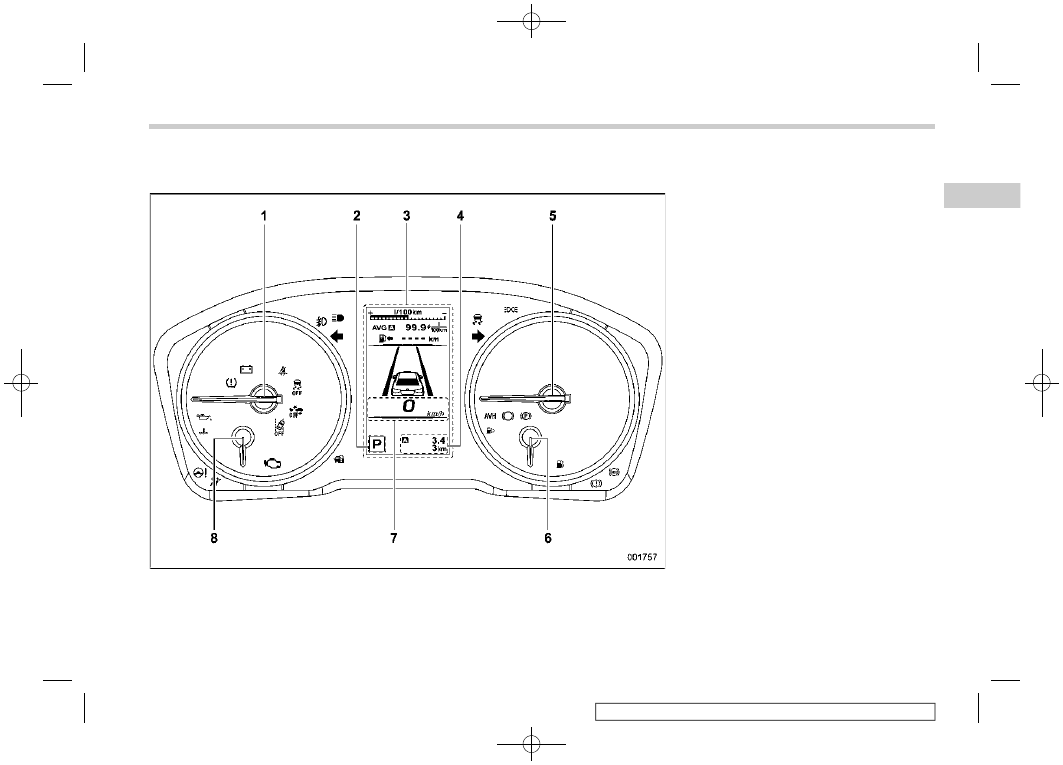
Combination Meter
&
U.S.-Spec. Models
1)
Tachometer (page 175)
2)
Select lever/gear position indicator (page
199)
3)
Combination meter display (color LCD)
(page 203)
4)
Trip meter and odometer (page 175)
5)
Speedometer (page 175)
6)
Fuel gauge (page 176)
7)
Digital speed screen (page 211)
8)
Engine coolant temperature gauge (page
177)
Combination Meter
22
(25,1)
&
Except U.S.-Spec. Models
1)
Tachometer (page 175)
2)
Select lever/gear position indicator (page
199)
3)
Combination meter display (color LCD)
(page 203)
4)
Trip meter and odometer (page 175)
5)
Speedometer (page 175)
6)
Fuel gauge (page 176)
7)
Digital speed screen (page 211)
8)
Engine coolant temperature gauge (page
177)
Combination Meter
23
Illustrated
Index
(26,1)
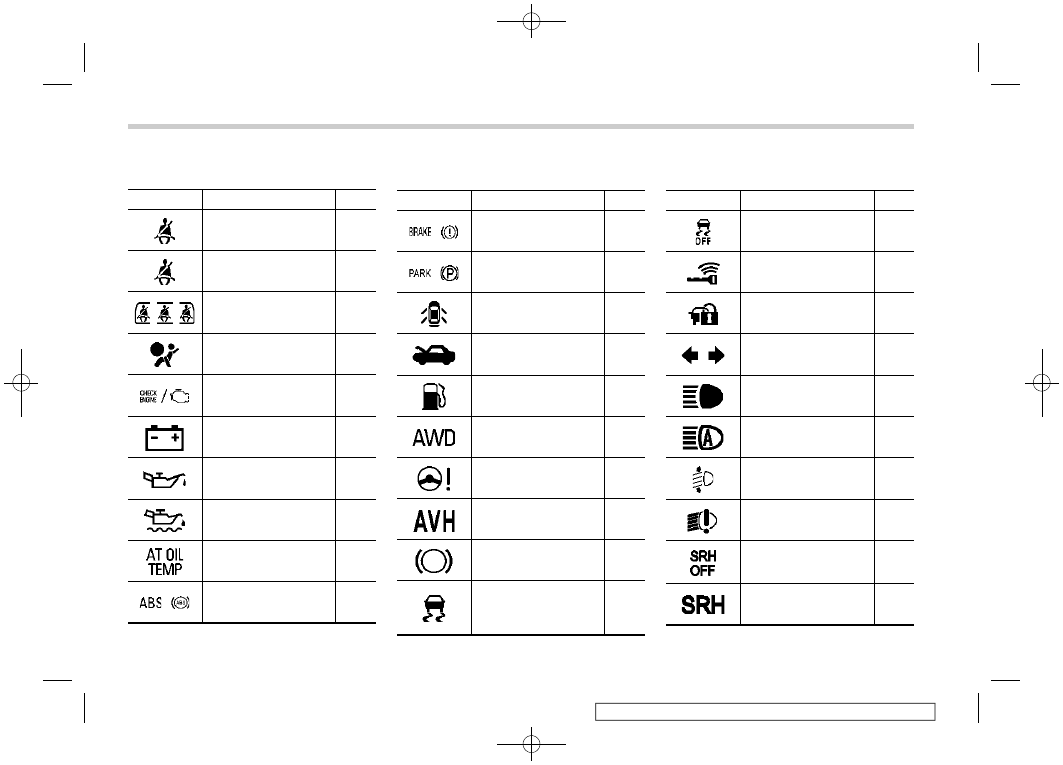
Warning and Indicator Lights
Mark
Name
Page
Seatbelt warning light
Front passenger’s
seatbelt warning light
Rear seatbelt warning
light
SRS airbag system
warning light
CHECK ENGINE warn-
ing light/Malfunction in-
dicator light
Charge warning light
Oil pressure warning
light
Engine low oil level
warning indicator
AT OIL TEMP warning
light
/
ABS warning light
Mark
Name
Page
/
Brake system warning
light
/
Electronic parking
brake indicator light
Door open indicator
Engine hood open
warning light
Low fuel warning light
All-Wheel Drive warn-
ing light
Power steering warning
light
Auto Vehicle Hold ON
indicator light
Auto Vehicle Hold op-
eration indicator light
Vehicle Dynamics Con-
trol warning light/Vehi-
cle Dynamics Control
operation indicator light
Mark
Name
Page
Vehicle Dynamics Con-
trol OFF indicator light
Access key warning in-
dicator (if equipped)
Security indicator light
Turn signal indicator
lights
High beam indicator
light
High beam assist indi-
cator
Automatic headlight
beam leveler warning
light
LED headlight warning
light
Steering Responsive
Headlight OFF indicator
light
Steering Responsive
Headlight warning light
Warning and Indicator Lights
24
(27,1)
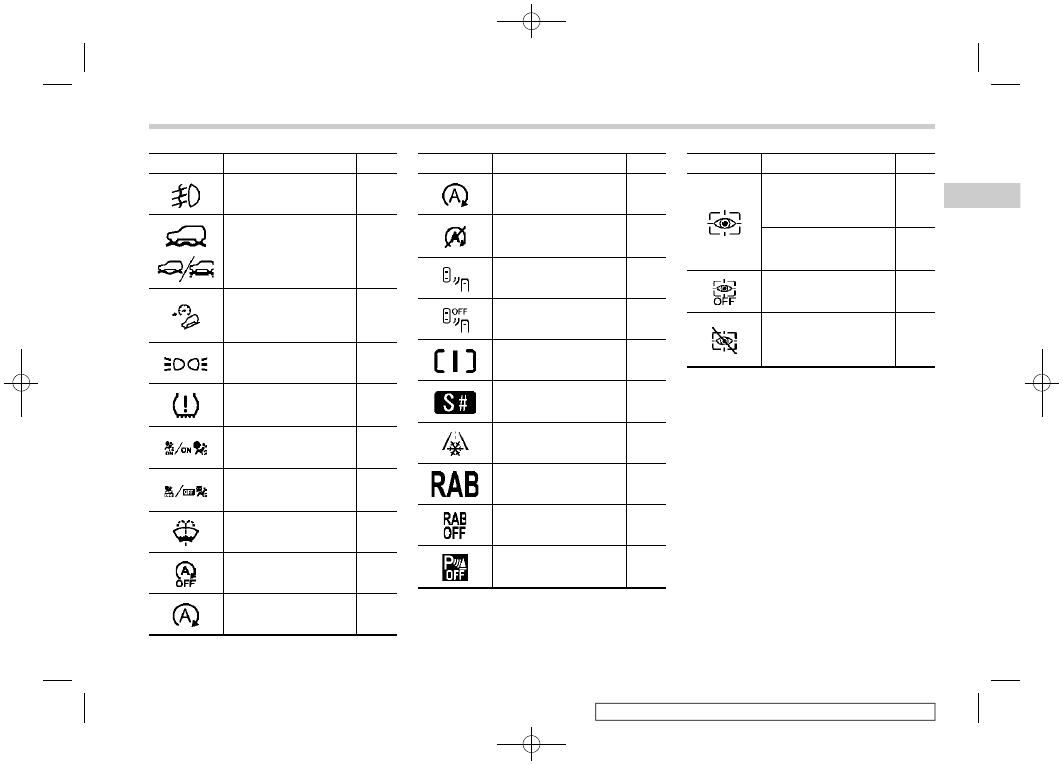
Mark
Name
Page
Front fog light indicator
light (if equipped)
X-MODE indicator
(Outback/Subaru
Outback Wilderness)
Hill descent control in-
dicator (Outback/
Subaru Outback
Wilderness)
Headlight indicator light
Low tire pressure warn-
ing light (U.S.-spec.
models)
Front passenger’s fron-
tal airbag ON indicator
light
Front passenger’s fron-
tal airbag OFF indicator
light
Windshield washer fluid
warning light
Auto Start Stop OFF
indicator light
Auto Start Stop indica-
tor light (green)
Mark
Name
Page
Auto Start Stop warning
light (yellow)
Auto Start Stop No Ac-
tivity Detected indicator
light
BSD/RCTA warning in-
dicator (if equipped)
BSD/RCTA OFF indi-
cator (if equipped)
Intelligent (I) mode in-
dicator (if equipped)
Sport Sharp (S#) mode
indicator (if equipped)
Icy road surface warn-
ing indicator
RAB warning indicator
(if equipped)
RAB OFF indicator (if
equipped)
Sonar audible alarm
OFF indicator (if
equipped)
Mark
Name
Page
Driver Monitoring Sys-
tem operation indicator
light (green) (if
equipped)
Driver Monitoring Sys-
tem warning light (yel-
low) (if equipped)
Driver Monitoring Sys-
tem OFF indicator light
(if equipped)
Driver Monitoring Sys-
tem temporary stop in-
dicator light (if
equipped)
Warning and Indicator Lights
25
Illustrated
Index
(29,1)
1-1. Front Seats. . . . . . . . . . . . . . 28
Manual Seat (If Equipped) . . . . . . . . . .31
Power Seat (If Equipped) . . . . . . . . . ..32
Head Restraint Adjustment . . . . . . . . ...37
1-2. Seat Heater (If Equipped) . . . . . . . . . 38
Front Seat Heater . . . . . . . . . . . . .39
Rear Seat Heater. . . . . . . . . . . . ...39
1-3. Seat Ventilation (If Equipped) . . . . . . .. 40
1-4. Rear Seats . . . . . . . . . . . . . . . 40
Reclining the Seatback (Outback/Subaru
Outback Wilderness). . . . . . . . . . ...41
Folding Down the Rear Seatback . . . . . . ..42
Head Restraint Adjustment . . . . . . . . ...44
Armrest . . . . . . . . . . . . . . . . 46
1-5. Seatbelts. . . . . . . . . . . . . . . 46
Seatbelt Safety Tips . . . . . . . . . . . ..46
Emergency Locking Retractor (ELR) . . . . . .47
Automatic Locking Retractor/Emergency
Locking Retractor (ALR/ELR) . . . . . . . ..48
Seatbelt Warning Light and Chime . . . . . . 48
Fastening the Seatbelt . . . . . . . . . . ..48
Seatbelt Maintenance. . . . . . . . . . . 54
1-6. Seatbelt Pretensioners . . . . . . . . . . 55
Seatbelt with Shoulder Belt Pretensioner . . . ..55
Seatbelt with Shoulder Belt and Lap Belt
Pretensioners . . . . . . . . . . . . . .56
System Monitors. . . . . . . . . . . . ...57
System Servicing. . . . . . . . . . . . ..57
Precautions against Vehicle Modification . . . ..57
1-7. Rear Seat Reminder . . . . . . . . . . . 58
1-8. Child Restraint Systems . . . . . . . . .. 58
Safety Precautions . . . . . . . . . . . ...58
Safety Tips for Installing Child Restraint
Systems. . . . . . . . . . . . . . . .60
Where to Place a Child Restraint System. . . ..61
Choosing a Child Restraint System . . . . . ..63
Installing Child Restraint Systems with
ALR/ELR Seatbelt. . . . . . . . . . . ...63
Installing a Booster Seat or Booster Cushion . ...68
Installation of Child Restraint Systems by Use
of Lower and Tether Anchorages (LATCH) . . ..70
Top Tether Anchorages . . . . . . . . . . 75
1-9. SRS Airbag (Supplemental Restraint
System Airbag). . . . . . . . . . . ... 78
General Precautions regarding SRS Airbag
System . . . . . . . . . . . . . . . ..78
General Precautions regarding SRS Airbag
System for Accessories and Any Objects . . ...80
General Precautions regarding SRS Airbag
System and Children . . . . . . . . . . ..82
Components . . . . . . . . . . . . . . 85
SUBARU Advanced Frontal Airbag System,
SRS Seat Cushion Airbag, SRS Side Airbag
and SRS Curtain Airbag . . . . . . . . . .87
SRS Side Airbag and SRS Curtain Airbag . . ... 101
SRS Airbag System Monitors . . . . . . . . 108
SRS Airbag System Servicing . . . . . . . 109
Precautions against Vehicle Modification. . . 110
How to Contact the Vehicle Manufacturer
concerning Modifications for Persons with
Disabilities That May Affect the Advanced
Airbag System . . . . . . . . . . . . . 111
Seat, Seatbelt and SRS Airbags
1
Seat,
Seatbelt
and
SRS
Airbags
(30,1)
1-1. Front Seats
WARNING
.
Never adjust the seat while driv-
ing, as personal injury or loss of
vehicle control may occur.
.
Before adjusting the seat, ensure
nothing is blocking the adjusting
mechanism.
.
After adjusting the seat, move it
back and forth to ensure the seat
is securely locked. If it is not, it
may move suddenly or the seat-
belt may not operate properly.
.
Do not put objects under the front
seats. They may interfere with
front seat locking mechanism
and cause an accident.
.
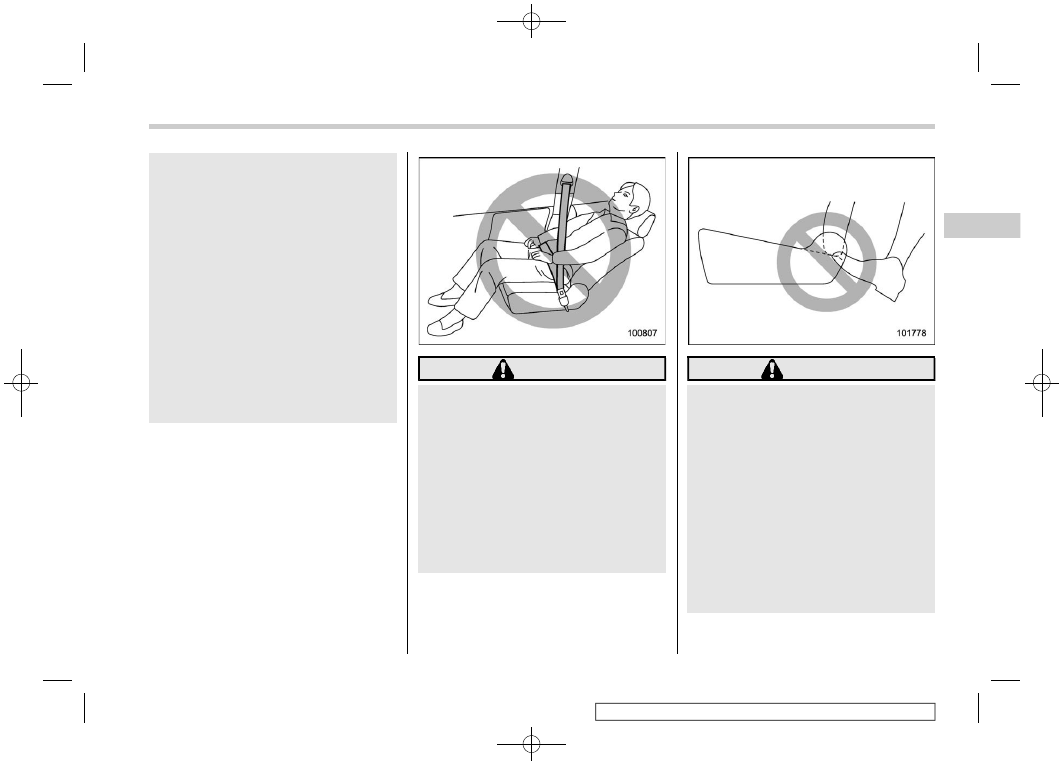
Seatbelts provide maximum re-
straint when the occupant sits
back and upright in the seat. To
reduce the risk of sliding under
the seatbelt in a collision, the
front seatbacks should always
be used in the upright position
while the vehicle is running. If the
front seatbacks are not in the
upright position and a collision
occurs, the risk of sliding under
the lap belt and of the lap belt
sliding up over the abdomen will
increase, and both can result in
serious injury or death.
.
The SRS airbags deploy with
considerable speed and force.
Occupants who are not sitting
back and upright when the SRS
airbag deploys could suffer ser-
ious injury. Because the SRS
airbag needs enough space for
deployment, the driver should
always sit upright and well back
in the seat as far from the steer-
ing wheel as practical while still
maintaining full vehicle control,
and the front passenger should
move the seat as far back as
possible and sit upright and well
back in the seat.
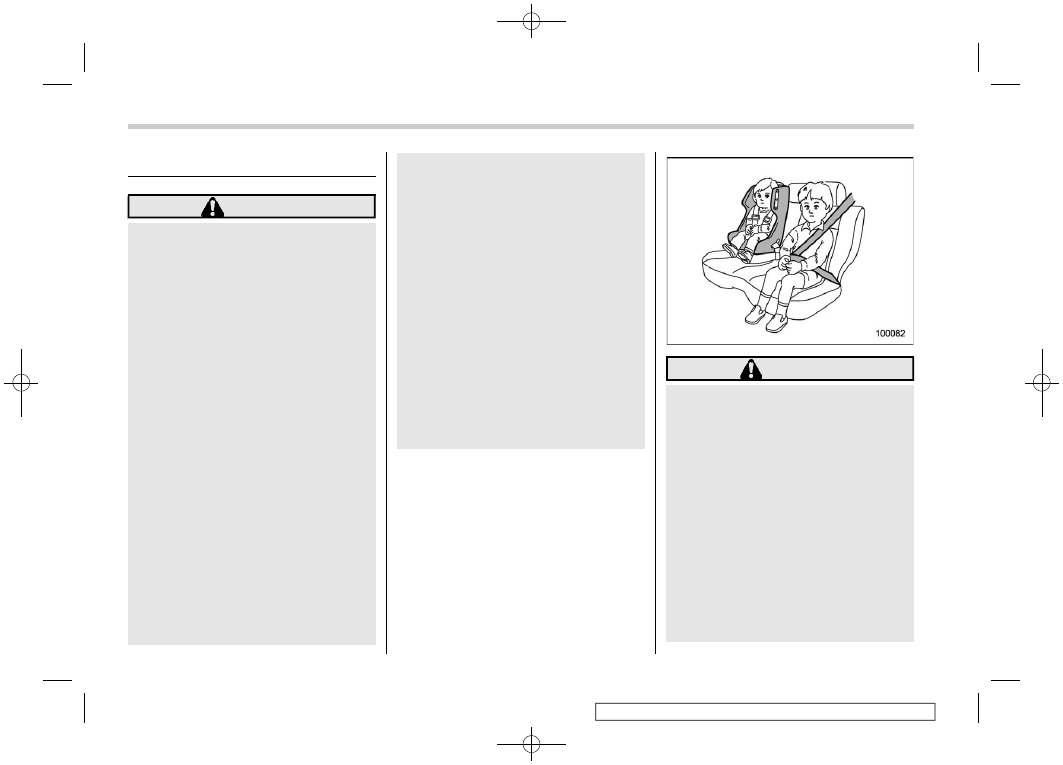
WARNING
Seat children in the rear seat prop-
erly restrained at all times. The SRS
airbag deploys with considerable
speed and force and can injure or
even kill children, especially if they
are not restrained or improperly
restrained. Because children are
lighter and weaker than adults, their
risk of being injured from deploy-
ment is greater. For that reason, we
strongly recommend that ALL chil-
dren (including those in child re-
straint systems) sit in the REAR seat
properly restrained at all times in a
child restraint system or in a seat-
belt, whichever is appropriate for the
child’s age, height and weight. Se-
Front Seats
28
(31,1)
cure ALL types of child systems in
the REAR seats at all times.
NEVER INSTALL A CHILD RE-
STRAINT SYSTEM IN THE FRONT
PASSENGER’S SEAT. DOING SO
RISKS SERIOUS INJURY OR DEATH
TO THE CHILD BY PLACING THE
CHILD’S HEAD TOO CLOSE TO THE
SRS AIRBAG.
According to accident statistics,
children are safer when properly
restrained in the rear seating posi-
tions than in the front seating posi-
tions. For instructions and precau-
tions concerning child restraint sys-
tems, refer to “Child Restraint Sys-
tems”
WARNING
To prevent the passenger from slid-
ing under the seatbelt in the event of
a collision, always put the seatback
in the upright position while the
vehicle is in motion. Also, do not
place objects such as cushions
between the passenger and the seat-
back. If you do so, the risk of sliding
under the lap belt and of the lap belt
sliding up over the abdomen will
increase, and both can result in
serious injury or death.
WARNING
Do not let rear passengers rest their
feet between the front seatback and
seat cushion. Doing so may lead to
defective operation of the following
systems and could result in serious
injury.
.
Occupant detection system
.
SRS side airbag
.
SRS seat cushion airbag
.
Front seat heater (if equipped)
.
F r o n t s e a t v e n t i l a t i o n ( i f
equipped)
.
Power seat (if equipped)
– CONTINUED –
Front Seats
29
1
Seat,
Seatbelt
and
SRS
Airbags
(32,1)
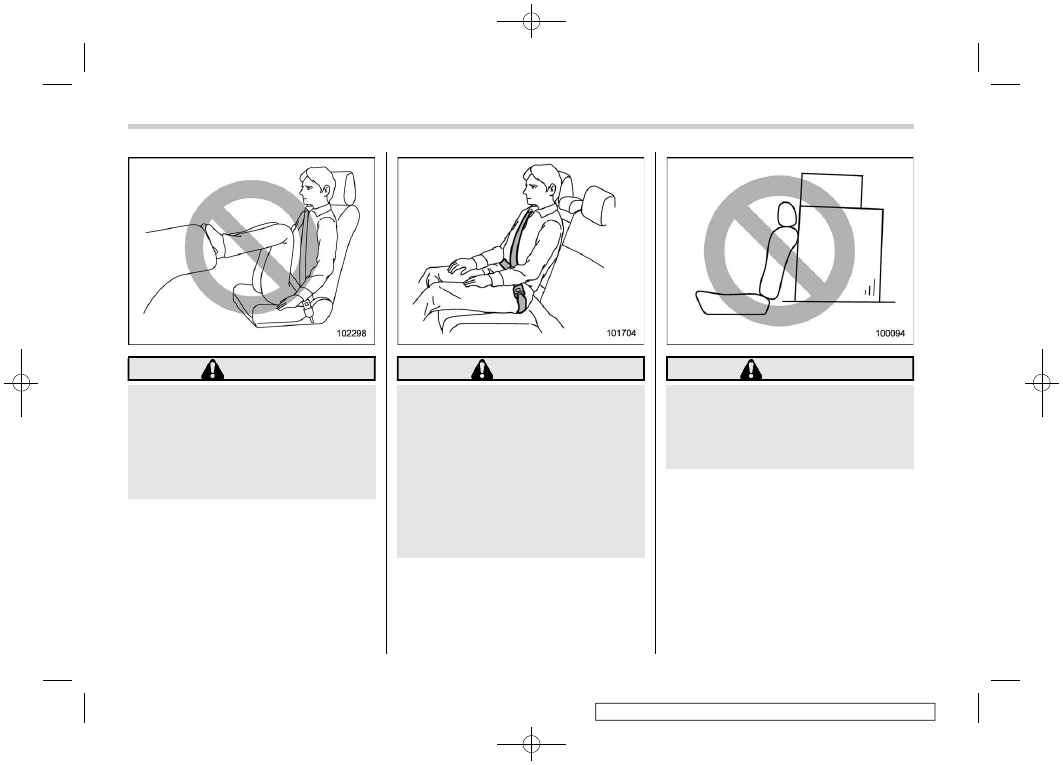
WARNING
Do not press your feet onto the
instrument panel. Doing so may
prevent the occupant detection
function of the SRS airbag system
from functioning correctly, and may
result in serious injury or death in
the event of an accident.
WARNING
Seatbelts provide maximum re-
straint when the occupant sits well
back and upright in the seat. Do not
put cushions or any other materials
between occupants and seatbacks
or seat cushions. If you do so, the
risk of sliding under the lap belt and
of the lap belt sliding up over the
abdomen will increase, and both can
result in serious internal injury or
death.
WARNING
Never stack luggage or other cargo
higher than the top of the seatback
because it could tumble forward and
injure passengers in the event of a
sudden stop or accident.
Front Seats
30
(33,1)
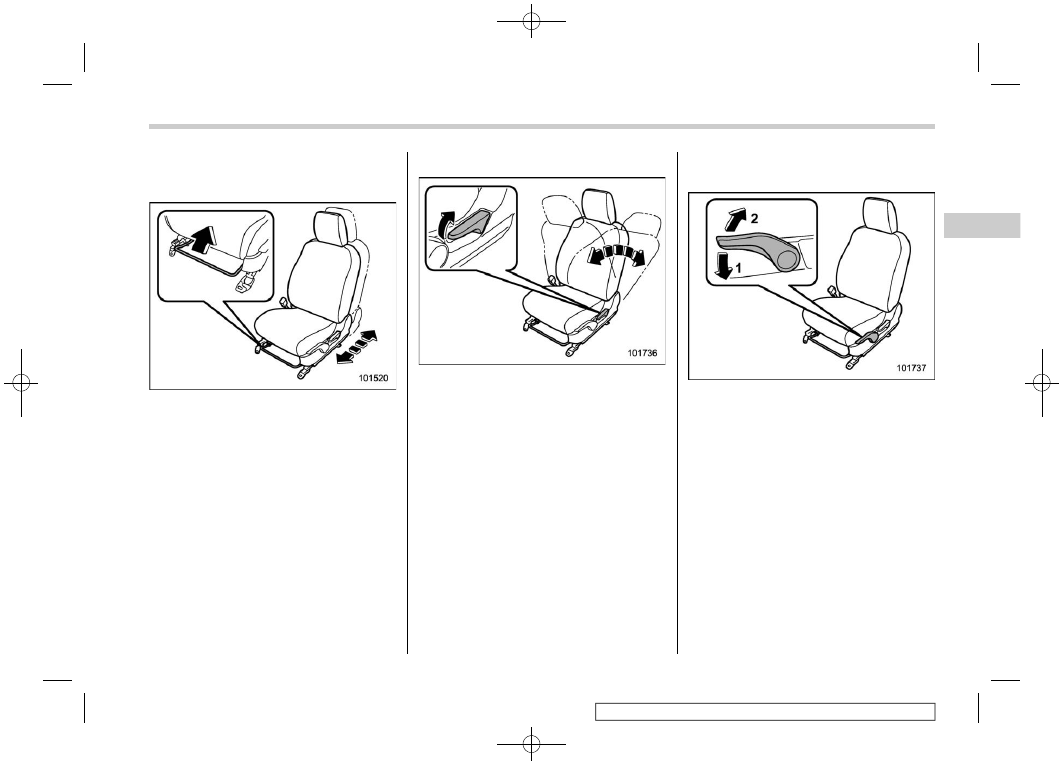
&
Manual Seat (If Equipped)
!
Forward and backward adjustment
1. Sit in the seat to adjust.
2. Pull the lever upward, slide the seat to
the desired position, and then release the
lever.
3. Try to move the seat back and forth to
make sure that it is securely locked into
place.
!
Reclining the seatback
1. Pull up the reclining lever, adjust the
seatback to the desired position, and then
release the lever.
2. Make sure the seatback is securely
locked into place.
The seatback placed in a reclined position
can spring back upward with force when
pulling up the lever. While operating the
lever to return the seatback, hold the
seatback lightly so that it may be raised
back gradually.
!
Seat cushion height adjustment
(driver’s seat)
1)
Push the lever down to lower the seat.
2)
Pull the lever up to raise the seat.
You can adjust the height of the seat by
moving the seat cushion adjustment lever
up or down.
– CONTINUED –
Front Seats
31
1
Seat,
Seatbelt
and
SRS
Airbags
(34,1)
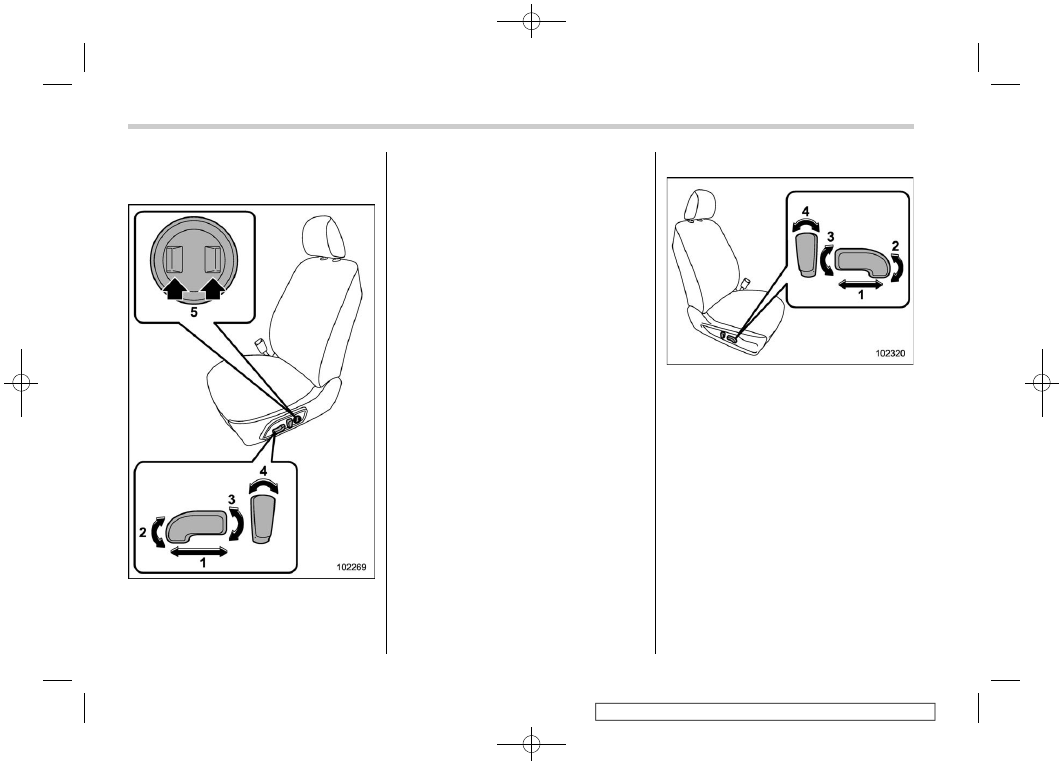
&
Power Seat (If Equipped)
!
Driver’s seat
1)
Seat position forward/backward con-
trol switch
To adjust the seat forward or backward,
move the control switch forward or
backward. During forward/backward ad-
justment of the seat, you cannot adjust
the seat cushion angle or seat cushion
height.
2)
Seat cushion angle control switch
To adjust the seat cushion angle, pull up
or push down the front end of the control
switch.
3)
Seat height control switch
To adjust the seat height, pull up or push
down the rear end of the control switch.
4)
Seatback angle (reclining) control
switch
To adjust the angle of the seatback, move
the control switch.
5)
Lumbar support control switch
To increase lower back support, push the
front side of the switch. To decrease
lower back support, push the rear side of
the switch.
!
Front passenger’s seat (if equipped)
1)
Seat position forward/backward con-
trol switch
To adjust the seat forward or backward,
move the control switch forward or
backward.
2)
Seat cushion angle control switch
To adjust the seat cushion angle, pull up
or push down the front end of the control
switch.
3)
Seat height control switch
To adjust the seat height, pull up or push
down the rear end of the control switch.
4)
Seatback angle (reclining) control
switch
To adjust the angle of the seatback, move
the control switch.
Front Seats
32
(35,1)
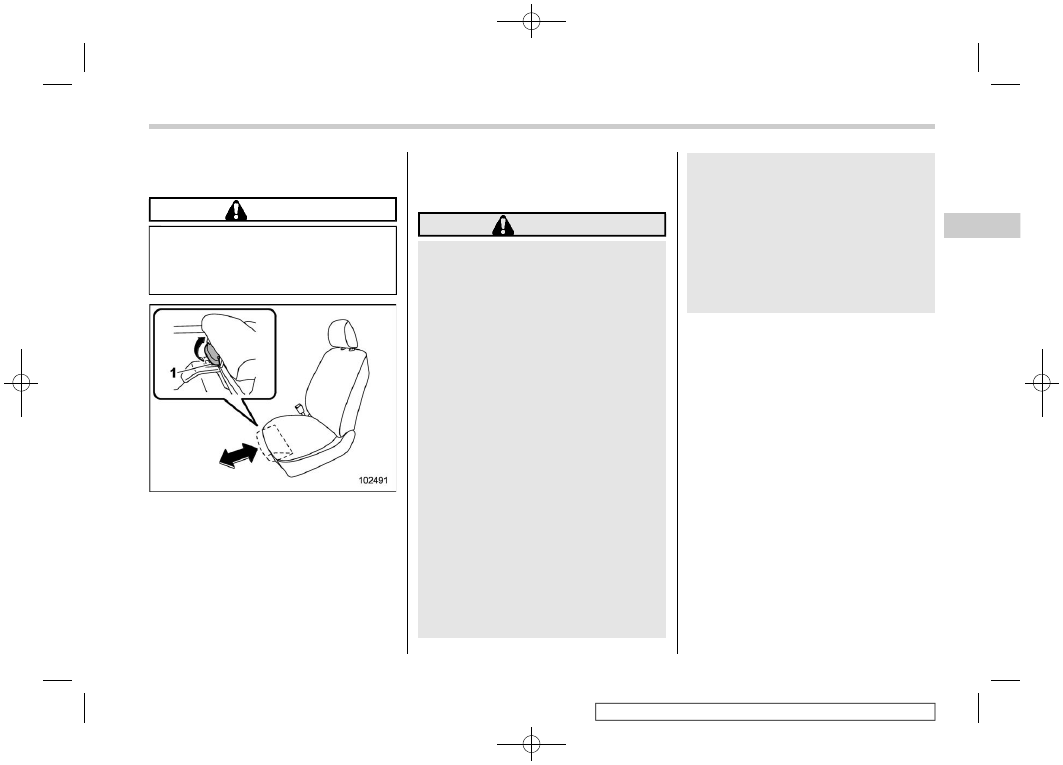
!
Thigh extension (driver’s seat – if
equipped)
CAUTION
When the thigh extension is pulled
out to its fullest, do not put weight on
the top of it. Doing so could break
the part.
The seat front length can be adjusted.
Pull up the lever “1” to adjust the length
and release the lever to lock it.
!
Power driver’s seat with synchro-
nized outside mirrors memory
function (if equipped)
WARNING
.
To avoid loss of vehicle control or
personal injury, never perform
the following operations while
driving.
– Adjusting the seat
– Selecting a registered seat
position
.
Before adjusting the seat or se-
lecting a registered seat position,
make sure that cargo or the
hands and feet of rear seat pas-
sengers are clear of the adjusting
mechanism.
.
The memory adjustment of the
seat position is finished. Be sure
to confirm that the select lever is
in the “P” position, and the park-
ing brake is applied, when adjust-
ing the seat position. Do not drive
until the utilizing of the seat
position is complete.
.
When any unusual conditions or
malfunctions occur during the
memory adjustment of the seat
position, stop the memory ad-
justment of the seat position by
performing any of the following
procedures.
– Operate any of the power seat
switches.
– Press the “SET” button.
– Press button “1” or “2”.
– Operate the outside mirror
control switch.
Register the seat position with button “1” or
“2” or each of the key fobs.
The following memory positions can be
registered.
.
Forward/backward position of the seat
.
Angle of the seatback
.
Angle of the seat cushion
.
Height of the seat
.
Angle of the outside mirrors
.
Angle of the outside mirror angle on the
passenger’s side when the reverse tilt-
down operates.
NOTE
The seat position can also be retrieved
with the Driver Monitoring System user
information. To do so, perform user
registration in the Driver Monitoring
System settings. Refer to “Driver Mon-
itoring System”
– CONTINUED –
Front Seats
33
1
Seat,
Seatbelt
and
SRS
Airbags
(36,1)
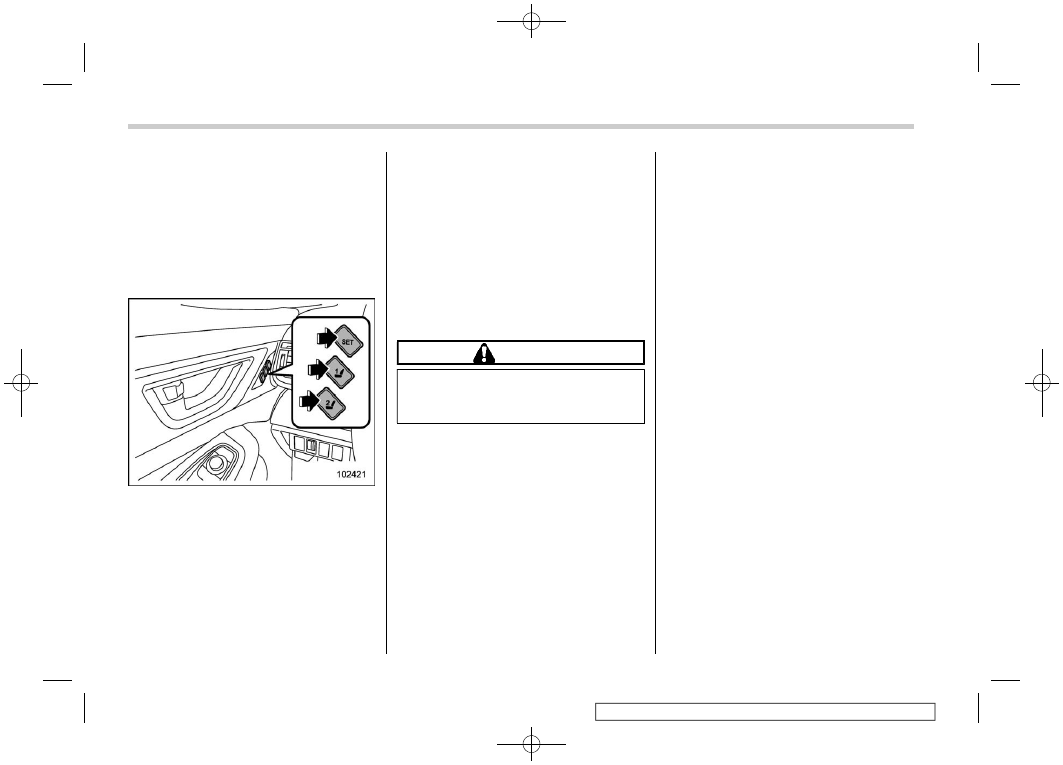
!
Registration of memory position
with button “1” or “2”
1. Adjust the seat and outside mirror
positions under the following conditions.
.
The parking brake is applied.
.
The ignition switch is in the “ON”
position.
.
The select lever is in the “P” position.
2. Register the adjusted positions by
either of the following procedures.
.
Press the “SET” button, then press
either “1” or “2” until a chirp sounds
within 5 seconds.
.
While pressing and holding the
“SET” button, press either “1” or “2”
until a chirp sounds within 5 seconds.
A chirp will sound once, and the seat
position and outside mirror angle on the
passenger’s side will be registered.
NOTE
If a new position is registered for the
same button, the previously registered
memory position is deleted.
!
Registration of the reverse tilt-
down mirror angle with button
“1” or “2”
CAUTION
Depress the brake pedal when re-
gistering the reverse tilt-down mir-
ror angle.
1. Move the select lever to the “R”
position, then the outside mirror angle on
the passenger’s side will move to the
reverse tilt-down position.
2. Adjust the outside mirror angle on the
passenger’s side. For details about the
settings, refer to “Remote control mirror
switch”
3. Move the select lever to the “P”
position, then the outside mirror angle will
return to its original position.
4. Register the adjusted positions by
either of the following procedures.
.
Press the “SET” button, then press
either “1” or “2” until a chirp sounds
within 5 seconds.
.
While pressing and holding the
“SET” button, press either “1” or “2”
until a chirp sounds within 5 seconds.
A chirp will sound once, and the seat
position and outside mirror angle on the
passenger’s side will be registered.
NOTE
.
Approximately 9 seconds after the
select lever is moved to any position
other than “R” position.
.
The factory setting (default setting)
for this function is set as the front
passenger’s side mirror. The setting of
the driver’s side mirror operation can
be changed by a SUBARU dealer.
Contact your SUBARU dealer for de-
tails.
!
Registration of memory position
with a access key fob (if
equipped)
1. Adjust the memory position under the
following conditions.
.
The parking brake is applied.
.
The ignition switch is in the “LOCK”/
“OFF” position.
.
The select lever is in the “P” position.
Front Seats
34
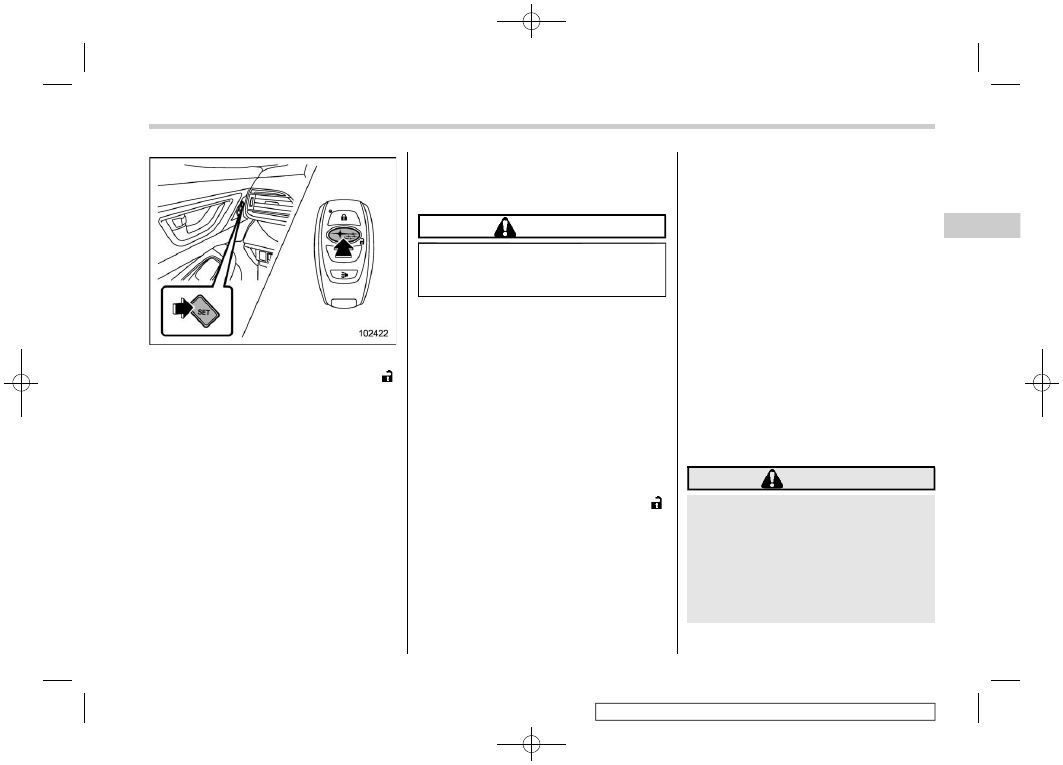
(37,1)
2. Hold the access key fob and press and
hold the “SET” button. Then press the “ ”
button of the access key fob.
A chirp will sound once, and the memory
position is registered.
NOTE
When registering the seat position,
carry the access key that you want to
register with you. If you are carrying 2
or more access keys, registration may
not be possible.
!
Registration of the reverse tilt-
down mirror angle with the key
fob
CAUTION
Depress the brake pedal when re-
gistering the reverse tilt-down mir-
ror angle.
1. Move the select lever to the “R”
position, then the outside mirror angle will
move to the reverse tilt-down position.
2. Adjust the outside mirror angle. For
details about the settings, refer to “Remote
control mirror switch”
3. Move the select lever to the “P”
position, then the outside mirror angle will
return to its original position.
4. Turn the ignition switch to the “OFF”/
“LOCK” position.
5. Hold the access key fob and press and
hold the “SET” button, then press the “ ”
button of the access key fob.
A chirp will sound once, and the reverse
tilt-down mirror angle will be registered.
NOTE
.
Approximately 9 seconds after the
select lever is moved to any position
other than “R” position.
.
The factory setting (default setting)
for this function is set as the front
passenger’s side mirror. The setting of
the driver’s side mirror operation can
be changed by a SUBARU dealer.
Contact your SUBARU dealer for de-
tails.
.
The system stores the adjusted
mirror angle for approximately 45 sec-
onds after the ignition switch is turned
to the “OFF” position. Register the
mirror angle while the memory function
is available.
!
Utilizing of memory position
registered with button “1” or “2”
WARNING
Be sure to press the correct button
to retrieve your registered memory
position. If the seat position is not
optimum for you, it may adversely
affect your driving and may reduce
the effectiveness of the seatbelt.
That could result in an accident
involving serious injury or death.
– CONTINUED –
Front Seats
35
1
Seat,
Seatbelt
and
SRS
Airbags
Нет комментариевНе стесняйтесь поделиться с нами вашим ценным мнением.
Текст