Subaru WRX (2021 year). Manual in english — page 22
(350,1)
&
Tire chains
CAUTION
You cannot use tire chains on your
vehicle because of the lack of clear-
ance between the tires and vehicle
body.
NOTE
Even though you cannot use tire
chains, use of another type of traction
device (such as spring chains) may be
acceptable if use on your vehicle is
recommended by the device manufac-
turer, taking into account tire size and
road conditions. Follow the device
manufacturer’s instructions, especially
regarding maximum vehicle speed.
To help avoid damage to your vehicle,
drive slowly, readjust or remove the
device if it is contacting your vehicle,
and do not spin your wheels. Damage
caused to your vehicle by use of a
traction device is not covered under
warranty.
Make certain that any traction device
you use is an SAE class S device, and
use it on the front wheels only. Always
use the utmost care when driving with a
traction device. Overconfidence be-
cause you are using a traction device
could easily lead to a serious accident.
&
Rocking the vehicle
If you must rock the vehicle to free it from
snow, sand, or mud, depress the accel-
erator pedal slightly and move the shift
lever/select lever back and forth between
“1”/“D” and “R” repeatedly. Do not race the
engine. For the best possible traction,
avoid spinning the wheels when trying to
free the vehicle.
When the road surface is extremely
slippery, you can obtain better traction by
starting the vehicle with the transmission in
2nd than in 1st (MT models and CVT
models).
If your vehicle is a CVT model, for
information about holding the transmission
in the 2nd position, refer to “Selection of
manual mode”
Loading your vehicle
WARNING
.
Never allow passengers to ride
on a folded rear seatback or in the
trunk. Doing so may result in
serious injury.
.
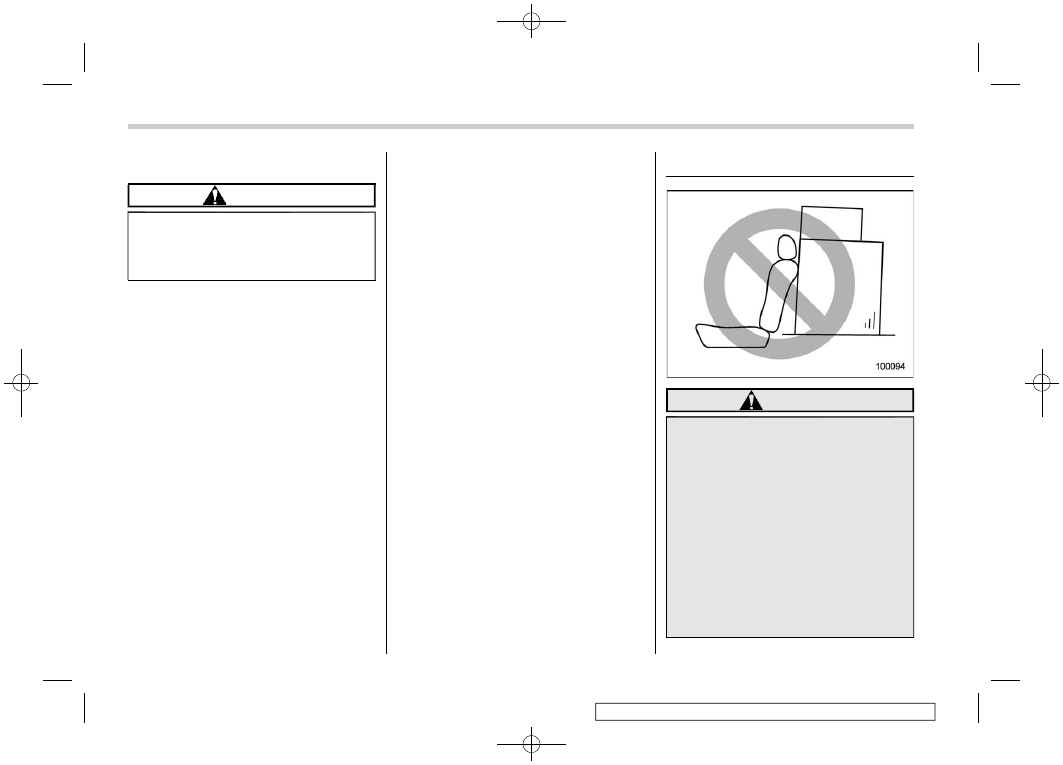
Never stack luggage or other
cargo higher than the top of the
seatback because it could tumble
forward and injure passengers in
the event of a sudden stop or
accident. Keep luggage or cargo
low, as close to the floor as
possible.
.
Stow cargo and luggage in the
trunk whenever possible.
Driving tips/Loading your vehicle
8-10
(351,1)
.
To prevent cargo and luggage
from sliding forward during brak-
ing, do not stack anything in the
enlarged trunk. Keep cargo and
luggage low, as close to the floor
as possible.
.
When you carry something inside
the vehicle, secure it whenever
you can to prevent it from being
thrown around inside the vehicle
during sudden stops, sharp turns
or in an accident.
.
Do not pile heavy loads on the
roof. These loads raise the vehi-
cle’s center of gravity and make it
more prone to tip over.
.
Secure lengthy items properly to
prevent them from shooting for-
ward and causing serious injury
during a sudden stop.
.
Never exceed the maximum load
limit. If you do, some parts on
your vehicle can break, or it can
change the way your vehicle
handles. This could result in loss
of control and cause personal
injury. Also, overloading can
shorten the life of your vehicle.
.
Do not place cargo or luggage in
or on the following locations as
the item may get under the
clutch, brake, or accelerator ped-
al and prevent the pedals from
being depressed properly, block
the driver’s vision, or hit the
driver or passengers, causing
an accident:
– At the feet of the driver
– On the front passenger or rear
seats (when stacking items)
– On the rear shelf
– On the instrument panel
– On the dashboard
CAUTION
Do not carry spray cans, containers
with flammable or corrosive liquids
or any other dangerous items inside
the vehicle.
NOTE
For better fuel economy, do not carry
unneeded cargo.
&
Vehicle capacity weight
Vehicle placard
The load capacity of your vehicle is
determined by weight, not by available
cargo space. The maximum load you can
carry in your vehicle is shown on the
vehicle placard attached to the driver’s
side door pillar. It includes the total weight
of the driver and all passengers and their
belongings, any optional equipment such
as a roof rack or bike carrier, etc.
– CONTINUED –
Driving tips/Loading your vehicle
8-11
8

(352,1)
&
GVWR and GAWR (Gross Ve-
hicle Weight Rating and
Gross Axle Weight Rating)
Certification label
The certification label attached to the
driver’s side doorjamb shows GVWR
(Gross Vehicle Weight Rating) and GAWR
(Gross Axle Weight Rating).
The GVW (Gross Vehicle Weight) must
never exceed the GVWR. GVW is the
combined total of weight of the vehicle,
fuel, driver, all passengers, luggage, and
any optional equipment. Therefore, the
GVW changes depending on the situation.
The GVWR equals Curb Weight (actual
weight of your vehicle – including standard
equipment, fluids, emergency tools and
spare tire assembly) plus the vehicle
capacity weight.
In addition, the total weight applied to each
axle (GAW) must never exceed the
GAWR. The front and rear GAWs can be
adjusted by relocating luggage inside the
vehicle.
Even if the total weight of your luggage is
lower than the vehicle capacity weight,
either front or rear GAW may exceed the
GAWR, depending on the distribution of
the luggage.
When possible, the load should be evenly
distributed throughout the vehicle.
If you carry heavy loads in the vehicle, you
should confirm that GVW and front and
rear GAWs are within the GVWR and
GAWR by putting your vehicle on a vehicle
scale, found at a commercial weighing
station.
Do not use replacement tires with a lower
load range than the originals because they
may lower the GVWR and GAWR limita-
tions. Replacement tires with a higher load
range than the originals do not increase
the GVWR and GAWR limitations.
&
Roof molding and crossbar (if
equipped)
CAUTION
.
For cargo carrying purposes, the
roof molding must be used to-
gether with a roof crossbar kit
and the appropriate carrying at-
tachment. Otherwise, damage to
the roof or paint or a dangerous
road hazard due to loss of cargo
could result.
.
When using the roof crossbar kit,
make sure that the total weight of
the crossbars, carrying attach-
ment and cargo does not exceed
the maximum load limit. Over-
loading may cause damage to
Driving tips/Loading your vehicle
8-12
(353,1)
the vehicle and create a safety
hazard.
Cargo can be carried after securing the
roof crossbar kit to the roof molding and
installing the appropriate carrying attach-
ment. When installing the roof crossbar kit,
follow the manufacturer’s instructions.
When carrying cargo on the roof using the
roof crossbar kit and carrying attachments,
never exceed the maximum load limit as
explained below. You should also be
careful that the vehicle does not exceed
the Gross Vehicle Weight Rating (GVWR)
and front and rear Gross Axle Weight
Rating (GAWR). For information about
loading cargo into or onto your vehicle,
refer to “Loading your vehicle”
8-10. The
maximum total load on the roof (including
crossbars, carrying attachments and car-
go) must not exceed
88 lbs (40 kg)
. Refer
to the crossbar installation instructions for
the maximum crossbar capacity. Place the
heaviest load at the bottom, close to the
roof, and evenly distribute the cargo.
Always properly secure all cargo.
!
Installing carrying attachments on
the crossbars
When installing any carrying attachments
such as the load carriers, crossbars, bike
carrier, ski carrier, kayak carrier, cargo
basket, etc., follow the manufacturer’s
instructions of the load capacity and make
sure that the attachments are securely
installed. Use only attachments designed
specifically for the crossbars. Before oper-
ating the vehicle, make sure that the cargo
is properly secured on the attachment.
NOTE
Remember that the vehicle’s center of
gravity is altered with the weight of the
load on the roof, thus affecting the
driving characteristics.
Drive carefully. Avoid rapid starts, hard
cornering and abrupt stops. Crosswind
effects will be increased.
!
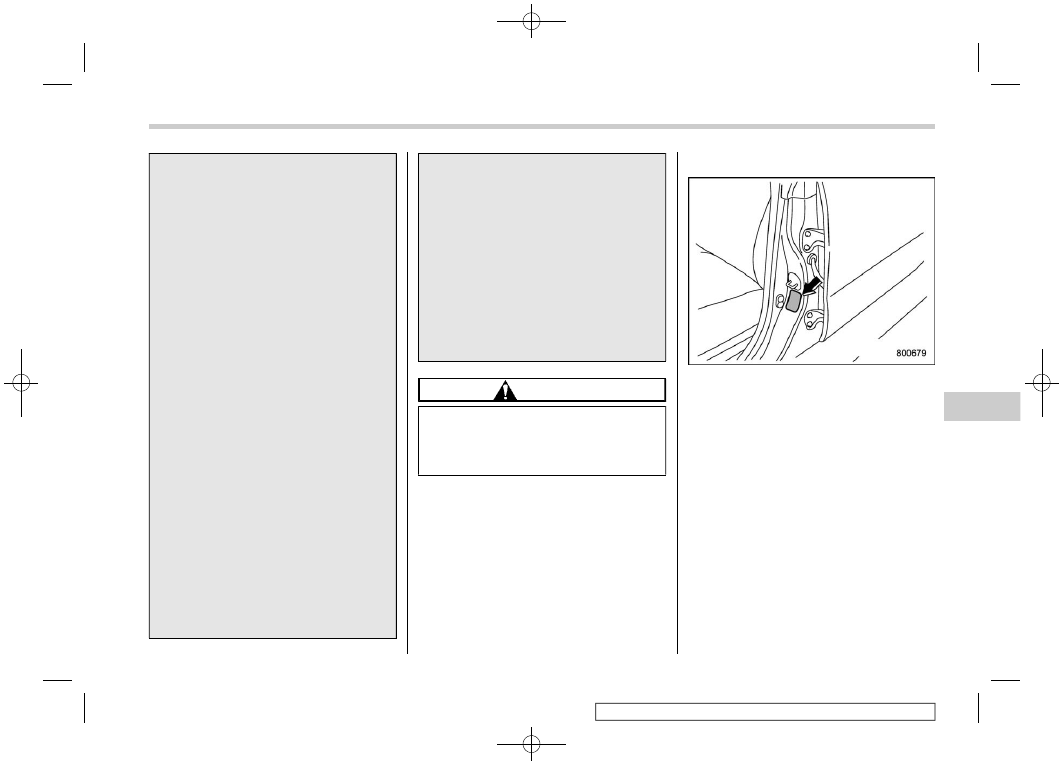
Removal and installation of the
crossbars
Each of the two roof moldings has two
mounting points for crossbars. Each
mounting point is fitted with a cover. Use
a screwdriver to remove the covers. When
installing the crossbars on the roof mold-
ing, follow the manufacturer’s instructions.
Driving tips/Loading your vehicle
8-13
8
(354,1)
Trailer towing
CAUTION
Your vehicle is neither designed nor
intended to be used for trailer tow-
ing. Therefore, never tow a trailer
with your vehicle.
SUBARU assumes no responsibility for
injuries or vehicle damage that may result
from trailer towing, from any trailer towing
equipment or from any errors or omissions
in the instructions accompanying such
equipment. SUBARU warranties do not
apply to vehicle damage or malfunction
caused by trailer towing.
Driving tips/Trailer towing
8-14
(355,1)
If you park your vehicle in case of
an emergency. . . . . . . . . . . . . ... 9-2
Temporary spare tire . . . . . . . . . . . .. 9-2
Maintenance tools. . . . . . . . . . . . ... 9-3
Flat tires. . . . . . . . . . . . . . . . ... 9-4
Changing a flat tire . . . . . . . . . . . . 9-4
Tire pressure monitoring system (TPMS)
(U.S.-spec. models) . . . . . . . . . . . .. 9-8
Jump starting . . . . . . . . . . . . . . .. 9-9
How to jump start . . . . . . . . . . . . . 9-10
Engine overheating. . . . . . . . . . . ... 9-12
If steam is coming from the engine
compartment . . . . . . . . . . . . . .. 9-12
If no steam is coming from the engine
compartment . . . . . . . . . . . . . .. 9-12
Towing . . . . . . . . . . . . . . . . ... 9-13
Towing and tie-down hooks/holes . . . . . . . 9-13
Using a flat-bed truck . . . . . . . . . . ... 9-16
Towing with all wheels on the ground . . . . ... 9-17
Electronic parking brake – if the electronic
parking brake cannot be released (models
with electronic parking brake system) . . . 9-18
Access key fob – if access key fob does not
operate properly . . . . . . . . . . . . 9-18
Locking and unlocking . . . . . . . . . . . 9-18
Switching power status . . . . . . . . . . 9-19
Starting engine . . . . . . . . . . . . . . 9-19
Moonroof (if equipped) – if the moonroof
does not close . . . . . . . . . . . . ... 9-20
If your vehicle is involved in an accident. . ... 9-20
In case of emergency
9

(356,1)
If you park your vehicle in
case of an emergency
Use the hazard warning flasher in day or
night to warn other drivers when you have
to park your vehicle under emergency
conditions.
Avoid stopping on the road. It is best to
safely pull off the road if a problem occurs.
You can activate the hazard warning
flasher regardless of the ignition switch
position.
Turn on the hazard warning by pushing the
hazard warning flasher switch. Turn it off
by pushing the switch again.
NOTE
When the hazard warning flasher is on,
the turn signals do not work.
Temporary spare tire
WARNING
When a spare tire is mounted or a
wheel rim is replaced without the
original pressure sensor/transmitter
being transferred, the low tire pres-
sure warning light will illuminate
steadily after blinking for approxi-
mately one minute. This indicates
the tire pressure monitoring system
(TPMS) is unable to monitor all four
road wheels. Contact your SUBARU
dealer as soon as possible for tire
and sensor replacement and/or sys-
tem resetting.
CAUTION
.
Never use any temporary spare
tire other than the original. Using
other sizes may result in severe
mechanical damage to the drive
train of your vehicle.
.
Always conform to the following
instructions when using the tem-
porary spare tire. Otherwise, a
seriously dangerous situation
may occur.
In case of emergency/If you park your vehicle in case of an emergency
9-2
(357,1)
The temporary spare tire is smaller and
lighter than a conventional tire and is
designed for emergency use only. Re-
move the temporary spare tire and re-
install the conventional tire as soon as
possible because the spare tire is de-
signed only for temporary use.
Check the inflation pressure of the tem-
porary spare tire periodically to keep the
tire ready for use. For the correct tire
pressure, refer to “Temporary spare tires”
When using the temporary spare tire, note
the following.
.
Drive with caution when temporary
spare tire is fitted. Avoid hard acceleration
and braking, or fast cornering, as control of
the vehicle may be lost.
.
Do not exceed 50 mph (80 km/h).
.
Do not put a tire chain on the temporary
spare tire. Because of the smaller tire size,
a tire chain will not fit properly.
.
Do not use two or more temporary
spare tires at the same time.
.
Do not drive over obstacles. This tire
has a smaller diameter, so road clearance
is reduced.
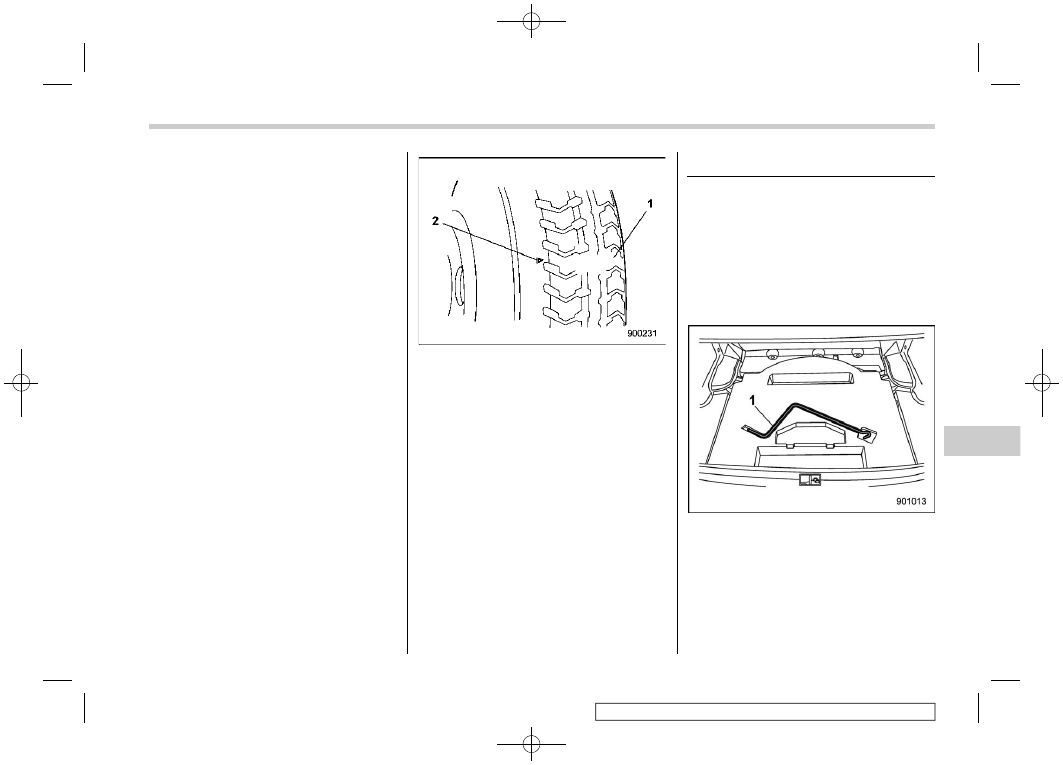
1)
Tread wear indicator bar
2)
Indicator location mark
.
When the wear indicator appears on
the tread, replace the tire.
.
The temporary spare tire must be used
only on a rear wheel. If a front wheel tire
gets punctured, replace the wheel with a
rear wheel and install the temporary spare
tire in place of the removed rear wheel.
.
Always set the driver’s control center
differential to the manual mode and adjust
the initial LSD torque to the minimum.
Maintenance tools
Your vehicle is equipped with the following
maintenance tools.
.
Jack
.
Jack handle
.
Screwdriver
.
Towing hook (eye bolt)
.
Wheel nut wrench
1)
Jack handle
– CONTINUED –
In case of emergency/Maintenance tools
9-3
9
(358,1)
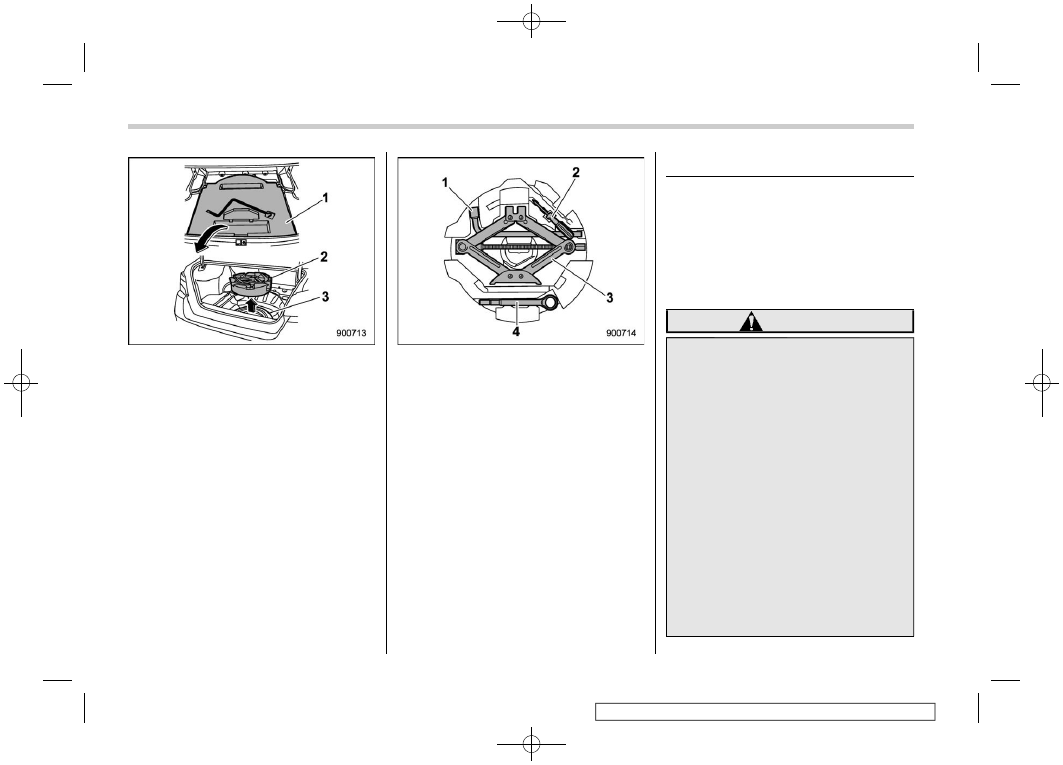
1)
Under-floor storage compartment (if
equipped) (Refer to “Under-floor storage
compartment”
2)
Tool bucket
3)
Spare tire
1)
Wheel nut wrench
2)
Screwdriver
3)
Jack
4)
Towing hook (eye bolt)
A jack handle is stored under the floor of
the trunk. Other tools are stored in the tool
bucket that is located in the recess of the
spare tire wheel.
NOTE
For how to use the jack, refer to “Flat
tires”
Flat tires
If you have a flat tire while driving, never
brake suddenly; keep driving straight
ahead while gradually reducing speed.
Then slowly pull off the road to a safe
place.
&
Changing a flat tire
WARNING
.
Use only the jack and the jack
handle provided with your vehi-
cle. The jack supplied with the
vehicle is designed only for chan-
ging a tire. Never get under the
vehicle while supporting the ve-
hicle with this jack.
.
Do not jack up the vehicle on an
incline or a loose road surface.
The jack can come out of the
jacking point or sink into the
ground and this can result in a
severe accident.
.
Do not jack up the vehicle with an
object on or underneath the jack.
The jack can be unstable and this
can result in a severe accident.
.
Before using the jack, be sure
that there are no occupants or
In case of emergency/Flat tires
9-4
(359,1)
cargo in the vehicle.
.
Always turn off the engine before
raising the flat tire off the ground
using the jack. Never swing or
push the vehicle supported with
the jack. The jack can come out of
the jacking point due to a jolt and
this can result in a severe acci-
dent.
CAUTION
Do not hit and bend the disc rotor
backing plate when removing and
installing the tire. A bent backing
plate may scrape against the disc
rotor and cause noise while the
vehicle is in motion.
NOTE
Contact a SUBARU dealer when jacking
up the vehicle using a garage jack.
1. Park on a hard, level surface, when-
ever possible, then stop the engine.
2. Set the parking brake securely and
shift the shift lever in reverse (MT models)
or the select lever to the “P” (Park) position
(CVT models).
3. Turn on the hazard warning flasher and
unload all occupants and luggage from the
vehicle.
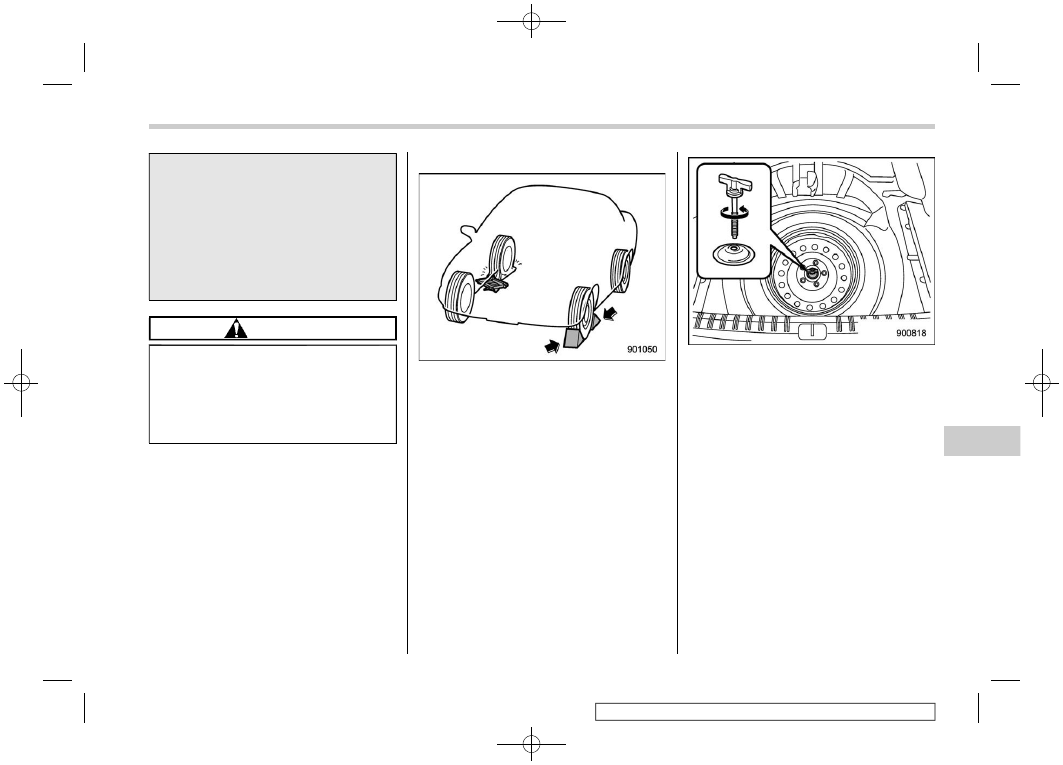
4. Put wheel blocks at the front and rear
of the tire diagonally opposite the flat tire.
5. Take out the jack, jack handle and
wheel nut wrench.
The tools and the spare tire are stored
under the floor of the trunk. Refer to
“Maintenance tools”
NOTE
Make sure that the jack is well lubri-
cated before using it.
6. Take out the tool bucket and turn the
attaching bolt counterclockwise, then take
the spare tire out.
NOTE
If the spare tire provided in your vehicle
is a temporary spare tire, carefully read
“Temporary spare tire”
9-2 and
strictly follow the instructions.
– CONTINUED –
In case of emergency/Flat tires
9-5
9
(360,1)
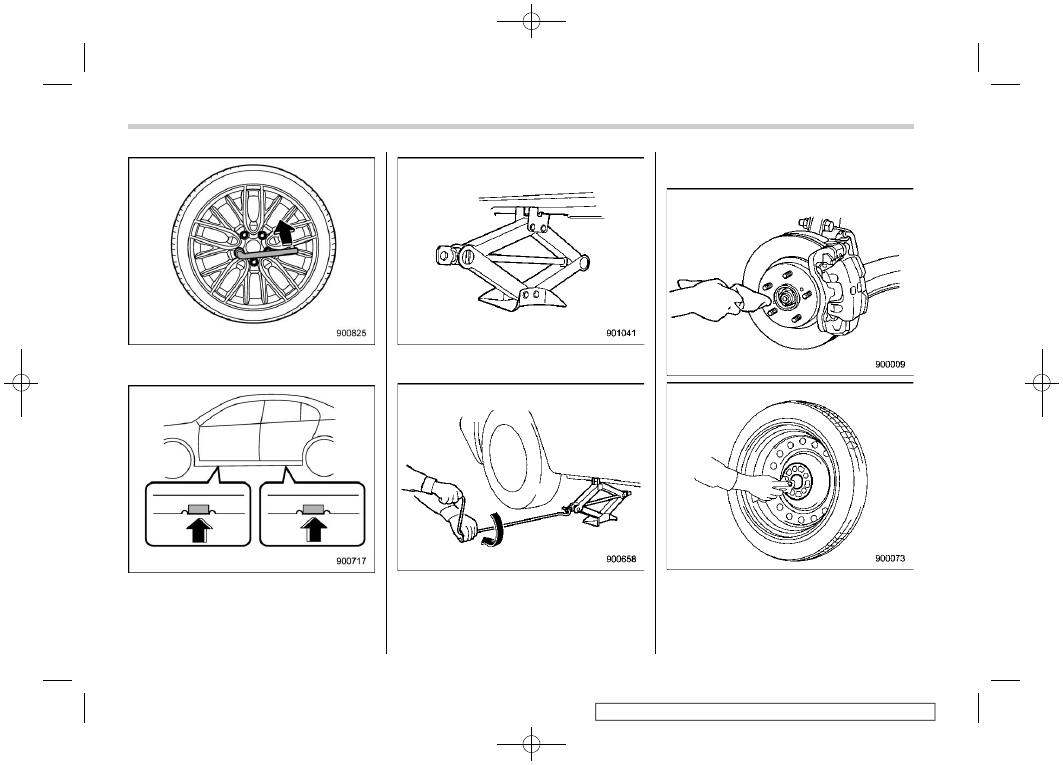
7. Loosen the wheel nuts using the wheel
nut wrench but do not remove the nuts.
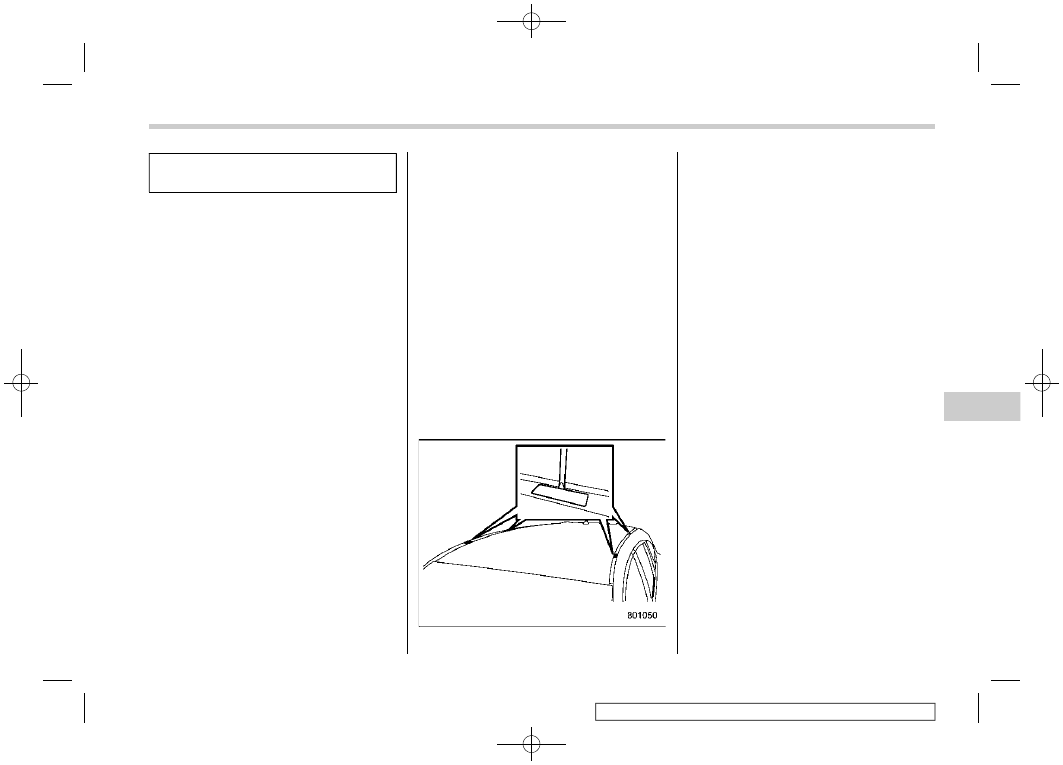
Jack-up points
8. Place the jack under the side sill at the
front or rear jack-up point closest to the flat
tire.
Turn the jackscrew by hand until the jack
head engages firmly into the jack-up point.
9. Insert the jack handle into the jack-
screw, and turn the handle until the tire
clears the ground. Do not raise the vehicle
higher than necessary.
10. Remove the wheel nuts and the flat
tire.
11. Before putting the spare tire on, per-
form the following steps.
.
Clean the mounting surface of the
wheel and hub with a cloth.
In case of emergency/Flat tires
9-6

(361,1)
.
Clean the threaded parts with a cloth
and check the conditions there.
CAUTION
If the threaded part was damaged,
you should immediately contact
your SUBARU dealer.
12. Put on the spare tire. Replace the
wheel nuts. Tighten them by hand.
WARNING
Do not use oil or grease on the wheel
studs or nuts when the spare tire is
installed. This could cause the nuts
to become loose and lead to an
accident.
13. Turn the jack handle counterclockwise
to lower the vehicle.
14. Use the wheel nut wrench to securely
tighten the wheel nuts to the specified
torque, following the tightening order in the
illustration.
For the wheel nut tightening torque, refer
to “Tires”
12-8. Never use your foot on
the wheel nut wrench or a pipe extension
on the wrench because you may exceed
the specified torque. Have the wheel nut
torque checked at the nearest automotive
service facility.
Except STI
15. Store the flat tire in the spare tire
compartment. For except STI models, put
in the spacer and tighten the attaching bolt
firmly.
Also store the jack, jack handle and wheel
nut wrench in their storage locations.
WARNING
.
Never place a tire or tire changing
tools in the passenger compart-
ment after changing wheels. In a
sudden stop or collision, loose
equipment could strike occu-
pants and cause injury. Store
the tire and all tools in the proper
place.
– CONTINUED –
In case of emergency/Flat tires
9-7
9
(362,1)
.
When you store a flat tire, be sure
to set the rear seatback to the
upright position. If you fold down
the seatback, an accident or
injury may occur when the flat
tire suddenly moves.
&
Tire pressure monitoring
system (TPMS) (U.S.-spec.
models)
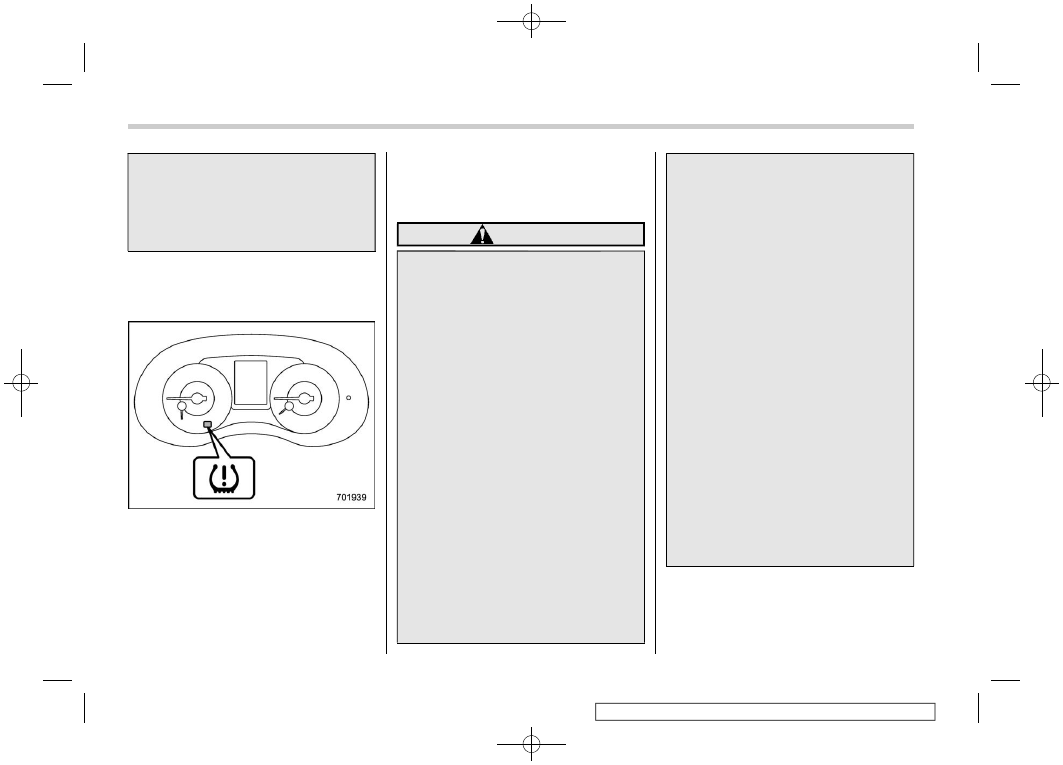
Low tire pressure warning light
The tire pressure monitoring system pro-
vides the driver with the warning message
indicated by sending a signal from a
sensor that is installed in each wheel when
tire pressure is severely low.
The tire pressure monitoring system will
activate only when the vehicle is driven.
Also, this system may not react immedi-
ately to a sudden drop in tire pressure (for
example, a blow-out caused by running
over a sharp object).
WARNING
.
If the low tire pressure warning
light illuminates while driving,
never brake suddenly. Instead,
perform the following procedure.
(1) Keep driving straight ahead
while gradually reducing
speed.
(2) Slowly pull off the road to a
safe place. Otherwise an acci-
dent involving serious vehicle
damage and serious personal
injury could occur.
(3) Check the pressure for all four
tires and adjust the pressure
to the COLD tire pressure
shown on the tire inflation
pressure label on the door
pillar on the driver’s side.
If this light still illuminates while
driving after adjusting the tire
pressure, a tire may have signifi-
cant damage and a fast leak that
causes the tire to lose air rapidly.
If you have a flat tire, refer to “Flat
tires”
.
When a spare tire is mounted or a
wheel rim is replaced without the
original pressure sensor/trans-
mitter being transferred, the low
tire pressure warning light will
illuminate steadily after blinking
for approximately one minute.
This indicates the TPMS is unable
to monitor all four road wheels.
Contact your SUBARU dealer as
soon as possible for tire and
sensor replacement and/or sys-
tem resetting.
.
When a tire is repaired with liquid
sealant, the tire pressure warning
valve and transmitter may not
operate properly. If a liquid sea-
lant is used, contact your nearest
SUBARU dealer or other qualified
service shop as soon as possi-
ble. Make sure to replace the tire
pressure warning valve and
transmitter when replacing the
tire. You may reuse the wheel if
there is no damage to it and if the
sealant residue is properly
cleaned off.
In case of emergency/Flat tires
9-8
(363,1)
If the light illuminates steadily
after blinking for approximately
one minute, promptly contact a
SUBARU dealer to have the sys-
tem inspected.
Jump starting
WARNING
.
Battery fluid is SULFURIC ACID.
Do not let it come in contact with
the eyes, skin, clothing or the
vehicle.
If battery fluid gets on you, thor-
oughly flush the exposed area
with water immediately. Get med-
ical help if the fluid has entered
your eyes.
If battery fluid is accidentally
swallowed, immediately drink a
large amount of milk or water,
and obtain immediate medical
help.
Keep everyone including chil-
dren away from the battery.
.
The gas generated by a battery
explodes if a flame or spark is
brought near it. Do not smoke or
light a match while jump starting.
.
Never attempt jump starting if the
discharged battery is frozen. It
could cause the battery to burst
or explode.
.
Whenever working on or around a
battery, always wear suitable eye
protectors, and remove metal
objects such as rings, bands or
other metal jewelry.
.
Be sure the jumper cables and
clamps on them do not have
loose or missing insulation.
Do not jump start unless cables
in suitable condition are avail-
able.
.
A running engine can be danger-
ous. Keep your fingers, hands,
clothing, hair and tools away
from the cooling fan, belts and
any other moving engine parts.
Removing rings, watches and
ties is advisable.
.
Jump starting is dangerous if it
done incorrectly. If you are un-
sure about the proper procedure
for jump starting, consult a com-
petent mechanic.
When your vehicle does not start due to a
run down (discharged) battery, the vehicle
may be jump started by connecting your
battery to another battery (called the
booster battery) with jumper cables.
– CONTINUED –
In case of emergency/Jump starting
9-9
9
(364,1)
&
How to jump start
1. Make sure the booster battery is 12
volts and the negative terminal is
grounded.
2. If the booster battery is in another
vehicle, do not let the two vehicles touch.
3. Turn off all unnecessary lights and
accessories.
4. Connect the jumper cables exactly in
the sequence illustrated.
In case of emergency/Jump starting
9-10

(365,1)
A)
Booster battery
B)
Strut mounting nut
(1) Connect one jumper cable to the
positive (+) terminal on the discharged
battery.
(2) Connect the other end of the
jumper cable to the positive (+) term-
inal of the booster battery.
(3) Connect one end of the other cable
to the negative (−) terminal of the
booster battery.
(4) Connect the other end of the cable
to the strut mounting nut of the vehicle
with the discharged battery.
Make sure that the cables are not near any
moving parts and that the cable clamps are
not in contact with any other metal.
5. Start the engine of the vehicle with the
booster battery and run it at moderate
speed. Then start the engine of the vehicle
that has the discharged battery.
6. When finished, carefully disconnect
the cables in exactly the reverse order.
In case of emergency/Jump starting
9-11
9
Нет комментариевНе стесняйтесь поделиться с нами вашим ценным мнением.
Текст