Ford Police Interceptor Sedan (2018 year). Manual — part 47
After battery replacement, or in some
cases after charging the battery with an
external charger, the battery management
system requires eight hours of vehicle sleep
time to relearn the battery state of charge.
During this time your vehicle must remain
fully locked with the ignition switched off.
Note:
Prior to relearning the battery state
of charge, the battery management system
may temporarily disable some electrical
systems.
Electrical Accessory Installation
To make sure the battery management
system works correctly, do not connect an
electrical device ground connection
directly to the battery negative post. This
can cause inaccurate measurements of
the battery condition and potential
incorrect system operation.
Note:
If you add electrical accessories or
components to the vehicle, it may adversely
affect battery performance and durability.
This may also affect the performance of
other electrical systems in the vehicle.
CHECKING THE WIPER
BLADES
E142463
Run the tip of your fingers over the edge of
the blade to check for roughness.
Clean the wiper blades with washer fluid
or water applied with a soft sponge or
cloth.
CHANGING THE WIPER
BLADES
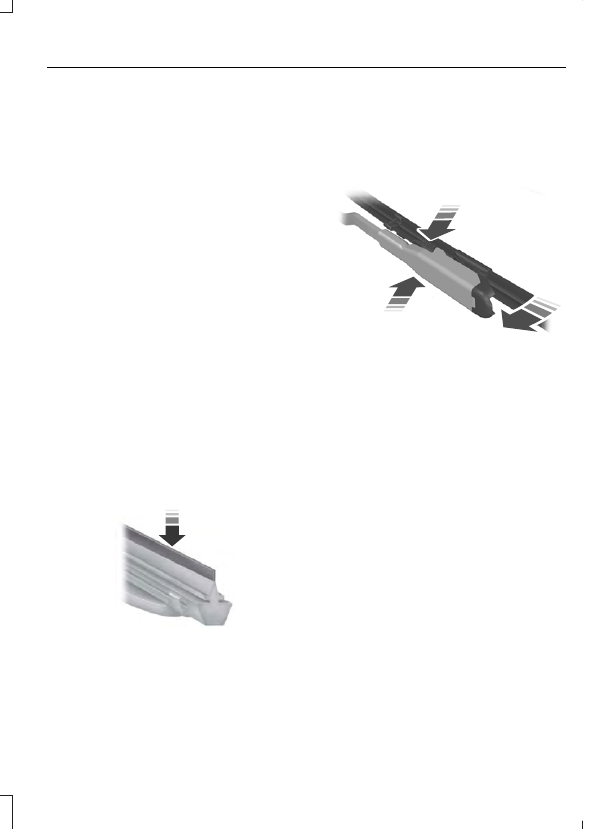
1.
Pull the wiper blade and arm away
from the glass and press the locking
buttons together.
E129990
1
1
2
2. Rotate and remove the wiper blade.
3. Attach the new blade to the arm and
snap it into place.
Replace wiper blades at least once per
year for optimum performance.
Poor wiper quality can be improved by
cleaning the wiper blades and the
windshield. See Cleaning the Windows
and Wiper Blades
ADJUSTING THE HEADLAMPS
Vertical Aim Adjustment
The headlamps on your vehicle are
properly aimed at the assembly plant. If
your vehicle has been in an accident, have
the alignment of your headlamps checked
by your authorized dealer.
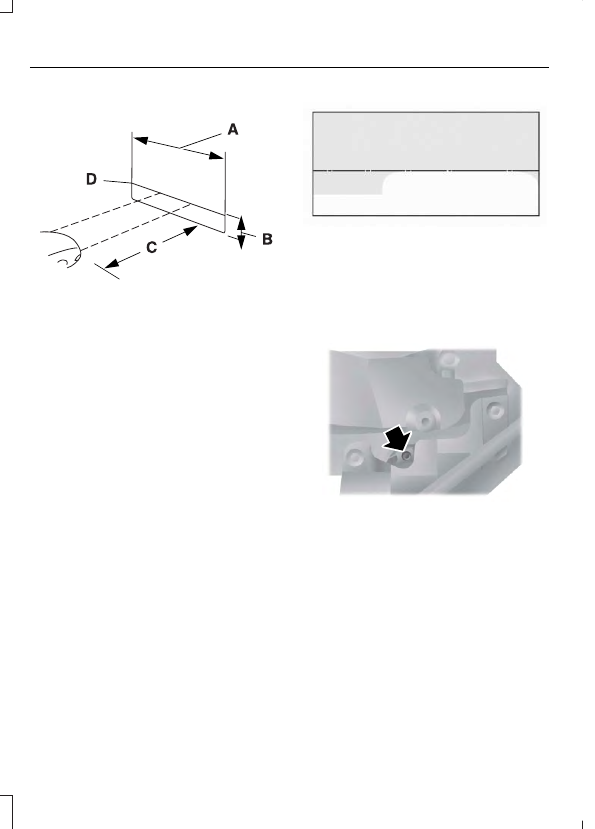
Headlamp Aiming Target
E142592
8 feet (2.4 meters)
A
Center height of lamp to ground
B
25 feet (7.6 meters)
C
Horizontal reference line
D
Vertical Aim Adjustment
1.
Park the vehicle directly in front of a
wall or screen on a level surface,
approximately 25 feet (7.6 meters)
away.
2. Measure the height from the center of
your headlamp (indicated by a 3.0
millimeter circle on the lens) to the
ground and mark an 8 foot (2.4 meter)
horizontal reference line on the vertical
wall or screen at this height (a piece of
masking tape works well).
Note:
To see a clearer light pattern for
adjusting, you may want to block the light
from one headlamp while adjusting the
other.
3. Turn on the low beam headlamps to
illuminate the wall or screen and open
the hood. Cover one of the headlamps
so no light hits the wall.
E142465
4. There is a distinct cut-off (change from
light to dark) in the left portion of the
beam pattern. Position the top edge of
this cut-off 2 inches (5 centimeters)
below the horizontal reference line.
E167359
5. Locate the vertical adjuster on each
headlamp. Use a Phillips #2
screwdriver to turn the adjuster either
clockwise or counterclockwise to
adjust the vertical aim of the
headlamp. The horizontal edge of the
brighter light should touch the
horizontal reference line.
6. Repeat Steps 3 through 7 to adjust the
other headlamp.
7.
Close the hood and turn off the lamps.
Horizontal Aim Adjustment
Horizontal aim is not required for this
vehicle and is not adjustable.
CHANGING A BULB
WARNINGS
Bulbs can become hot. Let the bulb
cool down before removing it. Failure
to do so could result in personal
injury.
Switch the lamps and the ignition off.
Failure to follow this warning could
result in serious personal injury.
Use the correct specification bulb. See
Bulb Specification Chart
Install in the reverse order unless otherwise
stated.
High-Intensity Discharge
Headlamps
These lamps operate at a high voltage.
See an authorized dealer if they fail.
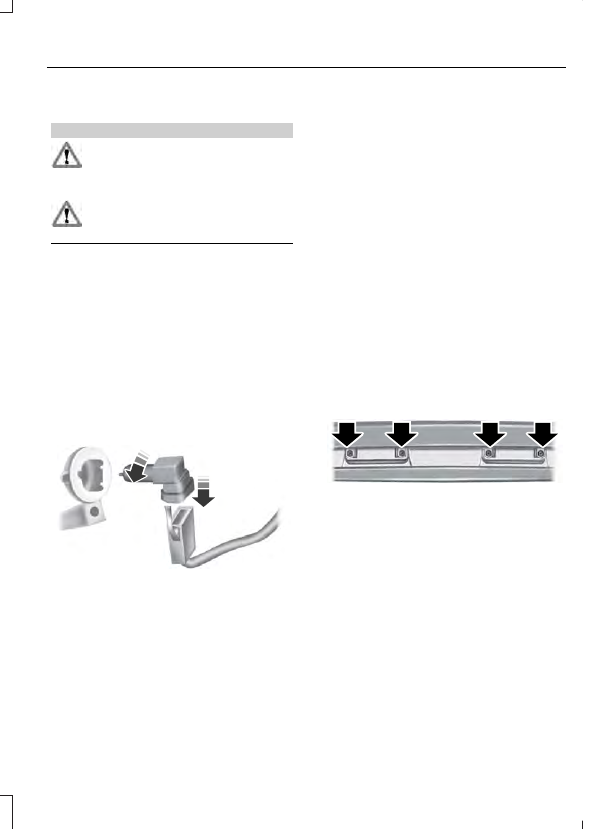
Front Fog Lamp
(If Equipped)
E163826
1.
Switch all of the lamps and the ignition
off.
2. Disconnect the electrical connector.
3. Turn the bulb holder counterclockwise
and remove it.
Note:
Do not touch the bulb glass.
Note:
You cannot separate the bulb from
the bulb holder.
LED Lamps
LED lamps are not serviceable items. See
an authorized dealer if they fail.
The following lamps are LED:
•
Front parking lamps.
•
Front side marker lamps.
•
Front direction indicators.
•
Side direction indicators.
•
Brake and rear lamps.
•
Central high mounted brake lamp.
•
Rear direction indicators.
•
Reversing lamps.
License Plate Lamp
1.
Switch all of the lamps and the ignition
off.
E178598
2. Remove the screws that secure the
lamp assembly.
E178599
3. Remove the bulb.
BULB SPECIFICATION CHART
Headlamp bulbs must be marked with an
authorized D.O.T. marking for North
America to make sure they have the proper
lamp performance, light brightness, light
pattern and safe visibility.
Replacement bulbs are specified in the
chart below. The correct bulbs will not
damage the lamp assembly or void the
lamp assembly warranty and will provide
quality bulb illumination time.
Exterior Lamps
Power (Watt)
Specification
Lamp
LED
LED
Front side marker lamps.
LED
LED
Front parking lamps.
LED
LED
Front warning lamp.
LED
LED
Daytime running lamps. If equipped.
LED
LED
Front auxiliary warning lamp.
LED
LED
Exterior mirror warning lamp.
LED
LED
Front direction indicator.
55
D3S
High-intensity discharge headlamps.
55
H11
Front fog lamps.
LED
LED
Side direction indicator.
LED
LED
Rear quarter window warning lamp.
LED
LED
Rear side marker lamp.
LED
LED
Front auxiliary warning lamp.
LED
LED
Brake and rear lamp.
LED
LED
Central high mounted brake lamp.
LED
LED
Rear direction indicator.
Нет комментариевНе стесняйтесь поделиться с нами вашим ценным мнением.
Текст